
XK8 Conv - Rear Subwoofer Replacement

#22
 08-26-2010, 09:20 PM

#23
08-26-2010, 11:49 PM

The subs in my 2003 XKR are clearly marked 2 ohms.
A couple of questions for ek_mundo:
Do you know how the head tech at the car audio specality shop measured the impedance of your sub?
Just curious, what year/model Jag did your subs come out of?
A 2 ohm load is more demanding than a 4 ohm load so there shouldn't be a risk or worry of damage to the amp with a 4 ohm replacement.
#24
09-04-2010, 07:31 AM

Junior Member
Join Date: Aug 2010
Location: Houston
Posts: 11
Likes: 0
Received 0 Likes
on
0 Posts
#28
09-08-2010, 09:43 AM
#29
09-18-2010, 01:59 PM
Junior Member
Join Date: Aug 2010
Location: Houston
Posts: 11
Likes: 0
Received 0 Likes
on
0 Posts
Installed the Kicker subwoofers this morning. Got the bass back! Sounds pretty good, nice and full. My XK8 convertible has the "Premium Sound Package" but I'm not sure those original rear subs were too "premium." Couple of notes to help out anyone else about to start this job.
- Have the shop vac ready as the old, dirty speaker foam is going to drop onto your nice leather. Be ready with some towells and leather cleaner for the same reason.
- The grills are held in with 6 - 8 wirey tabs. On the convertible, I was able to reach in and straighten out the top three and then pull the grill down from the top. Bent back on reinstallation.
- I discarded the original speaker brackets and then trimmed the Kicker plastic to fit directly in. If you go this method, cut the Kicker plastic ring all the way down to the metal. I wasted time trimming, fitting, trimming, fitting, and eventually was down to the metal. So on the second one I just went all the way to metal to start with. Not sure if this is the method others have used or if they used the original speaker spacer ring but it worked. The holes line up perfectly.
- The Kicker sub has some push-in connections for the wires. I stripped the factory wires a bit and connected via this friction method. I was going to solder the wire connection but it sounded good and I wasn't sure if I was going to have to change out anything (add a spacer ring, wire polarity wrong, grill doesn't fit over, etc.) so I never went back in and soldered it.
- Job took me about 1 1/2 hours because I like to go slow and sure. Longest part was trimming the Kicker plastic to fit the hole. Now that I have done it once I could probably do the same job on another vehicle in 20-30 minutes.
Probably the best $116 I have ever spent on a vehicle mod/repair!
Now on to the rear view mirror!
#31
09-19-2010, 08:08 AM
Junior Member
Join Date: Aug 2010
Location: Houston
Posts: 11
Likes: 0
Received 0 Likes
on
0 Posts
Sorry, I did not take any photos. In the attached stock photo, I took a dremel and reduced the outer ring (above the word Kicker and all the way around) down to the metal. The plastic was about 1/16th of an inch and beneath it is metal. My thinking was that I would rather keep everything with the vehicle stock and modify the (relatively inexpensive) speaker. This way I did not have to modify the sub enclosure in the car or the grill. Once I removed the outer ring of plastic - which is just decorative not structural - the speaker slipped into the mounting enclosure perfectly.
#32
03-09-2011, 07:09 PM
I'm doing this upgrade soon, however I chose the JL 6w3v3's. I know I may have a hard time getting them in, but I'm having a shop fabricate 1/2" spacers for me, so hopefully they'll go in without much troubles.
I've had a number of sound systems in the past (not bass-thumping car rattlers) but nice systems for regular music and I've never been satisfied with Kicker products.
I'll take some photos and post them if I encounter any problems that need to be corrected.
BTW, I hope some other people used the JL's. The guy at the audio shop checked out everything quickly and said they probably won't fit. I guess I'll find out.
#33
03-10-2011, 12:25 AM
Veteran member
I had the previous 6w0s in my car, they will fit with a spacer added. The 6w3s will be almost the same, maybe just a hair deeper.
Other members have installed the 6w3s, so don't worry yourself. Thats the very make that I recommend when someone wants to just swap out the OEM for another of similar size. I praise JL audio on their subwoofers and amplifiers religiously.
If anyone wants JL 6w0s, I still have a pair from my car, used maybe 2 weeks before getting replaced with a whole different system config. PM me an offer if you want them.
#34
03-10-2011, 01:11 AM
#35
03-11-2011, 10:26 AM
H2O, I would be interested in your speakers..but I have not been able to message you somehow... user issue probably. Will these fit in my 99 XK8? With spacers? Where do i get spacers? Sorry for all the questions but I want to have everything correct before i tear into my car and want everything to fit back in same day! Yes, I like to dream!!!
#36
03-11-2011, 10:57 AM
Veteran member
Suprisingly, the speaker replacement is not that hard.
Remove the cover and bolt for the seat belt swing
Remove one screw and one bolt/snap fitting for the boot cover, and the top trim piece just lifts off.
Remove the retaining bolts under the rear seat cushion - get low in the foot well
The panel with the grille just slides out of a few slots with clips. Its self-explanatory from there. It should take no longer than 10 minutes to get to the speaker and its enclosure.

Ignore the arrows in the below pic from my old install
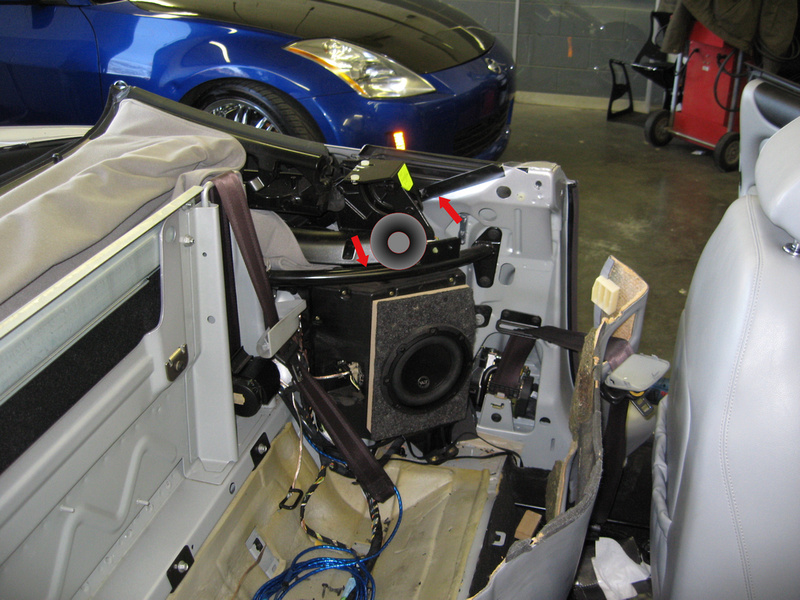
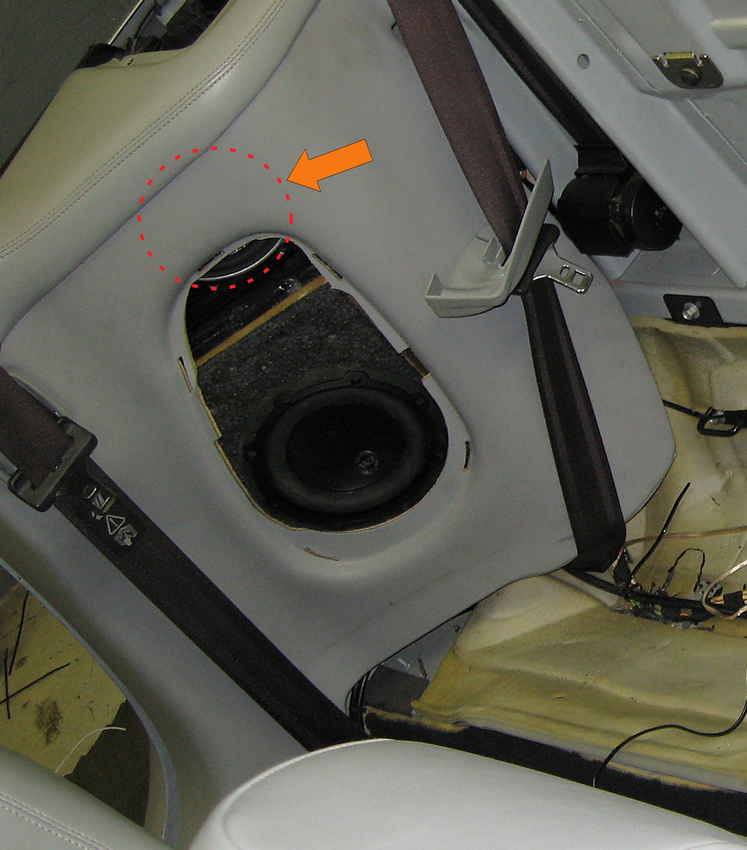
Since you are adding a spacer, don't try to go thru the grille opening. You can remove the grille once the top trim piece is off, but gently (I said gently) bending those grill tabs away from the panel, and it will come out.
Remove the cover and bolt for the seat belt swing
Remove one screw and one bolt/snap fitting for the boot cover, and the top trim piece just lifts off.
Remove the retaining bolts under the rear seat cushion - get low in the foot well
The panel with the grille just slides out of a few slots with clips. Its self-explanatory from there. It should take no longer than 10 minutes to get to the speaker and its enclosure.
Ignore the arrows in the below pic from my old install
Since you are adding a spacer, don't try to go thru the grille opening. You can remove the grille once the top trim piece is off, but gently (I said gently) bending those grill tabs away from the panel, and it will come out.
#37
03-13-2011, 03:16 AM
The 6w3v3's will not fit in my enclosures. I don't even have those enclosures as there is a definite inside relief for the original magnet. The 6w3v3 won't fit in even with a half-inch spacer... it would need a spacer at least 1 1/4" deep, it's not just the depth of the enclosure either, it's the width of the magnet on the 6w3's that is pushing the unit out even further.
Or do I need to butcher the face of the enclosure as you have pictured? But that wouldn't matter, I would need to move the speaker farther back behind the actual speaker grill to get that kind of clearance.
:\
Or do I need to butcher the face of the enclosure as you have pictured? But that wouldn't matter, I would need to move the speaker farther back behind the actual speaker grill to get that kind of clearance.
:\
#39
03-13-2011, 04:12 PM
I have it all back together at the moment, however it has the raised mounting ring for the original speaker that looks like it would need to be cut off, but even with that done, the speaker didn't come close to fitting in with at least an additional 3/4" sticking out past the OEM ring/guilde/lips/whatever.
There is also an area that has a relief for the OEM speaker magnet that isn't apparent in your picture. It was similar in shape and placement to the white line I added... I could be way off... and is probably a little lower than I drew it, but it was there.
If I have time in the next few days I'll pull it back apart and take a picture.
#40
03-16-2011, 11:25 AM
Veteran member
xeno, you want me to pull one panel off of mine and find out how the installers got the woofer to clear? I'm curious what the 'relief' piece is you are speaking about. You could take the entire enclosure out of the car, get the new subwoofer to fit and do the necessary plate/spacer mods in the comfort of your home. Looks like just a couple bolts keep it in place.
The following users liked this post:
rob162 (07-14-2011)