
Convertible top latch hydraulic problem
#541
 03-27-2013, 10:55 AM


Senior Member
I agree with Steve's comments regarding pressure and switches. The only other thing that I can think of is a cylinder failing to extend fully due to a mechanical problem. This could be an internal problem or premature operation of the cylinder switch. I think it would be informative to check the status of all the switches and the truth will be revealed.
If you look at the pressure graphs the max PSI occurs when the roof is at the apex of the lift. If the roof makes it past this point then pressure is not the problem. That is the case here so some sort of pressure relief problem is unlikely. The relief pressure was chosen to allow all parts to function as required (with some allowance for variation among vehicles) but prevent over pressure caused by the control holding the pump on during the latch operation (dead head). As Steve mentioned, you can reduce the pressure to the point of interfering with the lift. Maximum pressure occurs about when the roof is even with the front seat backs (apex) and then decreases as it moves toward the latch.
Check the switches and you will find the problem.
The following 3 users liked this post by walt_00XKRConv:
#542
03-27-2013, 11:56 AM
Veteran Member
I can agree with the switch in the header at the claw (ready to latch) may be sticking but the claw would not operate until the ram is at full extent. When we talked on the phone the roof was operating properly after lubricating the linkage and rams. Keep in mind that the right ram has the switch and the left does not. I personally feel the ram on the left was sluggish and the latch switch may be sticking but it is all working just fine as of last night.
Last edited by Gus; 03-27-2013 at 04:30 PM.
#543
03-27-2013, 12:20 PM
Veteran Member
I am like others still learning!
Gus, you know much more about this than I do but the latch CANNOT operate until the 'Ready to Latch' microswitch closes.
This can only close when the hook on the top pushes on the latch claw and actuates the switch.
It isn't a timing thing, the BPM needs to see both 'Top Raised' and 'Ready to Latch' before actuating the latch mechanism.
This can only close when the hook on the top pushes on the latch claw and actuates the switch.
It isn't a timing thing, the BPM needs to see both 'Top Raised' and 'Ready to Latch' before actuating the latch mechanism.
#544
03-28-2013, 08:14 AM
Senior Member
Possibly there is a timeout in the controller (due to slow operation) that terminates operation and goes to a "safe mode". This would explain the latch apparently closing without switch closure and then refusing to operate afterwards. This also correlates with it coming back to life after cycling the power, which erases the memory of the failed operation. I think we can rule out pump problems as it seems to work properly with some lubrication.
If there is extra force required to lift it is reasonable to conclude that the PRV is contributing to the sluggish operation. My pressure curve shows about 900 psi (peak) required to lift the roof on my car. There are a lot of variables (mainly temperature and friction) so it is reasonable to assume that a roof might require 20% more pressure to operate. This is why I put the bit about adjusting the pressure in the PRV installation instructions. I think it is a better idea to resolve the friction issue than adjust the pressure upward but to each his own. It does seem like a good idea to occasionaly shoot a little lube on the roof joints.
If there is extra force required to lift it is reasonable to conclude that the PRV is contributing to the sluggish operation. My pressure curve shows about 900 psi (peak) required to lift the roof on my car. There are a lot of variables (mainly temperature and friction) so it is reasonable to assume that a roof might require 20% more pressure to operate. This is why I put the bit about adjusting the pressure in the PRV installation instructions. I think it is a better idea to resolve the friction issue than adjust the pressure upward but to each his own. It does seem like a good idea to occasionaly shoot a little lube on the roof joints.
The following users liked this post:
Gus (03-28-2013)
#545
03-28-2013, 09:41 PM

The top is working fine after spraying the cylinders as Gus recommended (many thanks for the simple and elegant solution!).
I see Walt's point - when it was having trouble, the top was moving quite slowly and it looks like the latch opened and closed as if it timed out (possibly to prevent the latch being under pressure too long)?
Kal
I see Walt's point - when it was having trouble, the top was moving quite slowly and it looks like the latch opened and closed as if it timed out (possibly to prevent the latch being under pressure too long)?
Kal
Possibly there is a timeout in the controller (due to slow operation) that terminates operation and goes to a "safe mode". This would explain the latch apparently closing without switch closure and then refusing to operate afterwards. This also correlates with it coming back to life after cycling the power, which erases the memory of the failed operation. I think we can rule out pump problems as it seems to work properly with some lubrication.
If there is extra force required to lift it is reasonable to conclude that the PRV is contributing to the sluggish operation. My pressure curve shows about 900 psi (peak) required to lift the roof on my car. There are a lot of variables (mainly temperature and friction) so it is reasonable to assume that a roof might require 20% more pressure to operate. This is why I put the bit about adjusting the pressure in the PRV installation instructions. I think it is a better idea to resolve the friction issue than adjust the pressure upward but to each his own. It does seem like a good idea to occasionaly shoot a little lube on the roof joints.
If there is extra force required to lift it is reasonable to conclude that the PRV is contributing to the sluggish operation. My pressure curve shows about 900 psi (peak) required to lift the roof on my car. There are a lot of variables (mainly temperature and friction) so it is reasonable to assume that a roof might require 20% more pressure to operate. This is why I put the bit about adjusting the pressure in the PRV installation instructions. I think it is a better idea to resolve the friction issue than adjust the pressure upward but to each his own. It does seem like a good idea to occasionaly shoot a little lube on the roof joints.
Last edited by kvmentor; 03-28-2013 at 09:54 PM.
The following users liked this post:
Gus (03-29-2013)
#546
04-27-2013, 07:06 AM

Junior Member
Join Date: Nov 2010
Location: South Central KY
Posts: 18
Likes: 0
Received 0 Likes
on
0 Posts
Hey Gus,
If you're trying to re-engineer this cob job, what's wrong with a solenoid actuated latch? Unless there is some relevance to roll over standards, I don't see why this mechanism needs hydraulic control. For the sake of analogy, think door lock plate/ actuator motor.
I'm not saying it is an easy redesign, but it won't ever leak.
#547
04-27-2013, 07:14 AM
Veteran Member
The following users liked this post:
Jon89 (04-27-2013)
#548
05-27-2013, 09:48 PM

My 2005 with 50K miles began to leak right above the mirror. $1000 later, not by the dealer, its working fine. I bought the hoses from a hydraulic hose company with steel braid reinforcements, and my guy hated the job. The back seat, sub woofer, front seat... all had to come out.
Now the upholstery on the beams, header, and new rubber needs to be replaced. What a killer. This will cost another grand as the rubber is $$$$$.
Anybody know where to get new rubber?
Now the upholstery on the beams, header, and new rubber needs to be replaced. What a killer. This will cost another grand as the rubber is $$$$$.
Anybody know where to get new rubber?
#549
05-27-2013, 10:16 PM
Veteran Member
#550
05-27-2013, 10:24 PM
The hydraulic fluid as it ran down the side pillar caused the driver side to literally ruffle, actual wavy rubber with 1/2 in gaps every inch or so the whole distance from where the top meets the window down to the door along the fabric on the pillar. Its all one piece across the top and down each pillar.
#551
05-27-2013, 10:33 PM
Veteran Member
The hydraulic fluid as it ran down the side pillar caused the driver side to literally ruffle, actual wavy rubber with 1/2 in gaps every inch or so the whole distance from where the top meets the window down to the door along the fabric on the pillar. Its all one piece across the top and down each pillar.
#552
05-28-2013, 10:20 AM

as for the header and a pillar upholstery, i took a sample to an auto upholstery shop and was able to get a piece big enough to recover all three pieces for ten bucks. bought a can of 3m spray adhesive. i stripped all three pieces, cleaned them real good, cut new upholstery using the old ones for a pattern, sprayed adhesive on the back of new upholstry and the pillars and header. wait 5 to 10 minutes between spraying and carefully attaching to part. looks like a pro did it for less than 30 dollars.

#554
06-06-2013, 08:36 AM

Junior Member
Thank you soooooo much for the explanation and excellent photos. You made the job possible and really quite enjoyable; I have done it for just the cost of the new pipes and a can of fluid. Those two little screws in the rubber gunge on top were tricky to find; you start thinking that maybe they aren't there on "mine". Putting them back, I discovered the off white plastic locater on the underside, so I would suggest to future repairers to look for these quite visible lugs to help locate the screws in the gunge when taking the top cover off.
John
John
#555
07-02-2013, 11:57 AM
#556
07-02-2013, 12:01 PM
Veteran Member
#557
07-16-2013, 03:04 PM
Earlier this summer it was my turn for the infamous green shower. The trouble started when I replaced the old brown hydraulic fluid with the newer green fluid. First I got a leaking lift cylinder which I replaced, then I got a ruptured hose at the latch. The key lesson learned: If it ain't broken don't fix it! :-))
The repairs were straight forward with the help of the various forum texts, especially those by Steve.c3h8 (see the reply no. 213 in this thread) and by Gus (see JagRepair.com - Jaguar Repair Information Resource). A big thanks!
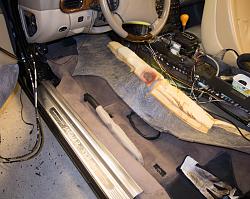
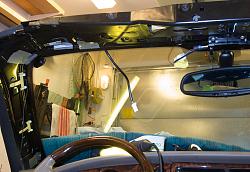
I got all new hoses from TopHydraulics and did the full change in three evenings. I was not opening up all the places for the first time, though. The first evening I removed the back and driver's seats, side panels and speakers on the back, the center console and almost everything above the windscreen. The second I replaced the hoses and tested the system, the third I put everything back in place. No special tools are needed and nothing was specially difficult to do.
To support the instructions provided already I'll share here my additional learnings.
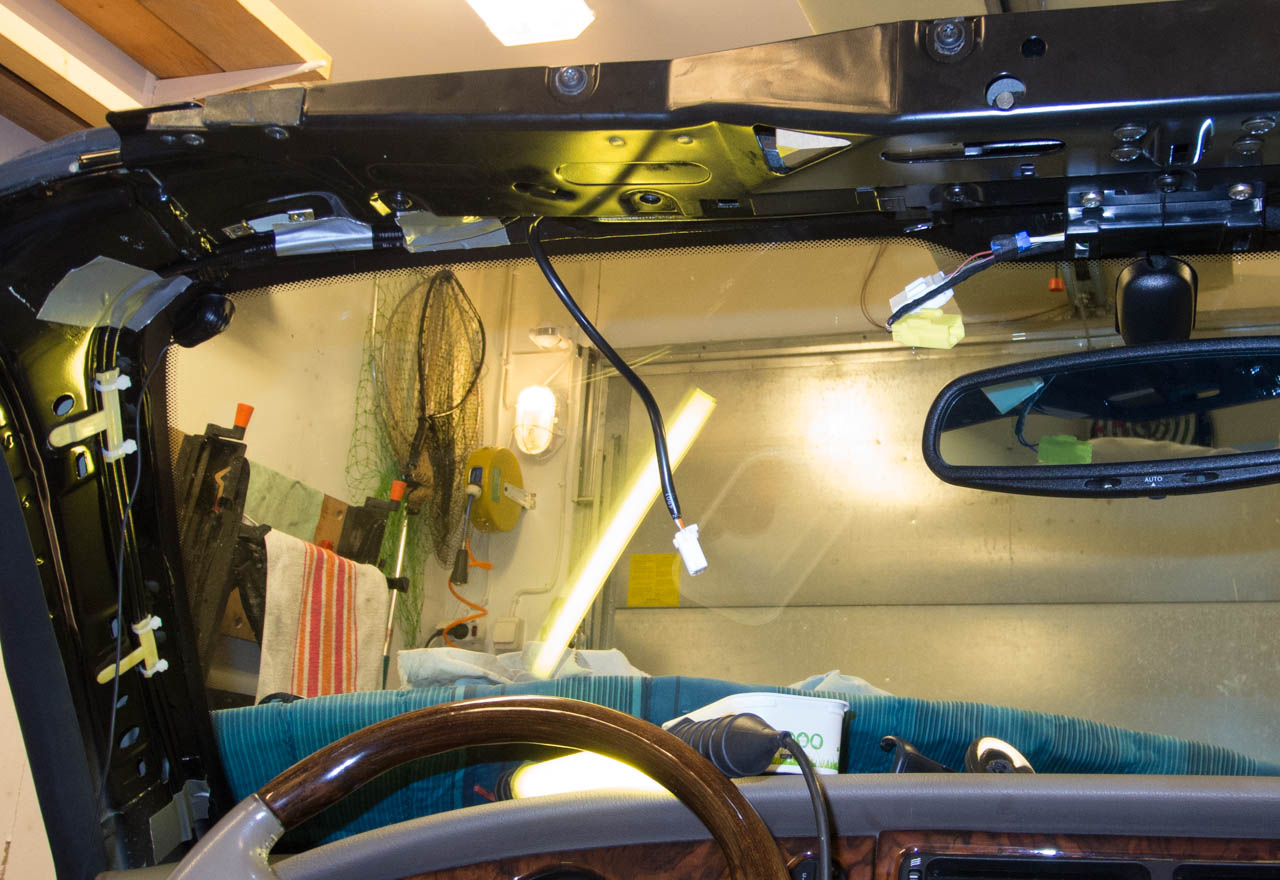
When the top is up and the hydraulics leak the way to lower the top goes like this: With the doors open and the windows down the rear seat and the side panels & speakers come out quite nicely. Open the valve at the side of the pump in the trunk, use the hex key on the pump to open the latch above the mirror. Pull down the rear lift shafts the needed few cm's, they are locked on the top position and are about impossible to unlock otherwise. Quite a hard pull is needed but it is doable by hand. Only after that lower the top, slowly.
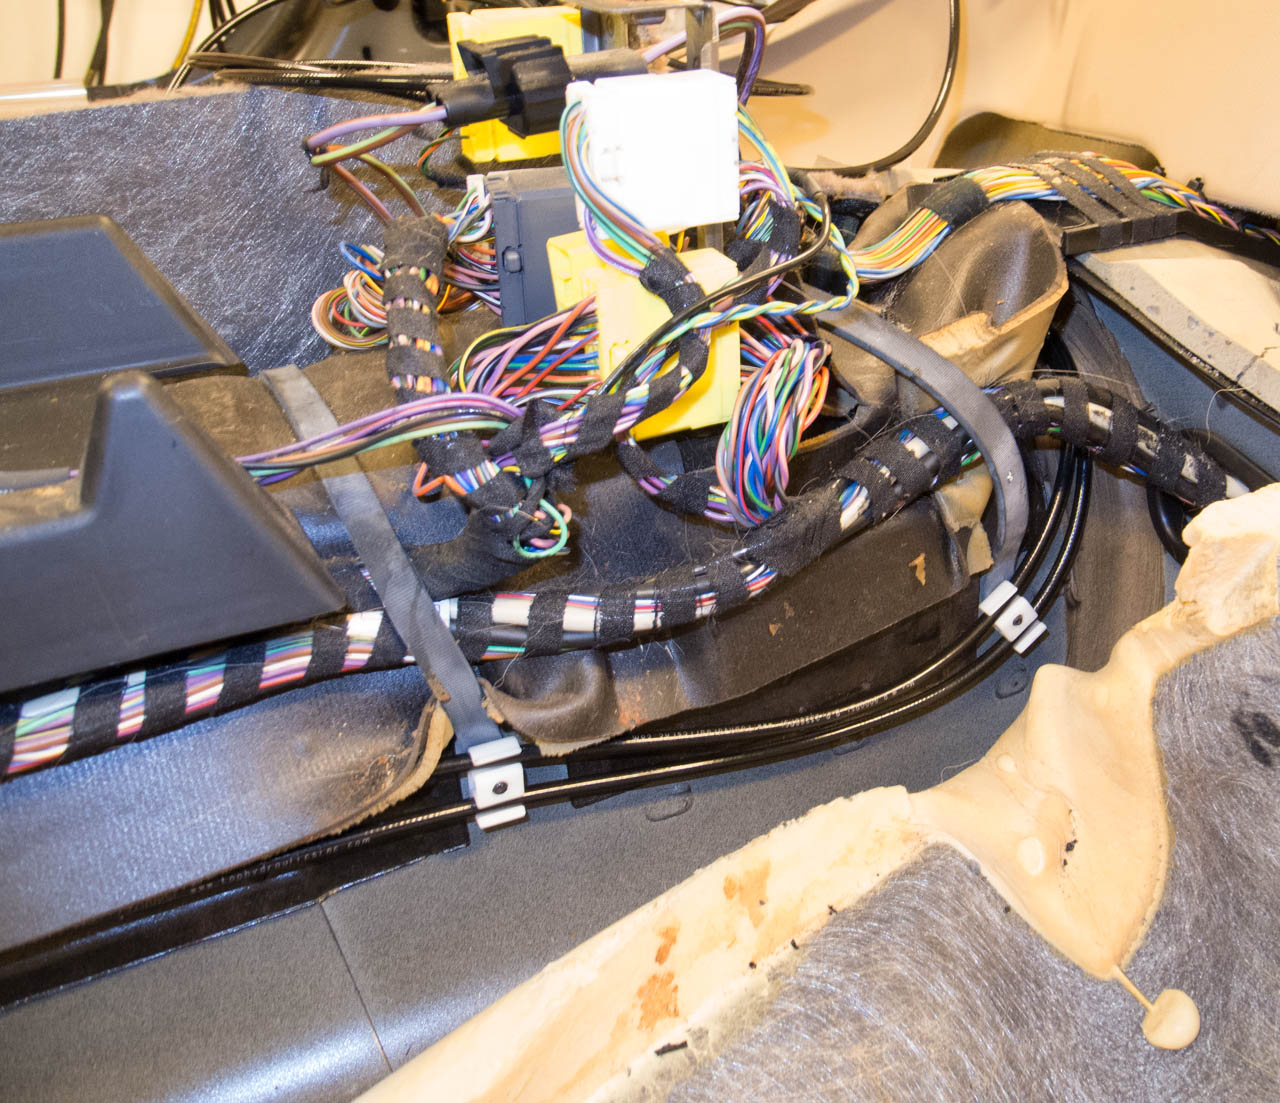
In case of the premium sound system the speaker boxes at the back are trapped behind the support bar. Opening of the front bolts and lifting the needed few mm's by hand releases the speaker boxes.
To avoid mess open up all hoses by the pump and put the ends in a suitable bottle. Lift the top by hand up and down a few times to empty the main lifts. Open up the other ends of the hoses one by one and blow with air all the oil out of the hoses. I did not need any of the old hoses for pulling the new ones, cutting the old ones instead of removing as a whole might have sped up the work a bit.
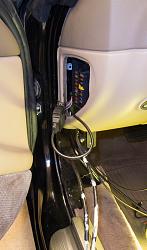
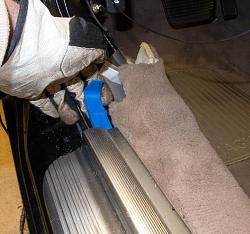
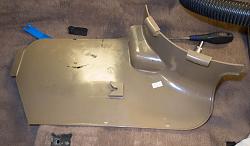
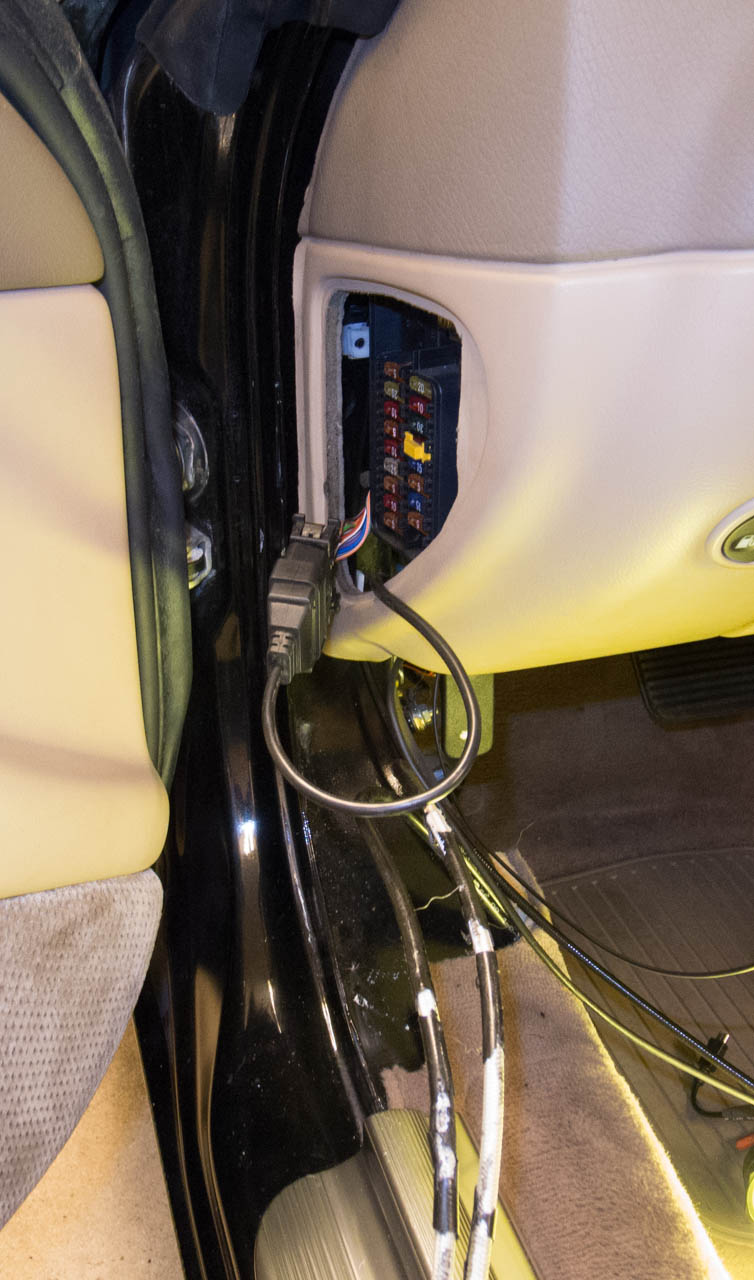
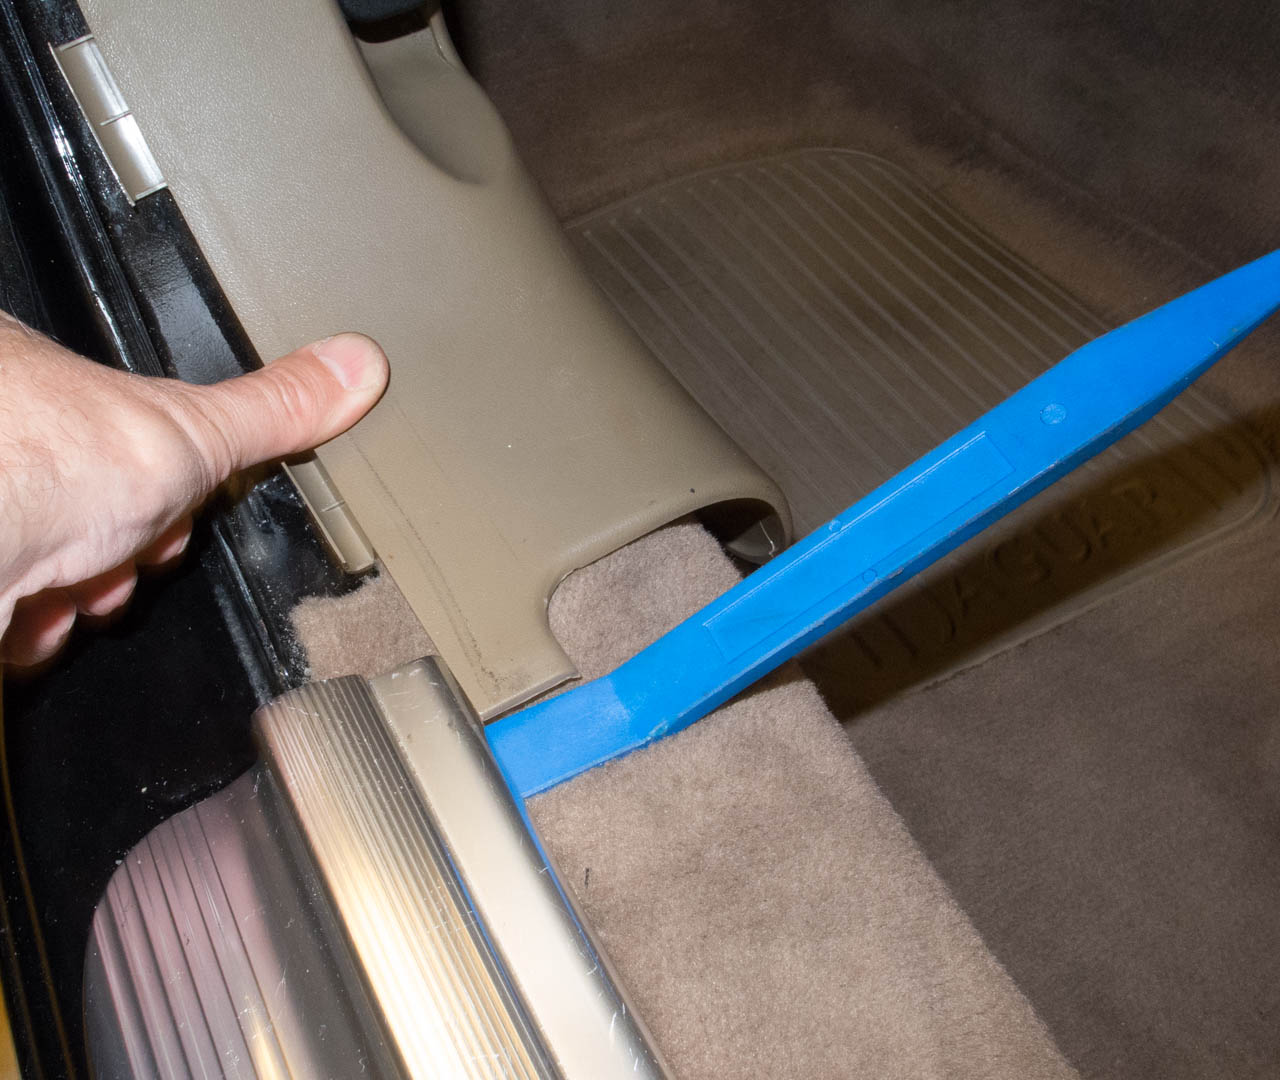
By using a cheap plastic tool both the kick panel and the needed amount of carpet can be carefully pulled from under the treadplate. See the picture of the rear side of the kick panel - it needs to be pulled backwards to release.
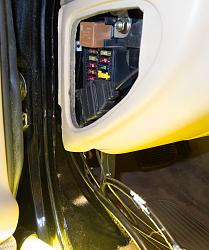
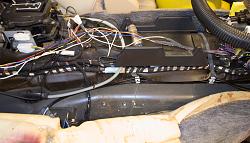
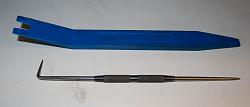
The new hoses were thinner than the originals and easy to get behind the fuse box. Remove the door seal, open the fuse box lid, remove the brown relay. The hoses slide in from the side and can be pushed into the white holders with help of a hook tool.
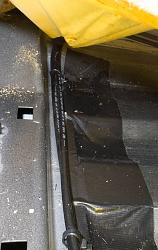
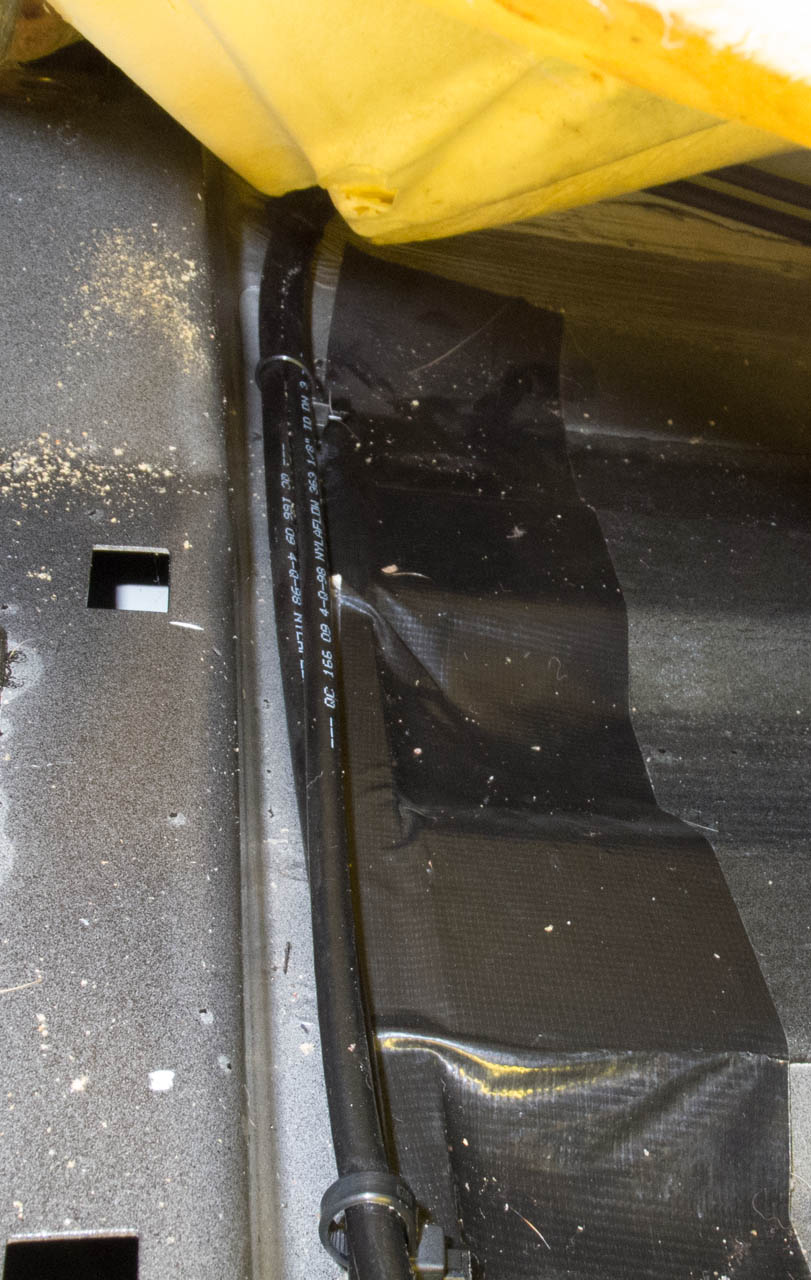
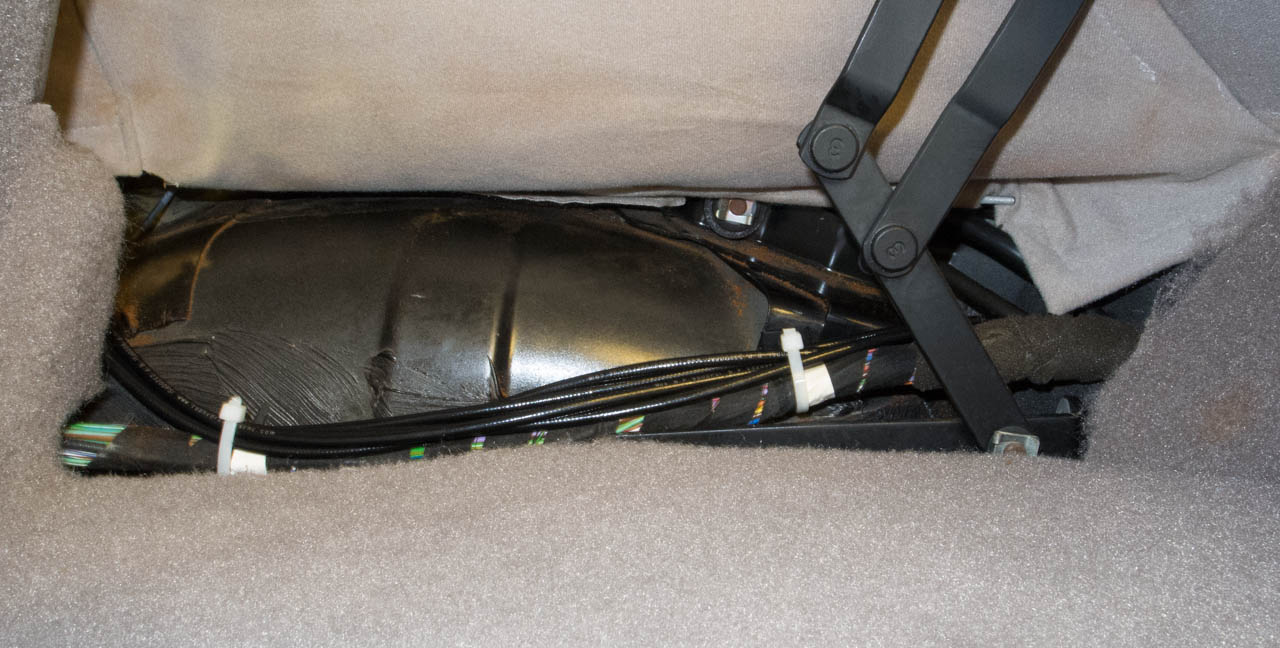
The tie straps under the carpet and in the back corner can be re-used. Cut the old strap, push a new regular strap of suitable width thru the old part.
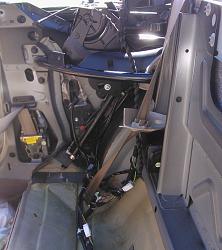
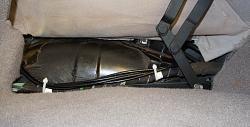
Feeding the hoses to the trunk could be done by (long?) hands. Feel the opening, there's plenty of space on the top side for feeding the thick ends. But be sure to position the hoses on the lower area and surrounded by foam, not on the top where sharp metal can touch the hoses. Attach the hoses as the originals were on rear right, the convertible mechanism folds there and can push the hoses if they are not correctly fastened.
These are just my additions to the hose replacement job, do check the instructions listed at the beginning and others before starting the work! JTIS is very useful, too, in many details as how to remove the latch mechanism etc.
Jouko


The repairs were straight forward with the help of the various forum texts, especially those by Steve.c3h8 (see the reply no. 213 in this thread) and by Gus (see JagRepair.com - Jaguar Repair Information Resource). A big thanks!
I got all new hoses from TopHydraulics and did the full change in three evenings. I was not opening up all the places for the first time, though. The first evening I removed the back and driver's seats, side panels and speakers on the back, the center console and almost everything above the windscreen. The second I replaced the hoses and tested the system, the third I put everything back in place. No special tools are needed and nothing was specially difficult to do.
To support the instructions provided already I'll share here my additional learnings.
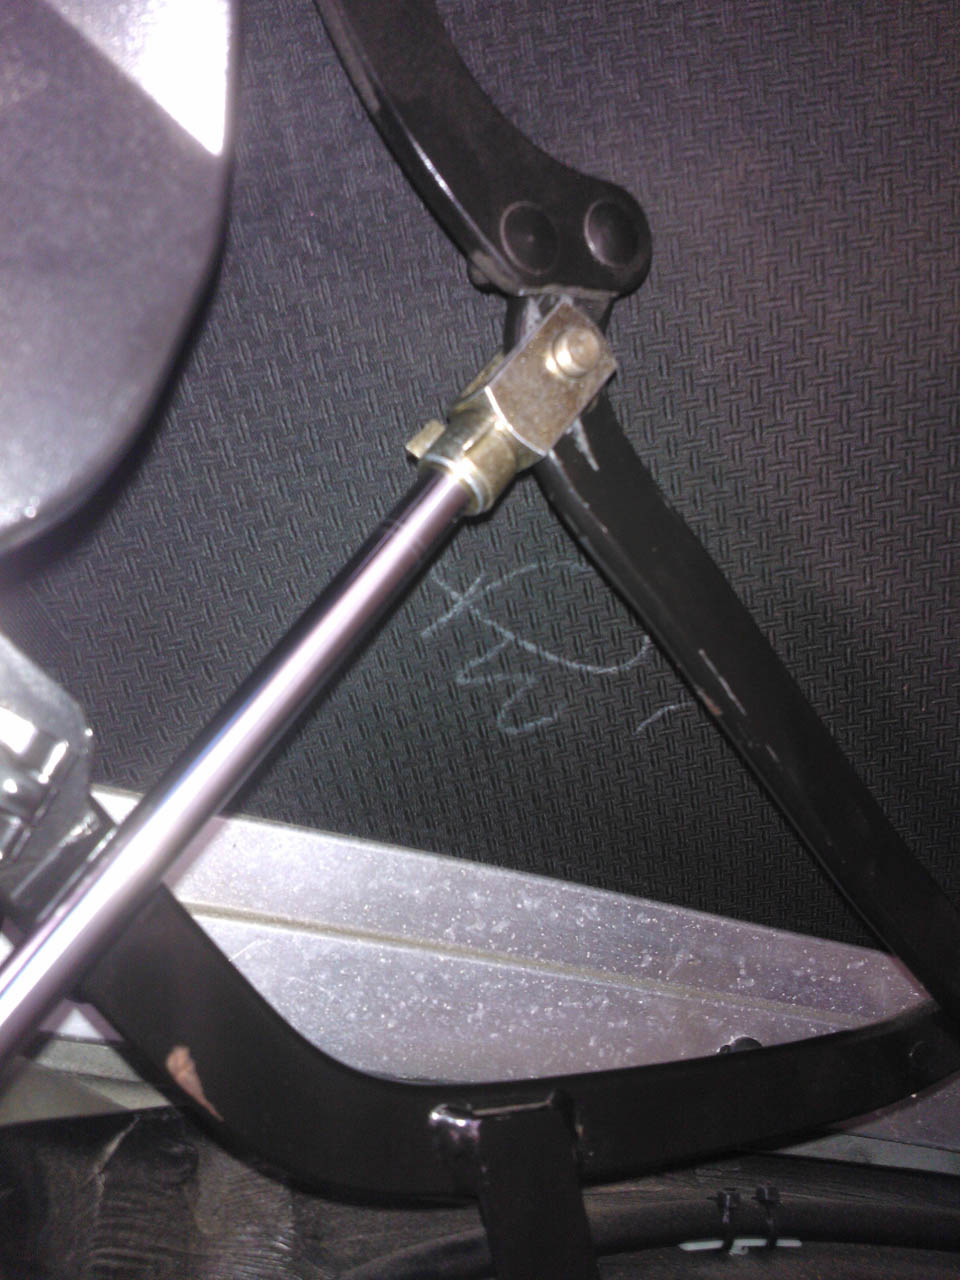
When the top is up and the hydraulics leak the way to lower the top goes like this: With the doors open and the windows down the rear seat and the side panels & speakers come out quite nicely. Open the valve at the side of the pump in the trunk, use the hex key on the pump to open the latch above the mirror. Pull down the rear lift shafts the needed few cm's, they are locked on the top position and are about impossible to unlock otherwise. Quite a hard pull is needed but it is doable by hand. Only after that lower the top, slowly.
In case of the premium sound system the speaker boxes at the back are trapped behind the support bar. Opening of the front bolts and lifting the needed few mm's by hand releases the speaker boxes.
To avoid mess open up all hoses by the pump and put the ends in a suitable bottle. Lift the top by hand up and down a few times to empty the main lifts. Open up the other ends of the hoses one by one and blow with air all the oil out of the hoses. I did not need any of the old hoses for pulling the new ones, cutting the old ones instead of removing as a whole might have sped up the work a bit.
By using a cheap plastic tool both the kick panel and the needed amount of carpet can be carefully pulled from under the treadplate. See the picture of the rear side of the kick panel - it needs to be pulled backwards to release.
The new hoses were thinner than the originals and easy to get behind the fuse box. Remove the door seal, open the fuse box lid, remove the brown relay. The hoses slide in from the side and can be pushed into the white holders with help of a hook tool.
The tie straps under the carpet and in the back corner can be re-used. Cut the old strap, push a new regular strap of suitable width thru the old part.
Feeding the hoses to the trunk could be done by (long?) hands. Feel the opening, there's plenty of space on the top side for feeding the thick ends. But be sure to position the hoses on the lower area and surrounded by foam, not on the top where sharp metal can touch the hoses. Attach the hoses as the originals were on rear right, the convertible mechanism folds there and can push the hoses if they are not correctly fastened.
These are just my additions to the hose replacement job, do check the instructions listed at the beginning and others before starting the work! JTIS is very useful, too, in many details as how to remove the latch mechanism etc.
Jouko


Last edited by JoukoN; 07-16-2013 at 03:06 PM. Reason: to increase font size
The following 3 users liked this post by JoukoN:
#558
04-02-2014, 07:42 PM
Junior Member
Hi Steve, I have just replaced my two latch hoses as well as the seals in the latch cylinder. We virtually followed your brilliant article to the letter on my RHD car.This is not a task for the faint hearted as its a huge job were-in most of the interior upholstery is removed to get at those pesky cable ties which are everywhere.I had the hoses made locally with DN2-PN630/2 hose supplied by STAUFF Corporation.The hose is only 5mm OD ( not 6.35mm )but everything worked a treat first time.
I am indeed indebted to you for this article. My out of pocket expenses to fix the problem and reupholster the three windscreen fabric trims was New Zealand dollars $890.00. Before I read your article I was going to get the local Jaguar agent to do the job, heaven knows what that would have cost. John Parker NZ 1999 XKR
I am indeed indebted to you for this article. My out of pocket expenses to fix the problem and reupholster the three windscreen fabric trims was New Zealand dollars $890.00. Before I read your article I was going to get the local Jaguar agent to do the job, heaven knows what that would have cost. John Parker NZ 1999 XKR
The following users liked this post:
Norri (04-02-2014)
#559
04-03-2014, 08:31 AM
Veteran Member
Question for you, John:
Did you make any attempt to prime the new hoses with fluid, or just start with everything dry? How did the system behave at first?
There was a case here recently where someone (Seawind, I think) found his latch would not close after changing hoses. It was trying, but would timeout without closing. I thought air in the hoses might explain things, but I don't think we ever learned how that particular case turned out.
#560
04-03-2014, 09:11 AM

Veteran Member