
New Member in the middle of an XJS restoration.


Thread Starter
|
Senior Member
Joined: Dec 2011
Posts: 936
Likes: 193
From: London
Hi,
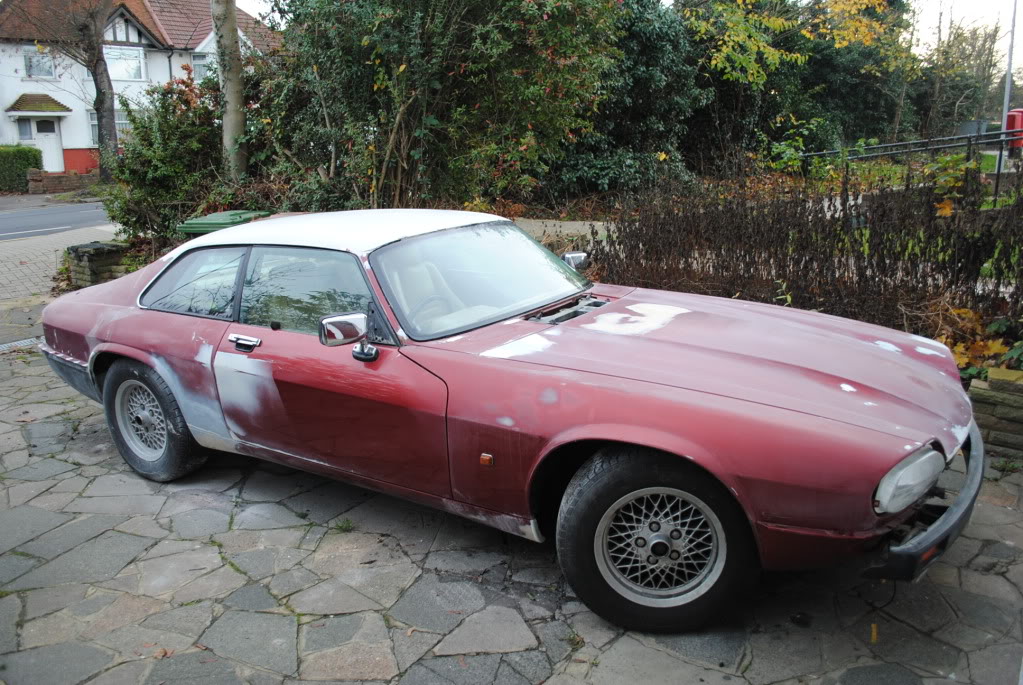
I'm restoring an XJS 1992 4.0 in Flamenco Red
I got this car with 119k miles on the clock and a full Jaguar main dealer history. The car is mechanically excellent (as far as I can tell so far) and structurally very sound.
As I got it (ignore the black paint on the roof as I put this on there as a sort of guide coat)


The body, wings, bootlid, bootfloor, floorpan, doors are all sound as shown in the pics below:


Now the bad bits! The paintwork has extensive lacquer. The bonnet has been dented beyond economic repair by some toerag walking on it before I bought it > , just before in fact! Luckily I sourced a replacement bonnet in the same colour but could have done without the extra work.

I'm restoring an XJS 1992 4.0 in Flamenco Red
I got this car with 119k miles on the clock and a full Jaguar main dealer history. The car is mechanically excellent (as far as I can tell so far) and structurally very sound.
As I got it (ignore the black paint on the roof as I put this on there as a sort of guide coat)
The body, wings, bootlid, bootfloor, floorpan, doors are all sound as shown in the pics below:
Now the bad bits! The paintwork has extensive lacquer. The bonnet has been dented beyond economic repair by some toerag walking on it before I bought it >
, just before in fact! Luckily I sourced a replacement bonnet in the same colour but could have done without the extra work.
Thread Starter
|
Senior Member
Joined: Dec 2011
Posts: 936
Likes: 193
From: London
The welding begins!
I welded all the bits necessary, then primed with POR-15 or Lechler Epoxy 2k primer (which I can recommend) or both as required. Note the rear lower quater panels have only been cut back enough to get to the rear an front panels yet, I will remove them later.


POR-15/ Epoxy primer applied inside all bits before welding the final pieces on and inside where accesible to avoid rusting.
I will waxoyl/ dintrol all cavities at the end to add the final rust prevention.
The rear lower quarters I am going to use fibreglass replacement panels as these areas seem to be designed to rust!
I welded all the bits necessary, then primed with POR-15 or Lechler Epoxy 2k primer (which I can recommend) or both as required. Note the rear lower quater panels have only been cut back enough to get to the rear an front panels yet, I will remove them later.
POR-15/ Epoxy primer applied inside all bits before welding the final pieces on and inside where accesible to avoid rusting.
I will waxoyl/ dintrol all cavities at the end to add the final rust prevention.
The rear lower quarters I am going to use fibreglass replacement panels as these areas seem to be designed to rust!
Thread Starter
|
Senior Member
Joined: Dec 2011
Posts: 936
Likes: 193
From: London
Some more pics,
Front panel was rotten so removed, lower valance was good so cleaned and painted with epoxy primer

New front panel also painted with epoxy primer

Rear lower quaters replaced in fibreglass so the never rot again!! Rivets painted with epoxy primer just because I'm compulsive I guess!


More pics of the car just before being ready to take to paintshop.

Note the rear valance was welded, derusted, epoxy primered then stone chip paint applied. It will be painted the same colour as the rest of the car.
Stone chip was only applied to the underside of the sills, as original I believe, because I prefer the smooth finish.

I'v also been restoring the wood work, a long labour of love/ hate. Stripped it all down to veneer then applied umpteen coats of rustins plastic wood, flatting between coats, and a final polish at the end.
As they were before,

and finally

Very happy with how they came out, in the end. Hey there's some cool smilies on the site!!
Front panel was rotten so removed, lower valance was good so cleaned and painted with epoxy primer
New front panel also painted with epoxy primer
Rear lower quaters replaced in fibreglass so the never rot again!! Rivets painted with epoxy primer just because I'm compulsive I guess!
More pics of the car just before being ready to take to paintshop.
Note the rear valance was welded, derusted, epoxy primered then stone chip paint applied. It will be painted the same colour as the rest of the car.
Stone chip was only applied to the underside of the sills, as original I believe, because I prefer the smooth finish.
I'v also been restoring the wood work, a long labour of love/ hate. Stripped it all down to veneer then applied umpteen coats of rustins plastic wood, flatting between coats, and a final polish at the end.
As they were before,
and finally
Very happy with how they came out, in the end.


Hey there Anjum and welcome to the site, great to have you with us here at JF
Great looking ride so far with loads to do and what looks like it will be a lbour of love!
Perhaps drop back by the new member section and do a brief intro so we can welcome you properly?
I've manually upgraded you to full forum access so you can better view the site and all its features


really cool stuff so far anjum......lovin your posts and I suspect that the members of this section will too
Trending Topics


Veteran Member
Joined: Jul 2009
Posts: 12,704
Likes: 1,236
From: Brittany France
Great thread, I could really do with you over here, I've got exactly the same rust problems on my 92.
Sill corners, and rear lower quarters..
2 questions, where did you source the fiberglass sections, and did you fabricate the sill sections yourself?
Sill corners, and rear lower quarters..
2 questions, where did you source the fiberglass sections, and did you fabricate the sill sections yourself?
Member
Joined: Dec 2011
Posts: 66
Likes: 10
From: Locust Grove, Georgia
That's a ton of work you've done. What was the approximate time period from start to completed paint? It looks great and for me, I really like seeing another XJS saved. Looks like it will be kept original, and that is another plus as far as I am concerned.
I am curious about the wheels also, what did you do to restore them?
All together an excellant thread you started and keep up the good work!
I am curious about the wheels also, what did you do to restore them?
All together an excellant thread you started and keep up the good work!

Senior Member
Joined: Jan 2011
Posts: 883
Likes: 173
From: Columbus, OH
Awesome work! It seems like they rust a little different in UK environment.
How is market of 20 y/o Jaguars in UK, what would she bring if was for sale?
Here not too many people would touch rusty XJS, except for few crazies (like myself).
BTW, here are some pics of mine for you
How is market of 20 y/o Jaguars in UK, what would she bring if was for sale?
Here not too many people would touch rusty XJS, except for few crazies (like myself).
BTW, here are some pics of mine for you
Thread Starter
|
Senior Member
Joined: Dec 2011
Posts: 936
Likes: 193
From: London
Hi Jamey,
Like the Quote from Winnie the pooh!
I removed the badge from the centres by pushing a small screwdriver through the holes inthe back untill the adhesive gave way.
Then it's a case of sanding off the paint on the flat part on the back, just used sandpaper on a flat surface and some sore fingers! Coarse until the paint is nearly gone then fine340grit. Doesn't have to be too fine. Clear plastic primer and then paint with body colour which I got from the bodyshop.
Finally polish the front, Hint - don't use thinners to clean any paint or gunge off the front as it will craze the plastic.
I then used Sikaflex to stick the badges onto the centres.
If the jaguar head chrome is gone bad, there is no way that I know to cost effectively restore it. Buy some second hand wheel centres and restore them.
Thread Starter
|
Senior Member
Joined: Dec 2011
Posts: 936
Likes: 193
From: London
The sill corners were cut off a later xjs with my favourite tool, the angle grinder. I made the end caps where neccessary using galvanised sheet with the galvanising removed local to the welds and weld through primered them.
The rust in these areas is due to the moisture getting behind the thick mastic and rotting the metal from the inside.
The rear lower quarters are just not a very well thought out design, nowhere for the water to go. The same goes for the rear valance box frame and the front panel, which traps leaves and rubbish and holds it against the panel and cross-member.
But hey, still better than most cars.
Thread Starter
|
Senior Member
Joined: Dec 2011
Posts: 936
Likes: 193
From: London
Thanks fo all the nice comments! Good for the motivation.
To answer some of the questions, so far this project has taken me 5 months to prepare the body for painting. The painting was carried out by a bodyshop who also refurbished and painted the wheels.
Prices for XJS's vary over here according to condition and mileage, the market is not very good at the moment obviously, but as always you can never hope to recoup your cost and effort when you resell.