Repairing The Teves ABS Actuator/Master On 1990 XJS V12 With Photos
#21
 05-06-2015, 05:31 AM


Veteran Member
OB,
Great work, congrats! I'm sure your perseverance will pay off.
Do remember when you come to the final fitup and bleeding that you need to do more than the Teves wheel bleeding procedure, because you've disrupted the reservoir and actuation fluid intake. You've also got to first run through the fluid Intake hose bleed procedure which can be quite messy! This is critical to do BEFORE the Teves wheel bleed procedure.
Have a really good read through that section of the manual (70.25.03) as it's naturally very important that you get these procedures correct.
Good luck with the final push!
Paul
The following users liked this post:
orangeblossom (05-06-2015)
#22
05-06-2015, 07:48 AM

OB,
Great work, congrats! I'm sure your perseverance will pay off.
Do remember when you come to the final fitup and bleeding that you need to do more than the Teves wheel bleeding procedure, because you've disrupted the reservoir and actuation fluid intake. You've also got to first run through the fluid Intake hose bleed procedure which can be quite messy! This is critical to do BEFORE the Teves wheel bleed procedure.
Have a really good read through that section of the manual (70.25.03) as it's naturally very important that you get these procedures correct.
Good luck with the final push!
Paul
Great work, congrats! I'm sure your perseverance will pay off.
Do remember when you come to the final fitup and bleeding that you need to do more than the Teves wheel bleeding procedure, because you've disrupted the reservoir and actuation fluid intake. You've also got to first run through the fluid Intake hose bleed procedure which can be quite messy! This is critical to do BEFORE the Teves wheel bleed procedure.
Have a really good read through that section of the manual (70.25.03) as it's naturally very important that you get these procedures correct.
Good luck with the final push!
Paul
Many Thanks but I've already hit a Problem!
I want to go belt and braces on this, so I'm fitting a new set of Calipers, although I put new ones on Her 12 years ago, when She started pulling to the right.
Also I want to put on new brake pipes and new wheels and tyres, as after many years of this Car sitting doing nothing, I feel she now deserves a few bob being spent on her.
I've got an amazing deal on the Calipers that's too good to pass up, so that is part of the reason why I'm going a bit OTT.
The other reason being that I do not really want to have to do all this again, so I'm leaving no stone unturned.
The Problem is that I cannot get one of the Calipers off, even though I'm using a socket spanner with a long extension handle as well as a Car Jack underneath that.
The Socket Spanner broke the ratchet inside it and a 19mm Spanner broke in half, when I hit it with a FBH!
So I am going to have to treat myself to an Air Impact Wrench, it looks so easy watching that on You Tube.
#23
05-06-2015, 11:14 AM
Veteran Member
OB,
Is there room to get an air impact wrench in there? Sounds like you need to use a socket and a breaker bar. That will give you the leverage and the swivel pin on a breaker bar is probably stronger than the internal traditional ratchet. Those caliper bolts can be very tight, particularly as garages seem to overtorque them on assembly.
Paul
The following users liked this post:
orangeblossom (05-06-2015)
#24
05-06-2015, 12:06 PM
OB,
Is there room to get an air impact wrench in there? Sounds like you need to use a socket and a breaker bar. That will give you the leverage and the swivel pin on a breaker bar is probably stronger than the internal traditional ratchet. Those caliper bolts can be very tight, particularly as garages seem to overtorque them on assembly.
Paul
Is there room to get an air impact wrench in there? Sounds like you need to use a socket and a breaker bar. That will give you the leverage and the swivel pin on a breaker bar is probably stronger than the internal traditional ratchet. Those caliper bolts can be very tight, particularly as garages seem to overtorque them on assembly.
Paul
Not with a 5 lb Club Hammer or even a Sledge Hammer, what I don't want to do, is to risk rounding off the Bolt, as that will make the job harder.
I reckon I will be able to get an impact wrench in there, which will probably come in useful for loads of other stuff.
#25
05-07-2015, 11:21 AM
Veteran Member
OB,
That's unfortunate. If done up at less than 60 ftlb, you should be able to shift those with a breaker bar.
If you are using an impact wrench, you're probably going to need to set it right up at Position 4 (assuming it has 1-4). Don't bother using just an air ratchet as most won't go anywhere close to the ftlb that you'll need if you can't undo so far with a long lever on a socket.
Good luck
Paul
The following users liked this post:
orangeblossom (05-07-2015)
#26
05-07-2015, 04:18 PM
OB,
That's unfortunate. If done up at less than 60 ftlb, you should be able to shift those with a breaker bar.
If you are using an impact wrench, you're probably going to need to set it right up at Position 4 (assuming it has 1-4). Don't bother using just an air ratchet as most won't go anywhere close to the ftlb that you'll need if you can't undo so far with a long lever on a socket.
Good luck
Paul
That's unfortunate. If done up at less than 60 ftlb, you should be able to shift those with a breaker bar.
If you are using an impact wrench, you're probably going to need to set it right up at Position 4 (assuming it has 1-4). Don't bother using just an air ratchet as most won't go anywhere close to the ftlb that you'll need if you can't undo so far with a long lever on a socket.
Good luck
Paul
What is really stopping me with the Breaker Bar idea, is the lack of height under the Car.
When I undid the passenger side, I was pushing the breaker bar down but when I'm doing the drivers side (UK) I'm having to push the breaker bar up, which isn't so easy.
When I originally did them up, I had the Car on my Garage Lift so I managed to get them done up really tight.
#27
05-07-2015, 05:43 PM
Veteran Member
The following users liked this post:
orangeblossom (05-08-2015)
#28
05-08-2015, 12:47 AM

Veteran Member
The following users liked this post:
orangeblossom (05-08-2015)
#29
05-08-2015, 04:04 AM
Its looking that way, I didn't have a Torque Wrench, when I put them on, so may have over tightened it or something.
#30
05-08-2015, 04:10 AM
Your are right but I think I will buy an Impact Wrench to go in the 'Toy Box' anyway, as they are only �25 and its one of those things I've needed in the past for lots of other jobs.
I'm also going to get those Clips, which are not as expensive as I thought they were going to be.
#31
06-06-2015, 11:47 PM
Again a dead easy job but you will need a Star Key to undo the middle bolt and I also used some new metal brake pipes, that didn't turn out quite right to keep the dirt out.
Star Key on this one.
Now for the real Horror Story Check This Out!
Maybe not so surprising, that the Brakes don't work!
These are the Electric Solenoid Valves with the Ribbon Connectors, that some Forum Members have re-wired with hard wire.
Cables at the Ready for Testing the Solenoid Valves.

This is as far as I have got, at the time of Posting but I am intending to put a 12V Battery on one end, with the negative wire on the common pin of that 7 pin plug and then dab the Positive wire on the other 6 pins.
In order to see if the Valves are working or sticking.
At least I think that this is what you are supposed to do, so if Davedental is reading this, please jump in and let me know if I am doing this right?
And also how you get a faulty valve out, as I've sort of hit the buffers at this point.


Star Key on this one.

Now for the real Horror Story Check This Out!
Maybe not so surprising, that the Brakes don't work!
These are the Electric Solenoid Valves with the Ribbon Connectors, that some Forum Members have re-wired with hard wire.
Cables at the Ready for Testing the Solenoid Valves.

This is as far as I have got, at the time of Posting but I am intending to put a 12V Battery on one end, with the negative wire on the common pin of that 7 pin plug and then dab the Positive wire on the other 6 pins.
In order to see if the Valves are working or sticking.
At least I think that this is what you are supposed to do, so if Davedental is reading this, please jump in and let me know if I am doing this right?
And also how you get a faulty valve out, as I've sort of hit the buffers at this point.

RennsportKC ? Jaguar XJS ATE ABS repair?
#32
07-01-2015, 01:54 PM
Having just experienced Brake Failure on my other XJS I tested the Valve Block with a Meter, which is very easy to do from under the Bonnet/Hood and found that something was wrong!
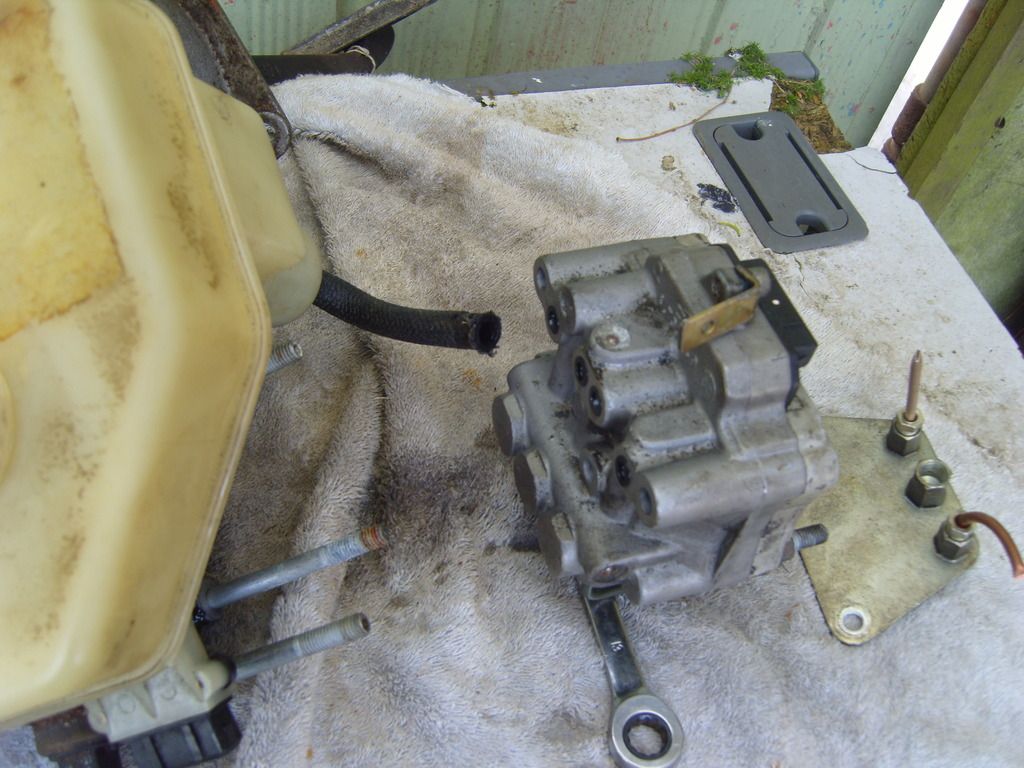
So this time I decided not to pull out the Master Cylinder/Actuator as I had done on my other Car but instead take the Valve Block off the unit.
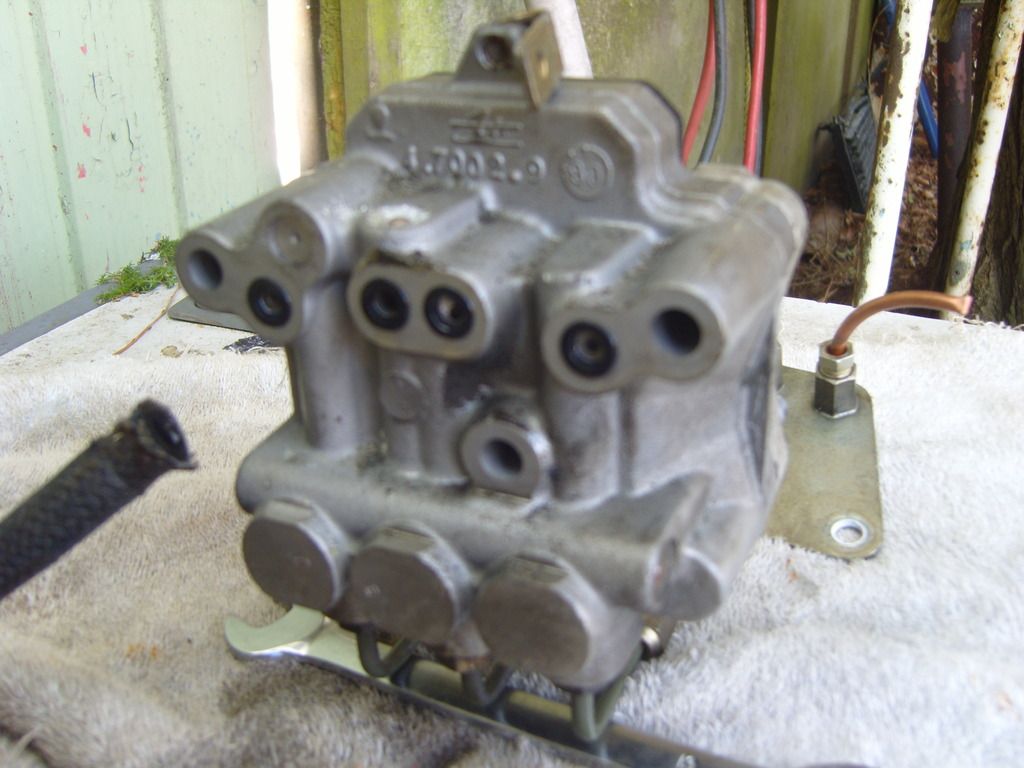
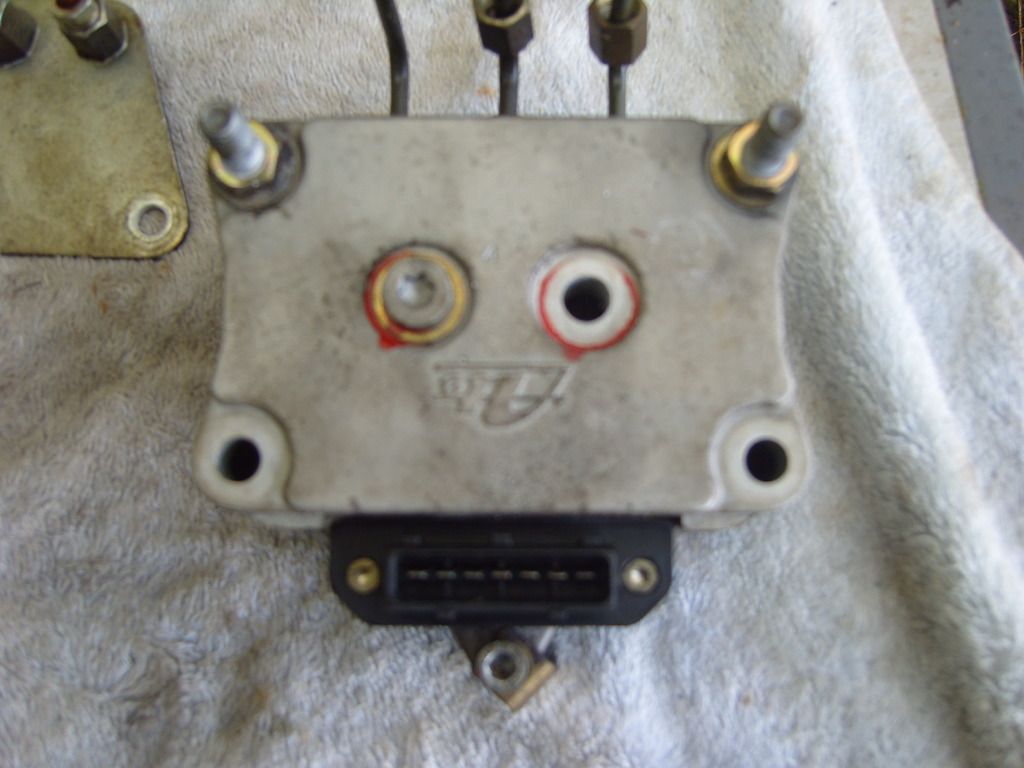
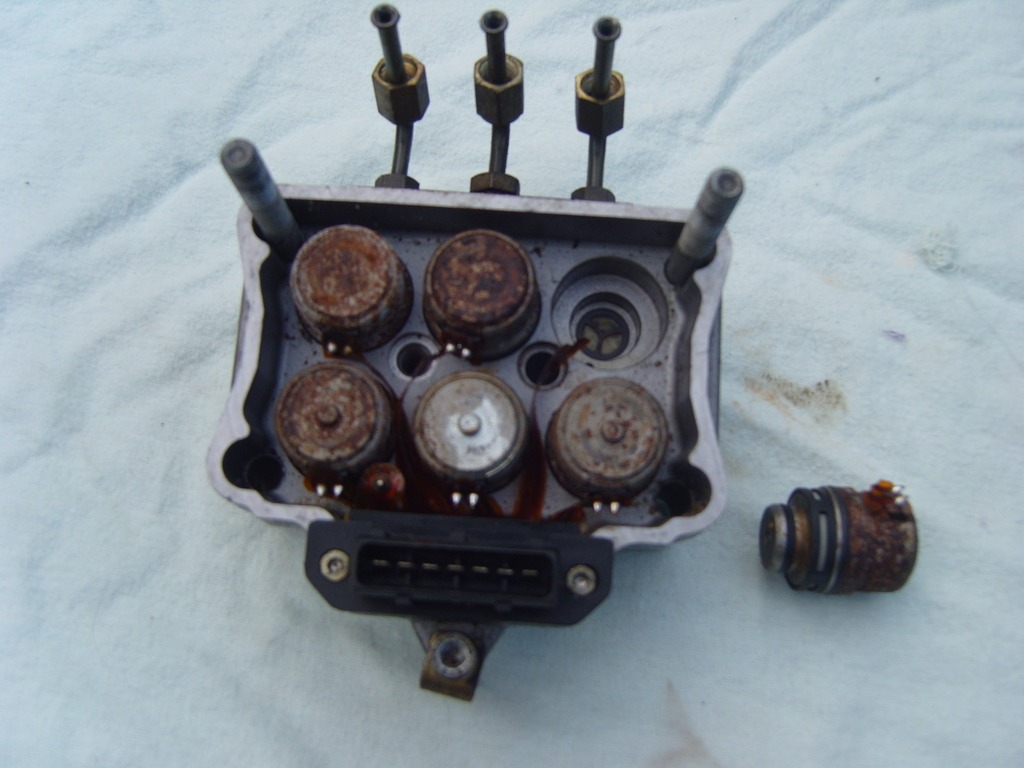
Where having very carefully pulled it off its studs and then removed the Face Plate (That's the Cover) I found that one of the Ribbon Type wires had become detached from the Valve!
No wonder the Car took a dive!
It doesn't take much to break them, just a big jolt or a bit of vibration would be enough to do it, as they are incredibly Fragile from many years of being subjected to heat and once one of those ribbons breaks.
Then it can make your XJS (A V12 in this case) take a very sudden unexpected dive, into oncoming traffic or whatever!
So having located an XJ6 in a Scrapyard, I'm going down to Test it and if it is OK then swop it over, as the Valves in this one look as rusty as hell.
The Valve Block in an XJ6 uses the same Teves Valve Block as the XJS V12 except that the Face Plate is a little bit different but is very easily swopped over.
Then once I've got them all cleaned up and Tested, they will come in handy for Spares, which I hope I'll never have to use.
So this time I decided not to pull out the Master Cylinder/Actuator as I had done on my other Car but instead take the Valve Block off the unit.
Where having very carefully pulled it off its studs and then removed the Face Plate (That's the Cover) I found that one of the Ribbon Type wires had become detached from the Valve!
No wonder the Car took a dive!
It doesn't take much to break them, just a big jolt or a bit of vibration would be enough to do it, as they are incredibly Fragile from many years of being subjected to heat and once one of those ribbons breaks.
Then it can make your XJS (A V12 in this case) take a very sudden unexpected dive, into oncoming traffic or whatever!
So having located an XJ6 in a Scrapyard, I'm going down to Test it and if it is OK then swop it over, as the Valves in this one look as rusty as hell.
The Valve Block in an XJ6 uses the same Teves Valve Block as the XJS V12 except that the Face Plate is a little bit different but is very easily swopped over.
Then once I've got them all cleaned up and Tested, they will come in handy for Spares, which I hope I'll never have to use.

Last edited by orangeblossom; 07-01-2015 at 02:05 PM.
#33
07-01-2015, 02:20 PM
Senior Member
Having just experienced Brake Failure on my other XJS I tested the Valve Block with a Meter, which is very easy to do from under the Bonnet/Hood and found that something was wrong!
So this time I decided not to pull out the Master Cylinder/Actuator as I had done on my other Car but instead take the Valve Block off the unit.
Where having very carefully pulled it off its studs and then removed the Face Plate (That's the Cover) I found that one of the Ribbon Type wires had become detached from the Valve!
No wonder the Car took a dive!
It doesn't take much to break them, just a big jolt or a bit of vibration would be enough to do it, as they are incredibly Fragile from many years of being subjected to heat and once one of those ribbons breaks.
Then it can make your XJS (A V12 in this case) take a very sudden unexpected dive, into oncoming traffic or whatever!
So having located an XJ6 in a Scrapyard, I'm going down to Test it and if it is OK then swop it over, as the Valves in this one look as rusty as hell.
The Valve Block in an XJ6 uses the same Teves Valve Block as the XJS V12 except that the Face Plate is a little bit different but is very easily swopped over.
Then once I've got them all cleaned up and Tested, they will come in handy for Spares, which I hope I'll never have to use.
NOW I see what happened, someone put the pedal assembly on the right side of the car, thus causing it to fail when sitting in the left, no wonder no brakes! ;-)
Nice work OB.
Jeff
#34
07-01-2015, 02:55 PM
Hi Jeff
On a UK. RHD. Car, The Master Cylinder/Actuator and the Pedals are all on the same side. (Drivers Side) Though I Don't know the US Set Up.
After years of being subjected to heat, those little ribbon Cables become very brittle and fragile.
One good jolt could be enough to break one, the only problem being that you don't know when that will be, or what traffic situation you will be in.
Once one of those Valves goes or a Cable breaks (as in this case) you would only need to touch the Brakes to send the Car flying!
If that ever happens to you, take your foot off the Brake and then get the Car straight, then very, very, gently Brake in order to slow her down.
If it happens in the Wet or in Ice and Snow, then it could be game over, as there is a very big chance the Car will spin!
Last edited by orangeblossom; 07-01-2015 at 02:58 PM.
#35
07-01-2015, 03:06 PM
Veteran Member

- crank wheel over for suitable access
- raise vehicle on hydraulic wheeled jack
- arrange socket and breaker bar on fastener such that the handle
end is supported by the ground, or use a suitable support such as
blocks of wood making sure that the arrangement is "raising handle=undo"
- lower vehicle slowly
- something will give
To avoid having the wrong thing give way, I prefer to lower just
enough to apply some large but not too large, amount of force,
then bang on the head of the breaker bar with a hammer.
Force + impact usually do the trick nicely.
If there is threadlocker on the bolt, the usual vendor says apply
heat. 350*F I think.
Last edited by plums; 07-01-2015 at 03:11 PM.
The following users liked this post:
orangeblossom (07-01-2015)
#36
07-01-2015, 04:02 PM
The ancient Greeks are your friend here, Archimedes maybe?
- crank wheel over for suitable access
- raise vehicle on hydraulic wheeled jack
- arrange socket and breaker bar on fastener such that the handle
end is supported by the ground, or use a suitable support such as
blocks of wood making sure that the arrangement is "raising handle=undo"
- lower vehicle slowly
- something will give
To avoid having the wrong thing give way, I prefer to lower just
enough to apply some large but not too large, amount of force,
then bang on the head of the breaker bar with a hammer.
Force + impact usually do the trick nicely.
If there is threadlocker on the bolt, the usual vendor says apply
heat. 350*F I think.
Too late the Bolt Snapped Off!
#37
07-01-2015, 08:16 PM
Senior Member
Hi Jeff
On a UK. RHD. Car, The Master Cylinder/Actuator and the Pedals are all on the same side. (Drivers Side) Though I Don't know the US Set Up.
After years of being subjected to heat, those little ribbon Cables become very brittle and fragile.
One good jolt could be enough to break one, the only problem being that you don't know when that will be, or what traffic situation you will be in.
Once one of those Valves goes or a Cable breaks (as in this case) you would only need to touch the Brakes to send the Car flying!
If that ever happens to you, take your foot off the Brake and then get the Car straight, then very, very, gently Brake in order to slow her down.
If it happens in the Wet or in Ice and Snow, then it could be game over, as there is a very big chance the Car will spin!
On a UK. RHD. Car, The Master Cylinder/Actuator and the Pedals are all on the same side. (Drivers Side) Though I Don't know the US Set Up.
After years of being subjected to heat, those little ribbon Cables become very brittle and fragile.
One good jolt could be enough to break one, the only problem being that you don't know when that will be, or what traffic situation you will be in.
Once one of those Valves goes or a Cable breaks (as in this case) you would only need to touch the Brakes to send the Car flying!
If that ever happens to you, take your foot off the Brake and then get the Car straight, then very, very, gently Brake in order to slow her down.
If it happens in the Wet or in Ice and Snow, then it could be game over, as there is a very big chance the Car will spin!
#38
09-22-2015, 03:08 PM

The following users liked this post:
orangeblossom (09-22-2015)
#39
10-02-2016, 10:28 AM

What a brilliant and clear explanation of how to repair the Teves actuator. I have the same problem on mine and am desperate to get it sorted out ASAP. Have been searching for months for information like this, saw your article yesterday and have to say its wonderfully clear I am going to get down to it myself just as soon as I can find a supply of those much needed rubber seals. As they are not available any more... Is there any chance you might have some spare rubber washers to sell me.... or would you be able to let me know a contact where I could get them from?
The following users liked this post:
orangeblossom (10-02-2016)
#40
10-02-2016, 06:31 PM
What a brilliant and clear explanation of how to repair the Teves actuator. I have the same problem on mine and am desperate to get it sorted out ASAP. Have been searching for months for information like this, saw your article yesterday and have to say its wonderfully clear I am going to get down to it myself just as soon as I can find a supply of those much needed rubber seals. As they are not available any more... Is there any chance you might have some spare rubber washers to sell me.... or would you be able to let me know a contact where I could get them from?
(Cheers) First of all I should point out that Success cannot be guaranteed, a lot depends on how bad the Valves and or the Wiring are.
If the Brake Fluid has not been Changed on a regular basis by a P.O. you might find that the Valves are very rusty, owing to Water content in the Brake Fluid.
When you open the Unit, be extremely careful because the Valves can drop out in your lap and the weight of a Valve is more than enough to break the Ribbon Connectors, which they use to wire them up.
These Ribbon Connectors are so Fragile that there is a 50/50 chance that one of them may be broken and if so would be the cause of the problem.
In any event its better to rewire them all, as you could easily break a Ribbon Wire when putting it all back together.
So first job is make a diagram of what wire goes where.
Having repaired a few of these, I would highly recommend that you take the unit to a Radio Repair shop and have a Professional, Solder the Wires for you as if its not done properly, then you could kill yourself.
As for the Valves, don't try pricking them out with a pin or anything like that because that hole is Microscopic and could be easily damaged.
You really need an Ultrasonic Cleaner, so if you don't want to buy one, you will have to Sweet Talk your local Jeweller (or dentist!) in to Cleaning them for you in their machine.
As for the Rubber 'O' rings they are NLA and I had to reuse the Old ones, which were not damaged and worked OK for me.
Though you may be able to get some from an 'O' ring manufacturer.
Unfortunately I don't have any spares.
Before you start be aware that it may not be the Master Cylinder/Actuator that is causing the problem.
It could be a 'Wheel Speed Sensor' which may either need Cleaning or Replacing, which is a much easier fix. (Lots of Videos on YouTube) about how to do that, so look at the 'Wheel Speed Sensors' First.
The Photo of the Valve with the 'Microscopic Hole' will show you just how easily a tiny piece of 'Crud' can block one up, so never lever the Calipers back when you are changing Brake Pads, without the 'Bleed Nipple' Out. (try not to do it at all)
Or you could send Brake Fluid back up to the 'Master Cylinder Actuator' and if it contains even Microscopic Particles of 'Crud' then it could cause the same problem that you have now.
Plan 'B' is get a S/H unit off an XJS Parts Car of one off an XJ6, there are quite a few Cars that use the same Teves Master Cylinder Actuator, if you have a 'Google' round.
In fact I would probably do that first (if it works, it works) then you will be able to repair your original one at your leisure, to keep as a spare.

The following 3 users liked this post by orangeblossom: