
Brake Switch Replacement How-To (W/ Pics) FAQ
#81
 03-23-2013, 09:15 AM


Veteran Member
#83
03-28-2013, 07:07 AM
Firstly I like to thank sgt for starting this thread and his pixs of the process, then all the additional input from other members. It apears I will have the excellent adventure of tackling this in the near future as I just got the "check rear lights, cruise not available" message pop up last week. I called the local dealer yesterday and was astonished to hear a new switch is $180+. Are there more economical sources? Maybe I should go the micro swith replacement route, does anyone have Omron #s for them/it as I've seen for the door switch repair posts?
#84
04-04-2013, 05:48 PM
There are cheaper switches than that available online; I saw one for $138 just now. That beats the dealer price of $225 where I am, plus about that much for them to install it. The mechanic seemed relieved when I declined the service right then - he's a husky fellow and probably can't squeeze under the dash easily.
For five hundred bucks I will take the plunge and attempt this myself, most likely using the Gus method described earlier. I've physically been able to get under the dash enough to touch and see the parts described while still able to move around, so for me it's do-able. Will let you know how it goes.
For five hundred bucks I will take the plunge and attempt this myself, most likely using the Gus method described earlier. I've physically been able to get under the dash enough to touch and see the parts described while still able to move around, so for me it's do-able. Will let you know how it goes.
#85
04-04-2013, 06:04 PM
Veteran Member
#87
05-04-2013, 12:42 AM

I replaced mine alone in about 15 minutes of work. (With an hour break in the middle) using this technique.
I wish I had taken pics. But I wasn't sure it would work.
This sounds wacky, but it worked like a charm.
A. Remove drivers seat. (2 minutes of work that makes things much easier in the long run.)
B. Remove old switch using instructions already shown.
C. Here's the trick. Drill a small hole (about 1/16") in the end of each of the two studs on the new switch bracket about 1/4" deep. (there is a small dimple, dead center on each stud that perfectly lines up the drill bit.)
D. Now then, take a "low E" guitar string (if you don't have guitar strings around I would suggest buying one at a local music store it's the perfect rigidity for this use) cut it in half.
E. Make large masking tape flags on one end of each of the two lengths of guitar strings. (The flags come into play later)
F. Now feed the end of one of the guitar strings into the upper of the two holes. And through towards the floor board. Be sure it goes through the large opening where the brake pedal goes through.The masking tape flag keeps the string from just falling all the way through the hole.
G. Now mix a small amount of "JB Kwik" 5min. Steel epoxy. Coat the very end of the guitar string with the epoxy and insert it into the hole you drilled in the upper stud on the bracket. Important! Be sure to be careful NOT to get epoxy on the threads of the stud.
H. Now, repeat G. With the other length of guitar string through the lower hole and glue it into the lower stud on the bracket. Do not get the upper and lower strings mixed up or the bracket will go in upside down.
Are you starting to see where I'm going with this?
I. Allow epoxy to cure for about 45 mins.
J. Now start the car and depress brake pedal and secure in place with a broom stick of other rod of some sort. (This keeps the pedal and post that activates the switch out of the way.)
K. Now back up top under the hood, gently lift the two guitar strings simultaneously by the masking tape flags, (shaking them a bit to help orientate the bracket and line up the studs) and pull the new bracket and switch right into place. You'll see the studs come right up into the holes.
L. Now while keeping tension on the strings (to keep the bracket in place) remove one of the masking tape flags. And slide the nut down over the end of the guitar string and it falls right down onto the stud. Finger tighten the nut and repeat with the other nut on the other string.
M. Using pliers now you can pull the guitar strings out of the studs or simply cut them off. Tighten nuts completely.
N. Remove broom stick from brake pedal (obviously).
O. Plug new switch connector in.
P. Replace seat (obviously).
I hope I explained this process clearly. My switch worked perfectly first try without any further adjustment.
I must reiterate. Be sure to Not get epoxy on the stud threads.
Good luck!
Last edited by Dlee; 05-04-2013 at 12:54 AM.
The following users liked this post:
Orthodixie (06-16-2017)
#88
06-12-2013, 10:55 PM

Senior Member
I recently replaced the brake light switch on my '98 XK8, and I thought I'd go ahead and document the process here for others. I am going to attempt to include several pictures. As this will be my first time doing so on this forum, I'll keep my fingers crossed.
Some of the steps/pictures included here may seem painfully obvious, but I subscribe to the theory that having too much information is vastly preferable to not having enough. So without further ado, here are my notes:
Supplies used:
New brake switch ($70+tax from dealer)
Socket wrench with 12" extension
8mm socket
Piece of scrap wood about 15" long
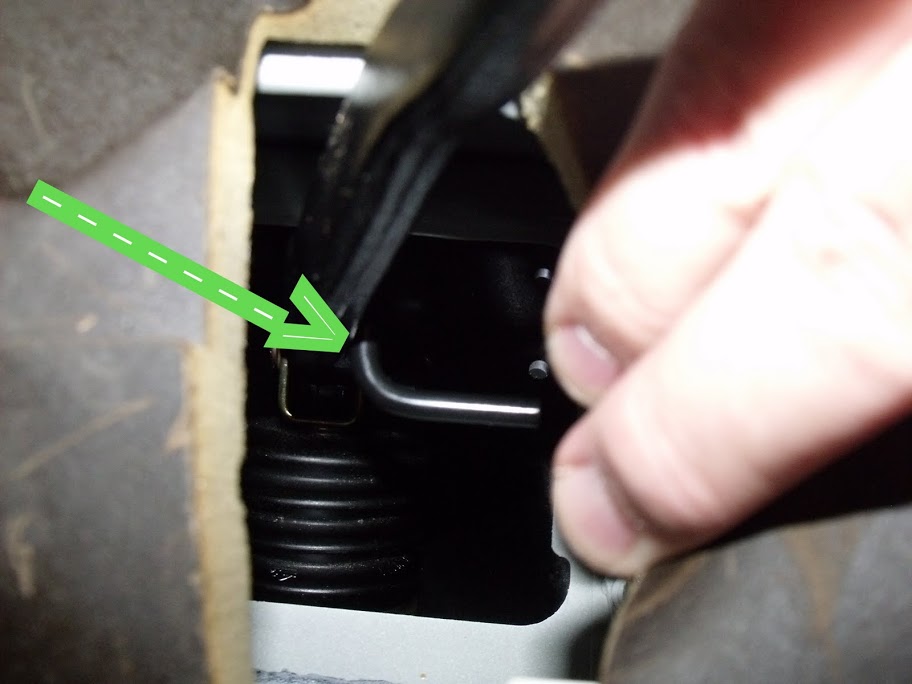
The nuts which mount the brake switch bracket to the vehicle's body are located under the hood/bonnet. After opening the hood, you need to remove the plastic cover identified by the green arrow below. Simply insert a finger or two into the hole presumably provided for this purpose and lift up and in towards the center of the car.

Next, remove the two 8mm nuts indicated in the picture below. You will need an extension if using a socket wrench. I used a 12" extension and had a few inches to spare.

Now move to the vehicle's interior and unplug the switch's electrical connector, which is located behind the brake pedal. Mine was readily visible, but even if yours isn't, you should easily be able to find it by tracing the wire from the switch.

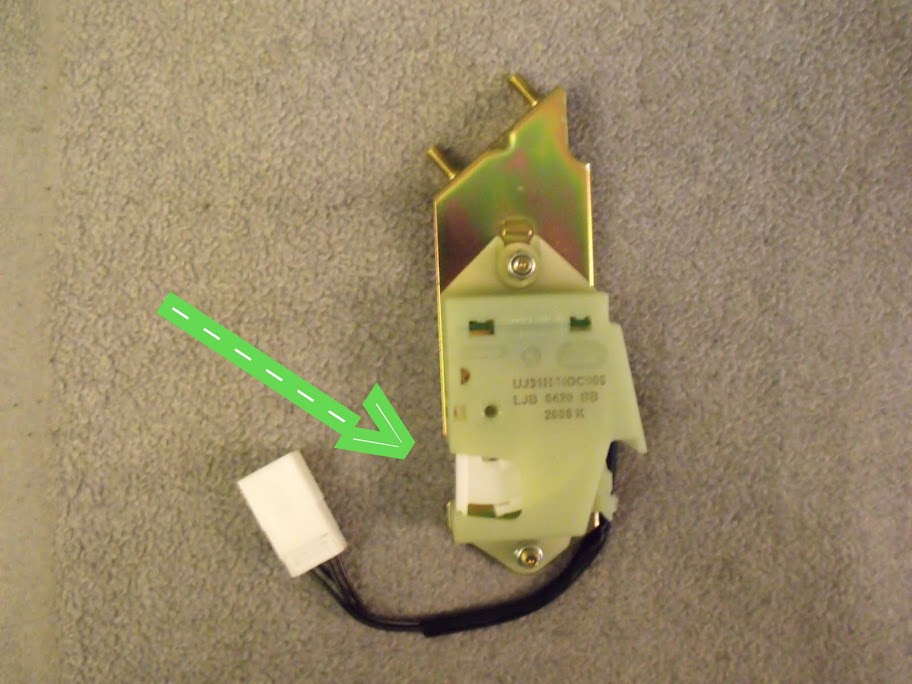
Remove the old switch and replace it with the new one. NOTE: The switch is designed to be engaged when the brake pedal is RELEASED. You will probably be working blind (I was unable to see the mouting holes no matter how I positioned myself), so if you do not orient the new switch properly, you will waste a lot of time trying in vain to mate the bracket's studs to the holes where they belong. There is a horizontal bar that protrudes from the brake pedal stem. This bar and the actual switch that is activated are shown in the two photos below.The side of the switch housing that allows the switch to make contact with the bar should face toward the front of the car.

If you are replacing the switch by yourself, you can wedge a piece of wood or something else under the switch to help hold it in place while you re-attach the nuts. Once the nuts are in place, re-connect the elctrical connector and test the switch. After the replacement, my brake lights stayed on even when the pedal was released. A gentle wiggle of the switch followed by a little additional tightening of the nuts solved the problem. Do not over-tighten the nuts. I don't have torque numbers for them, but maybe someone else here does.
That's it - job done. Good luck!
Some of the steps/pictures included here may seem painfully obvious, but I subscribe to the theory that having too much information is vastly preferable to not having enough. So without further ado, here are my notes:
Supplies used:
New brake switch ($70+tax from dealer)
Socket wrench with 12" extension
8mm socket
Piece of scrap wood about 15" long
The nuts which mount the brake switch bracket to the vehicle's body are located under the hood/bonnet. After opening the hood, you need to remove the plastic cover identified by the green arrow below. Simply insert a finger or two into the hole presumably provided for this purpose and lift up and in towards the center of the car.
Next, remove the two 8mm nuts indicated in the picture below. You will need an extension if using a socket wrench. I used a 12" extension and had a few inches to spare.
Now move to the vehicle's interior and unplug the switch's electrical connector, which is located behind the brake pedal. Mine was readily visible, but even if yours isn't, you should easily be able to find it by tracing the wire from the switch.
Remove the old switch and replace it with the new one. NOTE: The switch is designed to be engaged when the brake pedal is RELEASED. You will probably be working blind (I was unable to see the mouting holes no matter how I positioned myself), so if you do not orient the new switch properly, you will waste a lot of time trying in vain to mate the bracket's studs to the holes where they belong. There is a horizontal bar that protrudes from the brake pedal stem. This bar and the actual switch that is activated are shown in the two photos below.The side of the switch housing that allows the switch to make contact with the bar should face toward the front of the car.
If you are replacing the switch by yourself, you can wedge a piece of wood or something else under the switch to help hold it in place while you re-attach the nuts. Once the nuts are in place, re-connect the elctrical connector and test the switch. After the replacement, my brake lights stayed on even when the pedal was released. A gentle wiggle of the switch followed by a little additional tightening of the nuts solved the problem. Do not over-tighten the nuts. I don't have torque numbers for them, but maybe someone else here does.
That's it - job done. Good luck!
WOW! I can't believe a post from 2010 helped me solve my issue now in 2013...THANK YOU SgtOfMarines!
I was having an issue with my xk8 brake lights being stuck on all the time after having decided to jump start my xk8 due to it sitting for a long time.
Well, after reading your other post about the reason why you decided to change your brake switch, then this post,
Thank you, Thank you, Thank you SgtOfMarines!!!
Now my other issue still remains unresolved, for some reason my 2 fog light switches don't work anymore, both orange lights no longer light up and neither do the fog lights...
Last edited by Hi-Velo-Sid-E; 06-12-2013 at 11:07 PM.
The following users liked this post:
Orthodixie (06-16-2017)
#89
06-22-2013, 01:57 PM
Ok, just did this repair in about fifteen minutes. Can't believe how some posts make this sound so much more difficult. As long as you take out the seat and use a broom or similar wood dowel to hold the brake pedal in place, the rest isn't hard.
Even operating blindly it's possible to get the studs into the holes. If you don't have a helper to put the nuts on the studs while you hold the switch in place, tape the switch to the brake pedal lever so the switch doesn't move during the time it takes to get out of the car to the hood area to finish the job. I had a helper so I skipped the tape trick but even so it's very doable as a one man task.
Thanks for the helpful pics!
The following users liked this post:
Orthodixie (06-16-2017)
#90
02-14-2014, 05:15 PM

#91
02-28-2014, 06:43 PM
Would anyone who has replaced their switch be willing to send me their old one, please? I would be glad to pay postage or let me know if we could work out something. I would like to find parts (exact replacement switches, perhaps) and fix them. It would be a real help to others on the forum if we can accomplish this.
Thanks,
John.
Thanks,
John.
#92
03-01-2014, 12:23 PM

Junior Member
Join Date: Apr 2012
Location: FL
Posts: 18
Likes: 0
Received 0 Likes
on
0 Posts
Would anyone who has replaced their switch be willing to send me their old one, please? I would be glad to pay postage or let me know if we could work out something. I would like to find parts (exact replacement switches, perhaps) and fix them. It would be a real help to others on the forum if we can accomplish this.
Thanks,
John.
Thanks,
John.
Joe
#94
05-13-2014, 04:05 PM

I recently replaced the brake light switch on my '98 XK8, and I thought I'd go ahead and document the process here for others. I am going to attempt to include several pictures. As this will be my first time doing so on this forum, I'll keep my fingers crossed.
Some of the steps/pictures included here may seem painfully obvious, but I subscribe to the theory that having too much information is vastly preferable to not having enough. So without further ado, here are my notes:
Supplies used:
New brake switch ($70+tax from dealer)
Socket wrench with 12" extension
8mm socket
Piece of scrap wood about 15" long
The nuts which mount the brake switch bracket to the vehicle's body are located under the hood/bonnet. After opening the hood, you need to remove the plastic cover identified by the green arrow below. Simply insert a finger or two into the hole presumably provided for this purpose and lift up and in towards the center of the car.

Next, remove the two 8mm nuts indicated in the picture below. You will need an extension if using a socket wrench. I used a 12" extension and had a few inches to spare.

Now move to the vehicle's interior and unplug the switch's electrical connector, which is located behind the brake pedal. Mine was readily visible, but even if yours isn't, you should easily be able to find it by tracing the wire from the switch.

Remove the old switch and replace it with the new one. NOTE: The switch is designed to be engaged when the brake pedal is RELEASED. You will probably be working blind (I was unable to see the mouting holes no matter how I positioned myself), so if you do not orient the new switch properly, you will waste a lot of time trying in vain to mate the bracket's studs to the holes where they belong. There is a horizontal bar that protrudes from the brake pedal stem. This bar and the actual switch that is activated are shown in the two photos below.The side of the switch housing that allows the switch to make contact with the bar should face toward the front of the car.

If you are replacing the switch by yourself, you can wedge a piece of wood or something else under the switch to help hold it in place while you re-attach the nuts. Once the nuts are in place, re-connect the elctrical connector and test the switch. After the replacement, my brake lights stayed on even when the pedal was released. A gentle wiggle of the switch followed by a little additional tightening of the nuts solved the problem. Do not over-tighten the nuts. I don't have torque numbers for them, but maybe someone else here does.
That's it - job done. Good luck!
Some of the steps/pictures included here may seem painfully obvious, but I subscribe to the theory that having too much information is vastly preferable to not having enough. So without further ado, here are my notes:
Supplies used:
New brake switch ($70+tax from dealer)
Socket wrench with 12" extension
8mm socket
Piece of scrap wood about 15" long
The nuts which mount the brake switch bracket to the vehicle's body are located under the hood/bonnet. After opening the hood, you need to remove the plastic cover identified by the green arrow below. Simply insert a finger or two into the hole presumably provided for this purpose and lift up and in towards the center of the car.
Next, remove the two 8mm nuts indicated in the picture below. You will need an extension if using a socket wrench. I used a 12" extension and had a few inches to spare.
Now move to the vehicle's interior and unplug the switch's electrical connector, which is located behind the brake pedal. Mine was readily visible, but even if yours isn't, you should easily be able to find it by tracing the wire from the switch.
Remove the old switch and replace it with the new one. NOTE: The switch is designed to be engaged when the brake pedal is RELEASED. You will probably be working blind (I was unable to see the mouting holes no matter how I positioned myself), so if you do not orient the new switch properly, you will waste a lot of time trying in vain to mate the bracket's studs to the holes where they belong. There is a horizontal bar that protrudes from the brake pedal stem. This bar and the actual switch that is activated are shown in the two photos below.The side of the switch housing that allows the switch to make contact with the bar should face toward the front of the car.
If you are replacing the switch by yourself, you can wedge a piece of wood or something else under the switch to help hold it in place while you re-attach the nuts. Once the nuts are in place, re-connect the elctrical connector and test the switch. After the replacement, my brake lights stayed on even when the pedal was released. A gentle wiggle of the switch followed by a little additional tightening of the nuts solved the problem. Do not over-tighten the nuts. I don't have torque numbers for them, but maybe someone else here does.
That's it - job done. Good luck!
#95
05-18-2014, 08:47 AM

Member
OK, I had a look at this, and being 6' 2" there's not a chance in heck, even with the seat out, that I am gonna be able to manoeuvre myself into position to replace my brake light switch!
I bought a new switch, and spoke to my local Jag garage, and they are going to charge me $200 to fit the switch (that's just the labour cost...I am supplying the switch)
It might seem like a lot, but that's preferable to me sticking my big head and 50 year old body into a tiny under dash area...not for me!
Great guides though gents, but I think I will pass this one on...
The following users liked this post:
lrichard (05-19-2014)
#96
05-19-2014, 07:31 PM
Thanks Sgt, guide was a great help yesterday.
Aligning those bolts was challenging haha!
the main problem i found was the Bar got in the way of alligning them, so i used the 17 inch stick i cut to hold up the switch , to push the break pedal in while i positoned the switch, worked like a charm.
( if the break pedal is stiff to push start the engine )
Cheers again for the helpfull post
Good post. I struggled with the brake pedal what seemed like forever, until it dawned on my old head... Start the stupid engine. I did and things came together. Thanks for bringing this out to the forum and the several people that will benefit.
#97
05-19-2014, 07:44 PM
OK, I had a look at this, and being 6' 2" there's not a chance in heck, even with the seat out, that I am gonna be able to manoeuvre myself into position to replace my brake light switch!
I bought a new switch, and spoke to my local Jag garage, and they are going to charge me $200 to fit the switch (that's just the labour cost...I am supplying the switch)
It might seem like a lot, but that's preferable to me sticking my big head and 50 year old body into a tiny under dash area...not for me!
Great guides though gents, but I think I will pass this one on...
I bought a new switch, and spoke to my local Jag garage, and they are going to charge me $200 to fit the switch (that's just the labour cost...I am supplying the switch)
It might seem like a lot, but that's preferable to me sticking my big head and 50 year old body into a tiny under dash area...not for me!
Great guides though gents, but I think I will pass this one on...
I am so happy to have found this forum. The useful information is beyond belief. When a person finds a short cut to solve a problem and it sounds trite... it usually isn't. Tricks such as just cutting a piece of wood to a specific length, invaluable. Every entry, even those that tell me my entry is on the wrong page, are valuable to us "newbies". Please keep up the good work. I love you all for the effort you give to make this the go-to forum for help concerning the "horrible" Jag. BUT, riding through the city with my top down and radio blurring... The Jag is the best.
#98
05-19-2014, 09:10 PM
Veteran Member
#99
05-20-2014, 03:56 AM
Has anyone here purchased an after market switch such as this one?More Information for STANDARD MOTOR PRODUCTS SLS503
They are only 59 dollars, so I was wondering if I should go that route or not.
They are only 59 dollars, so I was wondering if I should go that route or not.
#100
05-20-2014, 10:23 AM
As far as I can tell, the SLS-503 is the exact same switch, right down to the Jaguar looking numbers on the side of the switch. Rock Auto (and every parts shop in internet) were out of stock for a few months, so I got micro-switches and replaced them on my switch rather than pay the $150 +- that Jaguar wants.
There is another thread with very good information on doing that here: https://www.jaguarforums.com/forum/x...ilable-107741/ I got a few extra micro-switches, and I will send you a rebuilt switch for $25 including postage if you will agree to send me back your old one (that way you are not stuck for a few days with your car apart). PM me or Email me at john_sullivan (at) bmc.com if interested.
There is another thread with very good information on doing that here: https://www.jaguarforums.com/forum/x...ilable-107741/ I got a few extra micro-switches, and I will send you a rebuilt switch for $25 including postage if you will agree to send me back your old one (that way you are not stuck for a few days with your car apart). PM me or Email me at john_sullivan (at) bmc.com if interested.
The following users liked this post:
waterloo (05-31-2014)