
Door microswitch
#21
 01-22-2013, 11:15 PM

Senior Member
I just did the job, thanks to all the posts and videos here! There are a couple of observations that make it easier.
1) Take the window down about 1/2" from full up. This makes it easier to take out the guide rail.
2) While taking out the 7MM bolt to remove the security plate, go all the way and take the second one out. This allows the outside handle to come out and it's 10 times easier to disconnect the brass and plastic rod that connects the lock to the latch.
3) Cut and insulate the BLUE wire on the new Omron microswitch. Only the BLACK (common) and RED (normally closed) contacts are required.
4) Install the new switch then use a simple continuity meter to check the circuit. The circuit is CLOSED when the door is OPEN. Look and play with the latch. It has three positions. The first is open, the second is when the striker is captured in the second position and final fully closed position, ready to lock. Attach your meter or buzzer or lamp to the microswitch. Have the lock in the open position. You should see continuity. (circuit operating) Move the latch to the second position, you should still have continuity. Click the latch shut and the circuit should open. Almost there. Adjust the bend on the microswitch lever so the switch changes state just as the latch rolls over from position two to position three. A bit of trial and error here bur once it is operating in that position, you know it is correct and the switch body is not acting like a stop for the lever.
5) As for puting the switch in 180 degrees out. Install the switch with the lever pointing towards the open throat of the latch where the striker plate enters the latch.
6) Re-assemble the latch and handles then test it properly before you put the door card back.
I did what SteveinFrance asked and there was water damage in th eso called sealed microswitch. It was also a real crappy switch inside so I'd always go with the Omron replacement rather than just another Burgess switch.
For what it's worth....
Cheers,
Dave
#22
01-27-2013, 09:24 AM

Member
I have a 2003 XK Coupe that was giving me a fit because of the faulty microswitch. The last straw was when I came out to my car yesterday morning in a parking lot to find the alarm going off and the passenger window completely down. I got fed up and took the door apart even though it was 28 degrees here with snow on the ground! Pulled out the bad switch, and carried it to radio shack. I found a similar switch(pn 275-0016), and soldered the green and black wires onto poles 1 and 3. (see pix) If you look at the old switch, you'll see that it is held in place on the latch assembly by a tab with two holes that fit over raised circles on the switch itself. The new switch that RS carries has two holes in the same position, so I was able to fit the switch and hold it in place by threading two very small zip ties through the tab, into the switch, and back out. This holds it in place perfectly. The only modification that the switch needed was to bend the metal arm that actuates the switch. I bent it up slightly to match the curve of the factory switch's arm. The only downfall I can potentially see is that this switch doesn't have the water resistance of the factory one, but my car rarely leaves the garage in the rain so hopefully it will last a while for me. I taped everything up very well and covered it in grease, so I am hoping this keeps the water out.
#24
01-27-2013, 10:29 AM

#25
01-27-2013, 10:52 AM

For anyone wishing to go down the OE route, Jaguar now supply the replacement switch through the dealer network as Part Number C2N1908.
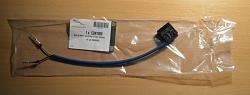
It's Jaguar so it's naturally more expensive than sourcing an aftermarket switch but the advantage is it has the correct length leads and terminations with seals.
Graham

It's Jaguar so it's naturally more expensive than sourcing an aftermarket switch but the advantage is it has the correct length leads and terminations with seals.
Graham
The following 2 users liked this post by GGG:
David's XKR (03-21-2013),
H20boy (01-28-2013)
#26
01-27-2013, 01:28 PM
For anyone wishing to go down the OE route, Jaguar now supply the replacement switch through the dealer network as Part Number C2N1908.
Attachment 31482
It's Jaguar so it's naturally more expensive than sourcing an aftermarket switch but the advantage is it has the correct length leads and terminations with seals.
Graham
Attachment 31482
It's Jaguar so it's naturally more expensive than sourcing an aftermarket switch but the advantage is it has the correct length leads and terminations with seals.
Graham

#28
02-09-2013, 03:28 PM
Senior Member
#29
02-09-2013, 05:57 PM
Before refitting the door latch to the vehicle, have your reconnected the it to the harness holding it outside the door and manually flipped the lock to the shut position to mimic the action of closing the door?
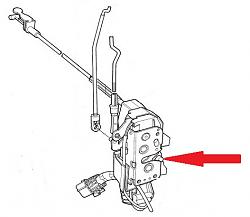
Push in the direction of the arrow. The Driver's Door Open warning should go out and the Window raise (if you reset the limit switches).
Don't forget to DISCONNECT THE BATTERY AGAIN after this test before sticking your hands in the door to refit the latch.
Graham

Push in the direction of the arrow. The Driver's Door Open warning should go out and the Window raise (if you reset the limit switches).
Don't forget to DISCONNECT THE BATTERY AGAIN after this test before sticking your hands in the door to refit the latch.
Graham
Last edited by GGG; 02-09-2013 at 06:01 PM.
#30
02-09-2013, 07:25 PM
Senior Member
Before refitting the door latch to the vehicle, have your reconnected the it to the harness holding it outside the door and manually flipped the lock to the shut position to mimic the action of closing the door?
Attachment 32929
Push in the direction of the arrow. The Driver's Door Open warning should go out and the Window raise (if you reset the limit switches).
Don't forget to DISCONNECT THE BATTERY AGAIN after this test before sticking your hands in the door to refit the latch.
Graham
Attachment 32929
Push in the direction of the arrow. The Driver's Door Open warning should go out and the Window raise (if you reset the limit switches).
Don't forget to DISCONNECT THE BATTERY AGAIN after this test before sticking your hands in the door to refit the latch.
Graham
#31
02-09-2013, 07:45 PM
Veteran Member
I had worked on a door switch and recall that the adjustment of the switch is critical. You may want to verify that the switch changes status when the door latch is closed, ajar and open. This link might help.
Link JagRepair.com - Jaguar Repair Information Resource
Link JagRepair.com - Jaguar Repair Information Resource
#32
02-09-2013, 08:02 PM
Senior Member
I had worked on a door switch and recall that the adjustment of the switch is critical. You may want to verify that the switch changes status when the door latch is closed, ajar and open. This link might help.
Link JagRepair.com - Jaguar Repair Information Resource
Link JagRepair.com - Jaguar Repair Information Resource
#34
02-10-2013, 07:41 AM
Senior Member
I started with it mounted in the latch and it didn't work. As long as you are working the switch, why would it matter if it's in the latch or not? Also, isn't the switch just opening and closing a circuit? So shouldn't you be able to get the same result by touching the two wires together?
Last edited by David's XKR; 02-10-2013 at 07:58 AM.
#35
02-10-2013, 08:17 AM
Veteran Member
The following users liked this post:
Jon89 (02-07-2019)
#36
02-10-2013, 08:22 AM
Senior Member
#37
02-10-2013, 08:28 AM
If you are pressing on the lever sticking out of the microswitch and getting no change on the leads you are using then either you're using the wrong leads or something's wrong here.
The microswitch has 3 leads
....2
1./
....3
In the 'non-pressed' state lead 1 connects to lead 2
when 'pressed' lead 1 connects to lead 3
You need to find leads 1 + 2 ('normally closed') that are closed and open when the switch is 'pressed'
I suspect you are connected to leads 2 + 3 so nothing happens.
If that doesn't sort things can we have a pic of your setup showing the microswitch by itself and installed on the latch?
Last edited by steveinfrance; 02-10-2013 at 08:36 AM.
#38
02-10-2013, 08:43 AM
Senior Member
If you are pressing on the lever sticking out of the microswitch and getting no change on the leads you are using then either you're using the wrong leads or something's wrong here.
The microswitch has 3 leads
....2
1./
....3
In the 'non-pressed' state lead 1 connects to lead 2
when 'pressed' lead 1 connects to lead 3
You need to find leads 1 + 2 ('normally closed') that are closed and open when the switch is 'pressed'
I suspect you are connected to leads 2 + 3 so nothing happens.
If that doesn't sort things can we have a pic of your setup showing the microswitch by itself and installed on the latch?
The microswitch has 3 leads
....2
1./
....3
In the 'non-pressed' state lead 1 connects to lead 2
when 'pressed' lead 1 connects to lead 3
You need to find leads 1 + 2 ('normally closed') that are closed and open when the switch is 'pressed'
I suspect you are connected to leads 2 + 3 so nothing happens.
If that doesn't sort things can we have a pic of your setup showing the microswitch by itself and installed on the latch?
"Cut and insulate the BLUE wire on the new Omron microswitch. Only the BLACK (common) and RED (normally closed) contacts are required."
I did what he said and I tried a few different combinations and will try again. Isn't it true that I should be able to get the same effect by touching the wires from the car together?
Last edited by David's XKR; 02-10-2013 at 08:53 AM.
#40
02-10-2013, 09:14 AM
Veteran Member
I would be cautious of shorting out any wires on this car it could come back to haunt you. As for the new switch install did you verify the open/close status to mirror it from the old one? Also are you doing this with the battery connected? If you are your car could be confuses and you may need to do a hard reset. I only wish I had documented the switch change when I had that door latch in my hands.