
DIY Repair - Air Bag Light Related to Harness under Driver's Seat ... or not

#22
 07-27-2010, 11:28 AM
No dang air bag blinking for 11 days straight...then twice in one day! Arggh!
Took brutal's advice, and went up into the seat upholstery (probably took 20 minutes tops) and removed/reinstalled the plug probably 4-5 times to hopefully assist the consistent connection at key-on.
The skin peeled back (if you don't know how to do this, check with seismicguy's thread on the headrest repair, it'll explain it much better than I can afford to do here.
Circled is the side air bag restraint unit. The plug is at the bottom.

Just squeeze the top two tabs and it pulls right out.
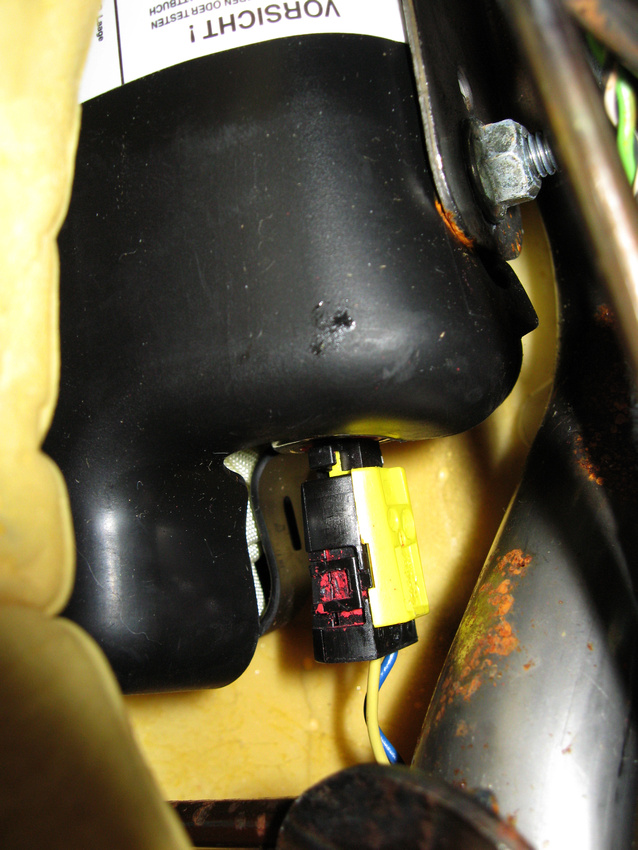
After 2 straight blinking sessions, the light remained off after this, and this morning's drive to work. If it remains off...this thread will remain silent. (at least from me)
Took brutal's advice, and went up into the seat upholstery (probably took 20 minutes tops) and removed/reinstalled the plug probably 4-5 times to hopefully assist the consistent connection at key-on.
The skin peeled back (if you don't know how to do this, check with seismicguy's thread on the headrest repair, it'll explain it much better than I can afford to do here.
Circled is the side air bag restraint unit. The plug is at the bottom.
Just squeeze the top two tabs and it pulls right out.
After 2 straight blinking sessions, the light remained off after this, and this morning's drive to work. If it remains off...this thread will remain silent.
(at least from me)
Last edited by H20boy; 07-27-2010 at 11:35 AM.
The following users liked this post:
thefixer (04-10-2011)
#23
07-27-2010, 01:10 PM

Join Date: Sep 2008
Location: Damon /Houston, Texas
Posts: 7,254
Received 2,185 Likes
on
1,356 Posts
#25
08-10-2010, 01:50 PM

Senior Member
Here are some comments regarding connectors and dielectric grease. There is a lot of detail behind what I have to say so this is just skipping off the high points.
The photo that Matt posted clearly shows electrolysis. Electrolysis is the exchange of atomic components that occurs when two materials of different atomic potential are placed side by side. This is synonymous with corrosion. This acts like a miniature battery and the side with more -'s starts plating to the + side. The causes are dissimilar metals and contaminants such as atoms from the salt group usually carried in water. Boat owners who live in salt water are very familiar with this on the macro scale.
Oxidation is the oxygen compound that forms in the unbonded boundary atoms of the metal. Gold is the best contact material because its atoms are tightly bonded and don't readily support oxidation. The silver colored contacts (except real silver) are much more reactive with oxygen.
Contact pins are usually a bronze compound and then plated with either a nickel compound (the silver color) or a tin compound (also silver). Gold is over plated for the more costly gold option. Various compounds are used but the results are similar. The pins are designed so they "wipe" when mated. This means that the surface area is intentionally disturbed to cut through any contamination such as oxide. This why remating the connector will often fix the problem at least temporarily.
Dielectric materials have long been used for severe duty applications, especially where water is involved. The purpose is to exclude air and water (with its soluble contaminants) from the contact. A dielectric is an insulator which is desirable so adjacent contacts don't interact. The insulation is not a problem to the connections because of the wiping action mentioned above. It is important to exclude air (oxygen), because it enhances oxidation and electrolysis, and water, which carries contaminants (mainly salts) that foster electrolysis.
There are a number of dielectric protective products on the market but my company uses NYOGEL 759G on all the connectors we provide for severe duty. This is a gel material that easily flows into tight spaces and stays there. It has proved to be very effective even with the so called water tight connectors made by Packard and Deutsch. When I'm not fixing the Jag I spend a lot of time racing my sail boat and I use Nyogel there to protect the instrument connections. It is especially useful on the masthead wind instruments and results in bullet proof performance.
Dielectric grease is protective but does not fix anything. The best resolution to an ugly case like Matt's photo is replacement. Replacement many or may not be practical as special (and expensive) crimping tools are often required.
The next best thing is to either replace both sides with another type of connector or clean and protect what you have. At times I have resorted to cutting the wires and splicing in a connector that I have tooling for. There are butt splices available that have integral dielectric gel and shrink tubing, and these do a really good job. The choice revolves around how critical the connection is. The seat is one thing, the ignition is another.
There are various contact cleaning products that do a good job of removing oxide and contamination. If you want to preserve what you have, first clean like your life depends on it, then use a dielectric material to protect. In most cases this will do the trick.
#26
08-29-2010, 01:39 PM

Veteran Member
I am not sure if I am experience the same thing but I figured I would ask for advice. Every so often, I get the light on the instrument panel (the one where the gas gauge is) blink a couple of times and then stay lit (manual says this indicates some potential air bag problem). Almost always, the next time I start the car everything will be okay again. I cannot find a pattern as to when or why this happens but it seems like at least once or twice a month the light comes on.
I know there are connectors for the actual airbag in the steering column which requires a pretty simple looking removal of 2 screws to get to and I was thinking about looking at these connectors but this thread talks about connectors under the seat.
Is there any definitive answer about what causes this airbag light to come on intermittently and, if so, does cleaning any/all of the possible connectors help?
Thanks,
Doug
#27
08-29-2010, 02:11 PM

I have to respectfully disagree. I have a degree in electrical engineering, so I think I'm qualified to comment on this. You never want to apply dielectric grease to two conductive mating surfaces. That will only increase the resistance of the connection, not make for a better connection. There are other types of lubricants that can be used on electrical connectors that are designed to enhance the conductivity between the pin and the socket, but typically they aren't necessary. The connectors themselves are designed in such a way that the sliding action of the pin within the socket cleans off any oxidation. If you do use a conductive lubricant on the pins you should lubricate each pin individually because you don't want a continuous flow of lubricant from one pin to another. That could result in current leaking from one pin to another and causing all sorts of problems.
I agreed with you on this one, clean them with chemicals and remove the corrosion save the grease for the rubber boots.Some contacts will have oxidation that actually is conductive(silver).But lets hear the opinions of others,we all have our own success. I do have both the dielectric and conductive materials,and use them the way Sam has explained above.
#28
08-29-2010, 06:35 PM
Doug, blinking 2-2 for a few cycles, then steady on? If not, check the FAQ thread for the particular air bag indicator code.
I've found my light now remains off after I've had the seat out, and the cover peeled back. I cleaned and reconnected every single connector I could find, including the ones again under the seat and that air bag on the side. A couple of my pins were a little bent, so straightened them up as well under the seat.
I've found my light now remains off after I've had the seat out, and the cover peeled back. I cleaned and reconnected every single connector I could find, including the ones again under the seat and that air bag on the side. A couple of my pins were a little bent, so straightened them up as well under the seat.
#29
08-29-2010, 10:50 PM
Veteran Member
Doug, blinking 2-2 for a few cycles, then steady on? If not, check the FAQ thread for the particular air bag indicator code.
I've found my light now remains off after I've had the seat out, and the cover peeled back. I cleaned and reconnected every single connector I could find, including the ones again under the seat and that air bag on the side. A couple of my pins were a little bent, so straightened them up as well under the seat.
I've found my light now remains off after I've had the seat out, and the cover peeled back. I cleaned and reconnected every single connector I could find, including the ones again under the seat and that air bag on the side. A couple of my pins were a little bent, so straightened them up as well under the seat.
I am not sure what you mean by blinking 2-2. I think that one time when this happened, the light blinked a couple of times, then blinked a couple of more times, and then stayed on. Next time starting the car the light was off. Another time I was driving and suddenly I noticed the light was on solid (I did not notice if that was preceded by blinks). Again, the next time I started the light was off.
I suspect there is maybe some dirty connector somewhere but am not sure where it is (under the steering wheel at the airbag? under the seat? inside the seatback beneath the upholstery?)
Doug
#31
08-30-2010, 10:15 AM
Veteran Member
While driving today I notice the light was on again but failed to notice the sequence of blinks prior to it staying solid. So can someone list or show illustrations of where all the suspect connections are and how to get to them? If some are under the seat then do you need to remove the seat?
Thanks,
Doug
Thanks,
Doug
#32
08-30-2010, 05:39 PM
Veteran Member
#33
08-30-2010, 10:31 PM
Only because i've had my seat out twice trying to get to every connector. I'll do my best doug to help you.
There is two connectors under the seat. A 2-pin plug (mine was attached to the underside of the seat with a plug, no way to get to it w/o removing it or getting the seat out and flipped. The other connector (shown in my first post) can be accessed, but your head will be under the seat and it is very uncomfortable. Easiest and most thorough way is to take the seat out.
Hope that helps.
There is two connectors under the seat. A 2-pin plug (mine was attached to the underside of the seat with a plug, no way to get to it w/o removing it or getting the seat out and flipped. The other connector (shown in my first post) can be accessed, but your head will be under the seat and it is very uncomfortable. Easiest and most thorough way is to take the seat out.
- First, two bolts on the front of the rails...seat all the way back to get to them. Large Torx head screws/bolts.
- Unsnap the large connector. Its the only one attached to the seat module. The other 2-pin connector is attached to the seat.
- Seat all the way forward (and reclined position forward) and remove the back two Torx head screws/bolts from the rail.
- Its heavy...take that thing out.
- Flip it over on a nice comforter or on your master bed...its appropriate.
- Peel back the upper seat skin and you'll see about 6-7 connectors to work with if you so choose.
Hope that helps.
#34
08-31-2010, 11:00 AM
Well I agree that hands-on experience beats book learning, but I have hands on experience, too. I was an avionics technician in the Marines, and I've worked in the electronics industry for the last 20 years.
OK!!! Enough of the "my d*ck is bigger than your d*ck stuff! LOL! Let's get back to h20boy's airbag problem!
OK!!! Enough of the "my d*ck is bigger than your d*ck stuff! LOL!
Drive On!!...
Fast Fredie...
#35
09-08-2010, 11:17 AM
Senior Member
Here is some good information regarding protection of connectors. We use 759G in connectors that are used in construction and marine duty equipment but there are other products that are also suitable. These products will protect a connector but have no remedial value. Once the connector is damaged then some sort of remediation is necessary such as cleaning. Replacement is the best option if you have the correct tooling. Most pin crimping tools run in the $500 - 1000 range so direct replacement can be difficult.
http://www.nyelubricants.com/applica...nnectors.shtml
http://www.nyelubricants.com/applica...nnectors.shtml
#36
11-14-2010, 08:34 AM

I remember a common way of stopping headlamp connector bases from corroding (with the bad atmosphere at the time, acid rain, corrosive salt on the roads in winter etc. was to simply dip them in the grease tin. Stopped all problems. I've commonly stopped battery connectors from sulphating using ordinary grease -- never a problem. In the electronics industry, if the maker can't afford gold plated connectors in his plug/sockets, almost any lubricant stops them from corroding, the best being "Electrolube". It would appear that since the lubricant/grease is a liquid or semi-solid, the pinching action of the connector electrodes shoves it out of the way to make a good connexion. Microscopically speaking, the connexion is a number of v. small "islands" interspersed with voids. The film of 'lube or grease stops the corrosive effects of a polluted atmosphere so it appears. It certainly works in practice. If you want a 'super' connexion, you "wet" it with mercury, as in mercury-wetted reed relays.
If I were designing car connectors, I would have them gold-plated as in the computer industry. In UK we have "Scart" connectors for tv etc. interfacing. The gold-plated ones are never a prob., but the tin ones certainly are!!!
Leedsman.
If I were designing car connectors, I would have them gold-plated as in the computer industry. In UK we have "Scart" connectors for tv etc. interfacing. The gold-plated ones are never a prob., but the tin ones certainly are!!!
Leedsman.
#37
11-15-2010, 08:06 AM
Senior Member
Your point is well made but we should be very careful regarding what sort of protection is used. If a conductive material gets in the low level signal circuit (who knows what is in the grease cup) it will cause parasitics and failure. Battery terminals should not be confused with sensor and CAN connections.
At one point in this thread someone was advocating using conductive materials and that is absolutely wrong for the reason I have just mentioned. Conductive materials, such as zinc grease, are very effective on isolated terminals but should never be used in multi-circuit connectors where the it will cause leakage between the individual conductors. The link I provided gives a very good solution for most situations.
The dielectric materials do not cause a connection problem because all connectors are designed with the wiping action you mentioned.
#38
12-21-2010, 11:38 AM
Hey pal: when I got my xkr that light(airbag) was one. I made them fix it. It was part #7 of your diagram(the seat belt receptical). I guess they had a hard time finding the part. Apperently the seat track had pinched the wires . I still have the old one. The sheath was torn and taped, but the wires look O.K. It's worked fine so far. I guess it is a fairly common occurrence.
#40
12-22-2010, 10:50 AM