
Wiring/Connection of XKR-Nav-Screen to aftermarket equipment - the 1000st


Thread Starter
|
Member
Joined: Sep 2012
Posts: 86
Likes: 25
From: Germany
First the wall: Great Thanks to the Community!!!
I got sooo much helpful information about the technical backround of my recently bought XKR - without the stunning work of the people here it would've been much much harder to do some repair. Now i'll try to give something back...
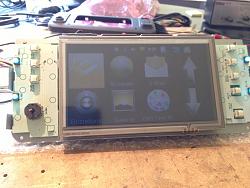
After made my decision to upgrade the build-in Navigation system - it doesn't even show my own homeplace due to 'stoneage' maps - i ran into some prob's while interfacing the screen.
Without original HU the screen doesn't work, the pinout of the FC98-Connector is well documented by forum-members here or shown in JTIS, the unknown signals FC98-14 (yel) and FC98-11 (Green) doesn't exist on my NAV-Unit - so all good.
The problem is the connector FC97. here are some undocumented wires, so far i could get, wich purposes nobody has released so far.
So i started to play a little bit with an self-made adapter and Oszi to find out.
The solution is Pin FC97-9 (orange). It has to be connected to 12V+ to switch on the screen - no power driven, only some kind of 'enable'-signal from the HU/radio.
BTW: Pin FC97-7 (red-blue) is not connected at least in my car.
So the 'kind of funny' mechanism is as followed:
Pin FC97-10 is an remote-out signal for the key's of the screen, going to the HU and there AFAIK converted to Ai-Net commands going to the original NAV-Unit.
If you press eg the On/Off-Button on the screen-unit, the remote lead transfers the corresponding command to the HU - and this switches the screen off/on by connecting FC97-9 to GND respective +12V.
Long story - short result: If you want to use the original screen without alpine-HU and NAV-Unit you 'll have to connect the orange-wire to +12V, or if you want to have On/off-functionality, switch it to GND or 12V.
I'll now try to connect a car-solutions WP9900 Android-Box to the rest of the car with addition of a touchscreen...
If there's somebody interested, i can add some picture's.
greetings from germany
Wolfgang
I got sooo much helpful information about the technical backround of my recently bought XKR - without the stunning work of the people here it would've been much much harder to do some repair. Now i'll try to give something back...
After made my decision to upgrade the build-in Navigation system - it doesn't even show my own homeplace due to 'stoneage' maps - i ran into some prob's while interfacing the screen.
Without original HU the screen doesn't work, the pinout of the FC98-Connector is well documented by forum-members here or shown in JTIS, the unknown signals FC98-14 (yel) and FC98-11 (Green) doesn't exist on my NAV-Unit - so all good.
The problem is the connector FC97. here are some undocumented wires, so far i could get, wich purposes nobody has released so far.
So i started to play a little bit with an self-made adapter and Oszi to find out.
The solution is Pin FC97-9 (orange). It has to be connected to 12V+ to switch on the screen - no power driven, only some kind of 'enable'-signal from the HU/radio.
BTW: Pin FC97-7 (red-blue) is not connected at least in my car.
So the 'kind of funny' mechanism is as followed:
Pin FC97-10 is an remote-out signal for the key's of the screen, going to the HU and there AFAIK converted to Ai-Net commands going to the original NAV-Unit.
If you press eg the On/Off-Button on the screen-unit, the remote lead transfers the corresponding command to the HU - and this switches the screen off/on by connecting FC97-9 to GND respective +12V.
Long story - short result: If you want to use the original screen without alpine-HU and NAV-Unit you 'll have to connect the orange-wire to +12V, or if you want to have On/off-functionality, switch it to GND or 12V.
I'll now try to connect a car-solutions WP9900 Android-Box to the rest of the car with addition of a touchscreen...
If there's somebody interested, i can add some picture's.
greetings from germany
Wolfgang

Veteran Member
Joined: Jan 2012
Posts: 1,174
Likes: 743
From: Sunshine Coast QLD
PM me your email an I send you a bunch of updates for the WP9900
I have a new firmware (compiled last week) and update for the new launcher
I will also send you the files to root the WP9900
I have mine running Igo Primo, Torque, PlayerPro, TPMS and email
I also used a jocon exr to interface to the steering wheel controls and the drivers door controls
I also expect to have an update very soon to allow bluetooth hands free from your phone
IE use the wp9900 as a handfree kit rather than use the internal 3G
Cheers
34by151
Last edited by 34by151; May 1, 2013 at 08:01 AM.
Thread Starter
|
Member
Joined: Sep 2012
Posts: 86
Likes: 25
From: Germany
Thanks very much for the offer. I think rooting of the device would help me to do some mod's. My Fw is a custom-build 20130418 from Axion, wich one do you have? Are you satisfied with the IGO?
My problem ATM is, that because of the round corners, i cant' reach the status-symbols on the top-right corner using the touchscreen i fitted.
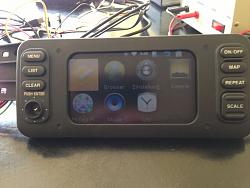
IIRC your XJ has the same screen with round corners - how did you solve this problem? Maybe, increasing the size of the status bar a little bit?
Sounds really interesting, but due of my lack of posts- i think - i'm not able to send you a PM.
Is there another possibility to contact you?
greetings
wolf
My problem ATM is, that because of the round corners, i cant' reach the status-symbols on the top-right corner using the touchscreen i fitted.


IIRC your XJ has the same screen with round corners - how did you solve this problem? Maybe, increasing the size of the status bar a little bit?
Sounds really interesting, but due of my lack of posts- i think - i'm not able to send you a PM.
Is there another possibility to contact you?
greetings
wolf
Thread Starter
|
Member
Joined: Sep 2012
Posts: 86
Likes: 25
From: Germany
And BTW: It's some kind of 'silly design' from Alpine to use an 5.8" screen in a 5.6" visable-frame, maybe for longterm i've to exchange the screen and it's driverboard to a higher-resolution 5.6".
Veteran Member
Joined: Jan 2012
Posts: 1,174
Likes: 743
From: Sunshine Coast QLD
i have PM'd you
I have the bigger unit that�s also in the S/X type
I retained the OEM system and added to it
I have a video interface in the boot
This has 2 RGBS inputs and 3 CVBS inputs
RGBS1 connects to the OEM nav
RGBS1 connects to WP9900
AV1 connects to a HDMI to CVBS converter, this then connects to my phone (Droid 4)
AV2 terminated in the glovebox for an aux in
AV3 is the reverse camera
The Reverse cam input has a control box on it
This is controlled by an audrino micro controller
I use the Joycon to interface to the to the Tun Signals, driver door mirror controls and steering wheel controls
From these I get the android buttons, launcher for Igo and music and camera control.
all this while retaining the factory functions
For the touch control I added a touch overlay over the screen
the microcontroller gets involved here again Diaabling the factory touch when on the wp9900 and the reverse when young the OEM touch screens for climate, audio ect
While on this when i select the phone on av1. The droid4 screen gets displayed on the monitor. The ouch goes to the droid and the button control also goes to the droid.
I have the droid4 nav mount in the console
As soon as the phone is unserted in the mount I use tasker to turn on the wifi hotspot, this gives the wp900 internet access. So now the browser works as does email
when a call comes through i use the OEM bluetooth to answer but detect the audio to switch the screen to av1 so i can see the phone
Lots more in the screen/audio control but you get the idea
Cheers
34by151
Thread Starter
|
Member
Joined: Sep 2012
Posts: 86
Likes: 25
From: Germany
WOW, sound like an really impressive installation. How long did you work on this 'little' arrangement? I'm thinking about a rear-camera as well, my box has an video-input wich may work - or even not, we'll see. Doc's are the problem with this absolutely stunning product.
With the wider screen you are much better. At this point im a little bit lost, but i want to do mod's in a way, that they can be undone without sign's. So you're more lucky with your car - when it comes to the entertainment section. For what purpose is the arduino on the back-cam?
Did you code the controls yourself?
Your idea of using the arduino as an interface-controller is really good - must be, cause i had the same
I'll try to 'decypher' the Ai-net commands going from HU to NAVI to use the original control-buttons beside the screen and the steering wheel controls. I'll see how much i can reach during the next weeks...
And my box 'freezes' from time to time, could be because of the OEM-fw the fellowes at axion installed, could you please tell me the version of your fw?
cheers
Wolf
Veteran Member
Joined: Jan 2012
Posts: 1,174
Likes: 743
From: Sunshine Coast QLD
Emailed a link to all the files you need
Most of the info is detailed in my Nav update thread
It's been a bit of an evolution though
The arduino eleven is used a a converter of sorts let me explain
The Turn stalk and steering wheel audio controls are on 2 resistor networks
I have these connected to a Joycon XLR
This has a usb output that connects to the WP9900
The Joycon emulates a keyboard but also uses 4 resistor networks
So the turn connects to one and the audio controls the other
To program the Joycon you use a PC app via the usb
First press the buttons and they will show up on the screen
Then you allocate a keyboad ket or key sequence to a button
Buttons can be programmed as a single press, repeating or long press
The Joycon also has 2 LED outputs. Again you can allocate these to keys
So in the case of the Left and right turn i dont send a keyboard command but tun on the led. Initally I connected this to the video interface to trigger the side cameras
I found out that I would also like to use the cam without turning on the turn signal
So Rather than adding buttons I though why not use the mirror select buttons i already have. Normally this is in the center off position. In this position the 4 mirror motor buttons are not used.
Unfortunately these are not a resistor network but all separate switches.
So I fed all of these into the arduino and also fed in the 2 led outs from the joycon.
The arduino then outputs to the video interface for the side camera control.
Another output which is a 0-5v signal connects back to the 3rd resistor network on the Joycon, but I'll explain that latter
So on the arduino, I then came up with some code that
1. Mirror Select left = on, turn on left camera, ignore tun signal input
2. Mirror Select right = on, turn on left camera, ignore tun signal input
3. Mirror Select = off, use tun signal input
Ok that bit is simple
So thinking about the mirror motor buttons that are unused when the mirror select is off lets use them for the android
So the next bit of code reads the 4 inputs and assigns a value to each switch. I then send this to the PWM output. 6 simple lines of code all up. This outputs a sepertae voltage depending on the button pressed.
Feeding this back to the Joycon I can now assign keyboard commands to the buttons
So the long and the short of it is
Audio Controls
Track UP, short press = keyboard Next Track key
Track Down, short press = keyboard Next Track key
Track UP, long press = keyboard "search+i" (Igo)
Track Down, long press = keyboard "search+p" (Music Player)
Mirror Buttons
Mirror Up, short press = Keyboard "Home"
Mirror Down, short press = Keyboard "Search"
Mirror Left, short press = Keyboard "Back"
Mirror Right, short press = Keyboard "Menu"
Mirror Up, long press = Keyboard "search+m" (Email)
Mirror Down, long press = Keyboard "search+b" (Internet, google chrome)
Mirror Left, long press = Keyboard "search+o" (Torque)
Mirror Right, long press = Keyboard "search+t" (TPMS)
Ok so that takes care of the Android Keys
The arduino had some unused input output pins. So the next thing I did was add control of the video select
My video interface has 5 inputs
2 for RGBS and 3 for composite video
RGBS1 connects to the OEM nav
RGBS2 connects to the Andorid (WP9900)
AV1 connects to my phone via the cradle
AV2 is a spare input located with the ACM in the glove box
AV3 is the reverse camera, wel it connects to a 3way video select that has the reverse and turn cameras
The interface has a few control wires
One is the rear camera select
Another is the button that cycles through the inputs (excluding the reverse cam)
There is also a 12v output for each video input. This goes to 12v when this input is selected
So what I did next was connect the reverse signal to the arduino. I then connected 2 resistors in series to each of video output wires
I varied the 2 resistors so that each video channle no longer is 12v out but a diferent voltage for each input. These are connected to a single input on the arduino
So on the arduino I can now work out which video input is on the screen, so the next code I added was to select the WP900 when I start the car.
Simple code, on start wait 10seconds, read the input, if it i the wp900 voltage exit. If not press the video select and loop
I am using the OEM bluetooth for hands free. So item wanted to go to the OEM phone screen when I get a call. So I then connected the phone module mute and head unit nav button to the arduino. So more code, when the phone module activates the mute the arduino press the video select till i get the OEM nav. This gives me the Phone screen automatically. When the mute turns off the reverse happens it presses the video select till I go back to the screen i was on before the call
Oh I forgot to add the arduino also intrups the power to the OEM touch matrix when on the WP9900 and disables the Joycon and Touch to the WP900 when on an OEM screen
The Code I'm working on adding at the moment controls my phone
I also have a mimics x2 connected to the OEM screen.
When Selected the phones screen is displayed on the OEM screen. The touch control is fed to the phone. So All I do is put the phone in the cradel to select this, no wires.
The Code I have working is for the phone select. I intend to to have the phone on the scree instead of the OEM bluetooth when I get a call. This bit is easy what I'm working out is how to interface the phone to the OEM voice controls
Cheers
34by151
Trending Topics
Thread Starter
|
Member
Joined: Sep 2012
Posts: 86
Likes: 25
From: Germany
Thanks for the files, i will work through in the next day's - i've not so much experience with android.
Good you mentioned your nav update thread - i should 've remembered that i read your story some time ago, forget it just because you didn't mention the wp9900 and you 've the 'wrong' car
A customer and friend of mine owns an XJ MY2008, ordered the car when new with every media-option that was possible, was really unsatisfied with it and last month he let an installer redo the entertainment for several thousand � - and i think he got much less than you did with your car. Maybe i will show him your thread - and watch him crying!
But compared to the XJ with the much more oldskool dashboard and entertainment of the XKR i've not so much options to connect switches and so on - and i would like to get a hfp- and a2dp-connection to my iphone, will be not possible with the 9900, i think. Maybe an extra module connected via UART-Port and some custom android-app...
ATM i do mechanical work to adapt the screen to the casing cause of the 'thicker' display+touch-unit. Not so funny - i've to adapt not only the screen-mounts, but the clamps for the button-pcb's to.
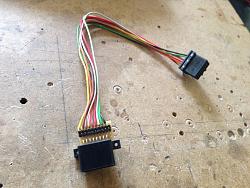
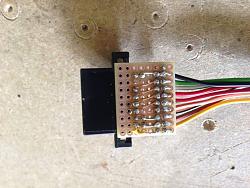
Here you can see a picture of the nav-connector adapter, i build for comfortable testing and signal injection to the screen and nav-unit. The plugs are the well known TE Multilock 40 II with 12p+16p (screen) and 16p+20p (navi), here in germany you can get them at rs-components. If somebody is interested, i'll post part-nr.
cheers wolf
BTW: Many thanks to reverend-sam who sold me my testing-screen for a very reasonable price!
Good you mentioned your nav update thread - i should 've remembered that i read your story some time ago, forget it just because you didn't mention the wp9900 and you 've the 'wrong' car
A customer and friend of mine owns an XJ MY2008, ordered the car when new with every media-option that was possible, was really unsatisfied with it and last month he let an installer redo the entertainment for several thousand � - and i think he got much less than you did with your car. Maybe i will show him your thread - and watch him crying!
But compared to the XJ with the much more oldskool dashboard and entertainment of the XKR i've not so much options to connect switches and so on - and i would like to get a hfp- and a2dp-connection to my iphone, will be not possible with the 9900, i think. Maybe an extra module connected via UART-Port and some custom android-app...
ATM i do mechanical work to adapt the screen to the casing cause of the 'thicker' display+touch-unit. Not so funny - i've to adapt not only the screen-mounts, but the clamps for the button-pcb's to.
Here you can see a picture of the nav-connector adapter, i build for comfortable testing and signal injection to the screen and nav-unit. The plugs are the well known TE Multilock 40 II with 12p+16p (screen) and 16p+20p (navi), here in germany you can get them at rs-components. If somebody is interested, i'll post part-nr.


cheers wolf
BTW: Many thanks to reverend-sam who sold me my testing-screen for a very reasonable price!
Veteran Member
Joined: Jan 2012
Posts: 1,174
Likes: 743
From: Sunshine Coast QLD
To put the problem in perspective
Removing the head unit for a doubledin would loose the climate controls, not good
This is why I have taken the route I have
I dont like and would not stand for switches drilled into the dash so OEM integration is a must, just requires a bit of work.
Lastly I think it all needs to be automatic. IE when you get a call the phone screen cones up and goes back to here you were when the call ends. Other wise you would need to do 5 ot 6 keys to see who is caling. PITA
I havent updated the nav thread for the wp900 as yet. Ive been going through too many updates. Initially i had the Just the Mimics X@ then added the WP9200RV (wince 6 + blutetooth handsfree) which has been replaced for the WP9900
That has caused changes to the buttons as well because i dint need the android buttons before
I'm not sure on the Uart port, I think it needs to be in the firmware to work. All I have done is add a usb keyboard.
The Joycon emulates a keyboard. The android already has keyboard shortcusts for the buttons. In the android setup you will will also fing keyboard shortcuts for seache + A-Z. Just allocate these to apps. This is what the arduino does. Convert single buttins into a resistor voltage that emulates a restive control. This is fed to joycon which sends the keyboard commands to the android.
As I had spre input/outport ports on the arduino I used these to do the camera cand video source control. Otherwise i would have addded a second arduino
The joycon and mimics links are in my nav thread
Cheers
34by151
Thread Starter
|
Member
Joined: Sep 2012
Posts: 86
Likes: 25
From: Germany
I can really reproduce your approach - and it's good to see people like you, investing time and money to create their own perfect solution. I ran into the same problem with a double-DIN, as i would have to relocate buttons for DSC, foglights, if i would go this way - and then the screen is not really in sight. And yes, you're right! Drilling holes in dashboard-parts is absolutely no go and for sure it has to be automagic.
But i wonder why not so many people go that way with using the existing controls. When it comes to my car, i found no nothing njet hint for simulating the alpine-nav on the bus and so getting the controls converted to keystrokes for the android-box - it can't be undoable! Using the joycon could be a solution, but only for the Steering-Wheel buttons.
BTW i think some of the newer arduino's can simulate an HID-device (keyboard) on USB, so the joycon is no more needed.
If i understand right, the arduino switches the video-inputs per pulling control-lines of the video-IF to high-level?
bye
Wolf
Veteran Member
Joined: Jan 2012
Posts: 1,174
Likes: 743
From: Sunshine Coast QLD
Most installs are done by installers merely fitting a product. Very few have the skills or even want to bother going the extra mile. Fewer clients wish to pay.
I have been accused of being **** in my approach in the past. I take that as a complement. As a pilot I value the "Human Factors" in automation especally how it relates to fatigue, stress, workload and reliability
To answer re the arduino;
Yes most of them can emulate a keyboard, in fact all that have usb ports can. Its just a bit of code that is supplied.
I used the joycon (which is really an arduino) for a few reasons.
First its cheep but most important its realiable and simple.
It already has a PC app to do 99% of the work even if I wish to rmap the buttons.
Why reinvent the wheel if you don�t have to!!!
Re the av control;
The arduino monitors which video input is being used. It also sends the signal to change inputs. I connected this to the av interface using an opto-coupler
I am using the fretonics eleven arduino because its cheep and has lots of plugin shield. Im using the terminal shield for the connections, An 8 port relay shield, and two 8 port opto couplers. At some point I will transfer all of these onto the eleven's board by making my own shield with all the needed parts.
The key with how i control the video inputs is first the arduino tells the av int3erface to switch inputs. It then reads the control lines of the av interface to confirm the input is the one I wanted. If it is not it repeats till i get the input wanted.
Doing theis i have a subroutine for switching input. In the code I can call the subroutine a sa single function
avinput=x (set variable)
avset (run subroutine)
The values are
0 = Not Run
1 = OEM nav, Nav screen
2 = OEM anv, Climate screen
3 = OEM anv, Phone screen
4 = OEM anv, Menu screen
5 = OEM anv, Audio screen
6 = RGBS2 (WP9900 android Nav)
7 = Aux video 1 (Phone)
8 = Aux video 2
When the code starts avinput = 0
The code has a subroutine to setup the screen on boot
So if avinput = 0 it will avset = 1 then avset = 6
The avset function also sets the value of another variable avlast
The values of avlast are the same as avset above
This allows me to return to the last input using the code
avinput = avlast
avset
This is used for the OEM bluetooth phone
Hardware wise I cut the mute wire on the bluetooth module.
Both ends are connected to the arduino
This way i can sense a mute to or from the bluetooth module.
A mute to the bluetooth module is relayed in by dropping the line connected to the mdule for the duration of the mute signal
In revers (when a call starts) the mute comes from the bluetooth module.
Here I trigger the other mute wire.
In the code, the inpout for the bluetooth module is setup as an interrupt. This means as soon as the line is dropped it will trigger the code for it.
In fact I have 2 interrupts setup for this one for going high and one for going low
When it goes low (phone call starts)
This causes avset to run with a value of 3 (phone) so I get the phone screen and audio
As avset will store the screen i am on as avlast
When it goes high (phone cal ends)
This causes avset to run with a value of avlast so I get the screen I was on and audio I was using
Hope that all makes sense
Cheers
34by151
Thread Starter
|
Member
Joined: Sep 2012
Posts: 86
Likes: 25
From: Germany
OK, you're right with installer's work, you can be really happy with your capabilitys to do yourself. I repair my cars myself in most cases and yes, from time to time something mishappens - and i've to do it again. But nearly every time i brought the car to a dealer, something went wrong too, at least with my financials...
And I meant it as a compliment. I'm a bit of a 'perfectionist' too (only when it comes to technical aspects - dishwashing i can rush ) and so i have to accept for myself, that a solution sometimes needs it 's time. Buuut i've fun with it. Not everybody, i'll try to phrase diplomatic, can understand this approach - ask my girlfriend :-)
Thanx for the explanation, i think i got the idea. Could i ask you, wich bluetooth-modul you use for the phone-connection. For the hell i couldn't find any OEM-Modul, that will display something on a screen - your's does, if i understand correctly. And my XKR hasn't any phone preparation beside the harness. For a moment i got the bluegiga wt32 module in my sight, but these things are weeks away...
greetings
wolf
And I meant it as a compliment. I'm a bit of a 'perfectionist' too (only when it comes to technical aspects - dishwashing i can rush
) and so i have to accept for myself, that a solution sometimes needs it 's time. Buuut i've fun with it. Not everybody, i'll try to phrase diplomatic, can understand this approach - ask my girlfriend :-)Thanx for the explanation, i think i got the idea. Could i ask you, wich bluetooth-modul you use for the phone-connection. For the hell i couldn't find any OEM-Modul, that will display something on a screen - your's does, if i understand correctly. And my XKR hasn't any phone preparation beside the harness. For a moment i got the bluegiga wt32 module in my sight, but these things are weeks away...
greetings
wolf
Veteran Member
Joined: Jan 2012
Posts: 1,174
Likes: 743
From: Sunshine Coast QLD
I just have a generic bluetooth dongle in the WP900
USB2.0 Bluetooth� V4.0 Class 2 Dongle - Jaycar Electronics
This is used only for the torque app
I have the integrated voice and bluetooth phone. So the handsfree calls are done via the OEM head unit. That why i intercept the mute line on the phone module, so i can switch to the OEM phone screen and back after the call without doing anything
My Phone (Droid 4) connects via bluetooth to the Mimics module. The mimics uses bluetooth to send the OEM screen touch inputs to the phone.
When I connect the phone in its cradle it runs some tasker script. This turns on the wifi host spot on which supplies internet to the WP9900. Tasker disables the hot spot when removed from the cradle
This way I don’t need another sim card or phone bill.
I also hacked the cradle, removing all the but the chassis where the phone goes. I then mounted this in the center console. Removing the mounts means its snug angst the wall of the console.
I then hacked the plug adding a HDMI. So when its connected to the Mimics the video is also on the OEM screen
I would not bother with the mimics again as its really been replaced by the WP9900, but since its in. I can still use it for Nav, Email and Phone calls
This might be a better option for you but I the BT handsfree client is mot far away for the WP9900.
Cheers
34by151
Thread Starter
|
Member
Joined: Sep 2012
Posts: 86
Likes: 25
From: Germany
Oh, i see - your XJ is much more modern compared to my XKR, related to the entertainment-section. My screen is originally only used for the navi, OK and a analogue clock - that saves the day...
Why the external USB-Bluetooth? So far i know the wp9900 has some integrated? I can start pairing with the iphone via internal-bluetooth - so a chip must exist, but the connection can't be established.
I saw the mimics some weeks ago too, but i couldn't get into decision to buy one - as i want the system being usable without the phone, and the navigation on my iphone (Navigon) is not really my favourite.
I would like to get the same solution u described, but then i've to find a module for the iphone. And a handsfree solution from Wondeproud, as they promised in their older description of the unit, will never become available - at least when it comes to apple, i'm afraid. Android-phone may be ...
greetings
wolf
PS: I think, it would be fine to upgrade or do some photos of the android in your navi-thread, many people would like the unit and its possibilities, i suppose.
Veteran Member
Joined: Jan 2012
Posts: 1,174
Likes: 743
From: Sunshine Coast QLD
I have the USB bluetooth as my WP9900 does not have the internal bluetooth and gsm option. Mine was supplied with the USB GSM module
I only use the usb bluetooth dongle to connect to the ODB2 ELM interface used by torque
As for the phone. I could install a sim in the GSM module and you would have hands free on the WP9900 using the internal GSM.
I ruled this out because I done want another sim account. I would also have a different number so would hav eto divert calls and pay again. Cloneing the sim is an option but we have v3 sims that cant be cloned
As for pairing the phone to the WP9900 this will and wont work. You can par the devices but both are using host profiles. One needs to be a client and the other host. So the WP9900 can not be the handsfree client for a phone.
This is being worked on and is due for release soon. (was due the end of April)
The next thing you have is the "mirror mode" this is the same as the "app radio" but presently only support on Samsung. I'm not about to downgrade to a Samsung phone anytime soon
Re the Mimics, I had this installed prior to the WP9900, so it's stayed. I probably would not install both again just the wp9900. That being said I do use both but only for apps that are on the phoe and not the WP9900. Somtime I want a doc on the phone or a movie that i have not transferred to the hdd connected to the WP9900.
PS I have a Samsung 840 PRO Series SATA3 512Gb SSD drive for music and video storage. This uses a usb to sata to connect to the WP9900. Also I upgraded the SD card to a 64Gb unit.
Once you root the wp9900 install tasker and samba. Use tasker to detect your home wifi, connect and start samba. You can go inside and upload files to the wp9900 from your PC. I have a dir on the server for data on the WP9900. A cronjob on my linux server detects and rsyncs the data to/from the wp900.
Fell free to post in that thread, its a public forum. The more info the better. I'l be putting more in there once things settle down and I can wite it up in a way that other can easily replicate.
Cheers
34by151
Veteran Member
Joined: Jan 2012
Posts: 1,174
Likes: 743
From: Sunshine Coast QLD
As an update note
Joycon have have released some new products (joycon EXD and Joycon BSGr)
RcJoyCon - Control Car PC with Steering wheel controls
RcJoyCon - Control Car PC with Steering wheel controls
Carpc Joycon EXD Steering Wheel Controls USB Interface | eBay
BSGR Button Signal Generator Resistive CAR Stereo Controller | eBay
Resistive 12 Buttons Module | eBay
The big difference in the new EXR over the EXR is it can output ibus/idrive signals
This is significant as my video interface can accept ibus/idrive but also because the BSGr converts ibus to restive controls
What does this mean for us
1. You could an an Idrive control cunnected to the EXD and BSGr to control your car
2. You can connect the oem controls to the ESC and BSGr to rmap your buttons
Exploring option 2
1. Cut the wire from steering wheel buttons and connect to the EXD
2. Connect the EXD usb output the the Android (emulates a usb keyboard)
3. Connect the BSGr to the ESD
4. Connect the BSGr restive output to the car
So we now have the EXD and BSGr in between the steering wheel buttons abd the car
Using the supplied windows app we now learn all the steering wheel buttons
We can now assign these buttons to either a keyboard output or using the BSGr out put the same signal as the car had before
Here is a a sample
Button
Voice button Short press send usb kbd "Home"
Voice button Long press send resistive signal to car for "Voice input"
Vol + button Short press send resistive signal to car for "Vol +"
Vol + button Long press send usb kbd "Menu"
Vol - button Short press send resistive signal to car for "Vol -"
Vol - button Long press send usb kbd "Back"
Track Up button short press send usb kbd "Next track"
Track Up button Long press send resistive signal to car for "Next track"
Track down button short press send usb kbd "Last track"
Track down button Long press send resistive signal to car for "Last track"
Source button Short press send a short pule to led A
Source button Long press send resistive signal to car for "source"
Connect LED A to the video interface input select
What would we loose in this remap of the button only the long press of the track buttons that are setup to change disk on the CD stacker ore ACM
Anyway this is just an example. Using the PC application you could do whatever you wanted and change it at will
PS I have both of the new units on order nowIn fact I have 2 of each on order as I intend to connect to both the left and right switch packs on the steering wheel which use separate resistive output on my XJR
Cheers
34by151
Thread Starter
|
Member
Joined: Sep 2012
Posts: 86
Likes: 25
From: Germany
Your explanation about the joycon sounds interesting, i'll have a look at the manufacturares spec's in the next days, if i had known it's capabilities and that it's avr-based earlier, i wouldn't have gone with my own test-pcb.
So if i understand correct, you take the signal from the 'resistive-buttons'-wire away from your cars electronics, feed it in the joycon + BSGr - and have iBus to video-IF AND usb to the android unit AND resistive to car-elektr. Am i right?
Could be funny thing for my e39, because of the '2nd-function' by long button-press.
ATM im fiddling all the way with the Alpine ai-net bus, because 1st i want to have the buttons beside the screen working, i hope i can get the codes... - and touchscreen or not, some buttons are really existential.
cheers wolf
Veteran Member
Joined: Jan 2012
Posts: 1,174
Likes: 743
From: Sunshine Coast QLD
If you have the EXD/BSGr in line with your steering wheel controls you can
Remap the buttons
Add new button functions
Use buttons to output usb keyboard strings, or control signals
The EXD has an ibus output. The BSGr is controlled via ibus
If you have other devices that can use ibus you can control them as well
In my case the video interface I used can take ibus.
So rather than use a button to just change to the next input and can send a ibus command to change to a specific input
Cheers
34by151

Junior Member
Joined: Jun 2013
Posts: 7
Likes: 2
From: NC
First the wall: Great Thanks to the Community!!!
I got sooo much helpful information about the technical backround of my recently bought XKR - without the stunning work of the people here it would've been much much harder to do some repair. Now i'll try to give something back...
After made my decision to upgrade the build-in Navigation system - it doesn't even show my own homeplace due to 'stoneage' maps - i ran into some prob's while interfacing the screen.
Without original HU the screen doesn't work, the pinout of the FC98-Connector is well documented by forum-members here or shown in JTIS, the unknown signals FC98-14 (yel) and FC98-11 (Green) doesn't exist on my NAV-Unit - so all good.
The problem is the connector FC97. here are some undocumented wires, so far i could get, wich purposes nobody has released so far.
So i started to play a little bit with an self-made adapter and Oszi to find out.
The solution is Pin FC97-9 (orange). It has to be connected to 12V+ to switch on the screen - no power driven, only some kind of 'enable'-signal from the HU/radio.
BTW: Pin FC97-7 (red-blue) is not connected at least in my car.
So the 'kind of funny' mechanism is as followed:
Pin FC97-10 is an remote-out signal for the key's of the screen, going to the HU and there AFAIK converted to Ai-Net commands going to the original NAV-Unit.
If you press eg the On/Off-Button on the screen-unit, the remote lead transfers the corresponding command to the HU - and this switches the screen off/on by connecting FC97-9 to GND respective +12V.
Long story - short result: If you want to use the original screen without alpine-HU and NAV-Unit you 'll have to connect the orange-wire to +12V, or if you want to have On/off-functionality, switch it to GND or 12V.
I'll now try to connect a car-solutions WP9900 Android-Box to the rest of the car with addition of a touchscreen...
If there's somebody interested, i can add some picture's.
greetings from germany
Wolfgang
How about using the display for aftermarket TPMS?
My car did not come with the factory TPMS (too old).
That is a shame because low profile tires beg for TPMS, so you can avoid shredding a tire because a visual inspection is simply not good enough, short of using a pressure gauge of course.
I have researched many aftermarket TPMS systems and both Schrader and Orange have systems which appear pretty good.
The problem with both of those systems, is that you have a display that has to be mounted on the dash.
I suppose it could be put in the ashtray compartment or in the glove box, but that is not nearly as convenient as a visual display, available all of the time. Plus, even though these displays look pretty small (about the size of the TPMS sender/valve itself) is really hard to tell.
There is also a handheld unit, which appears to be battery operated, that could be put in the center console (or glove bos), which would make it less conspicuous, but again, you would have to search for it and look at the display - but no wiring involved!
The wiring does not scare me because it would be very simple.
There is also an aftermarket unit that has a voice display (actually an English voice, so it would be just like the NAV system!)
I did find one that says that you can use the display on your DVD player. That got me to thinking that maybe I could use the display on the factory DVD/radio/NAV?
Looking at what you wrote above, Wolfgang, it appears that this may be possible? Anyone else?
Any input and any other ideas would be most appreciated.
As anyone else used in aftermarket TPMS on their Jaguar?
I thank you in advance.
Ben
Here are the links to some of the items that I found:
by Koolertron
by TYREDOG
by Orange Electronic