
Fun with paint, calipers and rotors...

Hi Folks,
I finally decided to jump into sprucing up my rotors and calipers. Both were looking pretty dingy. It also gave me the opportunity to have a look in around the wheel well area. I decided to go outside my comfort zone and painted the calipers red. They look pretty good when you're looking at the car in person, but I'm not sold quite yet looking at the car in the last two photos below.
I purchased the Dupli-Color caliper paint kit from Canadian Tire. It came with the paint, caliper cleaner, stir stick, paint brush and instructions. The first bit of business was to clean the caliper with the cleaner spray bomb. It worked fairly well. I used a steel brush, toothbrush and a dish brush to get in all the nook and crannies.
Here's some pics I took as I progressed through the project :
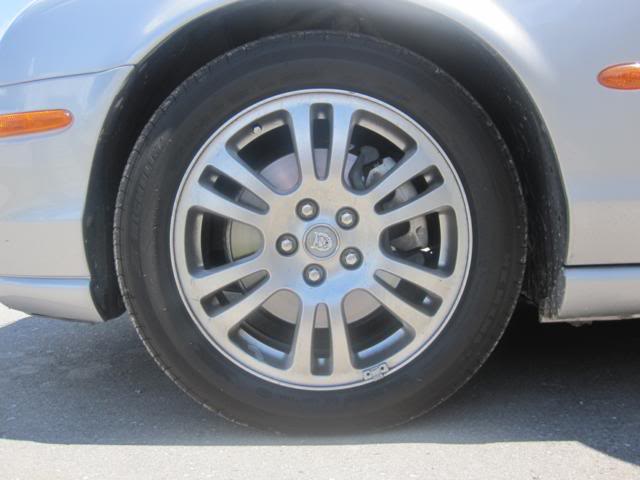
Here's a pic of the tires as they appear at the start of the project.
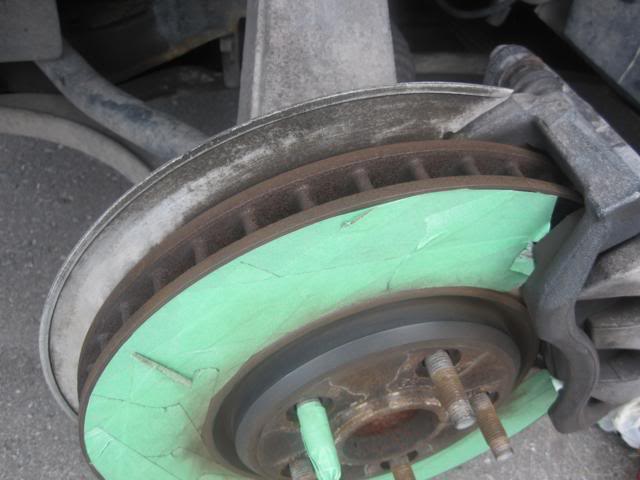
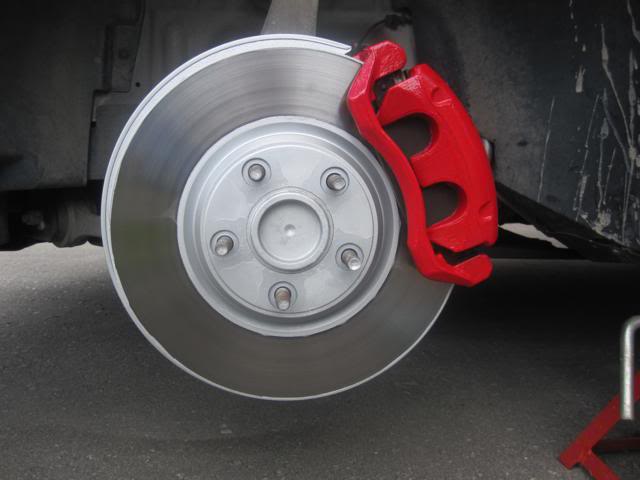
After removing the tire and cleaning the caliper, I taped up the outer surface of the rotor using some painters tape. After putting on the tape, I carefully cut around the outer and inner perimeter of the rotor, making sure to expose the thin rim of rust on each. Here's a pic of how everything looked prior to paint.
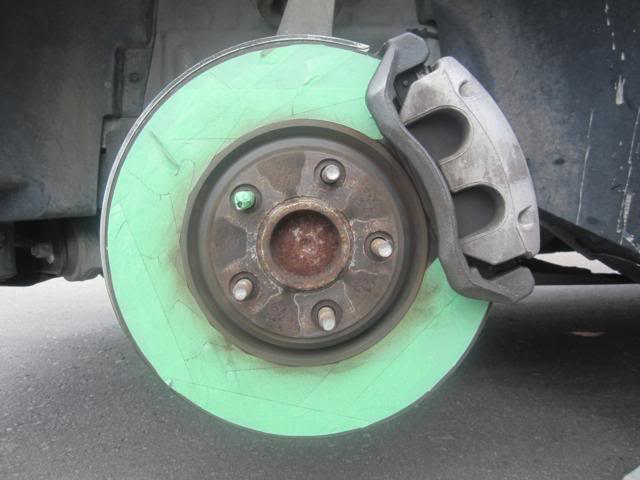
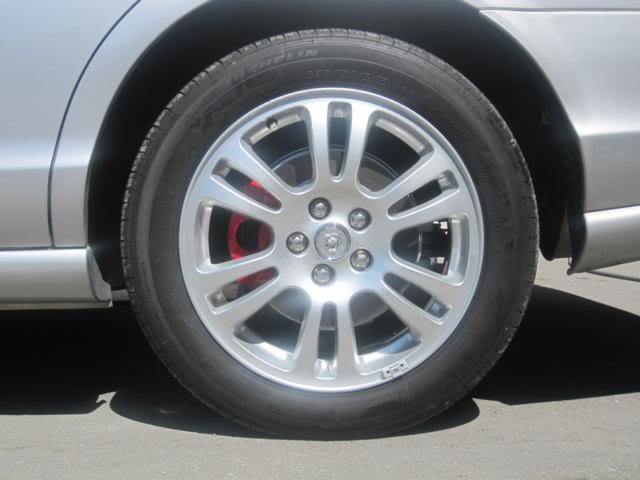
Here's a face on shot of the rotor :
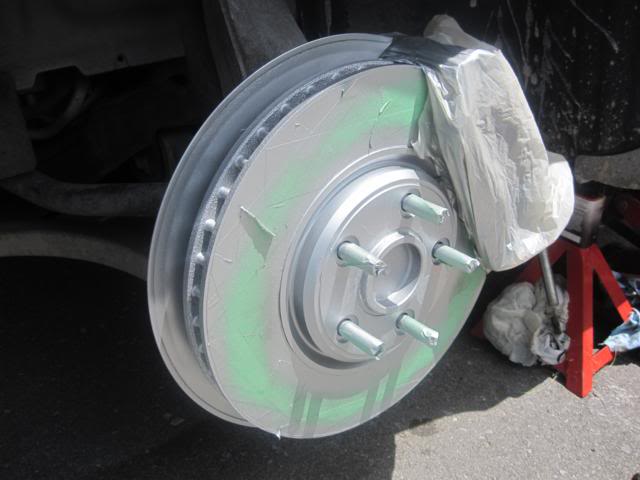
I sprayed the rotor edge, hub and guard first, covering each with 3 successive layers of paint. I was surprised at how nicely the spray bomb paint covered each! I covered the rotor with a plastic grocery bag while doing this :
After that dried, I painted the caliper. The brush on caliper paint is quite thick and dries EXTREMELY fast. Don't hesitate to put on medium thickness coats to cover the calipers. I did all four calipers on my car and I still have half a can of paint left! I'm not a brake guy, so I painted the calipers while still on the car. While not ideal, if you take the time to mask areas you don't want to paint, you'll get pretty good results. My brother-in-law is coming over next week when I get my new ceramic pads. I'll do some touch ups then when I have the calipers right off the car. Here's a set of shots of the completed job :

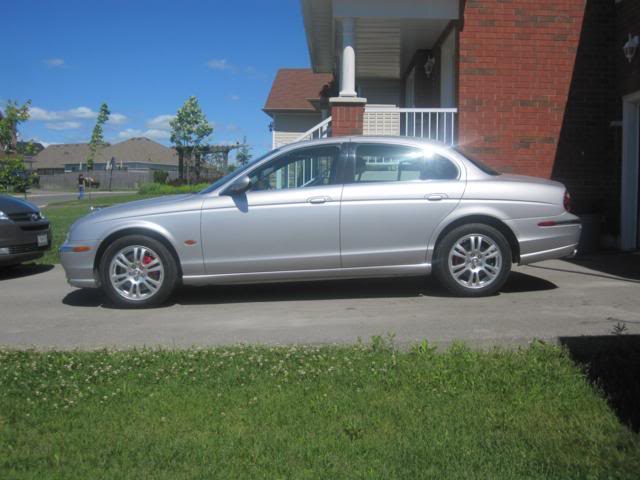
And a shot with the tire back on. While I had the tire off, I took the time to clean the inside of the rims - were they dirty! I don't think they've ever been cleaned before I bought the car.

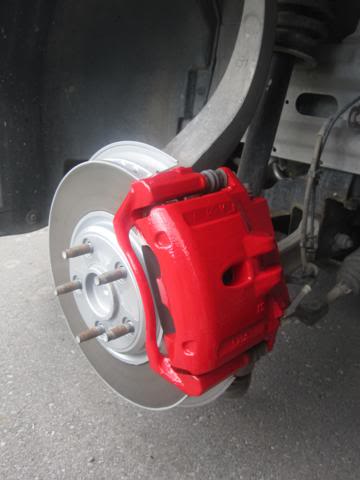
Here's a closer shot so you can see the caliper, guard, rotor edge and hub all painted and looking good!
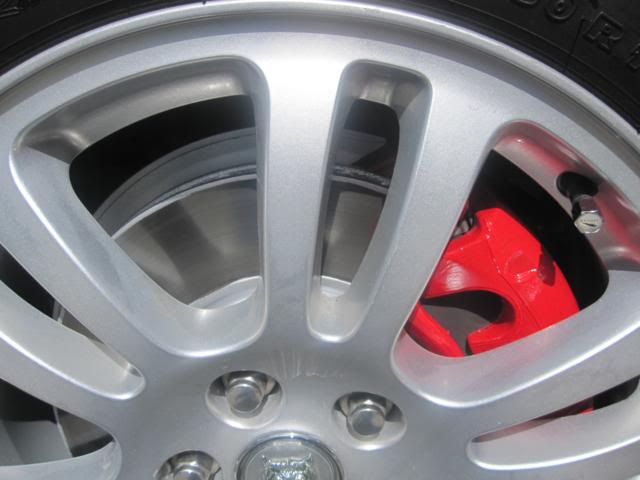
A quartering shot after my first caliper done. 2 afternoons later, I had all four done!
Here's a shot of the rear caliper painted. It's quite a bit smaller than the front, so it's a bit subtler of a look.
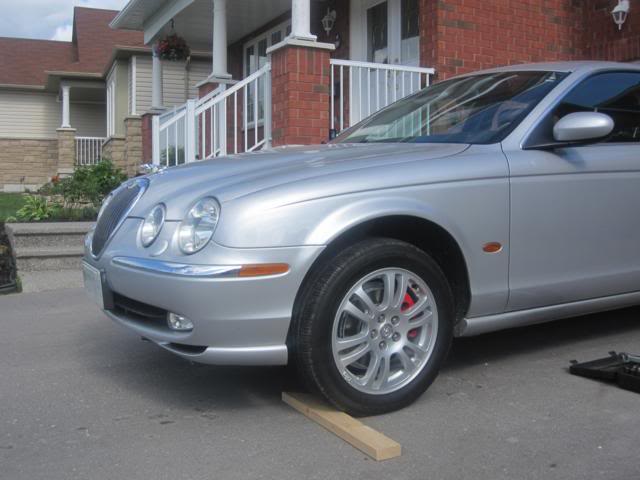
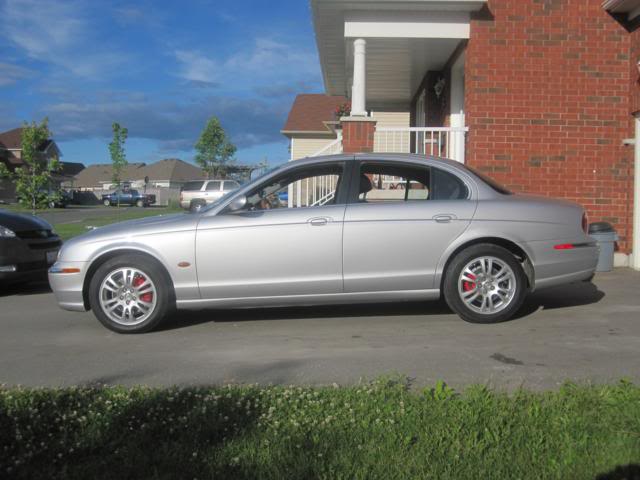
Now it's these last two pics that give me pause on the red calipers. Like I said before, in person, the red looks pretty sharp. The first shot was taken earlier in the day, and the red is certainly more subdued on the car. The second shot was taken as the sun was low on the horizon and it lit the calipers up like Christmas trees. I'm not too taken with the second shot.
What's everyone's thoughts? Unfortunately I can't have everyone show up to have a look in person, so I have to rely on these last two shots to get your opinions. I might take another pic today as it's overcast which may make them look different yet again!
Regardless, I hope everyone enjoys the pics!
P.S. - I know my car's dirty Rick! I have to wait 24hrs for the paint to cure to wipe all those dusty bunnies off of her! Lol.
I finally decided to jump into sprucing up my rotors and calipers. Both were looking pretty dingy. It also gave me the opportunity to have a look in around the wheel well area. I decided to go outside my comfort zone and painted the calipers red. They look pretty good when you're looking at the car in person, but I'm not sold quite yet looking at the car in the last two photos below.
I purchased the Dupli-Color caliper paint kit from Canadian Tire. It came with the paint, caliper cleaner, stir stick, paint brush and instructions. The first bit of business was to clean the caliper with the cleaner spray bomb. It worked fairly well. I used a steel brush, toothbrush and a dish brush to get in all the nook and crannies.
Here's some pics I took as I progressed through the project :
Here's a pic of the tires as they appear at the start of the project.
After removing the tire and cleaning the caliper, I taped up the outer surface of the rotor using some painters tape. After putting on the tape, I carefully cut around the outer and inner perimeter of the rotor, making sure to expose the thin rim of rust on each. Here's a pic of how everything looked prior to paint.
Here's a face on shot of the rotor :
I sprayed the rotor edge, hub and guard first, covering each with 3 successive layers of paint. I was surprised at how nicely the spray bomb paint covered each! I covered the rotor with a plastic grocery bag while doing this :
After that dried, I painted the caliper. The brush on caliper paint is quite thick and dries EXTREMELY fast. Don't hesitate to put on medium thickness coats to cover the calipers. I did all four calipers on my car and I still have half a can of paint left! I'm not a brake guy, so I painted the calipers while still on the car. While not ideal, if you take the time to mask areas you don't want to paint, you'll get pretty good results. My brother-in-law is coming over next week when I get my new ceramic pads. I'll do some touch ups then when I have the calipers right off the car. Here's a set of shots of the completed job :
And a shot with the tire back on. While I had the tire off, I took the time to clean the inside of the rims - were they dirty! I don't think they've ever been cleaned before I bought the car.
Here's a closer shot so you can see the caliper, guard, rotor edge and hub all painted and looking good!
A quartering shot after my first caliper done. 2 afternoons later, I had all four done!
Here's a shot of the rear caliper painted. It's quite a bit smaller than the front, so it's a bit subtler of a look.
Now it's these last two pics that give me pause on the red calipers. Like I said before, in person, the red looks pretty sharp. The first shot was taken earlier in the day, and the red is certainly more subdued on the car. The second shot was taken as the sun was low on the horizon and it lit the calipers up like Christmas trees. I'm not too taken with the second shot.
What's everyone's thoughts? Unfortunately I can't have everyone show up to have a look in person, so I have to rely on these last two shots to get your opinions. I might take another pic today as it's overcast which may make them look different yet again!
Regardless, I hope everyone enjoys the pics!
P.S. - I know my car's dirty Rick!
Veteran member


Joined: Mar 2007
Posts: 11,345
Likes: 1,165
From: Oak Ridge, TN
Well Spitfire, looks like i'm first in line.  You did an excellent job of prepping and painting the rotor and the calipers, definitely. And that paint kit is the exact bne that I used, good stuff! But as you mentioned, the red isn't for just everyone. When I was scrolling down, I saw the silver you applied to the rotor edges and thought to myself "wow, that color looks good, I bet the calipers would look good in that too", then saw you proceeded with the red paint. If you don't like it, repaint them when you get the calipers off in the near future, they're clean at least.
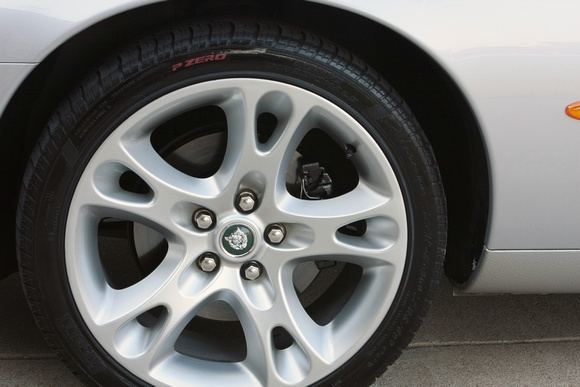
I considered carefully when I did mine also, I too have the silver, so not too many colors would look good, and I narrowed it down between the gloss black or silver (which was too close to the original dull grey 'iron' castings).
You did an excellent job of prepping and painting the rotor and the calipers, definitely. And that paint kit is the exact bne that I used, good stuff! But as you mentioned, the red isn't for just everyone. When I was scrolling down, I saw the silver you applied to the rotor edges and thought to myself "wow, that color looks good, I bet the calipers would look good in that too", then saw you proceeded with the red paint. If you don't like it, repaint them when you get the calipers off in the near future, they're clean at least. I considered carefully when I did mine also, I too have the silver, so not too many colors would look good, and I narrowed it down between the gloss black or silver (which was too close to the original dull grey 'iron' castings).

Nice job spitfire and they look great, especially as you painted the hub too....looks great in silver and really freshens up the whole look.
The wheels looked really niced n shiny after washing them inside n out.....The little Jaguar valve caps I noticed were a nice touch too.
You gotta get those balance weights off the outside though as my eyes were constantly drawn to them spoiling the overall effect just a little!
Veteran Member

Joined: May 2010
Posts: 4,114
Likes: 1,274
From: North Carolina
Wow! That looks awesome. I painted the left side calipers the other day, but I used the Dupli-color spray-on paint. I have already noticed some if it flaking off after washing the wheels. I guess I'm going to buy some of the brush-on stuff to do the other side, then I'll do the left side again. I even took the rotors completely off, pressure washed them, and primered them, but still the brake paint is flaking.
By the way, I like the red. Sure, it stands out a little, but that's why you painted the rotors, right?
By the way, I like the red. Sure, it stands out a little, but that's why you painted the rotors, right?
Member
Joined: Jun 2010
Posts: 53
Likes: 1
From: Southwest Florida
I think the red looks fantastic. As Reverend Sam points out, that's why you painted them, to make them stand out. Most of the high end sports cars (Porsche, Ferrari, etc.) flaunt their's in bright red.
Great job on documenting the project including procedures and pictures.
Thanks for sharing it.
Great job on documenting the project including procedures and pictures.
Thanks for sharing it.
Veteran Member
Joined: Feb 2009
Posts: 8,020
Likes: 1,731
From: Sunny South Carolina
Rob, nice job!!! They do look very nice. I have to ditto other posts nice write up.
BTW did you get around to getting the exhaust tips yet? <-- just curious on what you decided to use.
I have heard the dust bunny police may have moved on... good thing for us!
BTW did you get around to getting the exhaust tips yet? <-- just curious on what you decided to use.
I have heard the dust bunny police may have moved on... good thing for us!
Trending Topics
Joycesjag - I did actually get to the tips. I grabbed a piece of fine steel wool I had in the wood working shop and went to work on the tips. I first used the steel wool with a good degreaser and they cleaned up really well. After, I took a shop towel with a dab of polish on it and they shined up beautifully. No more baked-on gunk on my tips! I'll snap a quick pick next I clean the Jag for everyone to see.
Rob
Rob

Veteran Member
Joined: Aug 2008
Posts: 1,816
Likes: 305
From: SF Bay Area
I think the red looks really nice with the silver. I also had mine painted red with the dupli color kit, but then I changed my mind since the color contrast is a little strange so I painted them silver. But very nice


Thread
Thread Starter
Forum
Replies
Last Post
Currently Active Users Viewing This Thread: 1 (0 members and 1 guests)