When you click on links to various merchants on this site and make a purchase, this can result in this site earning a commission. Affiliate programs and affiliations include, but are not limited to, the eBay Partner Network.
I used a microfiber cloth and 70% IPA on my remaining sticky bits today - worked well. Took 3-4 application/scrubbing cycles. More on the nav facia, which was disgusting. Clean-ish and not sticky now! Was careful not to scrub hard on white labels.
Use a product called "Power Parafin". It walks like charm. Takes all the sticky goo off. No damage to print on the button. Yes, you will need to go over it a few times with a "Power Parafin" soaked piece of towling or a facecloth. Questions welcome.
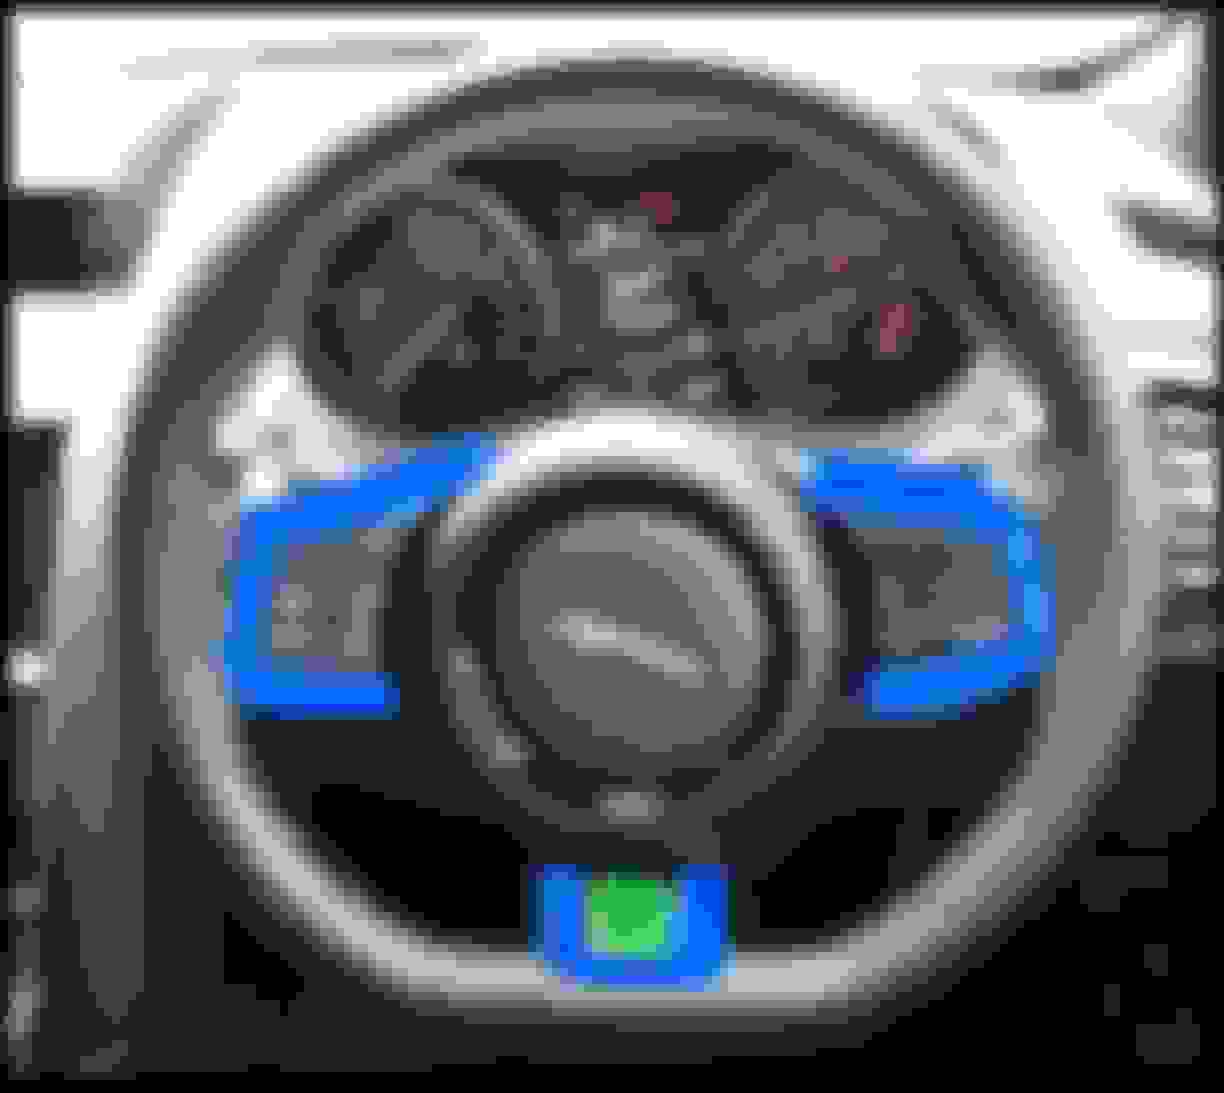
Just to confirm on the steering wheel since you�ve done it�you cleaned the blue parts I have highlighted below, correct? How about the green highlighted portion? Am looking to do mine but would like to know for sure before I start it. I�d rather have gloss black instead of sticky stuff. Thanks.
All of that goes to a glossy black. The blue and green parts you highlighted.
I cleaned the horizontal buttons on the console last year (a COVID project) with unscented hand lotion, paper towel and a plastic scraper. Tedious but effective.
A whole lot more has gotten sticky since then - the ignis paddles are like adhesive tape, as is the horizontal facia under the nav screen. I�ll try 70% IPA (isopropyl not India Pale) and I also have 100%.
My under Navi horizontal trim has also been sticky but I've just lived with it. It requires disassembly to be cleaned properly. I'll do it... Sometime.
Just to confirm on the steering wheel since you�ve done it�you cleaned the blue parts I have highlighted below, correct? How about the green highlighted portion? Am looking to do mine but would like to know for sure before I start it. I�d rather have gloss black instead of sticky stuff. Thanks.
I was premature claiming victory. 70% IPA worked great on the nav facia and paddles, buttons etc are still somewhat sticky. May try 100% IPA for places without labels. Unfortunately, I tried the 70% IPA on the clear part of the gearshift lever, and it clouded it a bit. Might polish out.
I was premature claiming victory. 70% IPA worked great on the nav facia and paddles, buttons etc are still somewhat sticky. May try 100% IPA for places without labels. Unfortunately, I tried the 70% IPA on the clear part of the gearshift lever, and it clouded it a bit. Might polish out.
what was sticky on the clear part that you tried to clean that?
Thanks guy. I went ahead and used the wipes to remove the coating around the steering wheel trim. As OzXFR pointed out, it did look splotchy, no matter how much I attempted to wipe it off. I ended up using some polish and my DA and got all that removed�residual coating that was probably embedded into the plastic. Now it�s much better and shiny black. Will keep it this way for now and worst case, I paint it with a base/clear. Thanks all.
here�s what it looked like before and after polishing.
The "fix" for this issue is typically to remove the rubber coating with some sort of solvent and the result is bare plastic, hopefully just shiny and not scratched. Another alternative is to just replace the trim with newer trim that uses rubber with a more durable formulation.
I chose a different approach that is cheap, quick, easy, and doesn't change the appearance of the trim. I used some Gold Bond powder (about $5) and a microfiber towel. I sprinkled some powder on the towel and rubbed it into the trim. Then I turned the towel to a clean spot and used it to wipe off any excess. I also dampened a corner a corner of the towel and used it to fully remove any powder from the interior parts next to the rubber trim. Presto. The trim is no longer sticky and it's not shiny, either. It took longer to go the the grocery store to get the powder than it took to de-sticky the trim.
Pictures? For some reason I can't see how the powder will simply take off the sticky and not leave the shiny bare plastic, or a mess.
Pictures wouldn't show you anything but a stock interior. The powder doesn't "take off" the sticky. It basically fills in. It's like when you put powder in a tight shoe and now your foot slides in easily. The powder is a very thin coating on top of the sticky rubber, so thin that it is invisible but you can feel it. Or rather, you can't feel the sticky.
Pictures wouldn't show you anything but a stock interior. The powder doesn't "take off" the sticky. It basically fills in. It's like when you put powder in a tight shoe and now your foot slides in easily. The powder is a very thin coating on top of the sticky rubber, so thin that it is invisible but you can feel it. Or rather, you can't feel the sticky.
wow, that�s pretty interesting and I think the first time I�ve read someone doing this. Let us know how that holds up and whether u have to reapply every so often to keep it non-sticky.
i applied a spray can clear coat on the paddles but don�t know if that will last. Will keep this in mind.