

2005 3.0 Rear Tie Rod and Sway Bar Links Replacement W/Pics FAQ

Thread Starter
|
Veteran Member


Joined: Feb 2009
Posts: 8,020
Likes: 1,731
From: Sunny South Carolina
Difficulty Level: Southern vehicles easy
Northern vehicles tougher due to rusted/seized parts
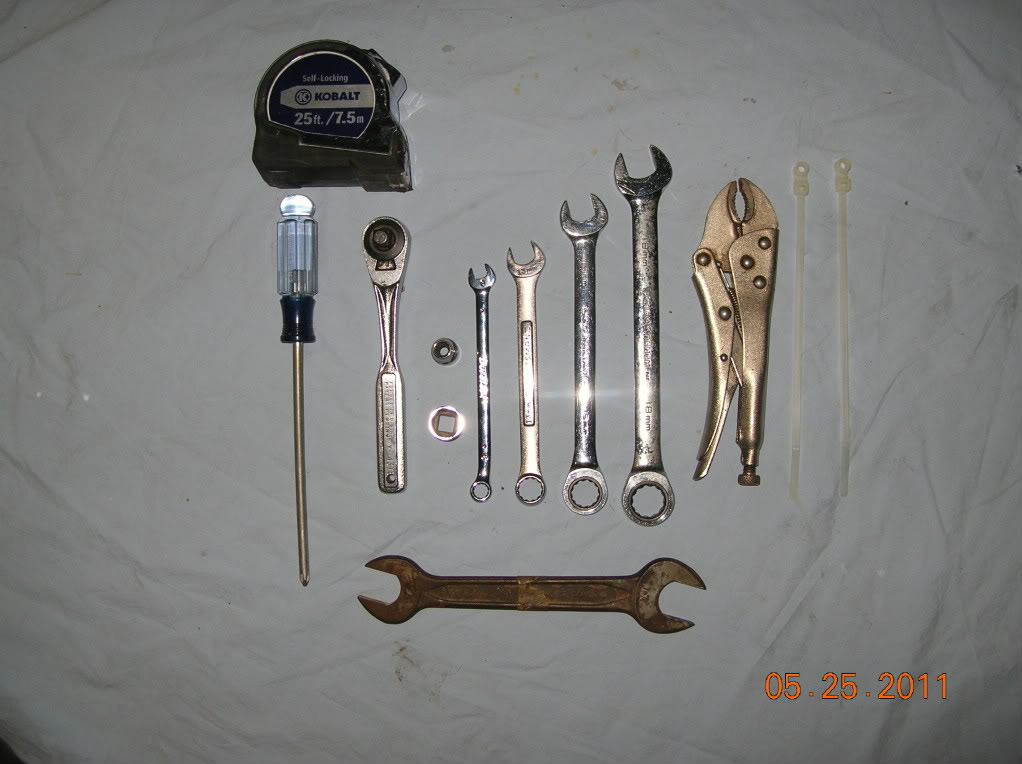
Tools Needed: Tape measure, 3/8 ratchet, 7mm and 15mm socket, 8mm 13mm 15mm 18mm wrenches (ratcheting optional), 7mm wrench or vise grips, phillips screw driver, the old 7/8" open end wrench was used instead of a 19mm or 20mm (?) open end that I do not own (used for jam nut on tie rod), a couple of zip ties.
Time: under 2 hours, but again if working on a northern vehicle allow for seized nuts, plan on alot of PB Blaster before hand.
**Remember you will need an alignment after this procedure!** The sooner the better.
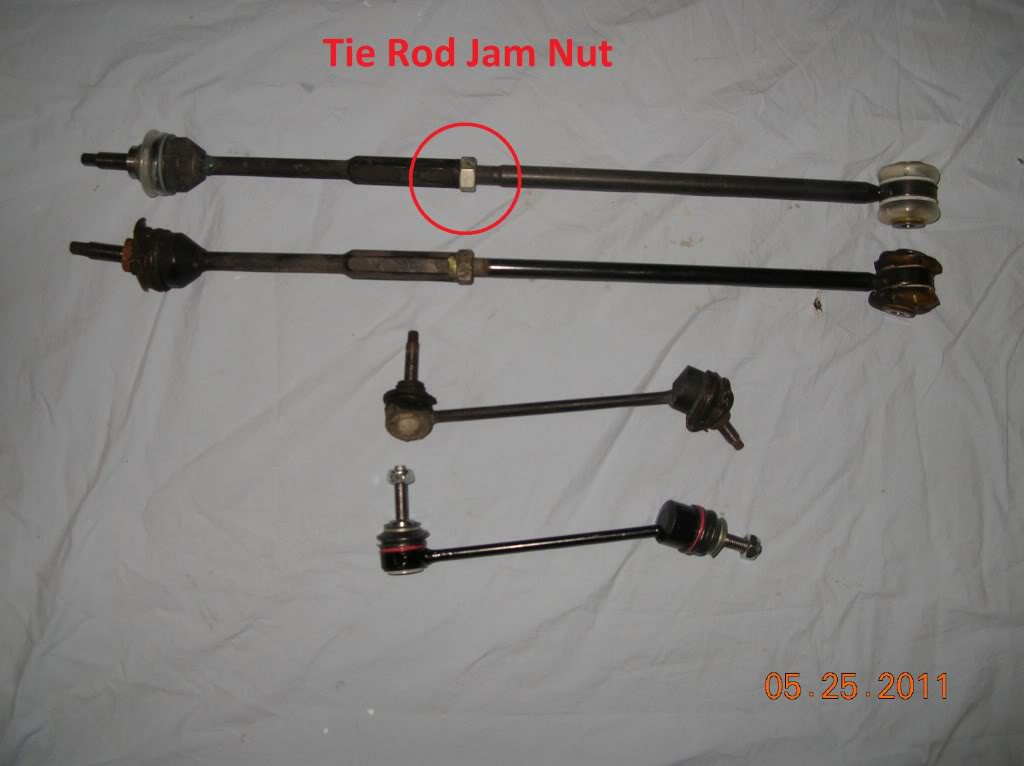
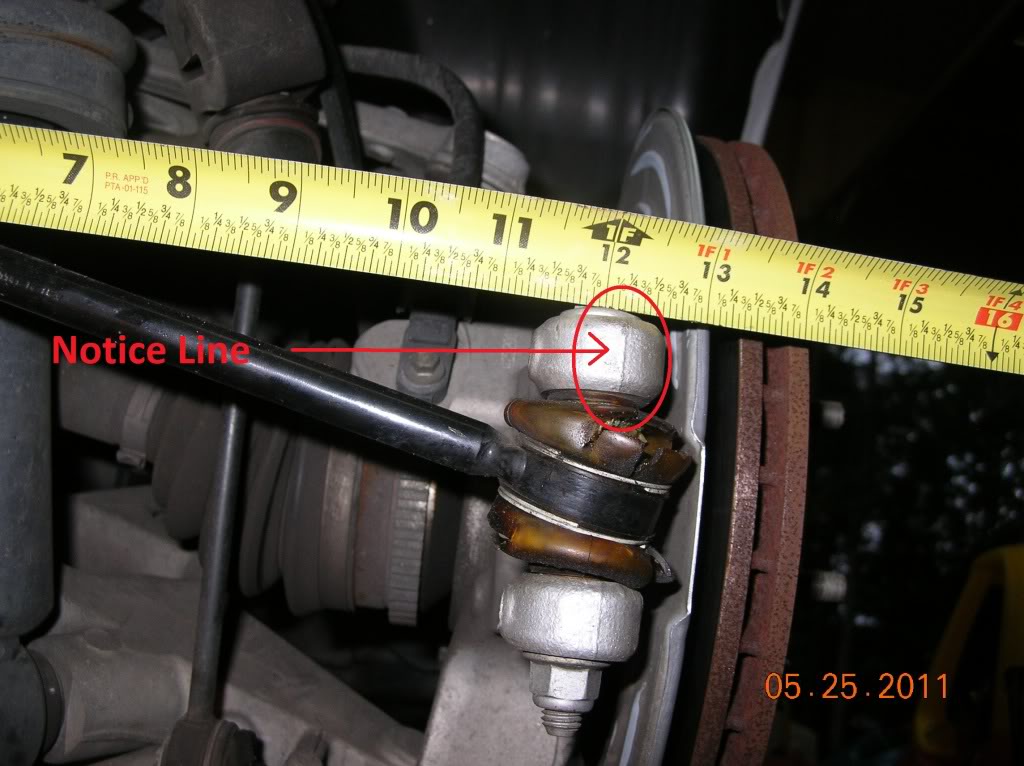
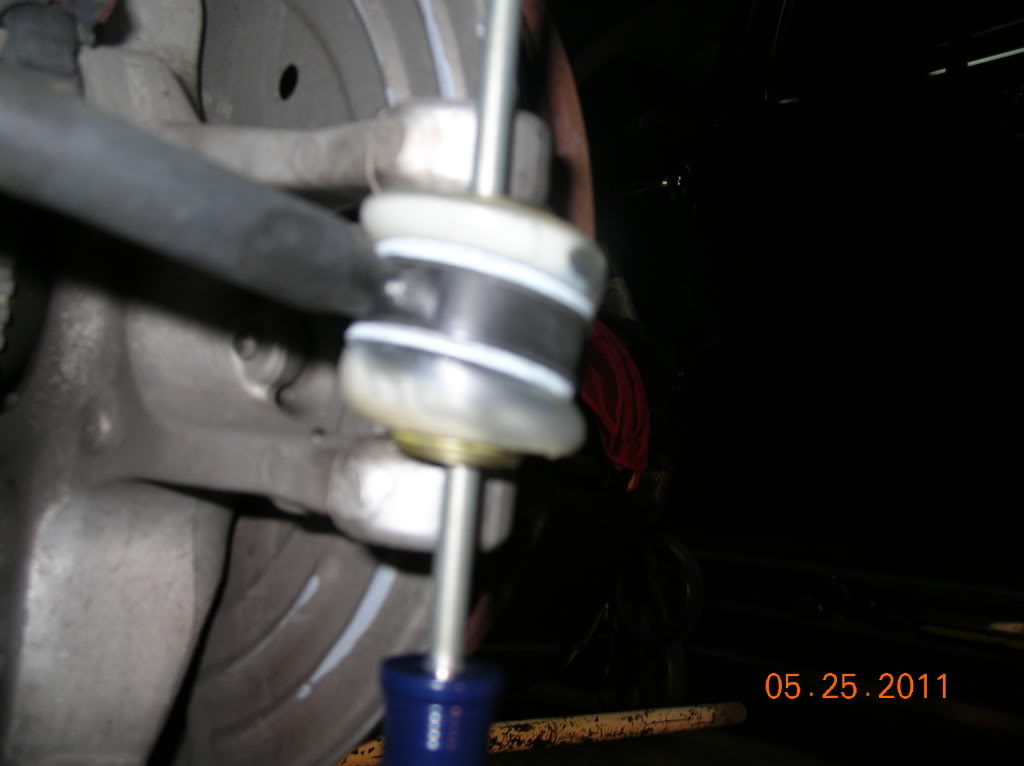
After stabilizing rear end in the air (jack stands) and wheels removed. Loosen Tie Rod Jam Nut. Using tape measure, I measured from female threads on inner tie rod to the mark on the wheel assembly. Noting the measurement for later use.

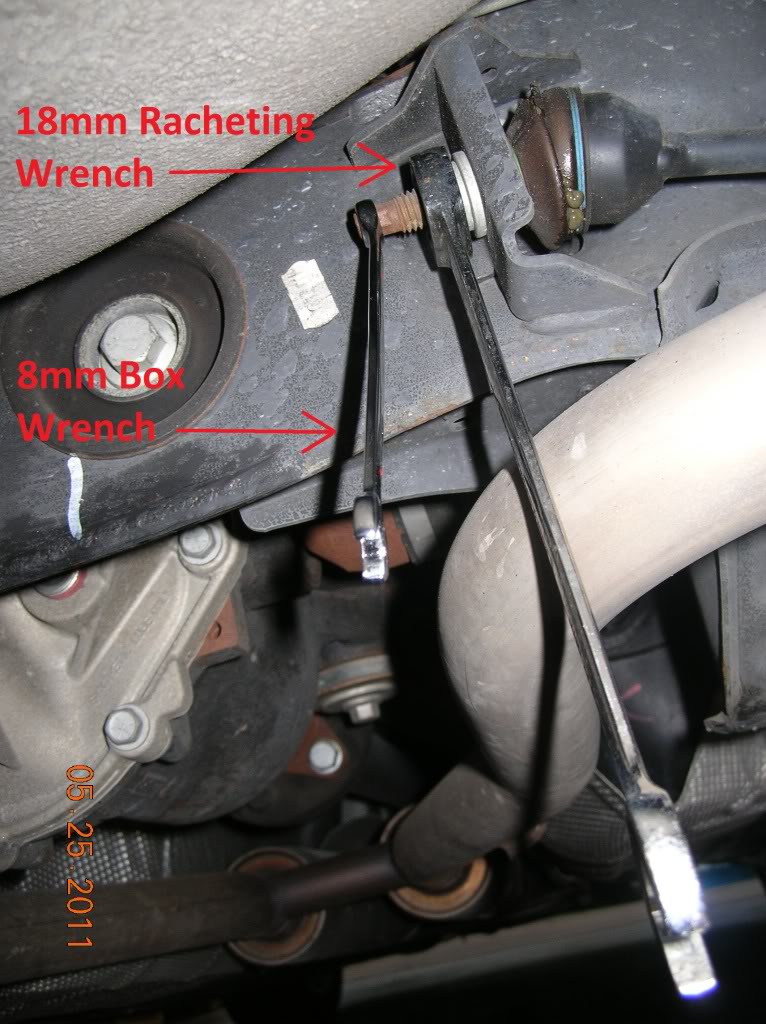
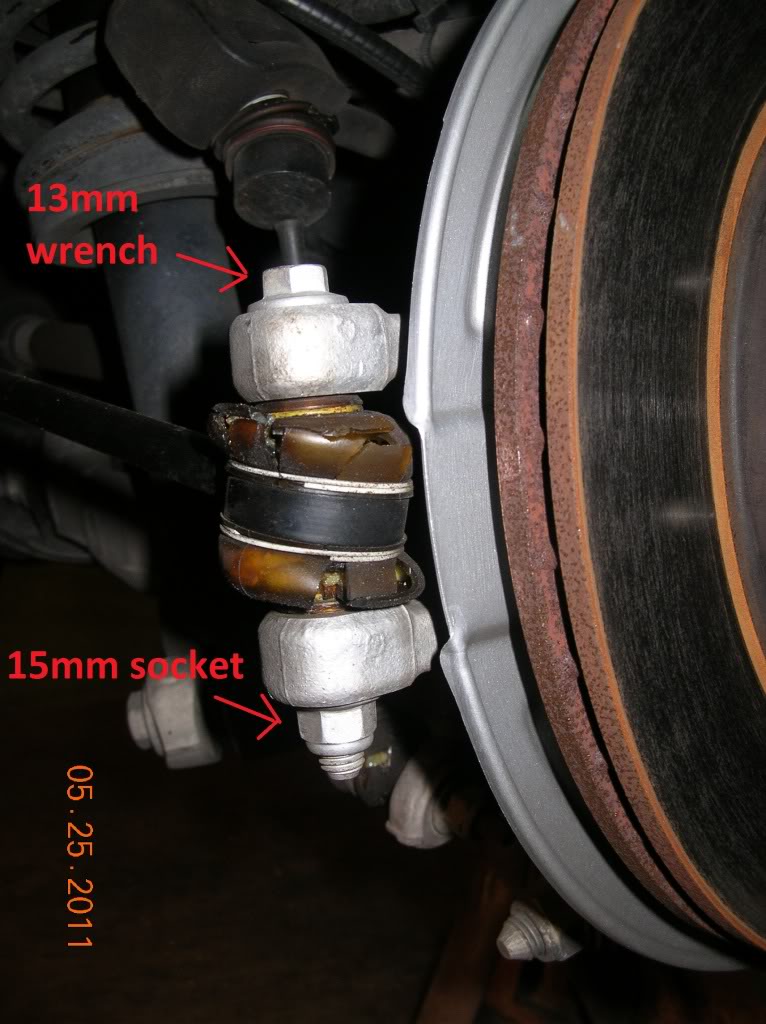
Next using the 18mm box wrench (here is where a ratcheting wrench works the best) and the 8mm box end, remove the inner tie rod nut. Then move to outer tie rod end using the 13mm wrench and 15mm socket. Pull bolt out and remove tie rod assembly.
Start inner tie rod nut, align outer tie rod with phillips screw driver, push in and insert bolt.

Torques: Inner Nut 100Nm (74 ft. lbs.)
Outer Nut 55Nm (41 ft. lbs.)
Now using your previous measurement, adjust tie rod.
I purchased aftermarket Tie Rods through Motor Cars Ltd, just shy of $100.00 ea.
If you are planning to replace Rear Sway Bar Links see post #2
Northern vehicles tougher due to rusted/seized parts
Tools Needed: Tape measure, 3/8 ratchet, 7mm and 15mm socket, 8mm 13mm 15mm 18mm wrenches (ratcheting optional), 7mm wrench or vise grips, phillips screw driver, the old 7/8" open end wrench was used instead of a 19mm or 20mm (?) open end that I do not own (used for jam nut on tie rod), a couple of zip ties.
Time: under 2 hours, but again if working on a northern vehicle allow for seized nuts, plan on alot of PB Blaster before hand.
**Remember you will need an alignment after this procedure!** The sooner the better.
After stabilizing rear end in the air (jack stands) and wheels removed. Loosen Tie Rod Jam Nut. Using tape measure, I measured from female threads on inner tie rod to the mark on the wheel assembly. Noting the measurement for later use.
Next using the 18mm box wrench (here is where a ratcheting wrench works the best) and the 8mm box end, remove the inner tie rod nut. Then move to outer tie rod end using the 13mm wrench and 15mm socket. Pull bolt out and remove tie rod assembly.
Start inner tie rod nut, align outer tie rod with phillips screw driver, push in and insert bolt.
Torques: Inner Nut 100Nm (74 ft. lbs.)
Outer Nut 55Nm (41 ft. lbs.)
Now using your previous measurement, adjust tie rod.
I purchased aftermarket Tie Rods through Motor Cars Ltd, just shy of $100.00 ea.
If you are planning to replace Rear Sway Bar Links see post #2
Last edited by joycesjag; Jun 5, 2011 at 07:25 AM.
Thread Starter
|
Veteran Member
Joined: Feb 2009
Posts: 8,020
Likes: 1,731
From: Sunny South Carolina
Ok moving on to the rear sway bar links.
First off there are different part numbers for the right (OE XR81692) and left (OE XR81693) sway bar links. I compared the 2 side by side and couldn't notice a difference. The above OE numbers were taking from the aftermarket package, so if they are incorrect let me know. Again the links were purchased through Motor Cars Ltd., $20.00 ea.
If you are planning on changing these and the tie rods together, I removed the tie rod then the sway bar link, replaced sway bar link then tie rod.
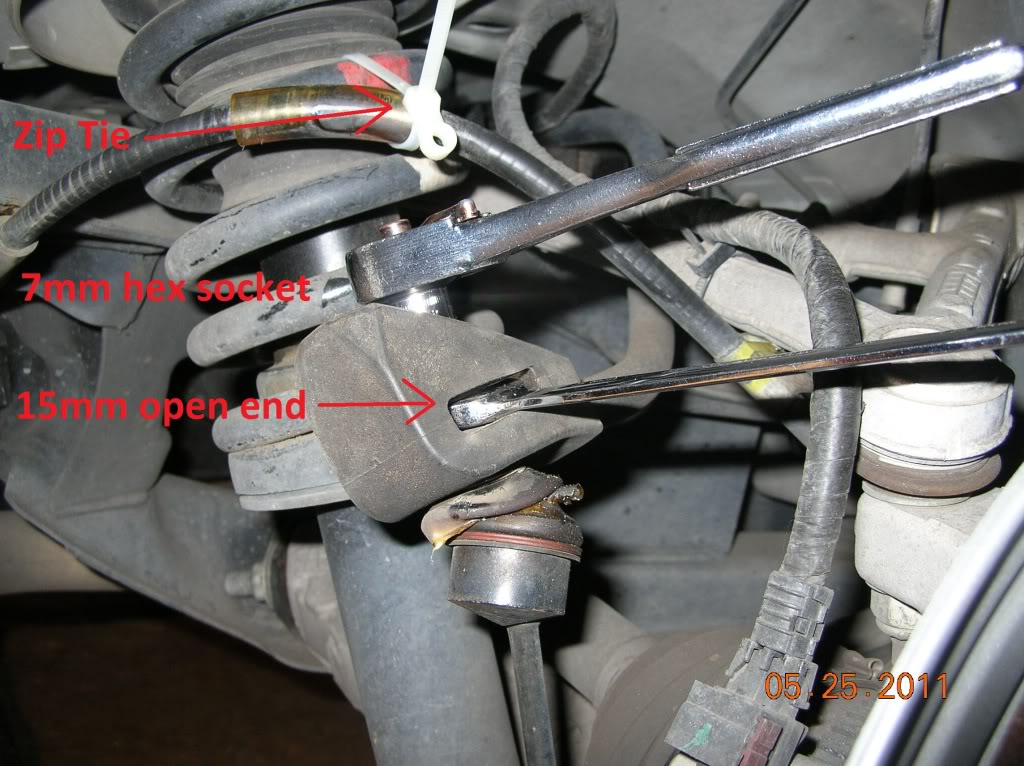
I used the zip ties to hold up emergency cables out of the way. Using the 7mm socket and 15mm open end wrench loosen the upper retaining nut. The rubber grommet is difficult to work with, remove nut.
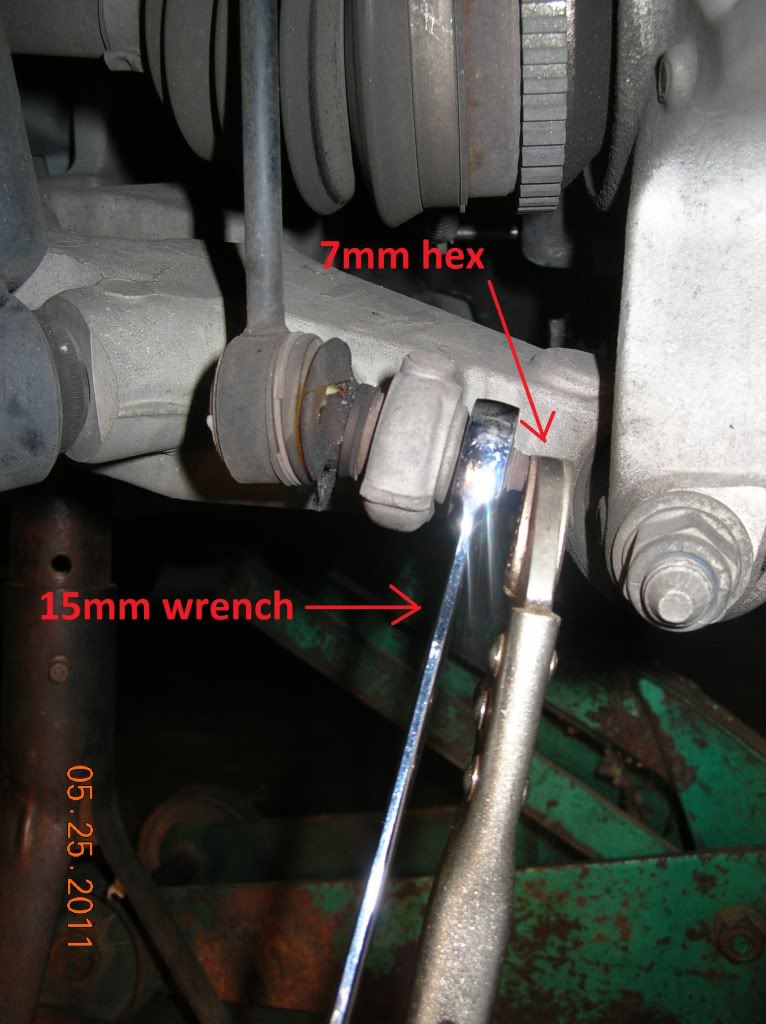
For the lower sway bar link I used vice grips on the 7mm end, (I do not have a 7mm wrench in my arsenal, I know shame on me) and the ratcheting 15mm wrench.
Install new sway bar links, snip zip tie.
Torque: 48Nm (35 ft. lbs.)
First off there are different part numbers for the right (OE XR81692) and left (OE XR81693) sway bar links. I compared the 2 side by side and couldn't notice a difference. The above OE numbers were taking from the aftermarket package, so if they are incorrect let me know. Again the links were purchased through Motor Cars Ltd., $20.00 ea.
If you are planning on changing these and the tie rods together, I removed the tie rod then the sway bar link, replaced sway bar link then tie rod.
I used the zip ties to hold up emergency cables out of the way. Using the 7mm socket and 15mm open end wrench loosen the upper retaining nut. The rubber grommet is difficult to work with, remove nut.
For the lower sway bar link I used vice grips on the 7mm end, (I do not have a 7mm wrench in my arsenal, I know shame on me) and the ratcheting 15mm wrench.
Install new sway bar links, snip zip tie.
Torque: 48Nm (35 ft. lbs.)
Last edited by joycesjag; May 27, 2011 at 11:04 AM.

Veteran Member

Joined: Jan 2009
Posts: 13,082
Likes: 4,736
From: Raleigh, NC
Another great how-to write-up, Rick....
I will always remember you clueing me in to look for this issue back in the spring of 2009 with the photos you posted of joycesjag's cracked rear boots. Jan's boots looked just as bad as Joyce's boots did, which really surprised me for a vehicle that had perhaps 25,000 miles on it at the time. I had our local dealership fix it under the factory warranty that was still in effect back then. The 2009 rear boots still look good and the car has held the 4-wheel alignment that it received as part of the fix remarkably well....
Thanks again....

Senior Member
Joined: Feb 2011
Posts: 422
Likes: 43
From: Pittsburgh
Up north we use this penetrating oil called Blaster and an air gun. If that don't work just fire up the torch.
Wonder if there is a source for the boots? Ours are cracked but I can't imagine the actual end joints being shot at 20thou.
Wonder if there is a source for the boots? Ours are cracked but I can't imagine the actual end joints being shot at 20thou.
Veteran Member
Joined: Dec 2006
Posts: 2,964
Likes: 507
From: Hamilton, NJ
Take care,
George
Trending Topics


Thread Starter
|
Veteran Member
Joined: Feb 2009
Posts: 8,020
Likes: 1,731
From: Sunny South Carolina
Mannn you guys are killin' me. I can't win, almost every thread like this, I put an approximate time and I receive flak for not allowing for seized bolts either publicly or via PMs.
In this case the seized bolt/nut vehicles could become a PIA, unless of course you are lucky enough to own a set of torches.
stars and bars baby
In this case the seized bolt/nut vehicles could become a PIA, unless of course you are lucky enough to own a set of torches.
stars and bars baby
Thread Starter
|
Veteran Member
Joined: Feb 2009
Posts: 8,020
Likes: 1,731
From: Sunny South Carolina
Thanks norri, I am working on the photos.


Joined: Oct 2007
Posts: 121,178
Likes: 6,658
From: PHX some of the time
The version I know is - If in doubt use a hammer, the bigger the doubt, the bigger the hammer. 
Rick, I see it's a work in progress, the first pics are good now and the others have gone.
I'll wait for the final reveal!
Rick, I see it's a work in progress, the first pics are good now and the others have gone.
I'll wait for the final reveal!

Edited now I believe and completed.....gotta be FAQ'd
I'll change the threa title to show this and one of the mods will no doubt FAQ it shortly
Nice one Rick and thanks for posting!
Joined: Oct 2007
Posts: 121,178
Likes: 6,658
From: PHX some of the time
Thread Starter
|
Veteran Member
Joined: Feb 2009
Posts: 8,020
Likes: 1,731
From: Sunny South Carolina
The $500.00 in new Michelin Sport rear tires.
Plus they aged the vehicle when looking at the profile!
Plus they aged the vehicle when looking at the profile!
Last edited by joycesjag; May 27, 2011 at 03:07 PM.
Junior Member
Joined: May 2011
Posts: 16
Likes: 0
From: South Beach
Thanks so much for this sweet write up! Made the job easy.
Used this today and completed the sway bar and link replacement in 3 hrs. Don't have ratchet wrenches so that is what me so long, plus had to cut one of the threads on the old sway bar as the nut was completely seized and I stripped the 7mm head. All the tips were perfect.
Used this today and completed the sway bar and link replacement in 3 hrs. Don't have ratchet wrenches so that is what me so long, plus had to cut one of the threads on the old sway bar as the nut was completely seized and I stripped the 7mm head. All the tips were perfect.

