

X-Type Power Driver seat repair


Just a quick update, after reading lots of pages on this forum, I was able to deduce that the gear on the assembly that is connected to the motor that powers the rear portion of the driver's seat (move the rear up and down) is bad in my 2005 X-Type 3.0. I was able to find a used motor with complete gear and assembly on ebay for about $60.00 shipped. I will try the repair and will try to post pictures of my experience.

Popular Reply
Oct 3, 2013, 10:46 AM
Sorry for the delay on this but I have been really busy but finally I was able to fix the power driver seat issue with my X-Type. Just a refresher of the issue I was having. My driver seat has three motors underneath. the first move the seat back and forth, the second move the front half of the seat up and down. And the third moves the rear of the seat up and down. This was the section of my seat which would not go down. My symptoms where that when i pushed the button to lower the seat the motor made a noise but the seat would not go down. After reading this forum I was able to deduce that the gears that actuate the assembly where stripped or broken. So my odessey began. I was able to track down the part on ebay which was the motor and assembly it was $60.00 shipped. The first step was to find the locations of all the bolts that connect the seat frame to the car. The front of the seat is bolted by 2 bolts, one on each side. They are 10mm hex bolts which require a socket and ratchet to remove.

Please note that you should power the seat to the highest position first before starting this process. Here is a picture of the bolts. Once you have loosened the bolts move the seat all the way forward. You will find the rear bolts are hidden by plastic covers. These are attached to the seat frame by #2 Phillips head screws.


After you remove the Phillips head screws you will find each seat "foot" is attached with 2 10mm bolts. Again use your socket here.

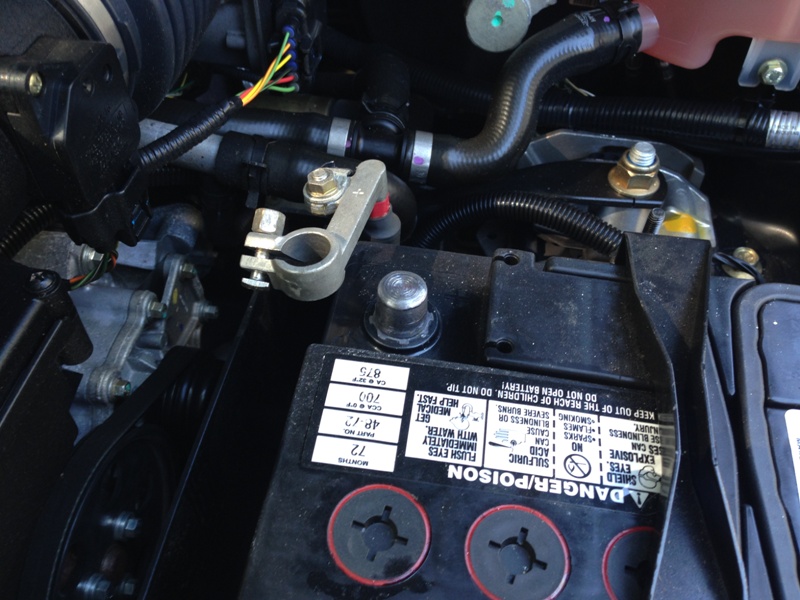
Once you have loosened all the bolts the seat can be lifted. I chose not to undo the seat belt from the frame and chose not to disconnect any of the wiring so I simply lifted the seat and tilted it so the bottom was facing the outside of the car. At this point I opened the hood and disconnected the positive battery terminal, also a 10mm bolt.
Please note that if you disconnect the battery prior to starting this you may not be able to access the bolts as they may be covered by the position of your seat. The next step was removing the plastic seat trim. (CORRECTION it is not necessary to remove the buttons as they are attached to the trim) You must first remove the button that move the seat up and down and recline. They just snap off and I recommend pulling one side up first.

Now that the buttons are removed we can remove the seat trim. First looking at the bottom of the seat toward the front you will see that the plastic trim is attached by a frame with two Phillips head screws.

You will need to remove them. At the back of the seat on the inside is a single phillips head screw that is holding the trim at the back you will need to remove this as well.

Once you have removed the screws the trim will simply slide forward. You will notice that in the middle of the frame and of the trim there is a bracket which holds the center on. This is what slides forward. Once I had the trim loose I just put it to the side.

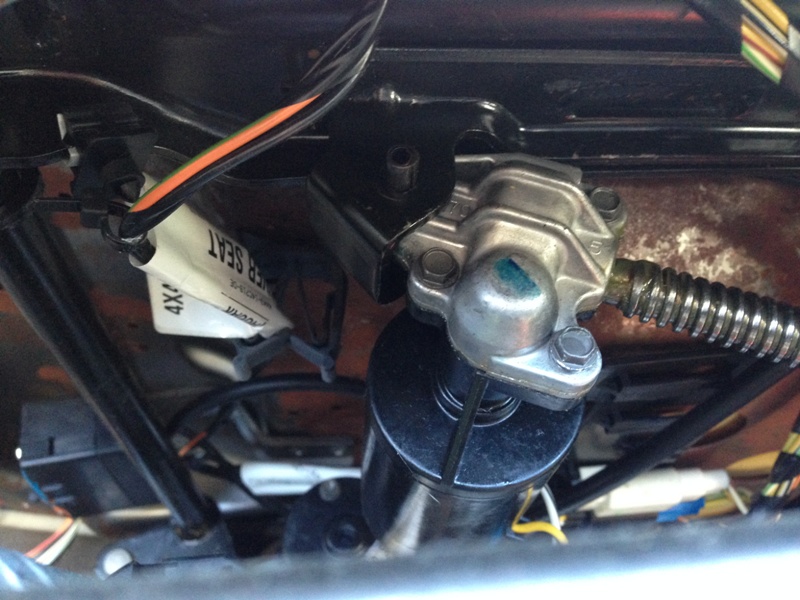
At this point the motor and assembly are exposed. The motor is attached by the assembly "head" with a pin which must be drifted out. I used a medium punch and hammer.
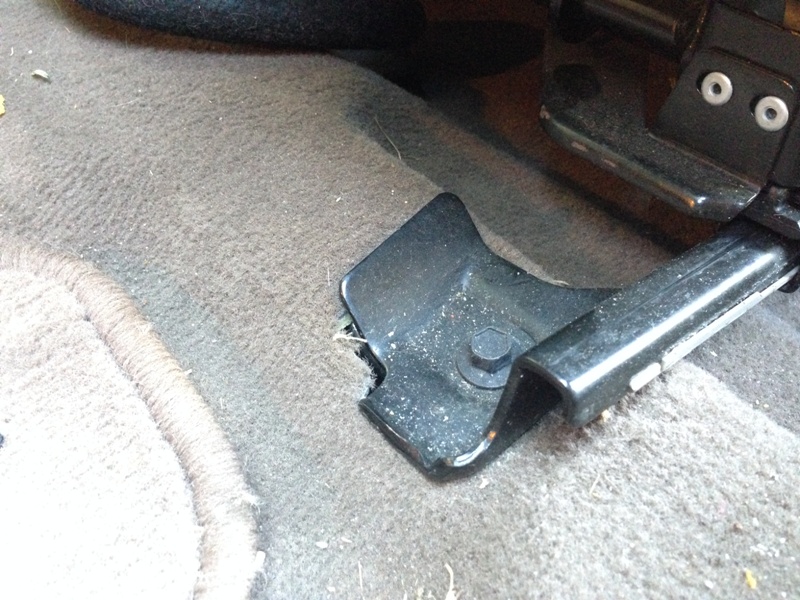
Once you have drifted the pin out, the assembly is attached to the rear of the seat by an Allen screw I believe it is the 1/4 if not mistaken, but it faces the inside of the frame. Sorry for the bad picture.

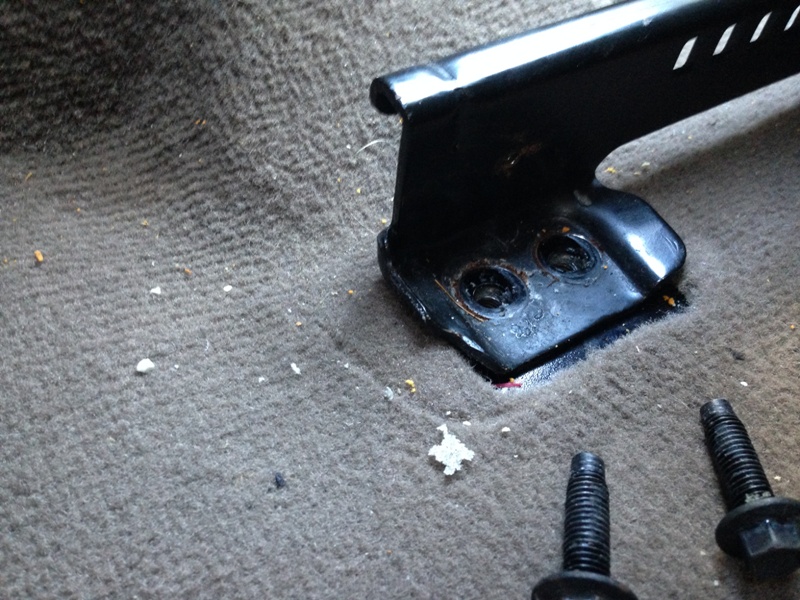
Once you remove the screw the motor and assembly can be taken down. You will need to unclip the power supply cable. To remove the clip a small flat head screw driver is helpful. You will notice that there is a frame which holds the clips in place mounted to the seat. You must first remove the plug from the frame and then unclip the plug form the power. I didn't get a good picture of this but you can see it in image of the motors pin. Here is the picture of the seat once the motor is removed.

Once all this was removed I put in the new motor. I had to manually actuate the assembly to the correct length to match the position of the seat but once that was done it was pretty easy to put everything back. Now my seat works great and I have alot more head room LOL! The only issue was that once i plugged the battery back in my auto down function on all passenger windows had stopped working, not sure what to do on that. Upon further inspection I decided to take the motor apart and found that the gears are made of plastic and that is what broke on my seat.

So with a $60.00 part, some patience and a little elbow grease I was able to repair my seat. Hope this is useful.
Please note that you should power the seat to the highest position first before starting this process. Here is a picture of the bolts. Once you have loosened the bolts move the seat all the way forward. You will find the rear bolts are hidden by plastic covers. These are attached to the seat frame by #2 Phillips head screws.
After you remove the Phillips head screws you will find each seat "foot" is attached with 2 10mm bolts. Again use your socket here.
Once you have loosened all the bolts the seat can be lifted. I chose not to undo the seat belt from the frame and chose not to disconnect any of the wiring so I simply lifted the seat and tilted it so the bottom was facing the outside of the car. At this point I opened the hood and disconnected the positive battery terminal, also a 10mm bolt.
Please note that if you disconnect the battery prior to starting this you may not be able to access the bolts as they may be covered by the position of your seat. The next step was removing the plastic seat trim. (CORRECTION it is not necessary to remove the buttons as they are attached to the trim) You must first remove the button that move the seat up and down and recline. They just snap off and I recommend pulling one side up first.
Now that the buttons are removed we can remove the seat trim. First looking at the bottom of the seat toward the front you will see that the plastic trim is attached by a frame with two Phillips head screws.
You will need to remove them. At the back of the seat on the inside is a single phillips head screw that is holding the trim at the back you will need to remove this as well.
Once you have removed the screws the trim will simply slide forward. You will notice that in the middle of the frame and of the trim there is a bracket which holds the center on. This is what slides forward. Once I had the trim loose I just put it to the side.
At this point the motor and assembly are exposed. The motor is attached by the assembly "head" with a pin which must be drifted out. I used a medium punch and hammer.
Once you have drifted the pin out, the assembly is attached to the rear of the seat by an Allen screw I believe it is the 1/4 if not mistaken, but it faces the inside of the frame. Sorry for the bad picture.
Once you remove the screw the motor and assembly can be taken down. You will need to unclip the power supply cable. To remove the clip a small flat head screw driver is helpful. You will notice that there is a frame which holds the clips in place mounted to the seat. You must first remove the plug from the frame and then unclip the plug form the power. I didn't get a good picture of this but you can see it in image of the motors pin. Here is the picture of the seat once the motor is removed.
Once all this was removed I put in the new motor. I had to manually actuate the assembly to the correct length to match the position of the seat but once that was done it was pretty easy to put everything back. Now my seat works great and I have alot more head room LOL! The only issue was that once i plugged the battery back in my auto down function on all passenger windows had stopped working, not sure what to do on that. Upon further inspection I decided to take the motor apart and found that the gears are made of plastic and that is what broke on my seat.
So with a $60.00 part, some patience and a little elbow grease I was able to repair my seat. Hope this is useful.
Last edited by bfuentes; Oct 3, 2013 at 01:15 PM.
Sorry for the delay on this but I have been really busy but finally I was able to fix the power driver seat issue with my X-Type. Just a refresher of the issue I was having. My driver seat has three motors underneath. the first move the seat back and forth, the second move the front half of the seat up and down. And the third moves the rear of the seat up and down. This was the section of my seat which would not go down. My symptoms where that when i pushed the button to lower the seat the motor made a noise but the seat would not go down. After reading this forum I was able to deduce that the gears that actuate the assembly where stripped or broken. So my odessey began. I was able to track down the part on ebay which was the motor and assembly it was $60.00 shipped. The first step was to find the locations of all the bolts that connect the seat frame to the car. The front of the seat is bolted by 2 bolts, one on each side. They are 10mm hex bolts which require a socket and ratchet to remove.
Please note that you should power the seat to the highest position first before starting this process. Here is a picture of the bolts. Once you have loosened the bolts move the seat all the way forward. You will find the rear bolts are hidden by plastic covers. These are attached to the seat frame by #2 Phillips head screws.
After you remove the Phillips head screws you will find each seat "foot" is attached with 2 10mm bolts. Again use your socket here.
Once you have loosened all the bolts the seat can be lifted. I chose not to undo the seat belt from the frame and chose not to disconnect any of the wiring so I simply lifted the seat and tilted it so the bottom was facing the outside of the car. At this point I opened the hood and disconnected the positive battery terminal, also a 10mm bolt.
Please note that if you disconnect the battery prior to starting this you may not be able to access the bolts as they may be covered by the position of your seat. The next step was removing the plastic seat trim. (CORRECTION it is not necessary to remove the buttons as they are attached to the trim) You must first remove the button that move the seat up and down and recline. They just snap off and I recommend pulling one side up first.
Now that the buttons are removed we can remove the seat trim. First looking at the bottom of the seat toward the front you will see that the plastic trim is attached by a frame with two Phillips head screws.
You will need to remove them. At the back of the seat on the inside is a single phillips head screw that is holding the trim at the back you will need to remove this as well.
Once you have removed the screws the trim will simply slide forward. You will notice that in the middle of the frame and of the trim there is a bracket which holds the center on. This is what slides forward. Once I had the trim loose I just put it to the side.
At this point the motor and assembly are exposed. The motor is attached by the assembly "head" with a pin which must be drifted out. I used a medium punch and hammer.
Once you have drifted the pin out, the assembly is attached to the rear of the seat by an Allen screw I believe it is the 1/4 if not mistaken, but it faces the inside of the frame. Sorry for the bad picture.
Once you remove the screw the motor and assembly can be taken down. You will need to unclip the power supply cable. To remove the clip a small flat head screw driver is helpful. You will notice that there is a frame which holds the clips in place mounted to the seat. You must first remove the plug from the frame and then unclip the plug form the power. I didn't get a good picture of this but you can see it in image of the motors pin. Here is the picture of the seat once the motor is removed.
Once all this was removed I put in the new motor. I had to manually actuate the assembly to the correct length to match the position of the seat but once that was done it was pretty easy to put everything back. Now my seat works great and I have alot more head room LOL! The only issue was that once i plugged the battery back in my auto down function on all passenger windows had stopped working, not sure what to do on that. Upon further inspection I decided to take the motor apart and found that the gears are made of plastic and that is what broke on my seat.
So with a $60.00 part, some patience and a little elbow grease I was able to repair my seat. Hope this is useful.
Last edited by bfuentes; Oct 3, 2013 at 01:15 PM.
Hey Gary I am not sure, my passenger seat is not power adjustable with three motors. It only adjust up and down, the frame of the seat is manual track and made completely different from the driver side. I also noticed that my passenger side motor is a different part number. But an easy way to check is to see of you passenger seat has three motors and see if the part numbers match up with the drivers side.
Member
Joined: Jun 2012
Posts: 48
Likes: 5
From: Tampa Bay, FL
Excellent post Mr. B. Seems my seat has lost some of its adjustability as well. But something strange happened recently - got my headliner replaced and once the job was done the seat functioned properly for a few days. Any thoughts? Perhaps something you learned while researching. Would appreciate any ideas.
Trending Topics
Excellent post Mr. B. Seems my seat has lost some of its adjustability as well. But something strange happened recently - got my headliner replaced and once the job was done the seat functioned properly for a few days. Any thoughts? Perhaps something you learned while researching. Would appreciate any ideas.
Last edited by bfuentes; Nov 3, 2013 at 08:28 AM.

Junior Member
Joined: Mar 2013
Posts: 22
Likes: 2
From: Charleston, WV
https://www.jaguarforums.com/forum/x...ws-reset-1916/
Junior Member
Joined: Dec 2013
Posts: 4
Likes: 5
From: LondonLondon

Junior Member
Joined: Dec 2013
Posts: 4
Likes: 5
From: LondonLondon
It need bit work to fit it.
The fact that on the Jaguar motor shaft, the original damaged white gear (nylon material?) is bonded onto the main shaft at manufacture. It is held onto the shaft by a raised, jagged area which needs to be ground down to the same diameter as the shaft itself. I hacksawed the old gear off the shaft and then ground the raised area down on a bench grinder, holding the shaft in the chuck of a cordless drill to rotate it whilst grinding. This gave an even, parallel shaft, which was then finished off to a smooth finish by rotating in the electric drill and applying abrasive paper to the rough areas of grinding.
Position was marked and the hole for the roll pin drilled. To ensure that the roll pin fitted easily into the hole, I ground a small taper into one end of the roll pin to ensure it fitted into the drilled hole.
Fairly easy if you know what you are doing and have access to reasonable DIY type tools.
Unfortunately I don't have any pictures. Seller sent drill bit and instructions with Gear.

Thank you so much for this lead. I had thought of getting a replacement metal gear made for my wife's 2002 3.0 Sport, will now buy from the UK eBay seller. :-) :-) :-) :-)
Update some weeks later. The gears came by parcel post from the UK eBay seller and were fitted today by my garage. Excellent solution, way better than fitting more replacement motors and their failing plastic gears and cheaper to boot. In the interim the adjustment has now failed in the passenger seat (same problem) and I've ordered two more replacement gears from the UK. :-( !
Update some weeks later. The gears came by parcel post from the UK eBay seller and were fitted today by my garage. Excellent solution, way better than fitting more replacement motors and their failing plastic gears and cheaper to boot. In the interim the adjustment has now failed in the passenger seat (same problem) and I've ordered two more replacement gears from the UK. :-( !
Last edited by Cornucopia; Jan 28, 2014 at 11:11 PM. Reason: Update to status
Here's a guess at why the seat adjustment functioned briefly after initially failing. When the plastic gear fractures it detaches from the spindle. However with no load in the seat there may be sufficient residual attachment for it to work intermittently. When you then try to adjust under load (that is, while sitting in the seat) it will fully detach and fail finally and irreversibly (until you replace the gear or the whole motor/spindle/ gear assembly). This is just a guess however something similar happened when my seat adjustment failed.

Veteran Member
Joined: Apr 2012
Posts: 1,136
Likes: 97
From: Plano, Texas
I tried to adjust my drivers seat today, and the same thing happened. It's not an issue for me, but it is something that is not working in the car and I just can't let that happen.This forum is so freaking awesome !!!! I have probably saved at least $1000 in repair work by being on here. Thanks Bfuentes for a most excellent write up of this problem. It most definitely will help me and many others. CHEERS !!!!!

