
How to Perform a 4-Wheel XF-SC & XFR Brake Job "HOW TO"


Junior Member
Joined: Jun 2015
Posts: 16
Likes: 0
If I choose 2010 XFR on eurocarparts, there are like four different lenghts of sensors, the site says they all fit. The lenght of the front sensor vary from 550-558. Only one rear tho, 635mm. With one is right for the front? Mine is a super early 2010, think it's made 2009 even.

Senior Member
Joined: Mar 2017
Posts: 354
Likes: 36
From: upstate new york
This post is a reference for the home mechanic to assist in performing a 4-wheel brake job on an 2011 XF SC or similar XFR model equipped with the integral electronic rear parking brake system. It is the compilation of hours or research and trial & error which may save someone a lot of time and frustration. Read it carefully, print it and the attachments and then start on your brake job! No warranties implied or expressed.
Tools needed::
1. The most difficult thing or tool to acquire is a 9 mm 3/8" Drive Hex Bit/ Allen Head Socket, Complete sets of Metric Hex Bits Sockets do not include this size and while they appear to be sold in increments of 1 mm they skip from 8 mm to 10 mm. After driving all over town not finding any and searching the internet, I ordered two types from my local NAPA Auto parts store and picked them up the next morning. You should also be aware that the 9 mm Hex Bits listed below are longer than standard which makes it easier to reach the bolt and around obstructions. I would highly recommend these two:

Socket, 3/8"; 9 mm; Impact; Hex Bit Metric- Product Number: NPT 613109, Price: $5.99
Bit Socket, 3/8"; 9 mm; Hex Bit Socket- Product Number: NHT NBH209M, Price: $3.30
Link to - NAPA 9 mm Hex Bit Sockets
2. You will also need a readily available 7 mm 3/8" Drive Hex Bit/ Allen Head Socket, which is included with a 3/8" drive Metric Hex Bit/ Allen set.
3. 3/8" ratchet with a long handle- preferred
4. 3/8" torque wrench
5. Torx size T-25 screw driver
6. Heavy dead-blow or brass hammer and a large pry type screw driver
7. A large C-Clamp to compress the front calipers or they can be compressed with the kit listed in #8.
8. The special tool set designed for retracting the rear calipers with their integral parking brake feature. This tool is available for free loan or purchase at AutoZone parts stores (OEM Disc Brake Caliper Tool Set for $60.00 Part Number: 27111), or Amazon.com for purchase. The rear calipers particular to the Jaguar requires this tool, which rotates and threads the pistons back into the caliper on vehicles with self-adjusting parking brakes. Without this special piston rewinding tool, servicing the rear brakes is almost impossible.
Link to AutoZone Brake Tool
9. A good floor jack and jack stands
Replacement Parts:
There are many ultra-high performance brake parts available that are extremely expensive, however I don't go racing this car. I would grade my use as "normal" city and then highway/interstate driving in the range of 60-75 MPH.
Ceramic Pads are the way to go. The Total Brake job on my 04 XJ VDP and now my 2011 XF SC with ceramic pads work great and virtually no dust. Semi-metallic brake pads are more abrasive and wear rotors faster. I have found more rotor wear and brake dust using semi-metallic pads, not less rotor wear. Ceramic pads cause less rotor wear and less visible dust.
Since they were first used on a few original applications in 1985, friction materials that contain ceramic formulations have become recognized for their desirable blend of traits. These pads use ceramic compounds and copper fibers in place of the semi-metallic pad's steel fibers. This allows the ceramic pads to handle high brake temperatures with less heat fade, provide faster recovery after the stop, and generate less dust and wear on both the pads and rotors. And from a comfort standpoint, ceramic compounds provide much quieter because the ceramic compound helps dampen noise by generating a frequency beyond the human hearing range.
Another characteristic that makes ceramic materials attractive is the absence of noticeable dust. All brake pads produce dust as they wear. The ingredients in ceramic compounds produce a light colored dust that is much less noticeable and less likely to stick to the wheels. Consequently, wheels and tires maintain a cleaner appearance longer.
Ceramic pads meet or exceed all original equipment standards for durability, stopping distance and noise. According to durability tests, ceramic compounds extend compared to most other semi-metallic and organic materials and outlast other premium pad materials by a significant margin - with no sacrifice in noise control, pad life or braking performance.
Basically I think the evolution of ceramic pads is an engineering improvement over past materials and they don't eat rotors they save them.
I found a 4-Wheel Set Ceramic Brake Pads #271010622898 that fit perfectly and cost in the range of $116.00 shipped are usually available on from Brake Labs.
Link: Brake Labs Ceramic Pads for XF SC & XFR I installed these and have no problems. Including any squeaking or break in issues.
EBC RED STUFF #DP32076C FRONT PADS, #DP32059C REAR, appears to be the only higher cost 4-wheel ceramic pads available for my 2011 XF-SC and XFR 5.0.
Link to EBC Red Brake Pads all four wheels $257.50 shipped. The EBC Red pads are for normal driving. EBC Yellow pads are for racing or track days and are not designed for daily driving.
A t 12K miles my front and rear rotors are still in perfect condition or they would have to be resurfaced or instead just replace them. The rear brakes usually last longer, however in this model the electric parking park is integrated into the rear calipers and the piston must be threaded back into the bore to retract unlike the front calipers which can move straight back into the bore when released. The characteristic may cause the rear brakes to drag slightly causing more wear. You will notice that the rear calipers are much harder to pull off the rotors than the front when removing.
There are two Brake Pad wear sensors that snap on to the Left Front inboard pad and fit into the rattle spring on the Right Rear inboard pad. They had not made contact with the rotors, so I just snapped them on to the new pads. If they are worn and you have gotten a brake wear warning, then they must be replaced at a cost of $75 to $90 each OEM. (Note: 2009 Models do not have this sensor)
Link for Brake Pad Sensors: Jaguar XF Brake Pad Sensor - Brake Pad Sensors - Genuine Centric - 2010 2011 2013 2012 2014 2009 2015 10 11 13 12 14 09 15 - PartsGeek.com
Supplies:
Two cans of brake cleaner spray and a quart of DOT4 brake fluid, Locktite thread locker or similar product and plastic tubing to drain fluid when bleeding brakes. You may invest in a "one-man brake bleeder" or get a friend, a glass jar and duct tape to bleed them.
Safety First: Always wear safety glasses and nitrile gloves to protect you from brake fluid and dust. Always use jack stands to support the car when the wheels are removed. Always chock the tires and use a floor jacket to lift the vehicle. Never climb under the vehicle under any circumstances.
First:
Get all the parts, tools and supplies. Take your time and be safe. It's actually very easy to complete with the right tools.
Before lifting the car remember first chock the wheels, now you are ready to slightly loosen the wheel lug nuts then jack the vehicle. Open the hood and open the cap to the brake fluid reservoir located under the cover on the drivers-side above the firewall. You can do one wheel at a time or all by using four jack stands.
Front Wheels:
Remove tire. Place a pan under the brake assembly and flush the grim off with brake cleaner.

Remove the spring loaded rattle clip located on the middle of the outboard side of the caliper. Remove the two 9 mm socket/Allen head slide pin bolts. They are located on the top and bottom of the inboard side of the caliper and you must remove the black rubberized cap that encloses the caliper slide pin bolts to access them.


Remove the caliper from the rotor. It may bind slightly, use a dead-blow or brass hammer to knock or pry it back off the rotor. Support caliper. These calipers and rotors are huge/massive.

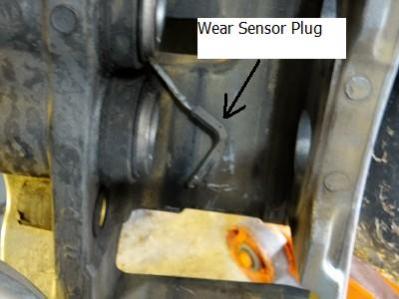
On the drivers or left-side front there is a "Wear Sensor" that snaps straight into a notch on the outside edge of the inboard pads. If worn and has cause a "Brakes Worn" warning light it needs to be replaced. If not worn snap into the slot on the new inboard pad. If reusing, take care to notice that a small clip may come off the sensor and stick to the notch in the old pad. Remove it then place it back on the sensor and snap it onto new pad.
On the XF SC and XFR the brakes are massive and especially the rotors. If the rotors look perfect and you are not replacing them then you can skip this step and save a lot of time. Nice rotors look nice and flat with no pits, flaking or grooves in them. You can scuff them up if you would like. If the rotors show signs of heavy wear or you have a pulsating pedal replace the rotors. Re-machining cost is significant and really not worth it. Just replace the rotors. Remove the two bolts holding the caliper mounting bracket to the vehicle. The bolts have thread locker applied and are difficult to remove. You may need a lot of effort and the dead blown hammer or a impact ratchet/gun to loosen them. After removing the caliper bracket. Remove the retaining clips around the wheel studs that hold the rotor to the hub. Snap them or break them off. The rotor should just pull off. If not spray around the joint between the rotor and the hub with penetrating oil. Then use your hammer to persuade it off.
If you are replacing rotors there a lot of choices. With include drilled and or slotted. I prefer the look of theses big rotors without hole and slots. The choice is yours. I have used Centric Rotors on my 2004 XJ VDP with great results.
There are Centric rear rotors available here for $146.00 each.
Link: Centric Rear Rotors #125.20031 and fronts for $205.00 each
Link: Centric Front Rotors #125.20030. About $700.00 a set of 4.
There also are this set of four drilled and slotted rotors available for $867.00.
Link: PREMIUM-SERIES-DRILLED-SLOTTED-Rotors
Compress the pistons straight back into the front caliper using an old disc brake pad and a C-clamp or utilizing the brake service kit that you will definitely need for the rear calipers. Clean the thread locker from the Caliper Mounting Bolts with a wire brush. Install the new disc. Apply thread locker to the caliper mounting bolts and torque to 135 Ft.lbs. Remove any clips from old pads and install on new pads. Make sure slide pins which have rubber boots around them on the caliper mounting brackets are free and lubricated. Install the pads on to the caliper mounting bracket with pad material contacting/ facing the rotor. Slide caliper over pads then install caliper mounting bolts torque to 25 Ft-lbs. and reinstall the rubber caps.
Rear Wheels:
Rear wheel procedure is the same as the front expect for the use of a 7 mm 3/8" Drive Hex Bit/ Allen Head Socket in additional complications caused by the electric parking park system. The cable attached to the rear calipers should be in a relaxed, non-tension condition. If not follow the procedure to release the parking brake.

First remove the anti-rattle spring and the flat cover attached with two Torx T-25 screws found on the outboard side of the caliper. You will need a 7 mm 3/8 drive Hex Bit/Allen Head Socket to remove the caliper slide pin mounting bolts.

On the passenger or right-side rear there is a "Wear Sensor" that fits into the anti-rattle spring and then into the notch on the outside edge of the inboard pad. You have to remove the spring from the pad then insert the sensor into the center of the spring, then replace the spring with the sensor into the notch on the inboard pad. If the sensor is worn and has cause a "Brakes Worn" warning light it needs to be replaced.
After removing the rear caliper, the piston is retracted by using the Special piston retraction tool which threads the piston back into the bore. The pins on the tool engage holes in the face of the piston which allow ot to thread in. Do Not Attempt to press the rear caliper piston straight into the bore. It will be ruined. Use the proper tool and it takes seconds, without it you're screwed. Note: When using the Auto Zone Brake Tool, NO adapter from the kit is needed to fit the holes in the face of the piston. (See picture below on left)


If required remove the caliper bracket and rotor using the same procedure as the front wheel. Clean Caliper mounting bracket bolts, install rotor, apply thread locker and mount caliper bracket. Install brake pads and caliper same as front wheel. Slide caliper over pads then install caliper mounting bolts torque to 25 Ft-lbs. and reinstall the rubber caps.
Flushing Bleeding Brake System:
Follow factory brake bleeding procedure in attached PDF file Jag Brake Bleeding. To flush the entire system start at the passenger rear and continue the pressing the brake pedal to pump the fluid through the system while opening and closing the bleeder valve until clean brake fluid can be seen exiting the bleeder tube and no bubbles are present. (Press pedal down to floor then open valve, watch for show, close bleeder valve, release pedal. Repeat.)Move to the driver rear, then passenger front then driver front. There is considerable debate regarding the need a frequency to flush and bleed your brake system. Double click PDF to open:
Add fresh brake fluid to reservoir as you flush and bleed system.
Take special note of page 3 of the brake bleeding procedure document "Additional Procedure to Bleed New Calipers with Integral Park Brake Mechanism" Follow this process for both rear calipers starting with the passenger rear caliper.
At this time I did not feeling it was necessary, however on my '04 XJ VDP it was time. The fluid looked dark and blackish. If after completing the brake job if the strong brake pedal doesn't come back then bleed the entire system.
After following the rear bleeding procedure and completing the front calipers you are satisfied that no bubbles are in the system and the fluid is now clean mount the tires. Lower the vehicle and chock the wheels. Torque wheel nuts to 90 Ft.lbs.
Tip: With the ceramic pads you will have virtually no dust on the wheels, but the inside of the wheels no doubt are still caked with semi-metallic brake dust. My tip is to wash the inside of the wheels before you re-install them, since that that grime will wash out over time and mess up your nice wheels.
Reset Electronic Rear Parking Brake:
Follow the procedure on pages 3 and 4 in the attached PDF file Electronic Parking Brake Calibration. It is critical to calibrate the parking brake system after any brake work. While the electronic parking brake does not automatically engage when the car is placed in Park like on earlier model XJ's, I utilized the same procedure. Double click to open:
After completing calibration process you are done. Remove Wheel Chocks! Take a test drive, if brake pedal is soft. Re-bleed the entire system using the special procedure for the rear calipers and then the front. After successful test drive top off brake fluid. Save this procedure for after your next 40K miles of fun driving.
Tools needed::
1. The most difficult thing or tool to acquire is a 9 mm 3/8" Drive Hex Bit/ Allen Head Socket, Complete sets of Metric Hex Bits Sockets do not include this size and while they appear to be sold in increments of 1 mm they skip from 8 mm to 10 mm. After driving all over town not finding any and searching the internet, I ordered two types from my local NAPA Auto parts store and picked them up the next morning. You should also be aware that the 9 mm Hex Bits listed below are longer than standard which makes it easier to reach the bolt and around obstructions. I would highly recommend these two:
Socket, 3/8"; 9 mm; Impact; Hex Bit Metric- Product Number: NPT 613109, Price: $5.99
Bit Socket, 3/8"; 9 mm; Hex Bit Socket- Product Number: NHT NBH209M, Price: $3.30
Link to - NAPA 9 mm Hex Bit Sockets
2. You will also need a readily available 7 mm 3/8" Drive Hex Bit/ Allen Head Socket, which is included with a 3/8" drive Metric Hex Bit/ Allen set.
3. 3/8" ratchet with a long handle- preferred
4. 3/8" torque wrench
5. Torx size T-25 screw driver
6. Heavy dead-blow or brass hammer and a large pry type screw driver
7. A large C-Clamp to compress the front calipers or they can be compressed with the kit listed in #8.
8. The special tool set designed for retracting the rear calipers with their integral parking brake feature. This tool is available for free loan or purchase at AutoZone parts stores (OEM Disc Brake Caliper Tool Set for $60.00 Part Number: 27111), or Amazon.com for purchase. The rear calipers particular to the Jaguar requires this tool, which rotates and threads the pistons back into the caliper on vehicles with self-adjusting parking brakes. Without this special piston rewinding tool, servicing the rear brakes is almost impossible.
Link to AutoZone Brake Tool
9. A good floor jack and jack stands
Replacement Parts:
There are many ultra-high performance brake parts available that are extremely expensive, however I don't go racing this car. I would grade my use as "normal" city and then highway/interstate driving in the range of 60-75 MPH.
Ceramic Pads are the way to go. The Total Brake job on my 04 XJ VDP and now my 2011 XF SC with ceramic pads work great and virtually no dust. Semi-metallic brake pads are more abrasive and wear rotors faster. I have found more rotor wear and brake dust using semi-metallic pads, not less rotor wear. Ceramic pads cause less rotor wear and less visible dust.
Since they were first used on a few original applications in 1985, friction materials that contain ceramic formulations have become recognized for their desirable blend of traits. These pads use ceramic compounds and copper fibers in place of the semi-metallic pad's steel fibers. This allows the ceramic pads to handle high brake temperatures with less heat fade, provide faster recovery after the stop, and generate less dust and wear on both the pads and rotors. And from a comfort standpoint, ceramic compounds provide much quieter because the ceramic compound helps dampen noise by generating a frequency beyond the human hearing range.
Another characteristic that makes ceramic materials attractive is the absence of noticeable dust. All brake pads produce dust as they wear. The ingredients in ceramic compounds produce a light colored dust that is much less noticeable and less likely to stick to the wheels. Consequently, wheels and tires maintain a cleaner appearance longer.
Ceramic pads meet or exceed all original equipment standards for durability, stopping distance and noise. According to durability tests, ceramic compounds extend compared to most other semi-metallic and organic materials and outlast other premium pad materials by a significant margin - with no sacrifice in noise control, pad life or braking performance.
Basically I think the evolution of ceramic pads is an engineering improvement over past materials and they don't eat rotors they save them.
I found a 4-Wheel Set Ceramic Brake Pads #271010622898 that fit perfectly and cost in the range of $116.00 shipped are usually available on from Brake Labs.
Link: Brake Labs Ceramic Pads for XF SC & XFR I installed these and have no problems. Including any squeaking or break in issues.
EBC RED STUFF #DP32076C FRONT PADS, #DP32059C REAR, appears to be the only higher cost 4-wheel ceramic pads available for my 2011 XF-SC and XFR 5.0.
Link to EBC Red Brake Pads all four wheels $257.50 shipped. The EBC Red pads are for normal driving. EBC Yellow pads are for racing or track days and are not designed for daily driving.
A t 12K miles my front and rear rotors are still in perfect condition or they would have to be resurfaced or instead just replace them. The rear brakes usually last longer, however in this model the electric parking park is integrated into the rear calipers and the piston must be threaded back into the bore to retract unlike the front calipers which can move straight back into the bore when released. The characteristic may cause the rear brakes to drag slightly causing more wear. You will notice that the rear calipers are much harder to pull off the rotors than the front when removing.
There are two Brake Pad wear sensors that snap on to the Left Front inboard pad and fit into the rattle spring on the Right Rear inboard pad. They had not made contact with the rotors, so I just snapped them on to the new pads. If they are worn and you have gotten a brake wear warning, then they must be replaced at a cost of $75 to $90 each OEM. (Note: 2009 Models do not have this sensor)
Link for Brake Pad Sensors: Jaguar XF Brake Pad Sensor - Brake Pad Sensors - Genuine Centric - 2010 2011 2013 2012 2014 2009 2015 10 11 13 12 14 09 15 - PartsGeek.com
Supplies:
Two cans of brake cleaner spray and a quart of DOT4 brake fluid, Locktite thread locker or similar product and plastic tubing to drain fluid when bleeding brakes. You may invest in a "one-man brake bleeder" or get a friend, a glass jar and duct tape to bleed them.
Safety First: Always wear safety glasses and nitrile gloves to protect you from brake fluid and dust. Always use jack stands to support the car when the wheels are removed. Always chock the tires and use a floor jacket to lift the vehicle. Never climb under the vehicle under any circumstances.
First:
Get all the parts, tools and supplies. Take your time and be safe. It's actually very easy to complete with the right tools.
Before lifting the car remember first chock the wheels, now you are ready to slightly loosen the wheel lug nuts then jack the vehicle. Open the hood and open the cap to the brake fluid reservoir located under the cover on the drivers-side above the firewall. You can do one wheel at a time or all by using four jack stands.
Front Wheels:
Remove tire. Place a pan under the brake assembly and flush the grim off with brake cleaner.
Remove the spring loaded rattle clip located on the middle of the outboard side of the caliper. Remove the two 9 mm socket/Allen head slide pin bolts. They are located on the top and bottom of the inboard side of the caliper and you must remove the black rubberized cap that encloses the caliper slide pin bolts to access them.
Remove the caliper from the rotor. It may bind slightly, use a dead-blow or brass hammer to knock or pry it back off the rotor. Support caliper. These calipers and rotors are huge/massive.
On the drivers or left-side front there is a "Wear Sensor" that snaps straight into a notch on the outside edge of the inboard pads. If worn and has cause a "Brakes Worn" warning light it needs to be replaced. If not worn snap into the slot on the new inboard pad. If reusing, take care to notice that a small clip may come off the sensor and stick to the notch in the old pad. Remove it then place it back on the sensor and snap it onto new pad.
On the XF SC and XFR the brakes are massive and especially the rotors. If the rotors look perfect and you are not replacing them then you can skip this step and save a lot of time. Nice rotors look nice and flat with no pits, flaking or grooves in them. You can scuff them up if you would like. If the rotors show signs of heavy wear or you have a pulsating pedal replace the rotors. Re-machining cost is significant and really not worth it. Just replace the rotors. Remove the two bolts holding the caliper mounting bracket to the vehicle. The bolts have thread locker applied and are difficult to remove. You may need a lot of effort and the dead blown hammer or a impact ratchet/gun to loosen them. After removing the caliper bracket. Remove the retaining clips around the wheel studs that hold the rotor to the hub. Snap them or break them off. The rotor should just pull off. If not spray around the joint between the rotor and the hub with penetrating oil. Then use your hammer to persuade it off.
If you are replacing rotors there a lot of choices. With include drilled and or slotted. I prefer the look of theses big rotors without hole and slots. The choice is yours. I have used Centric Rotors on my 2004 XJ VDP with great results.
There are Centric rear rotors available here for $146.00 each.
Link: Centric Rear Rotors #125.20031 and fronts for $205.00 each
Link: Centric Front Rotors #125.20030. About $700.00 a set of 4.
There also are this set of four drilled and slotted rotors available for $867.00.
Link: PREMIUM-SERIES-DRILLED-SLOTTED-Rotors
Compress the pistons straight back into the front caliper using an old disc brake pad and a C-clamp or utilizing the brake service kit that you will definitely need for the rear calipers. Clean the thread locker from the Caliper Mounting Bolts with a wire brush. Install the new disc. Apply thread locker to the caliper mounting bolts and torque to 135 Ft.lbs. Remove any clips from old pads and install on new pads. Make sure slide pins which have rubber boots around them on the caliper mounting brackets are free and lubricated. Install the pads on to the caliper mounting bracket with pad material contacting/ facing the rotor. Slide caliper over pads then install caliper mounting bolts torque to 25 Ft-lbs. and reinstall the rubber caps.
Rear Wheels:
Rear wheel procedure is the same as the front expect for the use of a 7 mm 3/8" Drive Hex Bit/ Allen Head Socket in additional complications caused by the electric parking park system. The cable attached to the rear calipers should be in a relaxed, non-tension condition. If not follow the procedure to release the parking brake.
First remove the anti-rattle spring and the flat cover attached with two Torx T-25 screws found on the outboard side of the caliper. You will need a 7 mm 3/8 drive Hex Bit/Allen Head Socket to remove the caliper slide pin mounting bolts.
On the passenger or right-side rear there is a "Wear Sensor" that fits into the anti-rattle spring and then into the notch on the outside edge of the inboard pad. You have to remove the spring from the pad then insert the sensor into the center of the spring, then replace the spring with the sensor into the notch on the inboard pad. If the sensor is worn and has cause a "Brakes Worn" warning light it needs to be replaced.
After removing the rear caliper, the piston is retracted by using the Special piston retraction tool which threads the piston back into the bore. The pins on the tool engage holes in the face of the piston which allow ot to thread in. Do Not Attempt to press the rear caliper piston straight into the bore. It will be ruined. Use the proper tool and it takes seconds, without it you're screwed. Note: When using the Auto Zone Brake Tool, NO adapter from the kit is needed to fit the holes in the face of the piston. (See picture below on left)
If required remove the caliper bracket and rotor using the same procedure as the front wheel. Clean Caliper mounting bracket bolts, install rotor, apply thread locker and mount caliper bracket. Install brake pads and caliper same as front wheel. Slide caliper over pads then install caliper mounting bolts torque to 25 Ft-lbs. and reinstall the rubber caps.
Flushing Bleeding Brake System:
Follow factory brake bleeding procedure in attached PDF file Jag Brake Bleeding. To flush the entire system start at the passenger rear and continue the pressing the brake pedal to pump the fluid through the system while opening and closing the bleeder valve until clean brake fluid can be seen exiting the bleeder tube and no bubbles are present. (Press pedal down to floor then open valve, watch for show, close bleeder valve, release pedal. Repeat.)Move to the driver rear, then passenger front then driver front. There is considerable debate regarding the need a frequency to flush and bleed your brake system. Double click PDF to open:
Add fresh brake fluid to reservoir as you flush and bleed system.
Take special note of page 3 of the brake bleeding procedure document "Additional Procedure to Bleed New Calipers with Integral Park Brake Mechanism" Follow this process for both rear calipers starting with the passenger rear caliper.
At this time I did not feeling it was necessary, however on my '04 XJ VDP it was time. The fluid looked dark and blackish. If after completing the brake job if the strong brake pedal doesn't come back then bleed the entire system.
After following the rear bleeding procedure and completing the front calipers you are satisfied that no bubbles are in the system and the fluid is now clean mount the tires. Lower the vehicle and chock the wheels. Torque wheel nuts to 90 Ft.lbs.
Tip: With the ceramic pads you will have virtually no dust on the wheels, but the inside of the wheels no doubt are still caked with semi-metallic brake dust. My tip is to wash the inside of the wheels before you re-install them, since that that grime will wash out over time and mess up your nice wheels.
Reset Electronic Rear Parking Brake:
Follow the procedure on pages 3 and 4 in the attached PDF file Electronic Parking Brake Calibration. It is critical to calibrate the parking brake system after any brake work. While the electronic parking brake does not automatically engage when the car is placed in Park like on earlier model XJ's, I utilized the same procedure. Double click to open:
After completing calibration process you are done. Remove Wheel Chocks! Take a test drive, if brake pedal is soft. Re-bleed the entire system using the special procedure for the rear calipers and then the front. After successful test drive top off brake fluid. Save this procedure for after your next 40K miles of fun driving.

Thanks a bunch Ed! Just did all four corners on my XFR today with EBC Red Stuff Pads, and did a serious clean while i was in there. I'm so happy with the look now. The only issue I ran into was with the lug nuts. I'm not positive if the ones I have are original, but they have a cosmetic cap over the actual nut which started spinning on one of the lugs (they were also way over tightened). I had to drill through it and ruin it trying to pull it off, also ruined the nut because I had to smack an 18mm socket on it to get any bite (they are 19mm nuts). I will post a separate thread about this issue.
Veteran Member


Joined: Feb 2014
Posts: 9,021
Likes: 3,658
From: Adelaide, South Australia
They probably are the original lug nuts, which are known for the caps coming off.
Crappy design really, I recently swapped out the OEM lug nuts on my F-Type for Gorilla black nuts. Nice solid one piece nuts and the black ones would probably go very well with your black packed XFR, or you can stick with chrome.
See this post: https://www.jaguarforums.com/forum/f...2/#post1711383
Crappy design really, I recently swapped out the OEM lug nuts on my F-Type for Gorilla black nuts. Nice solid one piece nuts and the black ones would probably go very well with your black packed XFR, or you can stick with chrome.
See this post: https://www.jaguarforums.com/forum/f...2/#post1711383

Senior Member
Joined: Aug 2012
Posts: 675
Likes: 126
From: Davenport, Iowa
There are several threads about the crappy factory lung nuts.
Buy a set of all-steel Toyota lugs from ebay for less than $25 shipped.
20 PCs TOYOTA-LEXUS OEM/FACTORY STYLE CHROME MAG LUG NUTS WITH WASHERS 12X1.5MM | eBay
Buy a set of all-steel Toyota lugs from ebay for less than $25 shipped.
20 PCs TOYOTA-LEXUS OEM/FACTORY STYLE CHROME MAG LUG NUTS WITH WASHERS 12X1.5MM | eBay
They probably are the original lug nuts, which are known for the caps coming off.
Crappy design really, I recently swapped out the OEM lug nuts on my F-Type for Gorilla black nuts. Nice solid one piece nuts and the black ones would probably go very well with your black packed XFR, or you can stick with chrome.
See this post: https://www.jaguarforums.com/forum/f...2/#post1711383
Crappy design really, I recently swapped out the OEM lug nuts on my F-Type for Gorilla black nuts. Nice solid one piece nuts and the black ones would probably go very well with your black packed XFR, or you can stick with chrome.
See this post: https://www.jaguarforums.com/forum/f...2/#post1711383
Veteran Member
Joined: Feb 2014
Posts: 9,021
Likes: 3,658
From: Adelaide, South Australia
There are several threads about the crappy factory lung nuts.
Buy a set of all-steel Toyota lugs from ebay for less than $25 shipped.
20 PCs TOYOTA-LEXUS OEM/FACTORY STYLE CHROME MAG LUG NUTS WITH WASHERS 12X1.5MM | eBay
Buy a set of all-steel Toyota lugs from ebay for less than $25 shipped.
20 PCs TOYOTA-LEXUS OEM/FACTORY STYLE CHROME MAG LUG NUTS WITH WASHERS 12X1.5MM | eBay
One problem though is they are all 21 mm head instead of the Jag OEM 19 mm head, so at a minimum you need a new or different socket, and on some wheel designs the lug holes are a bit narrow so the socket can be a very tight fit.
Also, I tried some very similar ones on my F-Type but on the rear they would not seat properly, due to the shank of the nut being slightly longer than OEM and/or the spacers I had fitted and/or the hole design of the particular wheels I have (Blade).
So you pays your money and you takes your chances!
Also it's important to remember when buying or fitting after-market lug nuts on modern Jags that they must be "mag seat" with a washer, ie flat face, and not the more common acorn or bulge type, see here: https://www.brandsport.com/howdoifirilu.html
The Gorilla nuts I have now went on perfectly, the only downside is they are a fair bit pricier than the available Toyota or Mitsubishi nuts.
Member
Joined: Jul 2019
Posts: 79
Likes: 37
From: Tulsa
I appreciate the thread on the brakes edobernig. I know I could have done this myself but as I type this I am having a complete brake replacement done. Rotors and pads are OEM but went with pad sensors from BrakeBest Part #116.20003 & 116.20004. The XF is running awesome and I could not be happier. One helluva nice car.
Jaguar front and rear pads - $431.99 (includes $17.99 - pads only for one day shipping) Oklahoma tax included on all) AutohausAZ
Jaguar front and rear rotors - $735.48 Free Ground Shipping AutohausAZ 130lbs.
BrakeBest pad sensors (4) - $110.75 ORiellys
Labor - $350.00
Total - $1628.22
Jaguar front and rear pads - $431.99 (includes $17.99 - pads only for one day shipping) Oklahoma tax included on all) AutohausAZ
Jaguar front and rear rotors - $735.48 Free Ground Shipping AutohausAZ 130lbs.
BrakeBest pad sensors (4) - $110.75 ORiellys
Labor - $350.00
Total - $1628.22
Last edited by SunFlower; Nov 4, 2019 at 12:51 PM.
Member
Joined: Jul 2019
Posts: 79
Likes: 37
From: Tulsa
Picked the car up a bit ago. Although I purchased 2 front and 2 rear brake pad sensors I learned that I only needed one of each. Already returned them to ORielly's.
Subtract $55.30 from the previous total which brings the cost for the brake job to $1572.92. Not bad at all. One thing I did notice now was the brake pedal is not quite as sensitive as it has been since I purchased it, thank God. Before the replacement I would barely touch the brake pedal and the car would want to stop immediately. Coming to a slow stop was rather difficult and the only thing about the car I did not like. Not a problem anymore. Smooth stops are now easily done. My guess is it had something to do with how wore down the rotors were getting and how long the brake pads had been on it. Rotors were definitely ready to be replaced (sizeable ridges one both sides of each rotor).
Have a great week and stay safe.
Senior Member
Joined: Mar 2017
Posts: 354
Likes: 36
From: upstate new york
Picked the car up a bit ago. Although I purchased 2 front and 2 rear brake pad sensors I learned that I only needed one of each. Already returned them to ORielly's.
Subtract $55.30 from the previous total which brings the cost for the brake job to $1572.92. Not bad at all. One thing I did notice now was the brake pedal is not quite as sensitive as it has been since I purchased it, thank God. Before the replacement I would barely touch the brake pedal and the car would want to stop immediately. Coming to a slow stop was rather difficult and the only thing about the car I did not like. Not a problem anymore. Smooth stops are now easily done. My guess is it had something to do with how wore down the rotors were getting and how long the brake pads had been on it. Rotors were definitely ready to be replaced (sizeable ridges one both sides of each rotor).
Have a great week and stay safe.
Subtract $55.30 from the previous total which brings the cost for the brake job to $1572.92. Not bad at all. One thing I did notice now was the brake pedal is not quite as sensitive as it has been since I purchased it, thank God. Before the replacement I would barely touch the brake pedal and the car would want to stop immediately. Coming to a slow stop was rather difficult and the only thing about the car I did not like. Not a problem anymore. Smooth stops are now easily done. My guess is it had something to do with how wore down the rotors were getting and how long the brake pads had been on it. Rotors were definitely ready to be replaced (sizeable ridges one both sides of each rotor).
Have a great week and stay safe.

Member
Joined: Jul 2019
Posts: 79
Likes: 37
From: Tulsa
the dusty organic pads are impossible to stop smoothly, at least that's what i experienced before switching to semi metallic or ceramic - and they are less dusty. I believe all in the aftermarket parts - replacement pads, rotors (drilled and slotted) and sensors for all 4 corners cost $700 with me doing the labor. LOL- i bet the rotors are 40 pounds each!!
$700 is a whole lot better then $1500 though. My hat is off to you Adam J.
Forgot - Yes, damn near 40 lbs a piece. 35 to be exact. The delivery was so heavy that the Walgreens store that I picked them up at just left the FedEx delivery back in there supply/stock part of the store. I had to borrow one of their dolly's to get them out to my truck.
Last edited by SunFlower; Nov 4, 2019 at 06:40 PM.

Junior Member
Joined: Nov 2019
Posts: 2
Likes: 0
From: Texas
Have a 2012 XF, Replacing the rear pads and rotors. Everything went as according to plan BUT now after whining back the calibers they RETURN to the old pad position, I can not get them to stay!, Any ideas?
Junior Member
Joined: May 2019
Posts: 26
Likes: 0
From: Sterling, Va.
This article, which contains a PDF for bleeding the brakes, does not contain any information on how to do a system-wide brake fluid change/exchange. It would be nice if this were added to this article. It must, though, contain the procedure for bleeding the ENTIRE system, ABS pump unit especially.

Senior Member

Joined: Jun 2019
Posts: 487
Likes: 146
From: Chicago
Just to help out anyone who is having trouble with it, I have a XJ 5.0 SC and XKR 4.2 SC and the process is pretty much the same on all of these (XKR has torx instead of hex socket). But on all 4 rear calipers, retracting that piston required cracking the bleed nozzle (10mm) to relieve pressure enough to be able to retract the piston.
I used SDD to put the caliper in service mode, and I have the proper windback tool- and yet all rear calipers required this extra step to retract enough to fit new pads in.
I used SDD to put the caliper in service mode, and I have the proper windback tool- and yet all rear calipers required this extra step to retract enough to fit new pads in.