When you click on links to various merchants on this site and make a purchase, this can result in this site earning a commission. Affiliate programs and affiliations include, but are not limited to, the eBay Partner Network.
Xdave if you are out there we have an error in the parts list??
PHP Code:
Non-latching 12V 15A automotive relay and enclosure. You need 3 per side. You could use Simtek p/n REL-905 mini relays and their REL-07U 7 way mini relay box to house everything neatly.
I ordered everything from SimTek and got the parts BUT the relay box is for MICRO relays and the relays listed are MINI relays. Well these are 2 completely different made relays.
I should have caught this because they are plainly labeled Micro and Mini on SimTek's website but I overlooked it.
Here is a MICRO relay;
Here is a MINI relay;
I did find some MICRO relays on SimTek but with lower Amp ratings. I could NOT find a relay box to hold MINI style relays.
I can make the harness and not use the relay box but it is a way to neatly store all the relays.
Any suggestions?
I can always just wrap the relays in a plastic bag.
.
.
.
Last edited by clubairth1; Nov 19, 2017 at 12:58 PM.
Getting the parts together and have a question on the relay wiring?
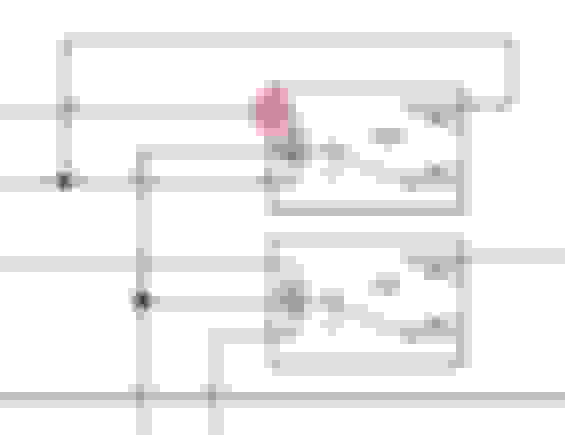
A coil will operate with either polarity. But most have a bleed off diode across the coil so you want to hook them up correctly.
Which side of the coil is towards the top of the page?
Is the red circle below the positive side of the coil (86 on the relay)?
I think it is.
Made my harness but the LED lights don't work and I have a yellow error lamp on (Adaptive Front Lighting System Error)?
I have went thru the harness twice comparing it to the wiring diagram and seems to be correct? Used my meter to make sure all the pins and connections are good.
I wired my relays like this?
Diodes measure about 165 ohms one way and open the other way.
Mine only had a band on one end and I installed them like this diagram.
I can clear the error by hooking up the stock non-LED headlights and restarting the car.
I finally installed mine last night. What a difference it made. Car looks great with new lights, the DRL are so bright, they look really cool! I bought mine from the U.K. Guy Sam that wires them to be plug and play. Install itself isn't too bad. You have to partially remove the bumper, then 3 bolts hold in lights.
I bought the lights from U.K. Goldeneyes and had them shipped directly to Sam. He modifies the lights internally so you can literally just plug the OEM plug into the back and they work perfectly. The auto brights, cornering lights, and turn signals, drl, etc, no error codes yet either.
If your putting the diode across the relay coil then reverse bias it (arrow toward positive). Otherwise it will short out the coil and the relay will never energize.
A diode is usually used to short out the field collapse voltage which is always opposite. The diode protects the computer circuit from voltage spikes which will burn it out.
Made my harness but the LED lights don't work and I have a yellow error lamp on (Adaptive Front Lighting System Error)? Any idea what I have done wrong?
I am assuming that the LED drivers are not powering up at all (the signature lamps are not coming on) in which case we'll only look at the driver supply circuits and not bother with levelling or indicator, etc, just yet.
The yellow lamp (AFS error) can be triggered by the adaptive module or the JNC/fuse box. The first thing I would check would be the fuses in the JNC.
F24/5A Tan/RH position lamps
F35/10A/Red/LH position lamps
Put 10A in both (the OEM wiring is safe for around 30A @ 12V when bundled with others). There are spare fuses in the fuse box. That is to ensure we don't blow the RH fuse during testing.
Measuring the harness with the lamps disconnected is difficult because the car will shutdown certain circuits when a fault is detected, so no voltage or signal will be present when testing, but might otherwise be fine.
With the diodes, the cathode is the one with the bar, and the anode is the other end. In the schematic the arrow points from the anode to the cathode.
The purpose of the diode between pin 2 and one end of the PLR relay coil is to prevent the rear parking lamps on that side from being active when the car is unlocked but ignition is off as the AFS motor circuit would latch the relay on regardless of the lighting switch position. That is because we combine the parking lamp supply with the AFS motor supply to provide the LED driver power, and the latter is made active on unlocking.
If the AFS motor circuit draws too much current the JNC will shut it down and trigger an AFS fault. It could draw too much current if the parking lamp circuit was not also being switched in via the PLR relay, so check the diode between it and pin 2 is working as expected. (For testing you can short across the diode with wire and the rear lamps will come on while the vehicle is unlocked, but you shouldn't damage the AFS motor circuit as they will be at similar potentials - it will trigger an AFS fault though and shut down the latter within a few seconds of unlocking the car - and you will be bypassing that shutdown which may cause behavioural issues.)
If you have access to a mechanics stethoscope then, with the lamps disconnected, switch to ignition with the parking lamp switch off, and have someone listen to the PLR relay while switching the parking lamp switch on to confirm that it is switching the contacts over. That should still happen regardless of the AFS fault being triggered. The relay coil and diode should provide enough resistance to the parking lamp circuit to prevent the JNC shutting it down thinking there is a blown bulb. If you have shorted the diode the resistance of the coil will hopefully be enough. In that instance you can then check for around +12VDC on pins 8, 11 and 14 of your new headlamp connector which should then be connected directly to the cathode of the pin 2 diode (and NO/87 on PLR). There will be a small voltage drop across the diode (your datasheet shows 0.55V) so with the engine off you may see just below 12V depending on the condition of your battery.
If that test succeeds then, with the lamps connected, the LED drivers should power on and the signature lamps light up. None of the other wires are used in that process.
If that test fails double check all the wiring to/from PLR, and that pin 9 headlamp-side is connected to ground.
When diganosing issues like this is can often be easier to rule out what it isn't, rather than try and find what it is. So with that in mind and the harness disconnected from the vehicle then we can ignore pins 1,2,16 (nc) and 5,6,7,13 (unchanged). That leaves these to check with a multimeter:
- Pin 3 headlamp-side to PLR/NO
- Pin 4 headlamp-side to pin 11 car-side
- Pins 8, 11 and 14 headlamp-side should all be connected together, to the 'C'ommons on each relay, and to the cathode of the diode with the anode to pin 14 car-side
- Pin 10 headlamp-side to HBR/NO
- Pin 12 headlamp-side to pin 12 car side, and also to TIR/coil and HBR/coil
- Pin 1 car-side to one end of PLR/coil
- Pin 2 car-side to anode of diode before splitting to PLR/C and PLR/NO
- Pin 3 car-side to TIR/coil
- Pins 4 and 8 car-side nc
- Pin 10 car-side to HBR/coil
- Do still test that 5,6,7 and 13 are connected straight across.
Repeat for each side. Check there is no connection between sides with the harness disconnected.
I will PM you with my email address. If you still have problems please can you email me to discuss so we can work through them, then post an update to the thread when we have the resolution?
Thanks for all the help and I am making progress!
I stupidly got the 2 plugs reversed so I had it backwards!
So with the wiring done I have the new LED lights working fine. All functions that I can statically test anyway. High/low beam, turn signals, running lights. No errors on the dash now either.
One last problem? The J Blades don't go off with the headlights? If I plug the LED's in and the car is off then the J blades are not on.
If I power the car up and get the led light working when I turn the car or the lights off everything goes off except the 2 J blades and the amber bulb. If I unplug the LED and re-plug it in they stay off.
To me this would point to a diode installed wrong but I have checked them several times and they are correct.
IIRC there are maybe 9 or 12 different power states for these vehicles, rather than the 'traditional' 3 of off, ignition and engine running. The extras include things like 'vehicle unlocked but no door opened' through to 'vehicle locked and alarmed'.
The JNC powers the AFS motor when the vehicle is in an unlocked state. We deliberately use that to power the LED drivers whenever the vehicle is unlocked. The signature J blades will come on whenever the LED drivers are powered as with the OEM-equipped LED vehicles - there is no external signal to control them. (They are unaffected by the headlamp controls.)
If you unplug and then plug them back in with the vehicle unlocked then the JNC will disable the AFS motor circuit believing it to be open circuit, and it will not be powered again until the vehicle is reset (locked and unlocked). Most of the power circuits have built-in monitoring like that, and that appears to match what you are observing. It makes testing with the hood/bonnet open more difficult.
I have no direct experience of the US-spec lamps with the arrow shaped amber marker lamps on the external corners of the headlights, but I would expect them to be directly powered by the LED drivers whenever they are powered in the same way as the signature lamps. It sounds like that is happened with yours?
If you install, shut the car down, turn it to ignition (start without brake pedal pressed) with the lighting stalk in the off position then check the rear lamps should be off and the signature blades on. Then turn the car off check again - there should be no change. Lastly lock the car and the blades should go out. If the rear lamps are illuminated during any of those steps then the diode on pin 2 car-side is not working.
Then repeat the tests with the lighting stalk in the parking lamps/1st position. The rear lamps should be on throughout all tests, including when the vehicle is finally locked (as that is the purpose of the parking lamps).
If one or both of the rear lamps are not working then check the fuse for that side (front and rear position lamps share the same fuse one per side). They are the F24/5A Tan/RH position lamps, and F35/10A/Red/LH position lamps fuses in the JNC behind the rear seat back. If one or both rear lamps is not showing parking lamps or rear head lamps then the corresponding fuse has blown. As we are using that circuit to draw slightly over 5.2A at full peak load (with full beam lamps on) then after a long drive the fuse can blow if a 5A is fitted and you would notice intermittent flickering from that sides front LED driver. I installed a 10A into both of mine (for some reason one is factory 10A the other 5A, even though the circuits and wiring lengths are the same per side).
First a very Merry Christmas to all! Your help is very much appreciated!
Especially ABrice and Xdave both have jumped in to help!
Xdave that makes good sense and I will do some further trouble shooting. It appears that yes the car is doing what you describe. No tail lights when the J blades are on. I have not locked it yet and since I am plugging in the LED lights I can't close the hood. Not sure I can lock the car with the hood open?
I will also take your advice to replace the 5A fuse with a 10A version in both the F24 and F35 positions.
The fuse box behind the rear seat. Is this is the one Jaguar sewed up on us and I can't get to it unless I slice the fabric open behind the rear seat center fold down arm rest?
.
.
.
There is a small connector plugged into the side of the LH hood latch. Disconnect it and short the pins with a paperclip or wire to make it think the hood is shut.
Originally Posted by clubairth1
The fuse box behind the rear seat. Is this is the one Jaguar sewed up on us and I can't get to it unless I slice the fabric open behind the rear seat center fold down arm rest?
That's the one, but you can get to it without scissors by just removing the rear seat base and hinging the seat back/s forward. There is a perforated section in the middle of the soundproofing sheet which lifts up to reveal the fuse box.
The seat base comes up the same as every other car I have seen - there are four clips along the front edge that need releasing then it just lifts up from the front. You can actually see them if you lay on the floor. All are released by pressing from the RH to the LH side.
Looks like I got it.
Jumped the hood switch and locked the car. The J blades went out immediately with the head light auto delay set to zero. What is different that threw me off is the J Blades stay on after you turn off the car but don't lock it. But only the J Blades. They time out after 10-12 minutes as I measured it twice to make sure.
Got my yellow headlight error back too. Several cycles on and off and no change. It was blinking this time.
Opened the rear seat up and pivoted the seat back down to get at the passenger fuse box. Pretty nice for Jaguar to give us this easy access. Just pull 2 straps and the entire back seat back pivots forward. But I have to think how much more effort would it have taken to add folding rear seats??
Replaced #24 and #25 with 10A fuses as recommended. (Xdave I think the #35 was a typo?). What I found interesting is in the owners manual they list a 5A for the right side but a 10A for the left side??
Even stranger was my car had 5A fuses in both positions. I also checked the other fuses since I had been plugging in my harness to check and might have popped something (I hoped!). Got lucky and found #50 5A blown. The left side headlight motor. That fixed my yellow headlight error on the dash.
Now to build the second harness and drop the bumper stuff to change them out!
.
.
.
Wanted to report back now the install is complete!
Before with HID's;
With the LED Lights;
There is a small issue but I think it might only effect the XJR's?? The LED and HID lights interchange but the electrical plugs are just a bit different on the back. The XJR has another small radiator only on the passenger side. That is fed by a duct going to the lower passenger side grill opening. Oddly the drivers side grill has a blank off plate on it? I was thinking of taking it off.
In the car the plug is very close to the hoses coming out of that small radiator. No room to work putting it in or out but room for the plug. I ended up plugging the plug in first and then installing the headlight in the body. Not sure what this small radiator is for? Inter-cooler? Seems like there is one already in front of the radiator?
But real happy with the lights and looking forward to trying them out at night!
.
.
.
They look really gooood!!! Those lights make a huge difference!!! Great work with figuring out the solutions to those small bugs. XDave is a huge help with that stuff. I've bugged him a lot. Lol. I did notice those fuse amperage differences the in the owners manual too. I'm not sure why they're not the same on both. Great job with the lights, nice ride brother!!!!
I wanted to ask if any of you willing to build a harness for me to do this mod. I lived in the US and will pay for the harness. Great job and will love to swap out my 2013 Jaguar XJ lights for the 2016.
I did the work all by myself. No mechanic, no electrician needed. I'm a novice too. I was completely clueless. I followed the wiring schematic and instructions posted by XDave, and watched a few youtube videos on soldering, diodes and relays just so I could them connect properly. It's really not hard at all.
I found the bumper on Ebay from a UK seller. The bumper came complete with the grille, emblem, parking sensors and wiring harness. I paid about $1250 shipped to the US. I then got the bumper painted to match my current color. The paint job was $350 and it matches perfectly!
The headlights were both used, and purchased off of Ebay. The left headlight was $320 and the right headlight was $900. I couldn't find one cheaper at the time. I paid $700 both of the rear taillights. The same seller in the UK that had the front bumper, also had the taillights.
The wiring harness components total costs about $250. I ordered them from that SIMTEK website that's mentioned in the thread. All of the parts come separately. You'll have to piece them together before you can actually start. Example, the circular headlight connector comes separately. You have to individually attach wiring to the 16 pinouts and stuff them through the connectors. This may sound confusing, but the items look exactly like the headlight connections that are currently attached to your vehicle. You have to take the parts and build the harness connections the same way. Then start following the diagram that's posted in this thread. That's probably the most time consuming part. Once you figure it out, it's easy but still time consuming considering that you have to build 2 headlight connectors per side (1 male, 1 female). It took me about 4 or 5 days to build the harness, that's working on it a few hours after work everyday. I'm willing to help you out in greater detail. Hopefully this is enough to get you started.
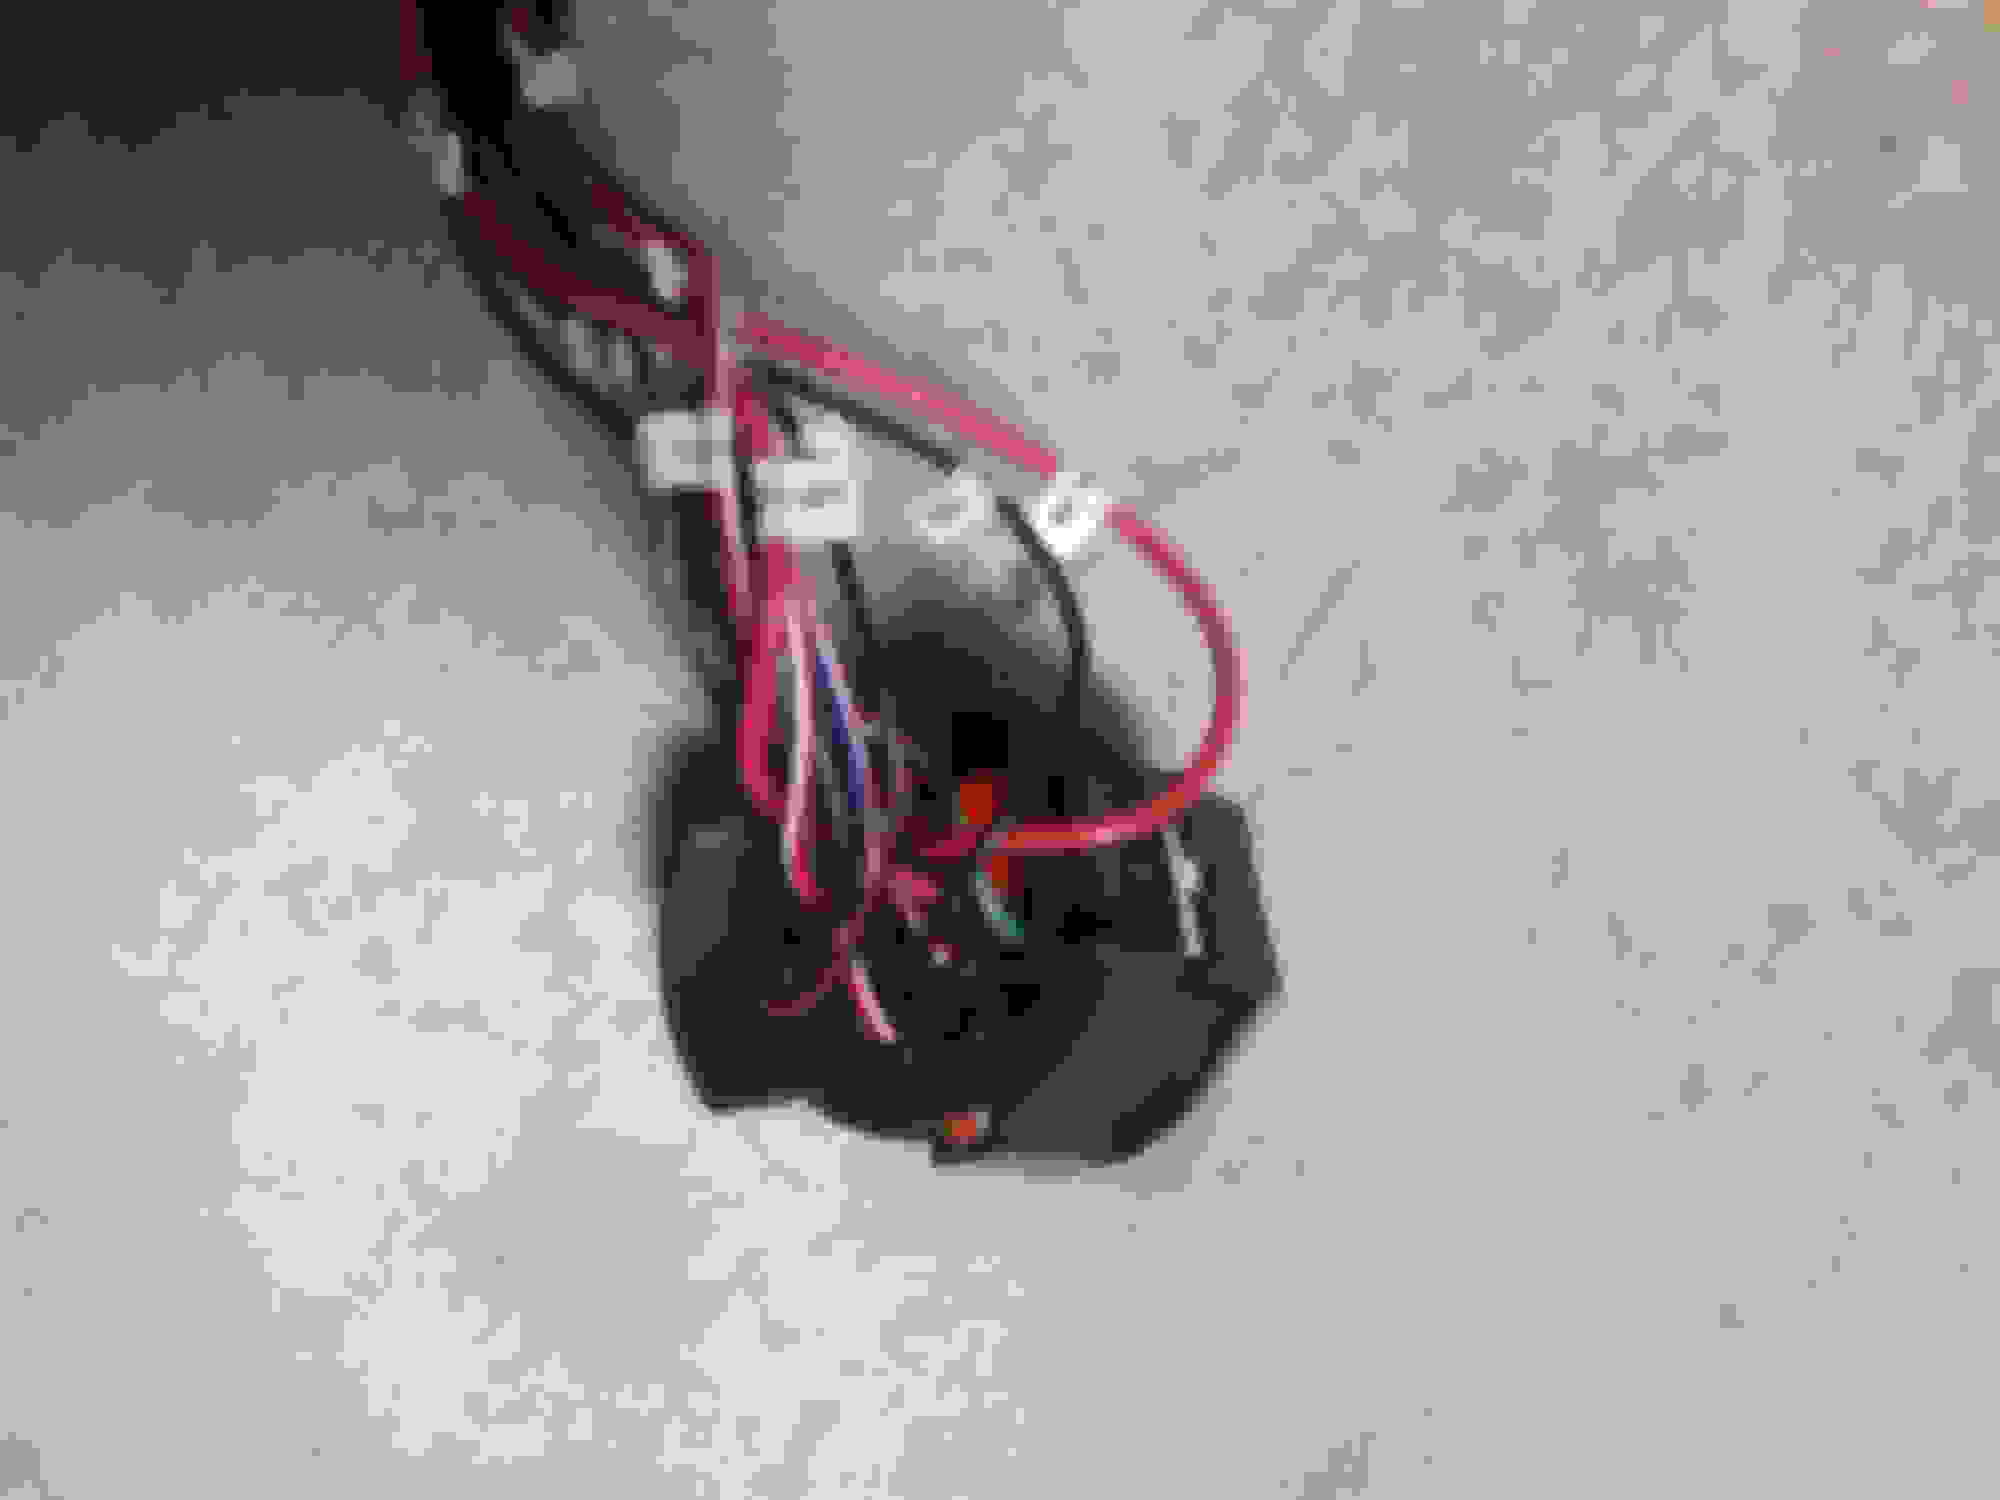
Here's a few pictures of the actual headlight harness. You experienced electrians out there, dont laugh. Lol. It's not pretty, but it works...and I didnt pay any labor costs.
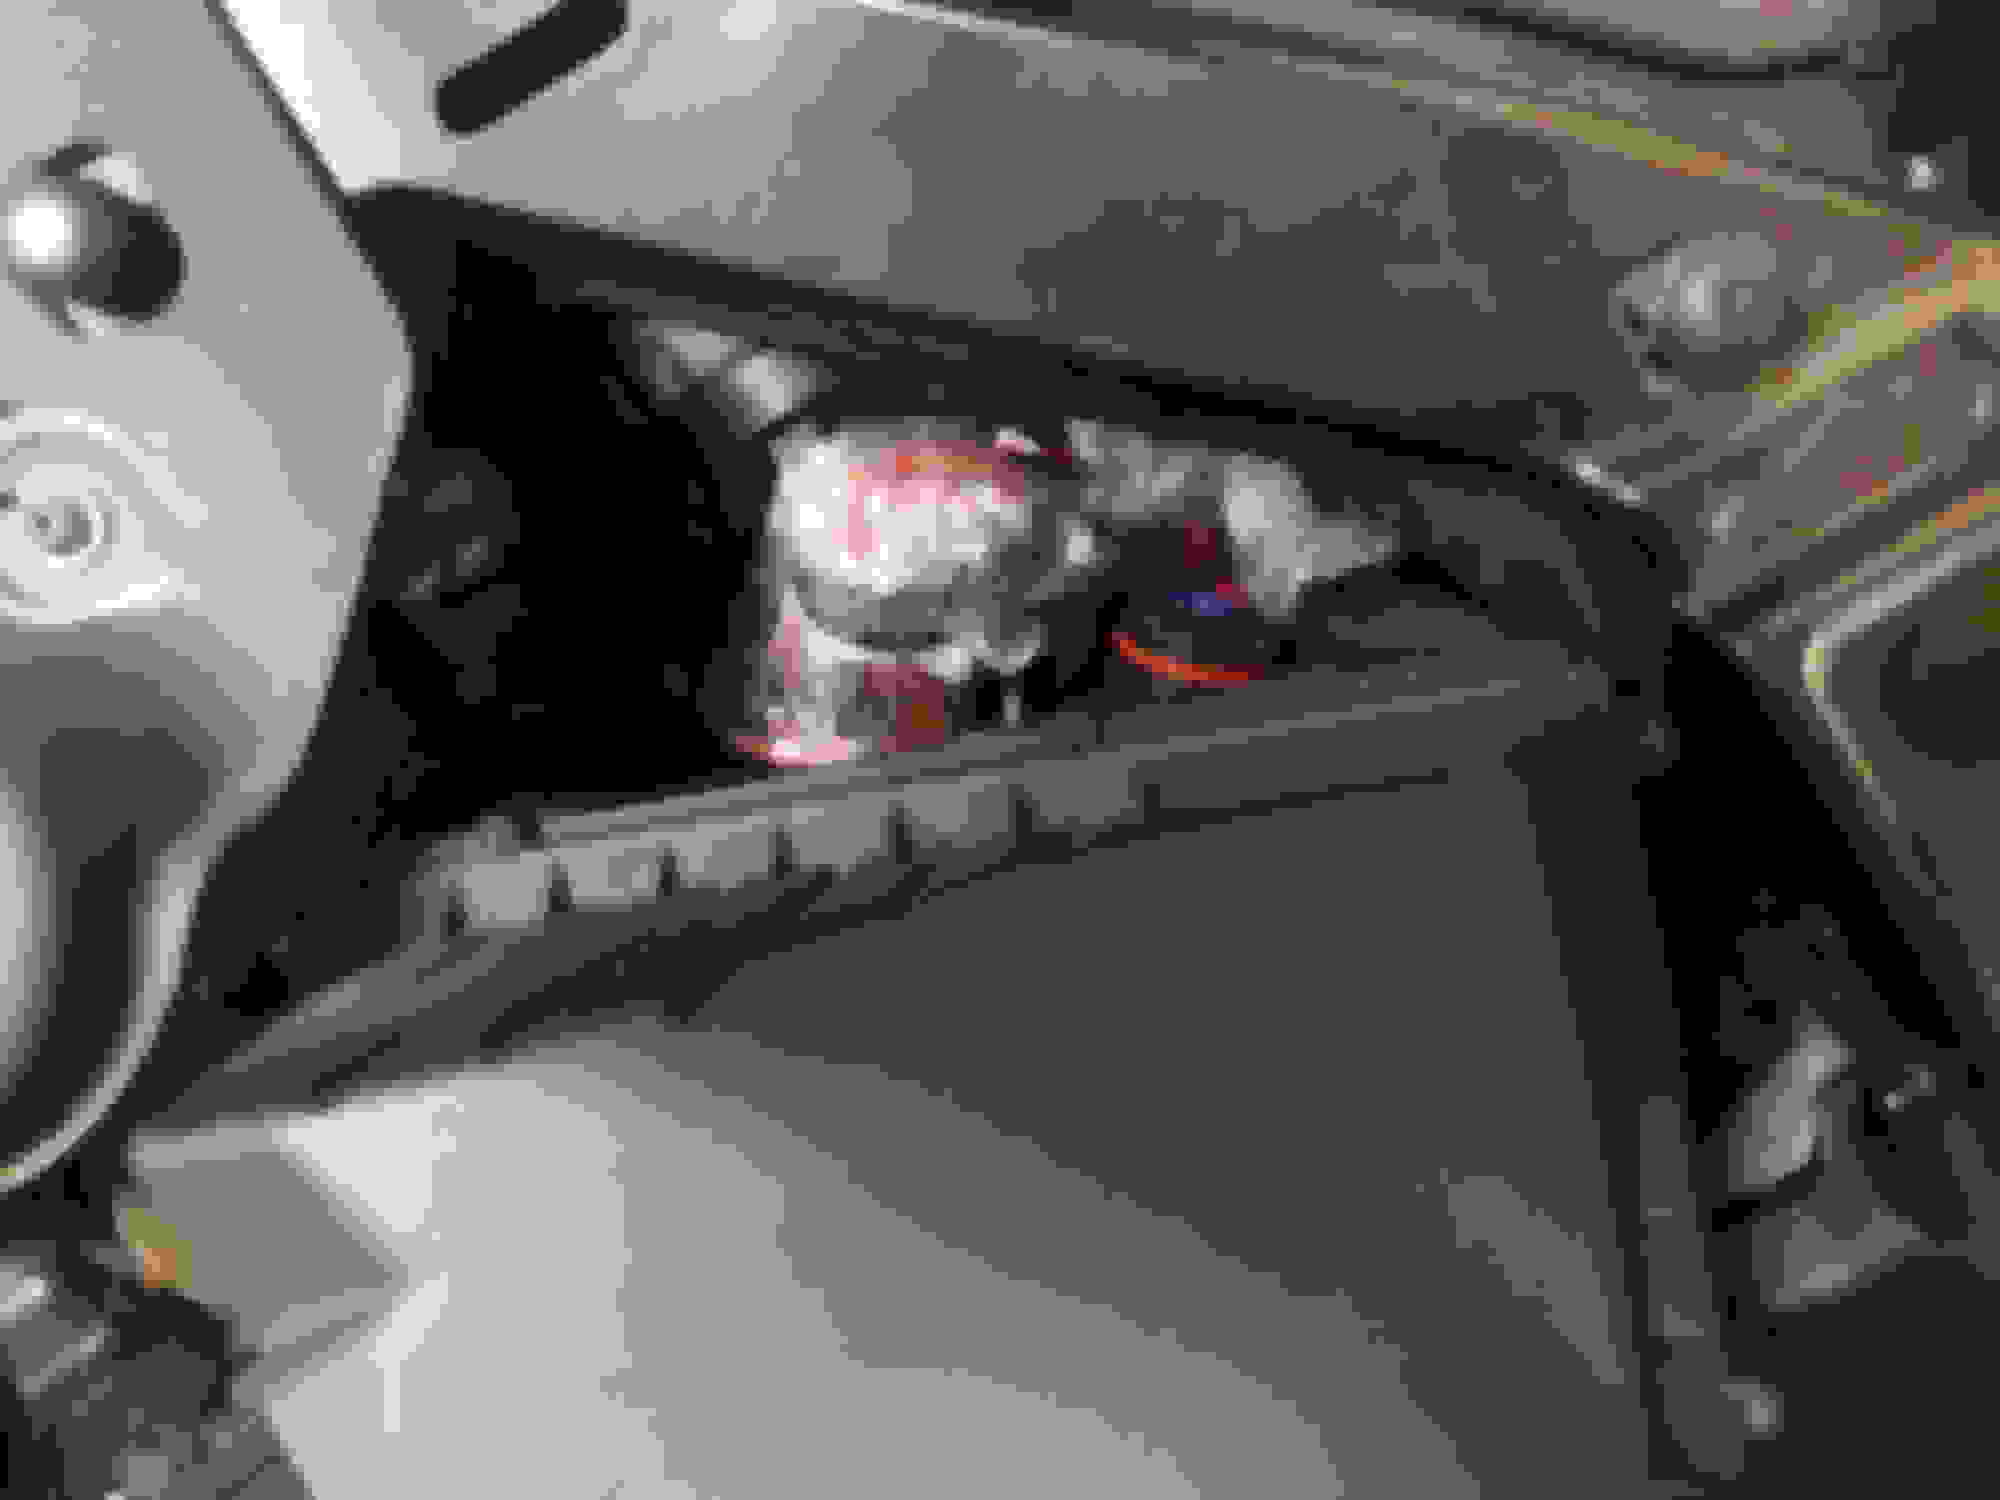
The headlight harness shown connected under the hood. I use zip ties to secure it. I used the zip lock bag to further waterproof the relays, diodes, and connections although everything is aleady properly sealed. You can never be too safe. The parts comes separately. You'll start off building these first. The diagram shows you which pinouts you'll actually use. I numbered mine so that I could better follow it.
Hi A Brice,
I am thinking of doing this mod. Do you remember if you made any changes or run any wire from or to the fuse box?
Is the harness the only thing you added to complete the mod?
Just a comment?
I just used the diagram Xdave posted. You don't need to run any other wires.
That's the best part it's just a harness and there are no other mods needed to the car. Just plug the harness in-between the car and the new LED headlights.
This was important to me.
A update on the headlights. Working great but I have twice now got the adaptive headlight error on the dash when starting. Just a shutdown and restart and all was well.


 It's not pretty, but it works...and I didnt pay any labor costs.