
Tail light condensation

Thread Starter
|
Senior Member
Joined: Oct 2017
Posts: 249
Likes: 38
From: South Carolina
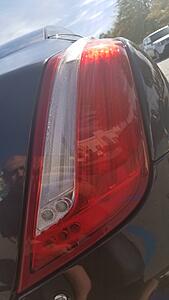
Have any of you guys experienced this? It is pretty much through the entire passenger side light, and never goes away. It wasnt there when I bought the car, but when the weather started getting cooler, it appeared and hasnt gone away.
My car is a CPO, but my local dealer said this isnt covered under the CPO (and the booklet I have basically says the same thing). My salesman (from a different Jag dealer) said it really depends on the servicing dealer's relationship with JLR corporate. The old methods of taking out the bulbs and drying the inside with a hair dryer wont work, and I am apprehensive about drilling a hole in the bottom of my tail light. Though if I need a new one, what difference does it make. Aside from pointing a hair dryer at the outside, or putting the tail light in a giant bowl of rice, anyone have any experience or ideas?
Or should I use this as an excuse to get 2016+ tails?


Thread Starter
|
Senior Member
Joined: Oct 2017
Posts: 249
Likes: 38
From: South Carolina
Originally Posted by clubairth1
Is that a slight crack in the plastic in your first picture?
Have you removed the light to inspect it where you can't see?
Have you removed the light to inspect it where you can't see?
I havent taken the light out yet, I was doing a lot of searching for manuals or step by step, i wasnt sure if the bumper had to come off, but based on what ive seen on the rear of the lights, it doesnt.
Thread Starter
|
Senior Member
Joined: Oct 2017
Posts: 249
Likes: 38
From: South Carolina
Whatever that line is, or was, i cant find it on the light now, at least with a flashlight in the garage. I will check again tomorrow during the day, but now that I know how to take the lights out, im going to give that a shot over the long weekend. Worst case scenario is i start sourcing some 2016+ tails.
Senior Member
Joined: Oct 2017
Posts: 962
Likes: 171
From: Batesville Arkansas
I remember reading these are LED, are they sealed with just wires hooking up to the assembly or do they have a replaceable LED bulb kind of a thing?
I've considered replacing my incandescents with the LED's that are made like a normal bulb. I have so many spare bulbs though I haven't run out yet.
I've considered replacing my incandescents with the LED's that are made like a normal bulb. I have so many spare bulbs though I haven't run out yet.
Thread Starter
|
Senior Member
Joined: Oct 2017
Posts: 249
Likes: 38
From: South Carolina
I remember reading these are LED, are they sealed with just wires hooking up to the assembly or do they have a replaceable LED bulb kind of a thing?
I've considered replacing my incandescents with the LED's that are made like a normal bulb. I have so many spare bulbs though I haven't run out yet.
I've considered replacing my incandescents with the LED's that are made like a normal bulb. I have so many spare bulbs though I haven't run out yet.

Whether the connector on the housing itself comes out, im not sure yet, but even if i did, i dont expect it to be much use since the LED boards will be in there, but ill know for sure this weekend.
Trending Topics
Thread Starter
|
Senior Member
Joined: Oct 2017
Posts: 249
Likes: 38
From: South Carolina
Yeah once that clicked in my head it was a bit of a bummer. I am going to try a couple of low dollar solutions, like drilling a vent hole in the bottom or using desiccate packets, or just pointing a hair dryer at it, but im not really expecting much.
Thread Starter
|
Senior Member
Joined: Oct 2017
Posts: 249
Likes: 38
From: South Carolina
in case anyone else has this issue and is searching the forum, drilling into these to let the water out really doesnt seem like a logical option, unless you have a replacement light available. the potential to drill into something, since you cant see what you are drilling into, is too high.
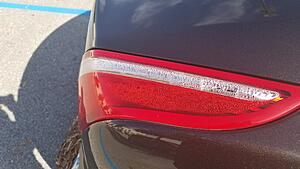
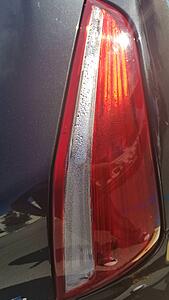
removing the tail light and basically hitting it with heat seems to be the best solution for now. i used my fireplace (gas) and since that is heating up the entire house, my next option is to try a small space heater. as far as fixing the problem from happening again goes, the lens doesnt seem to be one solid piece of plastic. Its like the white area was set into the red area, with a sealant or gasket in between, and that is where the water is coming in, because that is where it leaks out of. Maybe once as much of the water as possible is out, i will hit that with some clear silicone sealant or something.
The attached pictures show where it is leaking from, as well as the amount of water collecting at the bottom. Apologies for the bathroom photos, it was the best light without going back downstairs. /lazy

You could try Putting the light in a bucket of Rice for a couple of days to dry it out and then once dry scuff the lens with sandpaper and use a 2K clear to seal it.
Thread Starter
|
Senior Member
Joined: Oct 2017
Posts: 249
Likes: 38
From: South Carolina
i was joking around about doing that just not having enough rice to get the job done. It would be a pretty cheap solution though.

Senior Member


Joined: Jun 2019
Posts: 487
Likes: 146
From: Chicago
in case anyone else has this issue and is searching the forum, drilling into these to let the water out really doesnt seem like a logical option, unless you have a replacement light available. the potential to drill into something, since you cant see what you are drilling into, is too high.
removing the tail light and basically hitting it with heat seems to be the best solution for now. i used my fireplace (gas) and since that is heating up the entire house, my next option is to try a small space heater. as far as fixing the problem from happening again goes, the lens doesnt seem to be one solid piece of plastic. Its like the white area was set into the red area, with a sealant or gasket in between, and that is where the water is coming in, because that is where it leaks out of. Maybe once as much of the water as possible is out, i will hit that with some clear silicone sealant or something.
The attached pictures show where it is leaking from, as well as the amount of water collecting at the bottom. Apologies for the bathroom photos, it was the best light without going back downstairs. /lazy


Veteran Member


Joined: Jul 2013
Posts: 1,106
Likes: 330
From: Northern Virginia
Any update on a full solution? My passenger tail light has permanent condensation now. When I get a chance I will pull the light and dry it out, but any idea what to seal it with? Not having seen it myself, maybe a bead of silicon caulk?
Thanks!
Thanks!

Senior Member
Joined: Jun 2023
Posts: 322
Likes: 20
From: Bucharest
Why condensation? Except a crack? I don't have a crack and still condensationd
Senior Member
Joined: Jun 2023
Posts: 322
Likes: 20
From: Bucharest
hi guys.
it a almost summer and my condensation doesn't go away
so......couple of questions for you
is the clear part of the tail light a separate piece from the red part? if so, schematics? is there any way to dismantle the tail light? not remove from socket, discmantle if possible.
the black plastic part and the red and white part of the tail light, are glued? or heat pressed? or gasket?
i refuse to drill holes in it.
i will remove and dry the hell out of it.
i will use some really good bison adhesive , to seal everything on the back side. i used bison to repair parts of a headlight's broken mounts and its still holds after years. so.....why not to resigle the taillight?
i can and will ppf (protective film) the hell out of it.( done it on headlights and cars, wet and hot method)
did some of you did stuff like this? did it work? i really don't want to hear about drilling it , neighter front or back of it.
and finally.........you guys had moisture only on the transparent raised part......or in the red part also?
think the transparent part is inserted like in a socket , in the red part. if so.....that explaines why only transparent part is getting condensation.
so...please....ideas?

Veteran Member

Joined: Mar 2020
Posts: 1,133
Likes: 361
From: Finland, Helsinki
If you have accumulard water at botton: You have leak somewhere in lamp assembly.
Occosional moist is a dev effect caused by temperature differences and that is normal, because XJ rear light are closesd from factory and don�t breath moist out.
Many light assembly manufacturers use GORE valve stickers to reduct moist inside:
https://www.gore.com/products/gore-a...or-electronics
Cheap and easy to add as DIY.
Last edited by Vasara; May 10, 2024 at 01:04 PM.
Senior Member
Joined: Jun 2023
Posts: 322
Likes: 20
From: Bucharest
If you have accumulard water at botton: You have leak somewhere in lamp assembly.
Occosional moist is a dev effect caused by temperature differences and that is normal, because XJ rear light are closesd from factory and don�t breath moist out.
Many light assembly manufacturers use GORE valve stickers to reduct moist inside:
https://www.gore.com/products/gore-a...or-electronics
Cheap and easy to add as DIY.
Occosional moist is a dev effect caused by temperature differences and that is normal, because XJ rear light are closesd from factory and don�t breath moist out.
Many light assembly manufacturers use GORE valve stickers to reduct moist inside:
https://www.gore.com/products/gore-a...or-electronics
Cheap and easy to add as DIY.
Only at the top. Like a mist and some drips. But if sealed�. Where is it coming from?
Being led and not bulb, should be pretty air tight. Gasket from the plug?
Still.� some ideas for the source of the moist?
I prefer to seal everything really good
Veteran Member
Joined: Mar 2020
Posts: 1,133
Likes: 361
From: Finland, Helsinki
Air trapped inside in factory had moist already, like any normal air.