
Damon's XJ12


Thread Starter
|
Junior Member
Joined: Sep 2012
Posts: 27
Likes: 3
From: Houston, TX
Howdy!
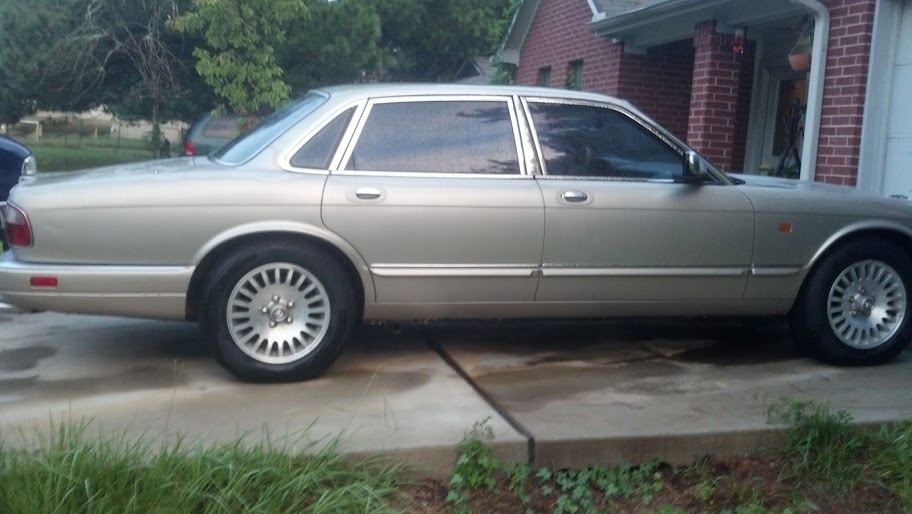
I recently picked up an issue-ridden '95 XJ12 for a pretty good price. Was looking for a comfortable cruiser due to a painful spine condition, and talked them down to half what my budget was. More than the other half has been spent on new tires and shocks, and trying to rectify a slew of problems.
But it will all be worth it. This is easily the greatest car I've ever driven.
I've previously had a few motorcycles:
-Ninja 500R
-SV650
-Triumph Daytona 955i
-Honda CBX
-Honda CBR900RR (2)
-Bandit 1200
-Honda GL650
-Honda VFR750 (excellent machine, well engineered)
And a too many cars to list. Had to give up the bikes, and also parted out/sold my turbocharged Miata. My daily was the new Mazda2, which was a fantastic car, but after the second neck surgery I decided it rode a bit too rough.
Had once owned an LS400, and was shopping for another, but could not find a decent example. Once I saw a V12 Jaguar sedan locally I decided I could withstand the punishment that would come with keeping one on the road in order to own such a car. I've always changed vehicles often to get new experiences, but this one is a KEEPER!
Car drives like a dream. Smooth and effortless.
Unfortunately I'm having to fix quite a few things:
-A/C
-PS fluid leaks
-clogged cats and wonky O2 sensors
-phantom battery drain
-trans warning light
-rear lighting issues
-driveline vibration at ~35mph and on decel
So far I've:
-put on new Michelins
-installed Bilstein shocks
-new plugs, wires and filters
-sourced a good rear lighting control module, and ran relays for the lights that still didn't work
-traced battery drain to the right side harness of the body processor module
-changed O2 sensors
I've got a few things left to try, like a new trans mount bushing and rubber driveshaft coupler. I'm really hoping it's not a rear diff issue or u-joints causing the vibration. I noted that they articulated well while swapping the rear shocks.
This will serve as a semi-build thread and a place to seek advice if ya'll don't mind checking in occasionally.
Thanks,
Damon
Thread Starter
|
Junior Member
Joined: Sep 2012
Posts: 27
Likes: 3
From: Houston, TX
Has anyone else measured the battery drain caused by their rear lighting control module?
Even after a half hour I'm seeing an extra 50mA current draw that disappears if I pull the 15A fuse in slot #6 in the back, which is for this module.
I've had rear light problems and want to know if this is normal.
I'm also still getting 150mA draw from the body processor module. Slowly going through the wiring diagram, but would also like to know if that is normal or not.
Overall "asleep" draw is ~240mA...just enough to worry me about leaving it overnight. I really want to get this under control so that the battery always stays connected and the ECU can go through the "learning" procedure. I'd like to see if that doesn't help the idle and gas mileage a bit as I'm sure it's running off base maps every time I reconnect the battery.
Thanks.
Thread Starter
|
Junior Member
Joined: Sep 2012
Posts: 27
Likes: 3
From: Houston, TX
I have found that the battery drain is at least bad enough to keep the car from starting after 3 days, but will start fine otherwise. Guess I can't leave it parked over the weekend as-is.
This weekend I changed gears and decided to chase down my driveline vibration. I changed the rear transmission mount bushing, and removed the center exhaust section in order to get more clearance for changing the jurid coupler. I was not able to remove the old one without doing so, but it was fine since I wanted to inspect and align the center propshaft bearing anyhow.
Removing the exhaust was a bit of a pain. I had planned on removing the downpipes to inspect and possibly hollow out the cats as well, but the driver's side appears impossible to get flange bolts.
Also, I had run a compression test while changing the plugs weekend before last. These are my numbers:

This was with engine cold, only three "pops" per cylinder test cycle, and throttle open. Even though pressure is below spec per manual (likely due to low engine temp), the variance across the cylinders is within spec.
More to come as things progress.
This weekend I changed gears and decided to chase down my driveline vibration. I changed the rear transmission mount bushing, and removed the center exhaust section in order to get more clearance for changing the jurid coupler. I was not able to remove the old one without doing so, but it was fine since I wanted to inspect and align the center propshaft bearing anyhow.
Removing the exhaust was a bit of a pain. I had planned on removing the downpipes to inspect and possibly hollow out the cats as well, but the driver's side appears impossible to get flange bolts.
Also, I had run a compression test while changing the plugs weekend before last. These are my numbers:
This was with engine cold, only three "pops" per cylinder test cycle, and throttle open. Even though pressure is below spec per manual (likely due to low engine temp), the variance across the cylinders is within spec.
More to come as things progress.
Thread Starter
|
Junior Member
Joined: Sep 2012
Posts: 27
Likes: 3
From: Houston, TX
I found that the driver's side downpipe bolts were accessible by removing the power steering heat shield. Both downpipes came off. This year does not have the screens at the downpipe entrance like earlier years, something I was looking forward to removing. Either way I will completely hollow out the downpipe until I'm later able to add high-flow 200 cell MetalCats.
The new jurid coupler went in easily once center exhaust was removed and carrier bearing support unbolted. I also aligned the driveshaft. I shimmed the shaft itself while doing this, and it pushes against the carrier bearing back towards the passenger side once pressure is released.
Has anyone considered reinforcing the carrier bearing surround material?
I've used 3M urethane to make/reinforce motor mounts and am considering similar here if my vibration issues continue.
Last edited by gospeed81; Dec 5, 2012 at 01:13 PM.

Thread Starter
|
Junior Member
Joined: Sep 2012
Posts: 27
Likes: 3
From: Houston, TX
Trending Topics
Thread Starter
|
Junior Member
Joined: Sep 2012
Posts: 27
Likes: 3
From: Houston, TX
I found that I won't be able to hollow the cats as I've done before with other cars. The second set of cats on these is a wound metal sheet, same style as aftermarket cats such as the MetalCats, and can not be punched out. I tried hard enough to break a mallet (and have the head bounce off my shin).
I'm off to an exhaust shop today to check out my options. At the very least I'll get a section of replacement pipe and weld it in myself. by cutting off the second cat I can access the first which should be easy to hollow out.
If I'm lucky the local shop will quote me a good price to just build a whole new downpipe, all straight thru tubing and bends with a y-connector. We shall see.
I also replaced the trans filter and fluid. Quite a bit of fine metal particulate on the magnetic plug, but the pan was clean. Beware of the WIX replacement filter kit as the gasket they include does not fit this pan, and is a much flimsier design than the OEM part which has pressed in metal bosses where the bolts pass through. I had to reuse the old one, but haven't run the car to see if it'll leak.
I realigned the driveshaft to see if it had settled. It had apparently, kicking out nearly a degree back towards the passenger side, which is where it was previously 2*+ misaligned. The rubber surround of the carrier bearing is maxed out to keep it in the new aligned position, so I imagine I'll find it has to be replaced. I still wonder if there isn't a way to reinforce this as long as the bearing itself is still good.
Thread Starter
|
Junior Member
Joined: Sep 2012
Posts: 27
Likes: 3
From: Houston, TX
I found this one for $3K, and managed to talk them down about what the set of tires cost me.
Unfortunately all said and done I've now got nearly $5K into the car, still have a few major issues to fix, and still am not driving it. There is no such thing as a cheap one.
Unfortunately all said and done I've now got nearly $5K into the car, still have a few major issues to fix, and still am not driving it. There is no such thing as a cheap one.
Senior Member
Joined: Oct 2009
Posts: 328
Likes: 92
From: Niagara Region, ON Canada
There is no such thing as a cheap one.
Reminds me of something said in the x300 buyers guide that another member, Doug Dwyer, made available to us. Here's the exerpt;
Price vs. Quality
There is nothing more expensive than a cheap Jaguar. Finding the right car is more important than finding the right price, within reason of course.
There is nothing more expensive than a cheap Jaguar. Finding the right car is more important than finding the right price, within reason of course.
Thread Starter
|
Junior Member
Joined: Sep 2012
Posts: 27
Likes: 3
From: Houston, TX
It's definitely proven to be true.
I finally got the car to the local exhaust shop where they replaced the entire middle section of the exhaust. I couldn't get a new downpipe fabricated, so I cut out the second cat and welded in a new section of pipe. Well, I spot welded it and took it to them to weld. Two shops claimed they couldn't weld it up due to the brittleness of the existing metal. So I then remounted the downpipes, and drove it up there (LOUDLY), where they just constructed anew from a new cut further up. This was right after the first cat (now hollow).
Not much louder, and don't know about power since I was just taking it a few blocks.
Remaining issues:
1. Power Steering leak. Will be replacing three hoses and rebuilding pump (has anyone attempted this?)
2. Chasing down battery drain. New theory is that the trunklid sensor is keeping body processor module from going to sleep (trunk ajar light on dash stays on).
3. Re-phase driveshaft again. It's aligned, but still vibrating. After that I'll have to break down and replace carrier bearing.
4. A/C. After the new compressor and high side line I've found it is MISSING the low pressure sensor, and that the low side fill port valve itself is leaking. Will charge after that and hope all is well.
Last edited by gospeed81; Dec 5, 2012 at 01:05 PM.
Thread Starter
|
Junior Member
Joined: Sep 2012
Posts: 27
Likes: 3
From: Houston, TX
Update on remaining issues:
1. Power steering leak(s) fixed.
I pulled the pump and alternator, cleaned both, and rebuilt the pump. The alternator got a good cleaning as it was caked. This all turned out to be for naught as it failed a week later. I first suspected cleaning didn't do it any favors, but found a wire on the back that had become exposed and likely ground killing some internal diodes or whatnot. I rewrapped the wire and installed a new alternator.
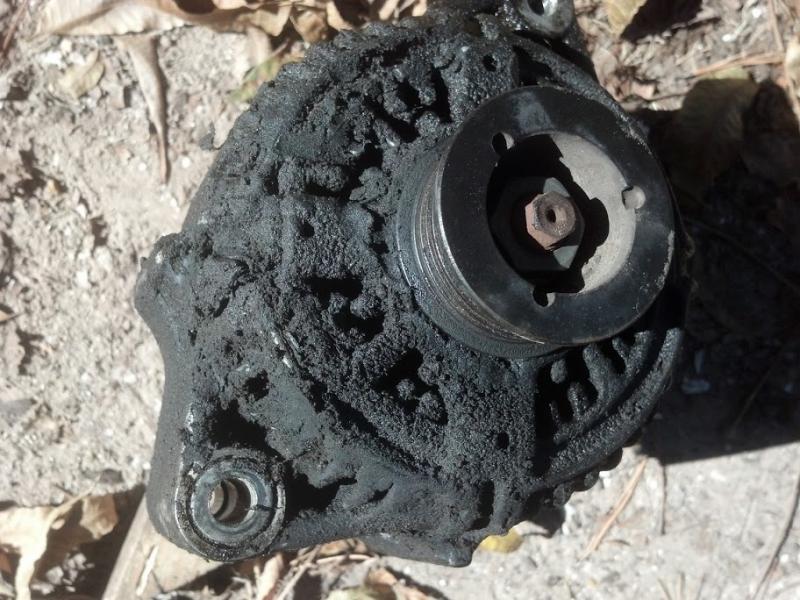
Dirty alternator, sorry no after pics, but I really cleaned it. It had been charging well at 14.8V, and I was worried about it possibly overheating due to lack of airflow, or a bit of this gunk working it's way into the windings.

I was not able to use the whole rebuild kit since I didn't want to completely disassemble the pump. It did not look easy as it was with the LS400, nor did I find any write-ups. Instead I just replaced the seals that are accessible once the case is split. Looking back I should have just spent for the new pump, as not being able to replace the bearing irked me a bit. Also, it looked like the impeller vanes had lost their spring pressure that pushes them out. This may not matter in actual operation due to the radial force on them. I also was not able to polish the volute they revolve in as I'd done on the Lexus.

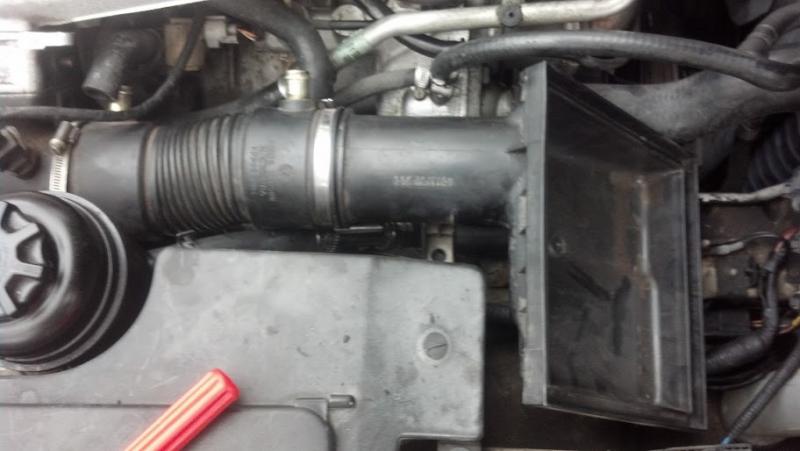
While I had the high pressure hose as well as one of the hoses that runs from the radiator to rack on hand, I did not have the reservoir hose that also appeared to be leaking. So I fabricated my own using a short run of straight hose, a chrome piece of pipe from Home Depot, and a random parts house hose that had just the right bends. Part numbers are shown for others who are not inclined to drop nearly $200 for this hose. Ended up costing me about $35 with hose clamps and all.
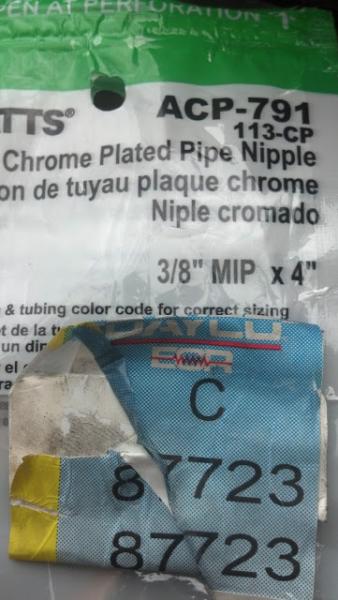

I used a little over 5" of straight hose to make the first run from reservoir to chrome connecting pipe.
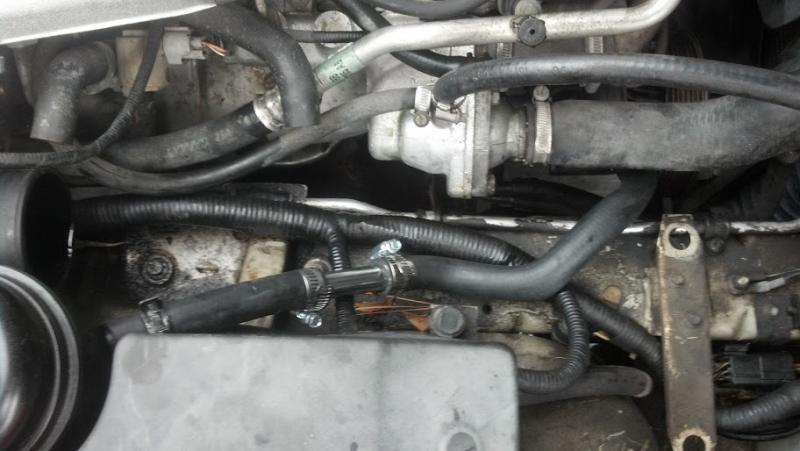
Completed
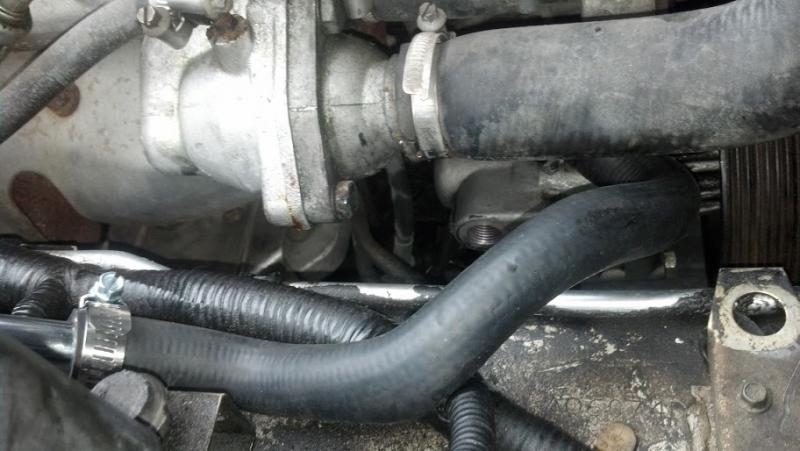
$25 AutoZone hose cleared well and snaked around intake.
I also replaced all 3 belts while I was in there, and cleaned all the tensioner assembly threaded eye bolts so tensioning and such was a lot easier. I was glad I did this when I had to replace the alternator 3 days later, made for a quick job besides having to remove the sway bar and passenger side wheel well lining to get access. Be aware that with the Advance Auto replacement alternator the connectors are "clocked" differently and you will have to re-route your main positive cable.
2. After much consulting with the wiring diagram I finally found the battery drain culprit!
It turned out the rear trunklid sensor was faulty, and was not allowing the security module or body processor module to go to sleep. I simply unplugged it for now. Battery stays charged, and I'm down to 80mA "sleeping state" current.
3. I rephased the driveshaft one more time, to no avail. Driveline vibration is still definitely there. I will now have to pull the driveshaft and replace the carrier bearing. Also may get driveshaft professionally balanced. Later may also replace motor mounts, and look into a stiffer transmission mount spring (in hopes it changes the natural frequency).
4. Have not touched A/C, it's cool now, and I haven't had a problem defrosting windscreen in the rain.
ADDED:
5. Front Upper Control Arm Bushings
I noticed the front passenger wheel has some side to side play and that these bushing appear very worn. Ordered for both sides, and will install before getting an alignment.
The really good news is I've now got the car in good enough shape that I can drive it daily. It's been a real pleasure besides the surprise (and sudden) alternator failure second day out.
At work:

The car is on Houston craigslist simply due to gas cost. I knew it would be bad, but things have gotten a little tighter, my commute 3 times longer, and I don't foresee the train of issues ever stopping.
Let me know if anyone is interested in buying it.
1. Power steering leak(s) fixed.
I pulled the pump and alternator, cleaned both, and rebuilt the pump. The alternator got a good cleaning as it was caked. This all turned out to be for naught as it failed a week later. I first suspected cleaning didn't do it any favors, but found a wire on the back that had become exposed and likely ground killing some internal diodes or whatnot. I rewrapped the wire and installed a new alternator.
Dirty alternator, sorry no after pics, but I really cleaned it. It had been charging well at 14.8V, and I was worried about it possibly overheating due to lack of airflow, or a bit of this gunk working it's way into the windings.
I was not able to use the whole rebuild kit since I didn't want to completely disassemble the pump. It did not look easy as it was with the LS400, nor did I find any write-ups. Instead I just replaced the seals that are accessible once the case is split. Looking back I should have just spent for the new pump, as not being able to replace the bearing irked me a bit. Also, it looked like the impeller vanes had lost their spring pressure that pushes them out. This may not matter in actual operation due to the radial force on them. I also was not able to polish the volute they revolve in as I'd done on the Lexus.
While I had the high pressure hose as well as one of the hoses that runs from the radiator to rack on hand, I did not have the reservoir hose that also appeared to be leaking. So I fabricated my own using a short run of straight hose, a chrome piece of pipe from Home Depot, and a random parts house hose that had just the right bends. Part numbers are shown for others who are not inclined to drop nearly $200 for this hose. Ended up costing me about $35 with hose clamps and all.
I used a little over 5" of straight hose to make the first run from reservoir to chrome connecting pipe.
Completed
$25 AutoZone hose cleared well and snaked around intake.
I also replaced all 3 belts while I was in there, and cleaned all the tensioner assembly threaded eye bolts so tensioning and such was a lot easier. I was glad I did this when I had to replace the alternator 3 days later, made for a quick job besides having to remove the sway bar and passenger side wheel well lining to get access. Be aware that with the Advance Auto replacement alternator the connectors are "clocked" differently and you will have to re-route your main positive cable.
2. After much consulting with the wiring diagram I finally found the battery drain culprit!
It turned out the rear trunklid sensor was faulty, and was not allowing the security module or body processor module to go to sleep. I simply unplugged it for now. Battery stays charged, and I'm down to 80mA "sleeping state" current.
3. I rephased the driveshaft one more time, to no avail. Driveline vibration is still definitely there. I will now have to pull the driveshaft and replace the carrier bearing. Also may get driveshaft professionally balanced. Later may also replace motor mounts, and look into a stiffer transmission mount spring (in hopes it changes the natural frequency).
4. Have not touched A/C, it's cool now, and I haven't had a problem defrosting windscreen in the rain.
ADDED:
5. Front Upper Control Arm Bushings
I noticed the front passenger wheel has some side to side play and that these bushing appear very worn. Ordered for both sides, and will install before getting an alignment.
The really good news is I've now got the car in good enough shape that I can drive it daily. It's been a real pleasure besides the surprise (and sudden) alternator failure second day out.
At work:
The car is on Houston craigslist simply due to gas cost. I knew it would be bad, but things have gotten a little tighter, my commute 3 times longer, and I don't foresee the train of issues ever stopping.
Let me know if anyone is interested in buying it.
Last edited by gospeed81; Dec 7, 2012 at 10:14 AM.

Veteran Member


Joined: Mar 2008
Posts: 25,541
Likes: 11,739
From: Pacific Northwest USA
Can you elaborate a bit?
Did you make up a jig and use it per the service manual? I've never really been able to wrap my head around the procesure as it is described.
I've been battling a bit of vibration for quite some time. At this point I seriously question if there's an actual problem or if I've become over-sensitized, but, still, I'd like more info on the procedure if you can help.
Cheers
DD
Thread Starter
|
Junior Member
Joined: Sep 2012
Posts: 27
Likes: 3
From: Houston, TX
The alignment per the manual involves using three plumb bombs, and a straight line fixture. Hard to explain, and I should have taken pictures. Also my manual with the diagram is at home.
So we'll start with theory I guess. The driveshaft is comprised of two parts, and can therefore articulate where these two parts meet. This will produce some sort of angle, which you are measuring by measuring the offset along a straight axis. To further complicate things the two pieces have different outside diameters, so a "zero angle" offset would measure as the difference in their radiuses.
Basically you measure both diameters (I wish I had written this down), subtract the smaller from the larger, and divide by 2 to get the proper offset from a straight line.
offset = (ODlarge-ODsmall)/2

The rear section is the larger diameter, and I hung two "bobs" off it. Just wrap any kind of string around it, and make sure it drapes right over the edge. So, twice on the rear section, and once on the front section. Your two rear weighted lines (I used sockets tied to twine) are what you aligned your 4th string to, which runs from front to rear of the car. For this I made some simple stands with 2x4s (upside down "T" style), notched at the top for the string.
You then measure how far this "straight" line is from the front most "bob". As you can see above, the driveshaft being canted one way will close this distance, and open it if it's misaligned the other way.
You then shift your carrier bearing bracket left or right until this offset is correct. It is an iterative process, and requires realigning your wooden stands and "straight" line after each adjustment.
NOTE: This did nothing to cure the vibration in my case, but should be checked anyhow. I also only believe it's beneficial if you've replaced your carrier bearing as mine has enough slack in it after only 100K miles that this adjustment required pushing the carrier bearing rubber almost to the extent of it's travel, meaning the bearing itself is no longer concentric with it's carrier housing. I plan to reinforce this rubber with 3M urethane and try again.
So we'll start with theory I guess. The driveshaft is comprised of two parts, and can therefore articulate where these two parts meet. This will produce some sort of angle, which you are measuring by measuring the offset along a straight axis. To further complicate things the two pieces have different outside diameters, so a "zero angle" offset would measure as the difference in their radiuses.
Basically you measure both diameters (I wish I had written this down), subtract the smaller from the larger, and divide by 2 to get the proper offset from a straight line.
offset = (ODlarge-ODsmall)/2
The rear section is the larger diameter, and I hung two "bobs" off it. Just wrap any kind of string around it, and make sure it drapes right over the edge. So, twice on the rear section, and once on the front section. Your two rear weighted lines (I used sockets tied to twine) are what you aligned your 4th string to, which runs from front to rear of the car. For this I made some simple stands with 2x4s (upside down "T" style), notched at the top for the string.
You then measure how far this "straight" line is from the front most "bob". As you can see above, the driveshaft being canted one way will close this distance, and open it if it's misaligned the other way.
You then shift your carrier bearing bracket left or right until this offset is correct. It is an iterative process, and requires realigning your wooden stands and "straight" line after each adjustment.
NOTE: This did nothing to cure the vibration in my case, but should be checked anyhow. I also only believe it's beneficial if you've replaced your carrier bearing as mine has enough slack in it after only 100K miles that this adjustment required pushing the carrier bearing rubber almost to the extent of it's travel, meaning the bearing itself is no longer concentric with it's carrier housing. I plan to reinforce this rubber with 3M urethane and try again.
Last edited by gospeed81; Dec 14, 2012 at 10:07 AM.
Veteran Member
Joined: Mar 2008
Posts: 25,541
Likes: 11,739
From: Pacific Northwest USA
Many thanks for taking the time for such a thorough reply.
Over the last week I've been trial-and-error experimenting with the adjustment (very easy to do if you have a hoist...only takes a few seconds) and I think I've found the sweet spot. More time on the road will confirm.
Cheers and thanks
Doug
Over the last week I've been trial-and-error experimenting with the adjustment (very easy to do if you have a hoist...only takes a few seconds) and I think I've found the sweet spot. More time on the road will confirm.
Cheers and thanks
Doug

Joined: Sep 2010
Posts: 2,114
Likes: 976
From: Indianapolis, IN
Many thanks for taking the time for such a thorough reply.
Over the last week I've been trial-and-error experimenting with the adjustment (very easy to do if you have a hoist...only takes a few seconds) and I think I've found the sweet spot. More time on the road will confirm.
Cheers and thanks
Doug
Over the last week I've been trial-and-error experimenting with the adjustment (very easy to do if you have a hoist...only takes a few seconds) and I think I've found the sweet spot. More time on the road will confirm.
Cheers and thanks
Doug
Been there, done that!
Cheers,
Veteran Member
Joined: Mar 2008
Posts: 25,541
Likes: 11,739
From: Pacific Northwest USA
It's as good now as I can ever remember it being.
I think the u-joints and center bearing were my actual problem but I must've lost the factory center bearing adjustment/location in the process.....I dunno how, as I thought I had it properly marked, but that's the only thing I can think of.
Adjustment of the center bearing shifts the vibration (more like a "tingle" than a vibration, if you get what I mean) from the seat to the steering wheel. Oddly, I can't feel it anywhere else and, believe me, I've tried. I would expect to feel it on the floorboards but I don't. Weird, since the seat is *attached* to the floorboards :-)
Before replacing the uj's and center bearing the vibration was very apparent thru the center console and images in the outside mirrors blurred from the vibration. All of that is gone.
What's left is too high frequency to get a reliable reading on the electronic vibration analyzer that I borrow.
I pretty well convinced that, yes, I've become hyper-sensitive/hyper-focused to the issue. I'll have to somehow just stop thinking about it.
Cheers and thanks
Doug