
308 Radio Installation Faceplate Adapter Kit on ebay

Veteran Member


Joined: Apr 2009
Posts: 1,737
Likes: 533
From: Lancashire, UK
You could even use gauges from the XK8/R which are still Jaguar items so would match really well. It would echo the original XJ6 design from the late sixties! I wonder if a thin strip of wood veneer in the area where you propose to mount the gauges would look good? Might break up the plainness of the blank area.

Thread Starter
|
Senior Member
Joined: Feb 2011
Posts: 134
Likes: 18
From: Sacramento, CA
There's only about an inch up there, I think it would be difficult see gauges that small at that distance. Maybe some kind of digital display could be added in but there isn't that much room.
The more I look at this, the more I like the black, without the leather idea. It matches the rest of the stereo color very well. Maybe a cat head up there, in chrome. The stereo will have a front panel USB for powering the phone, it is a GPS, so what do I need another power for, when the ashtray port is still available. Still thinking this through.
One thing important to me is to get my phone in a good location, easy to see, close to touch, and not in the way. I am thinking of a sheet metal bracket that comes out of the left side of this faceplate and holds the phone just above the line of sight to the stereo, over a portion of that one inch unused space in this faceplate, and a bit over the heater, mainly the fan knob. The small space above the stereo is no loss, and it is close, easy access, and right next to the stereo USB port for a short cable. I would want the bracket to rotate to change between landscape and portrait. Bluetooth streaming audio is great, the GPS smoothly interrupts it on my G2, as does a phone call.
I am also thinking of getting a 3" screen down there for menu selection, and music info, and maybe a backup camera.
Probably will not take any quick action until all this gels...
Might also put a power port in the center console.

Junior Member
Joined: Mar 2011
Posts: 12
Likes: 1
From: San Diego
Ok, I finally figured out how to reply here. It's Greg again, I'm the guy selling the Jag dash kits. I appreciate all the feedback from the members here and am making a few changes based on these comments. Thanks especially to h2oboy who graciously welcomed me and offered to help as well. I would like to take you up on your offer of the swatches of leather so I can experiment and possibly offer that as an option. (How shall I get my address to you?)
By the way, the website is now live-yeah! Here it is: http://www.hardtofindradiodashkits.com/
As far as the "leaper"; I did a lot of research trying to come up with something to fill the large space above the radio. I wanted to use the leaper like the ones over the radio in the series III XJ6 Jag-the one up to 1987, but could find only a few poor quality used versions, as new ones are not available. I had to find a source for something consistent, so found someone to make the ones you see on the kit now. The kits can be ordered without the leaper if someone wants to do something of their own choosing. Some of the ideas offered have been quite good.
QuadManiac has mentioned wanting to see pictures from different angles. I will take some soon and figure out how to post them here (this type of forum is new to me and am in the process of learning the ins and outs). Also, the dimensions for the blank space above the radio opening are 9 3/16"w X 1 1/5"h X 9/16"d (quite solid and sturdy-it does not flex).
stu1986 asked about the possibility of installing a flip-up nav-type head unit. In theory it should work fine, as there is ample room for it to swing up. However, I have not yet installed one to see if it will work in practice. Notice the radio is low in the opening (you would see why once the original radio is removed. It is dense with plastic behind there and would require a cost-prohibitive modification to the housing to be able to raise the radio higher). I have spent countless hours (and dollars) on this project trying to offer this at a cost that is attractive and still net a few bucks in the process. So tell everyone you know so I can keep them available!
Again, thanks and I am here to offer any assistance I can.
Best, Greg
Thread Starter
|
Senior Member
Joined: Feb 2011
Posts: 134
Likes: 18
From: Sacramento, CA
Gents, I have taken the next step and here is my report...
1) Greg, awesome job on the instructions. I was preparing to document my job with photos, when reviewing your work it became clear that you had already done that, better than I would have. Spend 5 minutes reading them before starting, and then have them in the car with you, and the job goes as smooth as any I have done, ready for the new stereo in under 45 minutes (including read time). Well done.
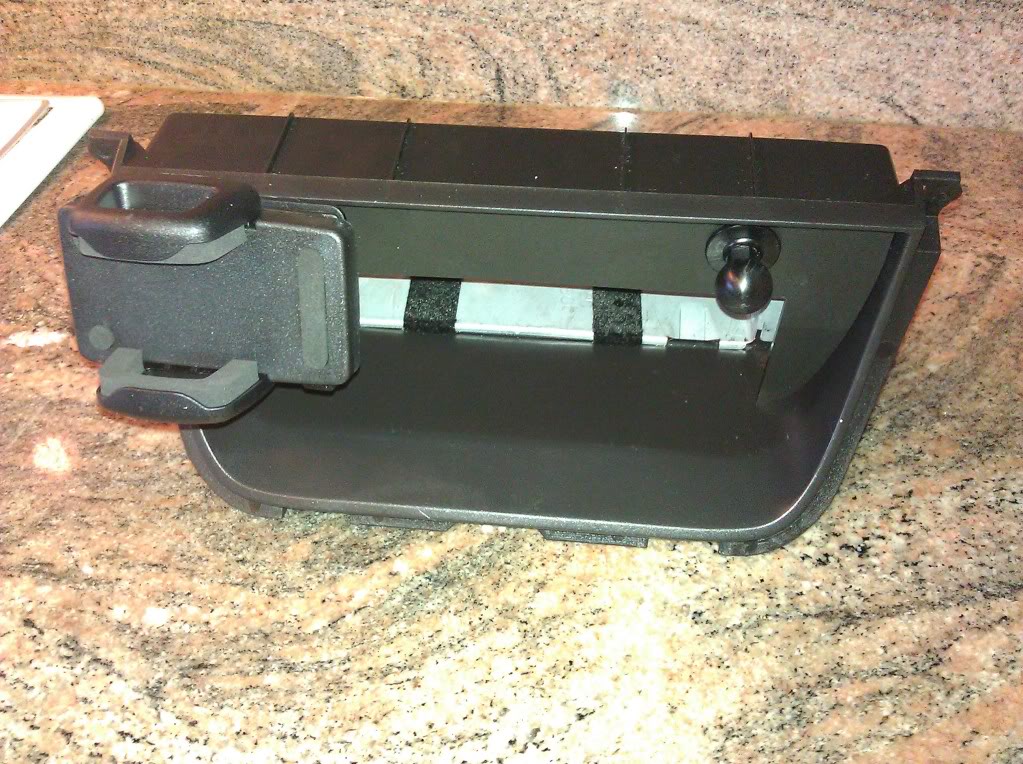
There is little space behind the upper panel area, not enough for a 12 volt power plug. Maybe 1.5" to play with, but the stock housing (still used in this approach) uses this space for reinforcement, meaning if you do put in a switch or whatever, have a dremel or cutting tool available to cut through some of the platic bracing in that area (doable easily with said tools). You can see the top of the assembly in the pics below, and the plastic box sticking out behind the faceplate is about all the depth you get.
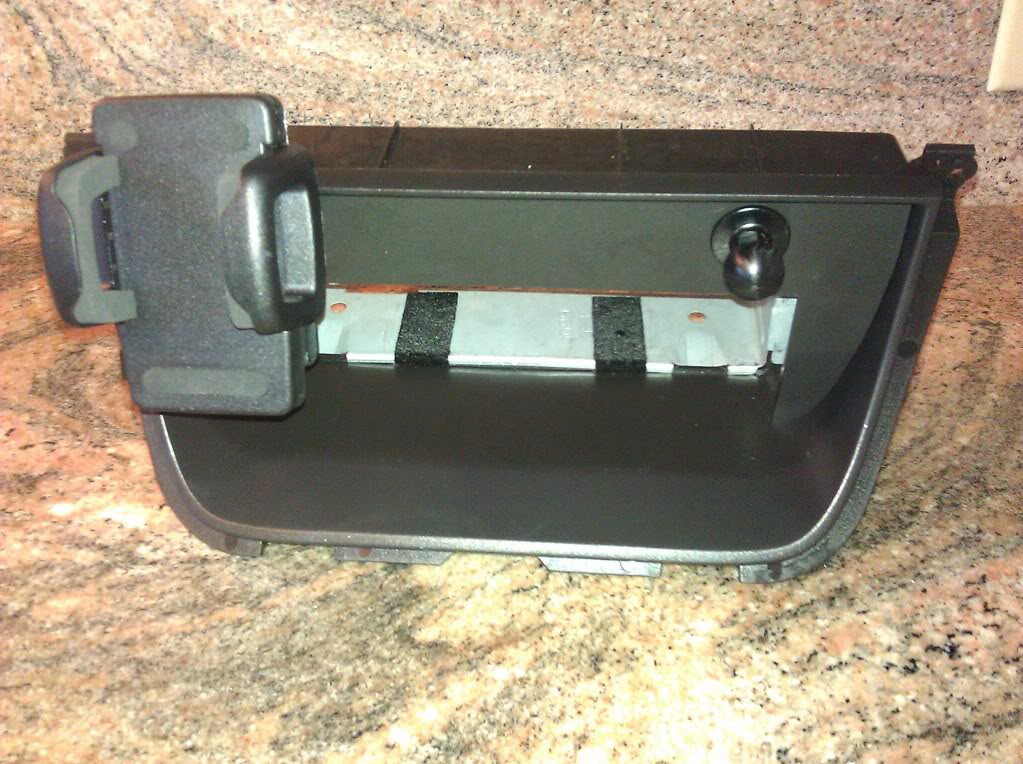
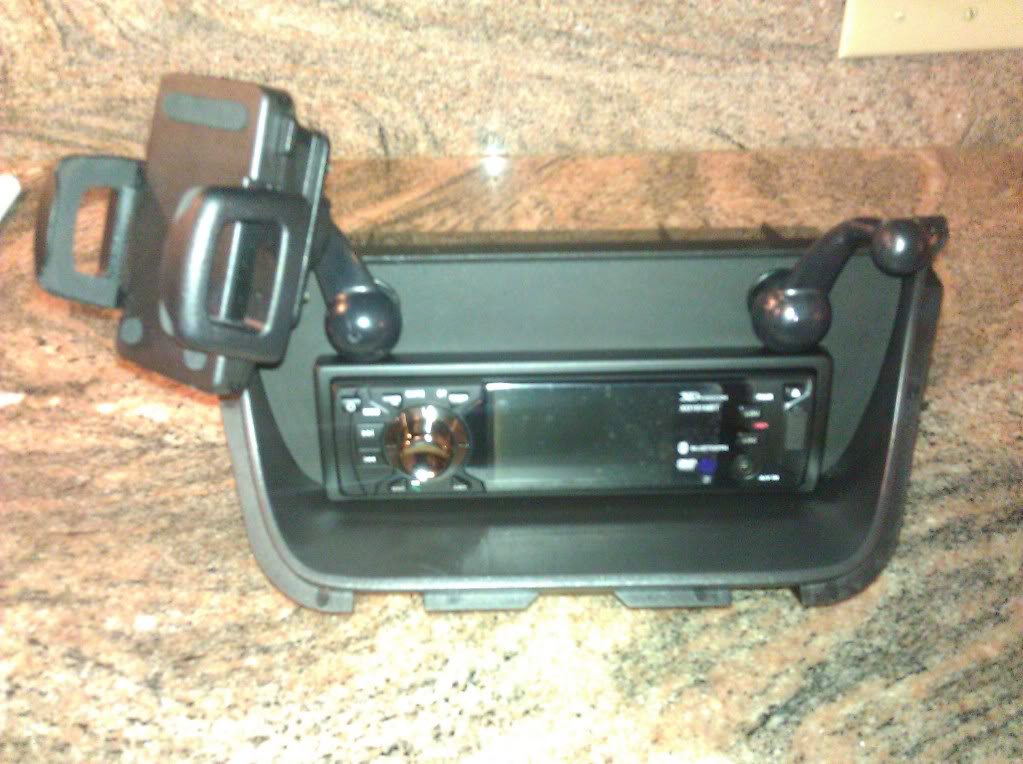
I chose to put mounts for mobile phones/accessories in that area (photos below). I unfortunately carry two cells, one for personal, one for work. This will allow me to have them both accessible through my new bluetooth stereo. I used a product from Pro-fit (http://www.pro-fit-intl.com/). The one I selected has a ball that mounts to the panel, and can accommodate numerous design holders. This ball approach allows you to easily rotate the holder for portrait or landscape viewing.
I have decided to leave that space unadorned, but if I were to do so, I now think having a wood veneer applied there would be better, though more difficult, than leather. With all the stuff I have hanging off there now, it is more about function than aesthetics. Having said that, it looks downright professional, not cheesy, and it does not bring down the vibe of the interior as much as having a mount stuck to the glass or sitting on a beanbag.
I took the opportunity to repair a light in my climate control display, but the darn bulbs are not available anywhere but the Jag dealer it would seem. So, until that is done, no pictures with the new stereo installed (DVD player for MP3 files - mondo storage on a single disc, carry a huge selection on a few discs). The Jag dealer parts counter in Sacramento is closed on Saturdays, so this will just have to sit till then...
I took the opportunity to polish the wood surround that goes around the shift area with Meguiars Scratch X 2.0 and it removed all the hairline scratches this area accumulated over the years. It looks brand new. Lest you think this is foolhardy applied to wood, I use it extensively in refurbishing/polishing guitars, removing pick marks, scratches, etc. Great stuff and leaves a flawless finish.
NEXT UP - Stereo installed and functioning. I am not looking forward to this, I have the premium sound with the sub.
1) Greg, awesome job on the instructions. I was preparing to document my job with photos, when reviewing your work it became clear that you had already done that, better than I would have. Spend 5 minutes reading them before starting, and then have them in the car with you, and the job goes as smooth as any I have done, ready for the new stereo in under 45 minutes (including read time). Well done.
There is little space behind the upper panel area, not enough for a 12 volt power plug. Maybe 1.5" to play with, but the stock housing (still used in this approach) uses this space for reinforcement, meaning if you do put in a switch or whatever, have a dremel or cutting tool available to cut through some of the platic bracing in that area (doable easily with said tools). You can see the top of the assembly in the pics below, and the plastic box sticking out behind the faceplate is about all the depth you get.
I chose to put mounts for mobile phones/accessories in that area (photos below). I unfortunately carry two cells, one for personal, one for work. This will allow me to have them both accessible through my new bluetooth stereo. I used a product from Pro-fit (http://www.pro-fit-intl.com/). The one I selected has a ball that mounts to the panel, and can accommodate numerous design holders. This ball approach allows you to easily rotate the holder for portrait or landscape viewing.
I have decided to leave that space unadorned, but if I were to do so, I now think having a wood veneer applied there would be better, though more difficult, than leather. With all the stuff I have hanging off there now, it is more about function than aesthetics. Having said that, it looks downright professional, not cheesy, and it does not bring down the vibe of the interior as much as having a mount stuck to the glass or sitting on a beanbag.
I took the opportunity to repair a light in my climate control display, but the darn bulbs are not available anywhere but the Jag dealer it would seem. So, until that is done, no pictures with the new stereo installed (DVD player for MP3 files - mondo storage on a single disc, carry a huge selection on a few discs). The Jag dealer parts counter in Sacramento is closed on Saturdays, so this will just have to sit till then...
I took the opportunity to polish the wood surround that goes around the shift area with Meguiars Scratch X 2.0 and it removed all the hairline scratches this area accumulated over the years. It looks brand new. Lest you think this is foolhardy applied to wood, I use it extensively in refurbishing/polishing guitars, removing pick marks, scratches, etc. Great stuff and leaves a flawless finish.
NEXT UP - Stereo installed and functioning. I am not looking forward to this, I have the premium sound with the sub.
Last edited by michaeldeanrogers; Mar 12, 2011 at 05:04 PM.


Senior Member
Joined: Oct 2009
Posts: 134
Likes: 8
From: Atlanta GA/Jacksonville FL
Ok, I finally figured out how to reply here. It's Greg again, I'm the guy selling the Jag dash kits. I appreciate all the feedback from the members here and am making a few changes based on these comments. Thanks especially to h2oboy who graciously welcomed me and offered to help as well. I would like to take you up on your offer of the swatches of leather so I can experiment and possibly offer that as an option. (How shall I get my address to you?)
By the way, the website is now live-yeah! Here it is: http://www.hardtofindradiodashkits.com/
As far as the "leaper"; I did a lot of research trying to come up with something to fill the large space above the radio. I wanted to use the leaper like the ones over the radio in the series III XJ6 Jag-the one up to 1987, but could find only a few poor quality used versions, as new ones are not available. I had to find a source for something consistent, so found someone to make the ones you see on the kit now. The kits can be ordered without the leaper if someone wants to do something of their own choosing. Some of the ideas offered have been quite good.
QuadManiac has mentioned wanting to see pictures from different angles. I will take some soon and figure out how to post them here (this type of forum is new to me and am in the process of learning the ins and outs). Also, the dimensions for the blank space above the radio opening are 9 3/16"w X 1 1/5"h X 9/16"d (quite solid and sturdy-it does not flex).
stu1986 asked about the possibility of installing a flip-up nav-type head unit. In theory it should work fine, as there is ample room for it to swing up. However, I have not yet installed one to see if it will work in practice. Notice the radio is low in the opening (you would see why once the original radio is removed. It is dense with plastic behind there and would require a cost-prohibitive modification to the housing to be able to raise the radio higher). I have spent countless hours (and dollars) on this project trying to offer this at a cost that is attractive and still net a few bucks in the process. So tell everyone you know so I can keep them available!
Again, thanks and I am here to offer any assistance I can.
Best, Greg
By the way, the website is now live-yeah! Here it is: http://www.hardtofindradiodashkits.com/
As far as the "leaper"; I did a lot of research trying to come up with something to fill the large space above the radio. I wanted to use the leaper like the ones over the radio in the series III XJ6 Jag-the one up to 1987, but could find only a few poor quality used versions, as new ones are not available. I had to find a source for something consistent, so found someone to make the ones you see on the kit now. The kits can be ordered without the leaper if someone wants to do something of their own choosing. Some of the ideas offered have been quite good.
QuadManiac has mentioned wanting to see pictures from different angles. I will take some soon and figure out how to post them here (this type of forum is new to me and am in the process of learning the ins and outs). Also, the dimensions for the blank space above the radio opening are 9 3/16"w X 1 1/5"h X 9/16"d (quite solid and sturdy-it does not flex).
stu1986 asked about the possibility of installing a flip-up nav-type head unit. In theory it should work fine, as there is ample room for it to swing up. However, I have not yet installed one to see if it will work in practice. Notice the radio is low in the opening (you would see why once the original radio is removed. It is dense with plastic behind there and would require a cost-prohibitive modification to the housing to be able to raise the radio higher). I have spent countless hours (and dollars) on this project trying to offer this at a cost that is attractive and still net a few bucks in the process. So tell everyone you know so I can keep them available!
Again, thanks and I am here to offer any assistance I can.
Best, Greg
Junior Member
Joined: Mar 2011
Posts: 12
Likes: 1
From: San Diego
I'm glad you can finish your sound system upgrade, Viapa and be able to save money in the process. Your kit is on it's way in the morning!
Love seeing the creative mind at work, like michaeldeanrogers's one for the phone cradle. If you are not familiar with it, Pro-Fit has an extension that is kind of "L" shaped that would clip onto the ball and raise the level of the phone cradle so you could see the radio better. I'd be glad to send you one, as I've got a few extras in my box of goodies.
Here are a few pictures of the original cassette and housing, as well as the new, bare faceplate:
http://blogs.gregsstudio.com/files/2...ng-150x150.jpg
http://blogs.gregsstudio.com/files/2...-1-150x150.jpg
http://blogs.gregsstudio.com/files/2...-1-150x150.jpg
http://blogs.gregsstudio.com/files/2...-1-150x150.jpg
(Sorry the pictures got cut down in size when added to this post).
Junior Member
Joined: Mar 2011
Posts: 12
Likes: 1
From: San Diego
michaeldeanrogers-Thanks for the tip on the Meguiars Scratch X 2. Part of my business is doing restoration detail work and I'm always looking for a "better way" to do things.
Also, nobody ever made a wiring harness for your X308 but I could give you a few tips on the stereo hookup if you like.
Also, nobody ever made a wiring harness for your X308 but I could give you a few tips on the stereo hookup if you like.
Thread Starter
|
Senior Member
Joined: Feb 2011
Posts: 134
Likes: 18
From: Sacramento, CA
Hi Greg, Yes and yes! I would like to raise the unit and if you have one u could send me, awesome. Just the part no would be enough... As to the wiring tips, great. I have the HK upgrade with the sub. My new unit has line out for sub, front and rear as well as speaker out. I plan on doing this next weekend...
Thanks forall the comments.
The X2 works great!
Thanks forall the comments.
The X2 works great!
Junior Member
Joined: Mar 2011
Posts: 12
Likes: 1
From: San Diego
Hi Mike,
I'll just send one out to you, as I don't have a part number-these come as part of a kit. We will need to arrange a time to chat on the phone since there is way too much information to try to post it here. I'll send a PM.
I'll just send one out to you, as I don't have a part number-these come as part of a kit. We will need to arrange a time to chat on the phone since there is way too much information to try to post it here. I'll send a PM.
Thread Starter
|
Senior Member
Joined: Feb 2011
Posts: 134
Likes: 18
From: Sacramento, CA
I received the extensions, and WOW, THANK YOU! These things are awesome in that they do indeed extend the device away from the radio, but what really gets me is how you can rotate them to move the holder in a much broader range of positions. Fantastic addition!
I received my new stereo, but after looking at it I may be back on the market for a better machine. No install pictures this weekend likely to come, unless I can't stand it any longer and just give this one a try...
Thanks again!
I received my new stereo, but after looking at it I may be back on the market for a better machine. No install pictures this weekend likely to come, unless I can't stand it any longer and just give this one a try...
Thanks again!
Thread Starter
|
Senior Member
Joined: Feb 2011
Posts: 134
Likes: 18
From: Sacramento, CA
Stereo installation update:
I got the new climate control bulbs from the dealer, installed and all is well there. Now to see how the stereo will fit...
As above, Greg's extensions were a huge improvement to the range of motion the phone holders can move. Brilliant!!
The DVD fits nicely with no modification at all, with a bit of room to spare.
Once in the car, the assembly went in smoothly, though there is not a lot of room back there for connectors and cables. I have a backup camera on order to use on the 3" screen on the head unit, but can't finish this till that is installed. I also have the premium unit with a separate amplifier, complicating installation matters... one step at a time.
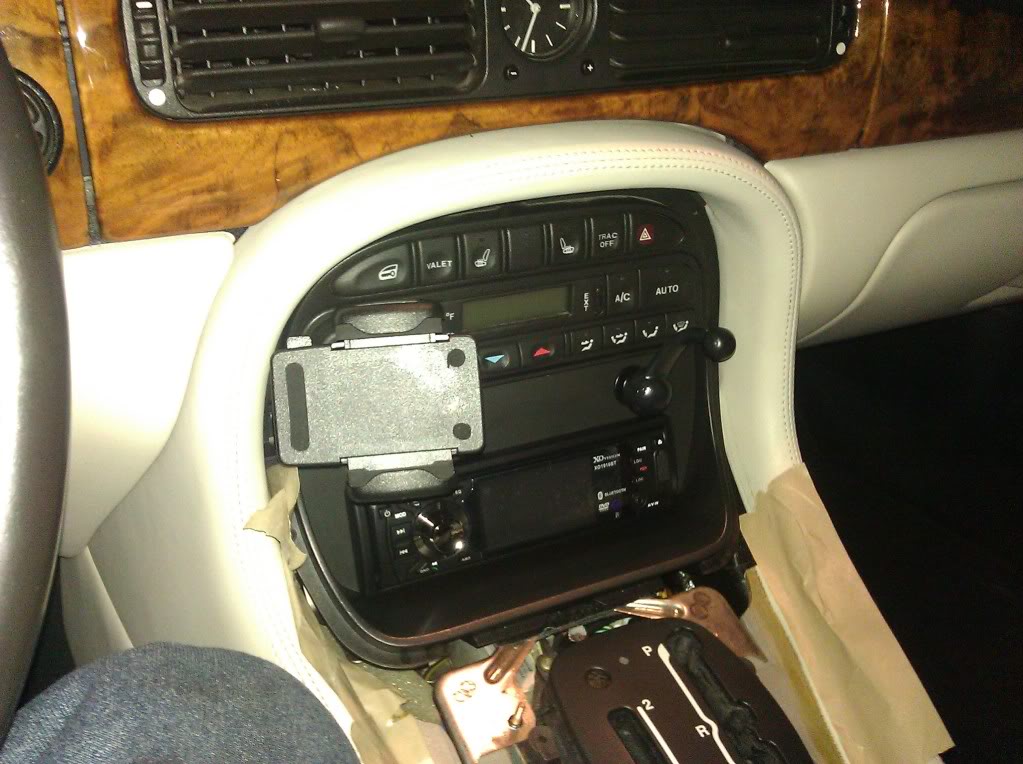
Here is one from eye level kicked back in the drivers seat.
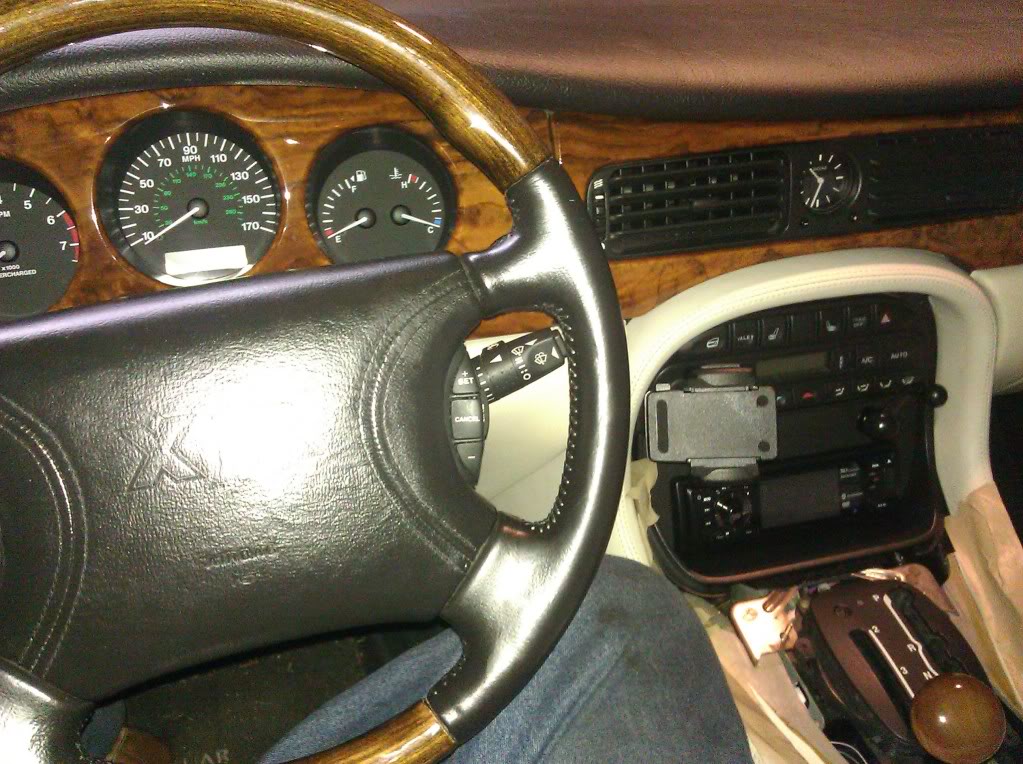
So, while waiting for parts and installation ferver, I will do the dreaded secondary tensioners this weekend and a plug change, if at all possible. Or, if I get a solution to my automatic lights not working with my new HIDs (elsewhere on the forum), that could take priority.
I am thinking about that space in the middle, and that leaper would've looked alright. I think a chrome Jag emblem of some sort.
But someday soon it will be done...
I got the new climate control bulbs from the dealer, installed and all is well there. Now to see how the stereo will fit...
As above, Greg's extensions were a huge improvement to the range of motion the phone holders can move. Brilliant!!
The DVD fits nicely with no modification at all, with a bit of room to spare.
Once in the car, the assembly went in smoothly, though there is not a lot of room back there for connectors and cables. I have a backup camera on order to use on the 3" screen on the head unit, but can't finish this till that is installed. I also have the premium unit with a separate amplifier, complicating installation matters... one step at a time.
Here is one from eye level kicked back in the drivers seat.
So, while waiting for parts and installation ferver, I will do the dreaded secondary tensioners this weekend and a plug change, if at all possible. Or, if I get a solution to my automatic lights not working with my new HIDs (elsewhere on the forum), that could take priority.
I am thinking about that space in the middle, and that leaper would've looked alright. I think a chrome Jag emblem of some sort.
But someday soon it will be done...
Junior Member
Joined: Mar 2011
Posts: 12
Likes: 1
From: San Diego
Hi Mike,
Nice going on the install. Looks clean and tidy, and I see how you followed instructions by dutifully masking the sides of the console. Glad the extensions worked out too. I see they offer more range of motion and provide an accessible spot for the phone without having to put holes anywhere on the dash or console.
And yes, I think the leaper would add a more finished look. I'm happy to send you one if you want to see how it might look. In any case, that old cassette is finally gone and you have a modern radio in the dash! Nice job!
Thread Starter
|
Senior Member
Joined: Feb 2011
Posts: 134
Likes: 18
From: Sacramento, CA
Thanks! Well, I ordered a chrome leaper from a chrome 1970s JAGUAR XJ6 VANDEN PLAS DASH EMBLEM, soon to be located perfectly between the device mounts, so no new panel required. Appreciate the offer very much.
I have a backup camera coming monday or tuesday, and then the final assault begins...
I have a backup camera coming monday or tuesday, and then the final assault begins...
Junior Member
Joined: Mar 2011
Posts: 12
Likes: 1
From: San Diego
Yes, that is the leaper from the series III I referred to when I said I had wanted to use those on the faceplate kits, but was unable to find many of them at all (and it was cost prohibitive as well). It's a perfect choice, glad you were able to locate one. It will finish the look perfectly.
Thanks for the kudos on the instructions too. Spent many hours on them!
Thanks for the kudos on the instructions too. Spent many hours on them!