
94 Xj40 A/C recharging (R134A)


Thread Starter
|
Veteran Member


Joined: Sep 2012
Posts: 2,729
Likes: 1,910
From: Victoria BC Canada
Anyone recharged the A/C themselves with a kit?
My system is so low on refrigerant that the compressor clutch doesn't engage. From what I've read online, adding a can of refrigerant will allow the compressor to kick in and then I could do a full recharge .."a/c pro" (no affil) sells a sealing kit and all the recharge paraphernalia ..I'm thinking of using the product as I took the car to a mechanic this morning and he told me a recharge alone would run me $3-400 bucks - that seemed a bit steep.
I found a good thread in the XJS forum that talks about DIY a/c repair, cleared up some of the mystery pretty well although my system didn't need converting from R12, it's a late model and came with R134a
https://www.jaguarforums.com/forum/x...lace-ac-72816/
Last edited by Lawrence; May 8, 2013 at 12:44 AM. Reason: more info
Senior Member
Joined: May 2012
Posts: 492
Likes: 249
From: Mobile, AL USA
Lawrence,
I've done it myself just a few weeks ago. Though I have the R12(?) system, my mechanic slipped on the proper connectors to use the R134 refill kits.
The way it is now is not a proper conversion for R12 to R134, from what I have read the compressor needs to be pulled and different o-rings need to be placed where the current ones are now, but it does work.
I think your MY is R134 and it is simple to do. Just need to make sure you're on the low side of the system when charging. Just the recharge can with connector was about $40, but going forward I need only purchase the recharge can which is around $20.
......and no, I haven't rebuilt the blower yet......
Thread Starter
|
Veteran Member
Joined: Sep 2012
Posts: 2,729
Likes: 1,910
From: Victoria BC Canada
Hi Rob, having a bit of trouble sourcing a "good" kit - checked out local auto parts place, all they had was a propane based kit w/o a pressure gauge so no go on that. The "a/c pro" kit isn't available in Canada, saw a comparable kit at wally mart, will probably go with that if I can't find anything better. I want to recharge with R134a and from what I understand I need to have the pressure gauge to do it right. If the leak is slow, I can live with giving it a recharge once a year ..of course the "jag" way would be to find the leak, drain the system, fix the leak then do a full evac and recharge ...maybe one day, but not today - my priority right now is bushing replacement on the shocks and if I've gotta shell out hundreds of $$$ I think that would be the place to do it.
Otherwise, she's running good (touch wood) and my blowers are still running after the long drawn out fix!!
Otherwise, she's running good (touch wood) and my blowers are still running after the long drawn out fix!!
The recharge kit is between 30 and 40$, They come with a gauge as well. Be sure to fill it in the right fitting though. As far as changing seals, I never have. I have changed over plenty of XJ's from R12. The fittings are easy to install and the recharge kit is just as easy. The hard work comes in when you see the gauge not holding pressure.
Thread Starter
|
Veteran Member
Joined: Sep 2012
Posts: 2,729
Likes: 1,910
From: Victoria BC Canada
The recharge kit is between 30 and 40$, They come with a gauge as well. Be sure to fill it in the right fitting though. As far as changing seals, I never have. I have changed over plenty of XJ's from R12. The fittings are easy to install and the recharge kit is just as easy. The hard work comes in when you see the gauge not holding pressure.

Senior Member
Joined: Dec 2012
Posts: 571
Likes: 303
From: Rhode Island, USA
Your 1994 XJ40 has a refrigerant capacity of right around 2.5 pounds of R-134a. Here in the US, R-134a is typically sold in 12 ounce cans. 2.5 pounds gives you 40 ounces, which means 3 and one third 12oz cans of refrigerant. Here, the cheapest I have found it is at my local parts shop for $8 and change per can. Walmart sells it for $9.99 a can.
How long has the system been without charge? If the system has been empty for a while, consider replacing the accumulator, also called a "receiver/dryer", which is basically a can that separates the liquid/vapor refrigerant. Inside is a desiccant material that absorbs moisture in the system. If the system has been empty of a while, chances are the desiccant is completely saturated, unable to absorb any more moisture. Moisture is very bad in an A/C system. It causes performance issues and it combines with the refrigerant to form an acidic solution which may damage compressor components. Accumulators are cheap and usually easy to replace.
Before charging any system however, do a visual check for leaks.
The refrigeration system has quite a few parts including the compressor, condenser, accumulator (aka receiver/dryer), expansion valve, evaporator, and the lines and hoses. All of these components have a certain amount of refrigerant oil in them, which circulates around and lubricates the compressor. This oil often has a die added to it to assist in finding leaks. If you see a large amount of green dye on the bottom of the compressor, around any fittings, or oily green stains on your condensor, chances are you have a leak there. Fix any obvious leaks first before charging, otherwise you are wasting money on refrigerant.
If the system has been opened for repairs (such as replacing the receiver/dryer), you will need to evacuate it first. I do it any time I have a car that has zero pressure in the system. Evacuation consists of hooking up an A/C manifold gauge set (whether rented or purchased), and connecting a vacuum source (again, rented or purchased) to pull a vacuum on the system. The vacuum pump you are using should be capable of pulling 28 inches of mercury. Let the system evacuate for 15 minutes at 28 inches of mercury, and close the valves. Let the system sit there with a vacuum and check for a pressure drop. This is indicative of a leak somewhere.
Once the system has been evacuated, and has held a vacuum, you can charge it. Putting your refrigerant cans in bucket of hot water helps speed the transfer into the system. You will need a can tap that connects to your manifold gauge set. Use a digital kitchen scale to measure the weight of the cans as you are charging. You want to get a full charge without overcharging the system.
Connect the gauge set. Close the Hi and Low pressure valves on the manifold. Hook the center charging hose to the can using the tap fitting. Open the valve on the can. Bleed the air out of the charging hose by pressing the purge valve on the manifold, this will purge any air in the hose and fill it with refrigerant. Start the vehicle, and turn the temperature control to max cool, fastest fan speed, and make sure the A/C function is selected. Open the low pressure valve on the manifold and allow the refrigerant to be drawn into the system. Your gauge set will indicate this with an increase in pressure on the low side. Once the system has enough pressure to close the low-pressure cutoff switch, the compressor clutch will engage, and the compressor will draw in the refrigerant through suction. Your high-pressure gauge will start moving now. Once the first can is emptied, close the low pressure valve on the manifold, close the valve on the can, and hook up your second can. Tap the new can, open the can valve, and then open the low pressure valve on the manifold. Repeat for the 3rd can. On the 4th can, weigh the can during charging to get the proper amount of refrigerant into the system.
Once the system is charged and functioning, it's time for testing. Check your low and high pressures against an R-134a performance chart using the current outside temperature, relative humidity, and vent discharge temperature. This will tell you if your system is performing to spec. You can also use an electronic sniffer to check all fittings and components for leaks. You can also buy a can of UV dye, and hook it up just like a can of R-134a. The dye with mix with the refrigerant oil and appear wherever you have a leak.
The main thing is do it right the first time. My cheap manifold/hose set cost me ~$50, the can tap fitting was another $5, and the vacuum pump I have is a Venturi style which connects to an air compressor to create a vacuum. That cost $25. With this small investment of under $100, my cars have never had cooler A/C, and I've saved thousands in shop costs. And it's the right way to do it. If I need to diagnose a problem, I now have the right tools to do it. You can't diagnose any A/C problems without a manifold gauge set.
Don't be fooled by those "Arctic Blast" types of charging "kits". Look at the weight of the can. They often only have 10-20% more refrigerant in them than standard 12oz cans, and cost 50-75% more.
Hope this information helps a little in your quest for ice cold A/C.
-Nick
Thread Starter
|
Veteran Member
Joined: Sep 2012
Posts: 2,729
Likes: 1,910
From: Victoria BC Canada
Your 1994 XJ40 has a refrigerant capacity of right around 2.5 pounds of R-134a. Here in the US, R-134a is typically sold in 12 ounce cans. 2.5 pounds gives you 40 ounces, which means 3 and one third 12oz cans of refrigerant. Here, the cheapest I have found it is at my local parts shop for $8 and change per can. Walmart sells it for $9.99 a can.
How long has the system been without charge? If the system has been empty for a while, consider replacing the accumulator, also called a "receiver/dryer", which is basically a can that separates the liquid/vapor refrigerant. Inside is a desiccant material that absorbs moisture in the system. If the system has been empty of a while, chances are the desiccant is completely saturated, unable to absorb any more moisture. Moisture is very bad in an A/C system. It causes performance issues and it combines with the refrigerant to form an acidic solution which may damage compressor components. Accumulators are cheap and usually easy to replace.
Before charging any system however, do a visual check for leaks.
The refrigeration system has quite a few parts including the compressor, condenser, accumulator (aka receiver/dryer), expansion valve, evaporator, and the lines and hoses. All of these components have a certain amount of refrigerant oil in them, which circulates around and lubricates the compressor. This oil often has a die added to it to assist in finding leaks. If you see a large amount of green dye on the bottom of the compressor, around any fittings, or oily green stains on your condensor, chances are you have a leak there. Fix any obvious leaks first before charging, otherwise you are wasting money on refrigerant.
If the system has been opened for repairs (such as replacing the receiver/dryer), you will need to evacuate it first. I do it any time I have a car that has zero pressure in the system. Evacuation consists of hooking up an A/C manifold gauge set (whether rented or purchased), and connecting a vacuum source (again, rented or purchased) to pull a vacuum on the system. The vacuum pump you are using should be capable of pulling 28 inches of mercury. Let the system evacuate for 15 minutes at 28 inches of mercury, and close the valves. Let the system sit there with a vacuum and check for a pressure drop. This is indicative of a leak somewhere.
Once the system has been evacuated, and has held a vacuum, you can charge it. Putting your refrigerant cans in bucket of hot water helps speed the transfer into the system. You will need a can tap that connects to your manifold gauge set. Use a digital kitchen scale to measure the weight of the cans as you are charging. You want to get a full charge without overcharging the system.
Connect the gauge set. Close the Hi and Low pressure valves on the manifold. Hook the center charging hose to the can using the tap fitting. Open the valve on the can. Bleed the air out of the charging hose by pressing the purge valve on the manifold, this will purge any air in the hose and fill it with refrigerant. Start the vehicle, and turn the temperature control to max cool, fastest fan speed, and make sure the A/C function is selected. Open the low pressure valve on the manifold and allow the refrigerant to be drawn into the system. Your gauge set will indicate this with an increase in pressure on the low side. Once the system has enough pressure to close the low-pressure cutoff switch, the compressor clutch will engage, and the compressor will draw in the refrigerant through suction. Your high-pressure gauge will start moving now. Once the first can is emptied, close the low pressure valve on the manifold, close the valve on the can, and hook up your second can. Tap the new can, open the can valve, and then open the low pressure valve on the manifold. Repeat for the 3rd can. On the 4th can, weigh the can during charging to get the proper amount of refrigerant into the system.
Once the system is charged and functioning, it's time for testing. Check your low and high pressures against an R-134a performance chart using the current outside temperature, relative humidity, and vent discharge temperature. This will tell you if your system is performing to spec. You can also use an electronic sniffer to check all fittings and components for leaks. You can also buy a can of UV dye, and hook it up just like a can of R-134a. The dye with mix with the refrigerant oil and appear wherever you have a leak.
The main thing is do it right the first time. My cheap manifold/hose set cost me ~$50, the can tap fitting was another $5, and the vacuum pump I have is a Venturi style which connects to an air compressor to create a vacuum. That cost $25. With this small investment of under $100, my cars have never had cooler A/C, and I've saved thousands in shop costs. And it's the right way to do it. If I need to diagnose a problem, I now have the right tools to do it. You can't diagnose any A/C problems without a manifold gauge set.
Don't be fooled by those "Arctic Blast" types of charging "kits". Look at the weight of the can. They often only have 10-20% more refrigerant in them than standard 12oz cans, and cost 50-75% more.
Hope this information helps a little in your quest for ice cold A/C.
-Nick
How long has the system been without charge? If the system has been empty for a while, consider replacing the accumulator, also called a "receiver/dryer", which is basically a can that separates the liquid/vapor refrigerant. Inside is a desiccant material that absorbs moisture in the system. If the system has been empty of a while, chances are the desiccant is completely saturated, unable to absorb any more moisture. Moisture is very bad in an A/C system. It causes performance issues and it combines with the refrigerant to form an acidic solution which may damage compressor components. Accumulators are cheap and usually easy to replace.
Before charging any system however, do a visual check for leaks.
The refrigeration system has quite a few parts including the compressor, condenser, accumulator (aka receiver/dryer), expansion valve, evaporator, and the lines and hoses. All of these components have a certain amount of refrigerant oil in them, which circulates around and lubricates the compressor. This oil often has a die added to it to assist in finding leaks. If you see a large amount of green dye on the bottom of the compressor, around any fittings, or oily green stains on your condensor, chances are you have a leak there. Fix any obvious leaks first before charging, otherwise you are wasting money on refrigerant.
If the system has been opened for repairs (such as replacing the receiver/dryer), you will need to evacuate it first. I do it any time I have a car that has zero pressure in the system. Evacuation consists of hooking up an A/C manifold gauge set (whether rented or purchased), and connecting a vacuum source (again, rented or purchased) to pull a vacuum on the system. The vacuum pump you are using should be capable of pulling 28 inches of mercury. Let the system evacuate for 15 minutes at 28 inches of mercury, and close the valves. Let the system sit there with a vacuum and check for a pressure drop. This is indicative of a leak somewhere.
Once the system has been evacuated, and has held a vacuum, you can charge it. Putting your refrigerant cans in bucket of hot water helps speed the transfer into the system. You will need a can tap that connects to your manifold gauge set. Use a digital kitchen scale to measure the weight of the cans as you are charging. You want to get a full charge without overcharging the system.
Connect the gauge set. Close the Hi and Low pressure valves on the manifold. Hook the center charging hose to the can using the tap fitting. Open the valve on the can. Bleed the air out of the charging hose by pressing the purge valve on the manifold, this will purge any air in the hose and fill it with refrigerant. Start the vehicle, and turn the temperature control to max cool, fastest fan speed, and make sure the A/C function is selected. Open the low pressure valve on the manifold and allow the refrigerant to be drawn into the system. Your gauge set will indicate this with an increase in pressure on the low side. Once the system has enough pressure to close the low-pressure cutoff switch, the compressor clutch will engage, and the compressor will draw in the refrigerant through suction. Your high-pressure gauge will start moving now. Once the first can is emptied, close the low pressure valve on the manifold, close the valve on the can, and hook up your second can. Tap the new can, open the can valve, and then open the low pressure valve on the manifold. Repeat for the 3rd can. On the 4th can, weigh the can during charging to get the proper amount of refrigerant into the system.
Once the system is charged and functioning, it's time for testing. Check your low and high pressures against an R-134a performance chart using the current outside temperature, relative humidity, and vent discharge temperature. This will tell you if your system is performing to spec. You can also use an electronic sniffer to check all fittings and components for leaks. You can also buy a can of UV dye, and hook it up just like a can of R-134a. The dye with mix with the refrigerant oil and appear wherever you have a leak.
The main thing is do it right the first time. My cheap manifold/hose set cost me ~$50, the can tap fitting was another $5, and the vacuum pump I have is a Venturi style which connects to an air compressor to create a vacuum. That cost $25. With this small investment of under $100, my cars have never had cooler A/C, and I've saved thousands in shop costs. And it's the right way to do it. If I need to diagnose a problem, I now have the right tools to do it. You can't diagnose any A/C problems without a manifold gauge set.
Don't be fooled by those "Arctic Blast" types of charging "kits". Look at the weight of the can. They often only have 10-20% more refrigerant in them than standard 12oz cans, and cost 50-75% more.
Hope this information helps a little in your quest for ice cold A/C.
-Nick
I had a (primitive) check of the system last Saturday - a pal who has some experience with systems removed the low side cap, depressed the valve and the after the big hiss said "well you've got SOME in there!"
Because the compressor wasn't kicking in, he wondered if there wasn't maybe another reason (like an electrical fault) preventing the compressor from coming on. I haven't really checked that idea out yet, I'm just assuming it's low on gas.
I bought the car last September with blower problems (now fixed) and didn't really get to test the A/C other than seeing the switches illuminate in the cabin and see the center vents open.
With the heat control set to min, seemed like I got cold air all right, but it was winter so ambient air would have been cold anyway ..so I don't know if the A/C was working when I got the car or if it quit since.
A/C doesn't get used much around here, weather is usually pretty balmy. If we get a really hot spell it only lasts a few days, so I'm thinking my car (local car) probably has some loss through disuse/dried out seals? As its still got a good bit of "hiss", could any leak I have be minor and fixable with a shot of sealer? Just guessing here.
As appealing as a complete rebuild/drain/refill sounds, (ideally that would be the way to go) do you think that A/c Pro stuff and an extra can of R134a could get the system up or would I be wasting my time??
Thanks again for the great post. Classic stuff. Thanks!
Trending Topics
Senior Member
Joined: Dec 2012
Posts: 571
Likes: 303
From: Rhode Island, USA
If you have *something* in the system, you may be able to quickly jump the low-pressure cutoff switch (bypassing it) and seeing if the compressor clutch is engaged. You'd only want to do this for a second as you'd be running the system under the minimum pressure. That would rule out a bad pressure switch and tell you if everything else is working. (Clutch relay, fuses, climate control panel)
A gauge set would also tell you if you have the minimum system pressure to enable the compressor clutch.
If you already have refrigerant in the system, you'll have to work with the high/low pressures when charging to get the correct amount. You'd be backtracking with your performance charts. (Starting with the temperature and ambient temp, and typical vent output temperature, and then finding what kind of pressures you need to be at, and charging to those pressures.) It's always more accurate to purge the system, and recharge from zero, but I can see your dilemma.
You can easily tell if the compressor is engaged by opening the hood, starting the vehicle, and switching on and off the ECON feature. This Economy button on the climate control panel disables the compressor to provide better fuel economy. You should hear and audible "click" from the compressor clutch as it slides to engage the compressor. Also, the electric condenser fan will start as well when the compressor clutch is engaged.
Nick
Thread Starter
|
Veteran Member
Joined: Sep 2012
Posts: 2,729
Likes: 1,910
From: Victoria BC Canada
If you have *something* in the system, you may be able to quickly jump the low-pressure cutoff switch (bypassing it) and seeing if the compressor clutch is engaged. You'd only want to do this for a second as you'd be running the system under the minimum pressure. That would rule out a bad pressure switch and tell you if everything else is working. (Clutch relay, fuses, climate control panel)
A gauge set would also tell you if you have the minimum system pressure to enable the compressor clutch.
If you already have refrigerant in the system, you'll have to work with the high/low pressures when charging to get the correct amount. You'd be backtracking with your performance charts. (Starting with the temperature and ambient temp, and typical vent output temperature, and then finding what kind of pressures you need to be at, and charging to those pressures.) It's always more accurate to purge the system, and recharge from zero, but I can see your dilemma.
You can easily tell if the compressor is engaged by opening the hood, starting the vehicle, and switching on and off the ECON feature. This Economy button on the climate control panel disables the compressor to provide better fuel economy. You should hear and audible "click" from the compressor clutch as it slides to engage the compressor. Also, the electric condenser fan will start as well when the compressor clutch is engaged.
Nick
A gauge set would also tell you if you have the minimum system pressure to enable the compressor clutch.
If you already have refrigerant in the system, you'll have to work with the high/low pressures when charging to get the correct amount. You'd be backtracking with your performance charts. (Starting with the temperature and ambient temp, and typical vent output temperature, and then finding what kind of pressures you need to be at, and charging to those pressures.) It's always more accurate to purge the system, and recharge from zero, but I can see your dilemma.
You can easily tell if the compressor is engaged by opening the hood, starting the vehicle, and switching on and off the ECON feature. This Economy button on the climate control panel disables the compressor to provide better fuel economy. You should hear and audible "click" from the compressor clutch as it slides to engage the compressor. Also, the electric condenser fan will start as well when the compressor clutch is engaged.
Nick
My pal also recommended a purge and re-charge from zero and I have no doubt that is the best approach.
As far as your second tip with the "ECON" setting goes, I don't think that applies as the VDP 94 MY climate control doesn't have an "ECON" switch?
The A/C panel on my car just has "ON" and "MAX" buttons which when lit seem to only control blower speed?
Anyway, let's see if I can get the compressor running, (even for a sec as you suggest) and we'll go from there.
Thanks again for the great advice,
all the best
Senior Member
Joined: Dec 2012
Posts: 571
Likes: 303
From: Rhode Island, USA
Yes, with your '94, you will have ON and MAX buttons for the Air Conditioning. Make sure either one is selected for the testing.
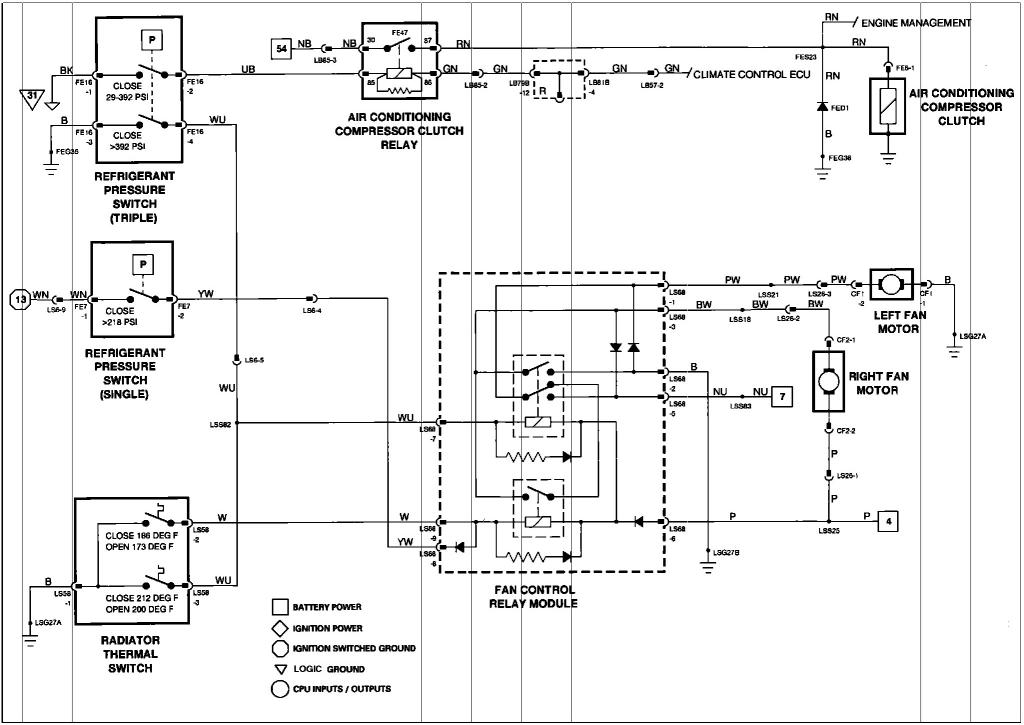
There are 2 pressure switches, one is a "slow" switch which commands the condenser fan to half speed, and the other is a three function switch.
The 3 function switch cuts out the compressor relay if the pressure is below 2 bar (29 PSI) or above 27 bar (390 PSI). Also, when the pressure is above 20 bar (290 PSI), it commands the condenser fan to high speed.
You are looking to bypass the low-pressure portion of the switch, or the BK wire (should be Black, with pink tracer) and wire UB (Blue, with black tracer). If the A/C is commanded on the control panel, all fuses are wiring OK, you should hear a "click" from the Compressor Clutch engaging.

Good Luck,
Nick
There are 2 pressure switches, one is a "slow" switch which commands the condenser fan to half speed, and the other is a three function switch.
The 3 function switch cuts out the compressor relay if the pressure is below 2 bar (29 PSI) or above 27 bar (390 PSI). Also, when the pressure is above 20 bar (290 PSI), it commands the condenser fan to high speed.
You are looking to bypass the low-pressure portion of the switch, or the BK wire (should be Black, with pink tracer) and wire UB (Blue, with black tracer). If the A/C is commanded on the control panel, all fuses are wiring OK, you should hear a "click" from the Compressor Clutch engaging.
Good Luck,
Nick
Thread Starter
|
Veteran Member
Joined: Sep 2012
Posts: 2,729
Likes: 1,910
From: Victoria BC Canada
Well, my layout isn't exactly like the illustration, switch #2 doesn't seem to be there - I wasn't exactly sure how to jumper the connections on the three function switch, couldn't get any probes in there, I ended up back probing the plug at the harness connection with a couple of paper clips but I'm not sure if I succeeded in getting a connection because the compressor didn't click when I connected them up to the jumper clips. I'll have a go again I guess.
Senior Member
Joined: Dec 2012
Posts: 571
Likes: 303
From: Rhode Island, USA
For the pressure switch, remove the connector and jumper the contacts themselves, taking the switch out of the circuit completely. You are becoming the switch when you jumper the connections. Make sure the engine is running as you test. Listen for the distinctive click from the clutch engaging. Make sure you only test it momentarily. You don't want to cause problems with a low charge.
You can also try jumping the Compressor Clutch relay itself, bypassing the pressure switch altogether. That will tell you whether or not the compressor clutch is functional.
Using a fused jumper of the proper wire gauge, jump pins 30 and 87 on the compressor clutch relay with the ignition on and engine running. The clutch should engage. If it engages, I'd work back to the pressure switch again, or rent/borrow a gauge set to see what low-side pressure you are at in the system. If it's below 29PSI, which, quite likely, it is, then that would explain the lack of compressor clutch engagement.
Let us know,
Nick
Last edited by NTL1991; May 15, 2013 at 09:03 PM.
Thread Starter
|
Veteran Member
Joined: Sep 2012
Posts: 2,729
Likes: 1,910
From: Victoria BC Canada
Ok Nick, got it, I think!
I've been looking through a few threads and the manual but can't figure out where the Compressor Clutch relay is located? Am I looking for one of the typical colored relays or is it a different looking unit?
<edit> Ok, just found it in Haynes. It's the light blue one with the green base. </edit>
I've been looking through a few threads and the manual but can't figure out where the Compressor Clutch relay is located?
<edit> Ok, just found it in Haynes. It's the light blue one with the green base. </edit>
Last edited by Lawrence; May 15, 2013 at 11:46 PM.
Senior Member
Joined: Dec 2012
Posts: 571
Likes: 303
From: Rhode Island, USA
Great, now that you've found the relay, you can manually jump terminals 30 and 87 of the relay connector. My manual is showing terminal 30 as Brown with Black tracer, and terminal 87 as Red with Brown tracer.
These are the high current wires that feed the Compressor Clutch circuit. Terminal 30 is fused 12V and terminal 87 is the feed to the Compressor Clutch.
And you are correct, the Compressor Clutch Relay is the blue relay with the green base.
Nick
These are the high current wires that feed the Compressor Clutch circuit. Terminal 30 is fused 12V and terminal 87 is the feed to the Compressor Clutch.
And you are correct, the Compressor Clutch Relay is the blue relay with the green base.
Nick
Thread Starter
|
Veteran Member
Joined: Sep 2012
Posts: 2,729
Likes: 1,910
From: Victoria BC Canada
Thanks Nick, I think I have the "proper" gauge wire, so do I have to make up a jumper with an inline fuse carrier? To be on the safe side, what value should the fuse be?
Senior Member
Joined: Dec 2012
Posts: 571
Likes: 303
From: Rhode Island, USA
Nick
Last edited by NTL1991; May 16, 2013 at 09:06 PM.
Thread Starter
|
Veteran Member
Joined: Sep 2012
Posts: 2,729
Likes: 1,910
From: Victoria BC Canada
Fired up the car and set the A/C on max then connected the circuit. I heard a faint click, but the compressor clutch didn't engage. Checked the fuse and it had blown. That was the "click" I heard I guess!!
Checked the rating on the fuse - ONE amp. The invoice was for a 10 amp fuse but the guy had given me a ONE.
(note to self: always check parts before leaving store)
When I got back to the store it was closed so nipped into the gas station and picked up a 10, rechecked and yes indeed the compressor clutch engaged. So now we know the compressor is working, right?
There's some gas in the system and the car hasn't had A/C working for at least 9 months, so I'm leaning towards it being low on gas.
I guess the next step is to get hold of a pressure gauge with the right fitting and pressure test the system to see if it's below 29PSI?
Thanks again for the great help Nick, maybe I can fix this A/C at home after all!
Last edited by Lawrence; May 18, 2013 at 03:16 AM. Reason: additional info
Senior Member
Joined: Dec 2012
Posts: 571
Likes: 303
From: Rhode Island, USA
Hi Nick, Made up the jumper today with a fuseholder and 10 amp fuse from the local electronics shop. I put spade ends on the jumper and plugged them in terminals 30 and 87 of the green base relay connector on the bulkhead. So far so good.
Fired up the car and set the A/C on max then connected the circuit. I heard a faint click, but the compressor clutch didn't engage. Checked the fuse and it had blown. That was the "click" I heard I guess!!
Checked the rating on the fuse - ONE amp. The invoice was for a 10 amp fuse but the guy had given me a ONE.
(note to self: always check parts before leaving store)
When I got back to the store it was closed so nipped into the gas station and picked up a 10, rechecked and yes indeed the compressor clutch engaged. So now we know the compressor is working, right? I know you didn't have it engaged long, but did the compressor make any noises as it spun (bad pulley bearings?). If not, that's great news too.
There's some gas in the system and the car hasn't had A/C working for at least 9 months, so I'm leaning towards it being low on gas.
I guess the next step is to get hold of a pressure gauge with the right fitting and pressure test the system to see if it's below 29PSI?
Thanks again for the great help Nick, maybe I can fix this A/C at home after all!
Yes, I'd agree the most likely issue is that the system has just lost its charge. Check around at some local parts shops, they often rent tools for free-- just pay a deposit for the price of the tool, and when you return it back, you get your deposit back. Your system is R-134a right from the factory, so there will be no issues with the connectors on the low/hi side; they are standard automotive R-134a fittings, so any auto A/C gauge set will work (unless it's really old and designed for R-12 systems).
Check for low refrigerant pressure (below 29PSI) and if so, I'd purge or recover the small amount left in the system, and then charge from zero, so you know exactly where you are starting from. You probably have less than a can's worth of refrigerant in the system, and personally, the piece of mind knowing that I'm not overcharging would be worth more than that one can of R-134a. Once it's charged, it's time to add a can of leak detecting dye, and start searching for the culprit. The leak may be small enough that you'll only have to charge once every 2 years, or severe enough that it will only last a couple of weeks. Judging by the fact that you still have pressure and it's been at least 9 months, it doesn't seem too severe to me.
The good thing is that the system has *some* residual pressure in it, meaning outside air (and the moisture in it) hasn't had a chance to contaminate the system; the positive pressure will help prevent moisture from migrating into the system.
If you have more than 29PSI of pressure in the system--which will be displayed on both the high AND low side of the gauge set because the pressure equalizes once the compressor disengages. (That's why you'll often hear a hissing noise once you turn the car off; it's the refrigerant pressure equalizing in the system)-- then we'll have to go back and verify that the pressure switch is functioning properly, the clutch relay is functioning properly (remember, we *became* the relay in that last test, bypassing it with the jumper) and the wiring and associated fuses are good.
Keep us updated!
Nick
Last edited by NTL1991; May 18, 2013 at 05:28 PM.
Thread Starter
|
Veteran Member
Joined: Sep 2012
Posts: 2,729
Likes: 1,910
From: Victoria BC Canada
I got hold of a pressure gauge today and took a reading - the pressure was down to about 15psi.
When I removed the gauge I noticed there was a blue residue color on the valve - I'm assuming that was dye or is that the color of r134a?
Anyway it turns out that you can't buy R134a in Canada without a refrigeration ticket and believe me I looked everywhere. It's a restricted substance (according to Environment Canada) because it can be used as a "recreational drug"
A bit frustrating, but I still may have a couple of other options - I have 2 friends who have tickets so I'll see if we can work anything out, but right now it's looking like I might have to hand over the job to an A/C tech - BUMMER!!
When I removed the gauge I noticed there was a blue residue color on the valve - I'm assuming that was dye or is that the color of r134a?
Anyway it turns out that you can't buy R134a in Canada without a refrigeration ticket
A bit frustrating, but I still may have a couple of other options - I have 2 friends who have tickets so I'll see if we can work anything out, but right now it's looking like I might have to hand over the job to an A/C tech - BUMMER!!
Senior Member
Joined: Dec 2012
Posts: 571
Likes: 303
From: Rhode Island, USA
I got hold of a pressure gauge today and took a reading - the pressure was down to about 15psi.
When I removed the gauge I noticed there was a blue residue color on the valve - I'm assuming that was dye or is that the color of r134a?
Anyway it turns out that you can't buy R134a in Canada without a refrigeration ticket and believe me I looked everywhere. It's a restricted substance (according to Environment Canada) because it can be used as a "recreational drug"
A bit frustrating, but I still may have a couple of other options - I have 2 friends who have tickets so I'll see if we can work anything out, but right now it's looking like I might have to hand over the job to an A/C tech - BUMMER!!
When I removed the gauge I noticed there was a blue residue color on the valve - I'm assuming that was dye or is that the color of r134a?
Anyway it turns out that you can't buy R134a in Canada without a refrigeration ticket
A bit frustrating, but I still may have a couple of other options - I have 2 friends who have tickets so I'll see if we can work anything out, but right now it's looking like I might have to hand over the job to an A/C tech - BUMMER!!
Best of luck with your cold air adventure!
Keep us updated!-Nick