
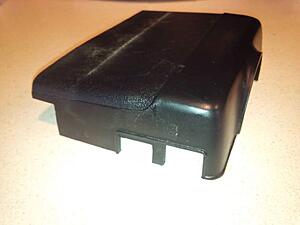
hazard switch


Thread Starter
|
Senior Member
Joined: Dec 2017
Posts: 193
Likes: 13
From: Massachusetts
I got the headlights working, then the directionals, now the hazard switch needs attention. I believe hazards are required for my state inspection. The pivot point on the switch is broke. I can fumble it around and it will flash on the left side only. How would I remove the switch to either fix it or replace it? Does the steering wheel have to come off?
thanks.
thanks.
Thread Starter
|
Senior Member
Joined: Dec 2017
Posts: 193
Likes: 13
From: Massachusetts
Have been searching the forum to answer my own question I believe the steering wheel has to come off - or maybe not, maybe just loosen column and lower. Maybe with some super glue I can fix my switch - they are pricey.
I do have a service manual on CD. Step One - remove drivers side dash liner. Eep! no more details on doing that!
Directionals work - with ignition off - isn't that odd?
I do have a service manual on CD. Step One - remove drivers side dash liner. Eep! no more details on doing that!
Directionals work - with ignition off - isn't that odd?
Last edited by Nanonevol; Feb 15, 2018 at 02:29 PM.

Veteran Member


Joined: Mar 2008
Posts: 25,535
Likes: 11,735
From: Pacific Northwest USA
I'm "pretty sure" I've replaced the hazard switch without removing the wheel. It screws to the backside of the plate that the signal switch is attached to
https://www.jaguarclassicparts.com/u...dicator-switch
But, if needed, removing the wheel isn't hard: remove the horn pad, remove the plastic hex nut-and-rod for the horn, loosen the big nut, give the wheel a few yanks and jiggles. After the wheel breaks free of the splines, remove the big nut.
Cheers
DD
Thread Starter
|
Senior Member
Joined: Dec 2017
Posts: 193
Likes: 13
From: Massachusetts
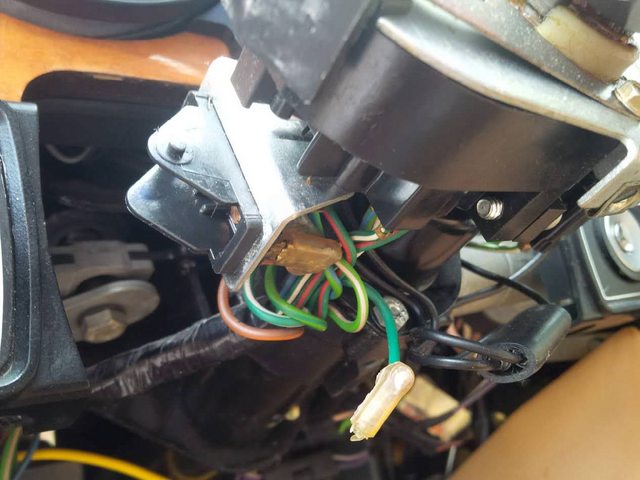
I wonder if Jose could describe where he cut this nacelle so as to minimize interference with the hazard switch.

Last edited by Nanonevol; Feb 20, 2018 at 12:31 PM.
Veteran Member

Joined: Mar 2007
Posts: 9,139
Likes: 2,662
From: Florida
I will copy your picture and show where I filed off 1/16" of an inch so the switch moves freely. I still think it is an error in the manufacture of the nacelle.
I would not remove your switch until you have the new one; Certainly do not disconnect any wires until you can orient the new switch with the old one and replace one wire at a time, ask me how I know!
There are two tiny screws but in my car they are accesible normally, not on the impossible side. Can you post a picture?
Trending Topics
Veteran Member
Joined: Mar 2007
Posts: 9,139
Likes: 2,662
From: Florida
ok, I looked at the drawing-illustration link you provided but you do not have to remove that metal bracket unto which the switch is mounted.
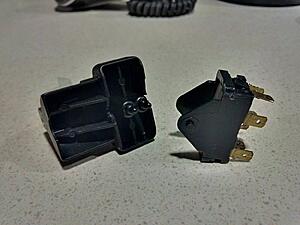
The switch is screwed to that plate with two tiny screws, but you have to pull the switch Handle/Cover to see them.
the switch's Handle always breaks at its "tab ears". I have been able to fix this problem gluing tiny copper washers over the broken hole where the Handle snaps over the two "pins".
Also I added grease to the pins to eliminate friction. Dielectric grease or even vaseline works great.
If installing a brand new switch, add vaseline to the two pins onto which the Handle/Cover snaps to.
Thread Starter
|
Senior Member
Joined: Dec 2017
Posts: 193
Likes: 13
From: Massachusetts
I took careful notes of the wire color before disassembly. Meanwhile I'll have a new switch soon.
I stressed over the screws that need access from the back before noticing that I could carefully push the switch out through the rectangular hole in the steel.
(I like that tip using washers on the hinge!)
I stressed over the screws that need access from the back before noticing that I could carefully push the switch out through the rectangular hole in the steel.
(I like that tip using washers on the hinge!)

Thread Starter
|
Senior Member
Joined: Dec 2017
Posts: 193
Likes: 13
From: Massachusetts
That would be awesome!
Thread Starter
|
Senior Member
Joined: Dec 2017
Posts: 193
Likes: 13
From: Massachusetts
Cool! Did that. Just need to put things back together now. While lowering the steer column I ended up taking the 2 bolts all the way out. Then some miscellaneous parts fell out of the dash including 5 of the horseshoe shaped pieces show here:
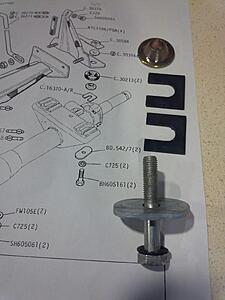
I don't understand what their purpose is nor where exactly they go.

I don't understand what their purpose is nor where exactly they go.
Last edited by Nanonevol; Feb 21, 2018 at 04:18 PM.
Veteran Member
Joined: Mar 2007
Posts: 9,139
Likes: 2,662
From: Florida
those are Spacers to raise or lower the column.
they always fall in odd numbers. Ask me how I know.
I used two spacers on each bolt and I ended with one leftover.
follow the drawing, The Spacers go above the column Bracket, so it is a very delicate
assembly.
they always fall in odd numbers. Ask me how I know.
I used two spacers on each bolt and I ended with one leftover.
follow the drawing, The Spacers go above the column Bracket, so it is a very delicate
assembly.


