
Project Jag-Dad---Budget Restoration of a lumped 1971 Series I XJ6

Senior Member
Joined: Mar 2013
Posts: 101
Likes: 17
From: New Hampshire, USA
Johhny,
Way to go on mobility! I know what you mean about glass storefronts and the parking lot approach. An advanced topic is the parking lot over-the-shoulder look, too.
I have no idea why I didn't think of the SAE to Metric change on the brake bits, I feel like a dolt. These things changed around '74-'75, IIRC. This has nothing to do with Jaguars, but I mention it because it's interesting, and because it's how I should have known you'd run into that problem:
There's a weird combination of changes surrounding the TR6 and its Girling calipers, whereby the calipers changed to metric bolts, but the car did not, so there are these odd-ball bolts with metric shanks and SAE threads. The side benefit is that those bolts allow one to fit a later four-piston Toyota caliper that was an evolution of the Girling design. More info here, if I have piqued your curiosity: Brake Conversion - Copyrighted Article
Back to the Jaguar, or rather, the Jagrolet: I am of no help when it comes to the lump. Heck, I'm of no help when it comes to the XK6, either! My suggestion would be to keep poking away at it, but get everything else sorted before really digging in. That way, you can enjoy the car as you sort it out, which will provide momentum as you plow through the project. Then, once the suspension, brake, and electrical stuff is straightened out, worry about the lump.
I would personally want to revert to an XK engine, preferably a quarterbreed (if they're as good as I want them to be), but the cheapest, easiest, and most sensible option is almost certainly to buy a crate engine or locate a good drivetrain in a hopeless car. Look here for some ideas: Jaguar Specialties: About Us
Keep at it!
Tom
PS: Definitely have the wheel bearings out and give them a good insepction and re-packing. Do double-check the service manual. I don't know if this applies to the XJ6, but many other British cars use shims to adjust end-float (is that the right term?) on the bearings, as opposed to the "American" way to just torquing them down and backing off a bit.
Last edited by trymes; Mar 19, 2013 at 08:09 AM. Reason: Added postscript.
Veteran Member
Joined: Jun 2012
Posts: 1,336
Likes: 344
From: Glendora, CA USA
Check the underside of the front axles for wear, the stub axles go ALL too often and the wear is overlooked.
Front upper shocks rubber bushings wear and are hard to see....noises. Be sure the steering rack bushings are tight or very strange things occur. No movement when the steering wheel is turned with the engine off is "perfect".
Finding the SBC Chev problems should be easy enough, or just buy my SII with the custom 383/700R and resolve all your issues....
I have S3 master cylinder on my '71 and also discovered the metric fittings. Be sure to change all three brake hoses to get hard pedal and then bleed the system changing all the fluid from the RR forward...really helps things work correctly on these old car.
Senior Member
Joined: Mar 2013
Posts: 101
Likes: 17
From: New Hampshire, USA
Roger just mentioned the flexible hoses, I think, and it bears repeating. They are cheap money and can rapidly become a major safety problem if one ruptures, or more likely, collapses internally and prevents the brakes from releasing after application.
I was thinking that there should be four, but then remembered that we're talking inboard brakes!
Tom
I was thinking that there should be four, but then remembered that we're talking inboard brakes!
Tom

Veteran Member
Joined: Jul 2012
Posts: 6,796
Likes: 2,403
From: Walnut Creek, California
Great work . My son is working on a toy for me!!! A derelict home built dune buggy on a shortened VW pan of the early 60's!!! Not a Manx or even close. welded tubing snd sheet metal!! He thinks the 40 HP engine is toast. I say it is fixable.As a talented machinist, he demands perfection. I've dealt with less than perfect dritters for decades!!
As you probaly well know, a smoky SBC is due to cooked valve seals. Not too hard to renew.
I would be interested in one of the leapers! Contact me off list at carl.hutchins1@sbcglobal.net.
PS Grind off that rust on the door and get some good primer on it before it gets much worse!!I gues you know that all primer is not water resistant!!
Those S3 seats are just like the ones in my car. My vote is to get them in. Much nicer tht gswdawful green!!

Senior Member
Joined: Dec 2011
Posts: 936
Likes: 193
From: London
Sounds like the wheel bearings. try tightening them up as specified and see what the play is then.
See how rough they run when spun, could just need regreasing and setting.
Check the condition of the stub axle, if you take the hub off.
See how rough they run when spun, could just need regreasing and setting.
Check the condition of the stub axle, if you take the hub off.

Thread Starter
|
Member
Joined: Feb 2013
Posts: 84
Likes: 9
From: San Antonio, NM
All right, pulled the wheels and found the axle bolts FINGER TIGHT! Yikes! The stubs are a little scored where the bearing have been spinning but not so badly that it is a safety issue. Cleaned everything up and with some fresh grease, they feel much better. Nice when that happens. Also, no shims, fairly standard wheel bearing setup. FSM even says to tighten till resistance is felt then turn back 1-2 flats.
Control arm bushes are crispy and the lower ball joints have never been changed. I've been told to spring for Jaguar OEM ball joints and skip the aftermarket ones. Any experience here? I'll probably swap the bushes out for poly if it doesn't cost too much more.
Smoke on the lump has gone down dramatically after changing the oil last night to non-detergent HD30w. Dr. Jag recommended this for the next 500 to swell the valve seals and reseal gaskets. I've never heard of this before and apprehensively poured it in. No difference last night but today...I'm very impressed. Rodger, a 383 would be a hoot but I'm hoping to not pull the engine.
First "big" purchase for the car will be tires. Any thoughts here? Again, Dr. Jag recommended some Hankooks that he has been running on his customer's cars with success. A set installed locally would be around $430, very reasonable. I'd love to keep raised white letter tires on it but that severely limits my tire choices and will cost an additional hundred for a similar, if not lower quality tire. Thats a lot of bushings!!
I spent a little time polishing the wheels and chrome bits. Makes a world of difference and now find myself doing Tom's over the shoulder look back. Love this car. It'll be tough to give it away once its back up to snuff. Pops better like it as much as I do or I'll take it back in a minute!
Last edited by Johnny Bouncewell; Mar 19, 2013 at 11:18 PM.
Veteran Member


Joined: Dec 2009
Posts: 9,553
Likes: 2,553
From: Crewe, England
For the front ball joints the XJ40 ones are a straight swap and last forever, (or at least it seems that way compared to the old ones !!). For the lowers, you must knock out the bearing ring for the upper half of the ball, which is fitted into the suspension upright. Its a push fit, but tends to rust in, so a tap or two with a hammer will drive it out. It comes out from the bottom of the retaining hole, and is concentric with the ball joint shaft that bolts up to the lower wishbone. Of course your car might have the later ball joints in already. The ones you adjust with shims are useless, so dont use them !! They were OK on 50s Jaguars with crossply tyres.
Here's the US price (typical)
Jaguar Ball Joint, XJ6, XJ8, XJS, XK8, S-TYPE, X-TYPE, XJ40, X300, X308, jaguar parts, new and used Jaguar auto parts, technical information, Jaguar XJ6 parts, Jaguar XJS
Here's a UK site with a pic of one
Classic Jaguar, Jaguar Daimler DS420 Limo, E-Type Series 3, MK2, XJ Series 3, X300, XJ40, XJS Front Lower Ball Joint (CAC9937-A) | JustJagsUK.com
The top one looks the same as the old one, but has no grease nipple, and you don't need it, really !
Thread Starter
|
Member
Joined: Feb 2013
Posts: 84
Likes: 9
From: San Antonio, NM
Okay, a little update. Replaced the tires with a new set of Firestones. While it was on the lift, I poked around under the car for a while taking notes of conditions and what not. Unfortunately I didn't have my camera with me.
First off, wow is this car solid! Not an ounce of rust on the floor pans. Thats what I saw when I bought it, but its nice to see I wasn't tricking myself into buying it. I've done that in the past. "Oh man, this thing is great! I gotta get it, here's your asking price." The rear of the front wheel wells will need some minor attention which to me, is no big deal.
An exhaust mount that is tied near the diff is broken causing the whole system to shake around and make a racket. I'll get in there and weld that snug this weekend. One shock is coated with oil and obviously blown. I'm going to pick up a couple of these from the junkyard. I know, I know, used shocks are a bad idea but at $20 for four, its worth the gamble. The diff looks wet which scares me a bit. Mainly looked like I'm leaking from the pinion seal. I'll spend sometime cleaning it up and note the rate of leakage. If its slow, I'm leaving it as it. Pops won't put more than 3000 miles on it a year, if he does half that, I'd be impressed.
The main reason for getting tires on it before I start more pressing work is so that I can drive it and have a modicum of safety. Today I drove it 80 miles on the highway and again, made some notes.
Really vague steering at speed. Steering rack work and tie rod ends should help. I'll poke around and see if I can find a good one at the junkyard ($30!). I'm guessing the replacing the lower ball joint will help too and I can't imagine worn control arm bushings not exacerbating this. Combine all that with blown rear shocks and it was a rather exciting drive.
The speedometer is making an audible click and jumping the needle around every time the odometer rolls one tenth of a mile. I'm hoping this is just a "remove, regrease, reinstall" the cable issue. Its wildly inaccurate too. My GPS said 70, speed claimed 90. Tach seems high too. I'm fairly confident the SBC wasn't spinning at 5000 RPM. Also, smoke has nearly gone away and I've stopped shopping for crate motors.
Finally, all of the central gauges are not working which spooks me out when driving it. PO claimed they worked at some point and failed one by one. I took a gander in there and saw one of the tabs holding the pin connector has broken. There is some solder on the printed board and it may be easier to rewire them completely with a new pin connector. Cleanly rewiring it with 22 gauge wire would be a breeze (I do this in my lab all the time). I did notice in the FSM there is a "Voltage Stabilizer". As this simply regulates voltage to the gauges, it possible that this has failed and is no longer sending voltage to the gauges (they all read zero/flat). I've gotta spend some time in there with a meter and poke around a bit. If anyone has been in a similar boat, I'd love to hear your solution so I don't waste a ton of time on it.
Last edited by Johnny Bouncewell; Mar 25, 2013 at 10:51 PM. Reason: tYpos
Senior Member
Joined: Dec 2011
Posts: 534
Likes: 89
From: australia
Vague steering could be shot steering rack mounts. There are three of them; one on each end of the rack, and an upper one near the pinion. They fail due to oil leaks, or time. Should have some movement in them, but not more than 1/2". There are aftermarket replacements. Shot ball joints won't help, generally makes them twitchy. Check the trailing arm bushes holding the rear suspension in; the big ones tend to fail. Pinion seal is no problem to replace, might get one at your local bearing store; seek advice on re-torquing the pinion nut, cos that I don't know.
Re: tacho not working properly, originally it was driven from a small generator on the firewall end of the inlet camshaft, (about 3" in diameter), not pulses from the distributor. Re: speedo, if you can get it to work without jumping, you can change it for one from a Jaguar with a different diff ratio, like a manual overdrive car. There is a little number near the bottom of the dial, from memory, about 1040. Lower number, less revolutions per mile.
Re: tacho not working properly, originally it was driven from a small generator on the firewall end of the inlet camshaft, (about 3" in diameter), not pulses from the distributor. Re: speedo, if you can get it to work without jumping, you can change it for one from a Jaguar with a different diff ratio, like a manual overdrive car. There is a little number near the bottom of the dial, from memory, about 1040. Lower number, less revolutions per mile.
Veteran Member
Joined: Jun 2012
Posts: 1,336
Likes: 344
From: Glendora, CA USA
The purpose of the gauge voltage stabilizer is to provide a relatively stable 10VDC to "only the fuel and temp" gauges. Otherwise the gauge readings would vary up and down with the charging system fluctuations. There are modern solid state ones sold on Ebay from the UK.
Check all the connections at the firewall connector(s) - take them all off and clean starting at the inside the car connections, washers etc. I made my car read all the instruments correctly - including the "voltage guessing meter from Jag".
Speedo is off due to V8 speedo trans gears and the tach might not have been "converted" to read the correct SBC V8 pulses. Take off the 90 degree speedo cable adapter
at the trans, take it apart and lube and clean for help with smooth speedo needle movement
Lube the inside speedo cable or replace with new one and be sure the routing is not causing a tight bend. It goes through the tunnel into the car - either the front of the firewall or back into and behind center console to the speedo.
Last edited by Roger Mabry; Mar 26, 2013 at 11:08 AM. Reason: Clarification
Senior Member
Joined: Mar 2013
Posts: 101
Likes: 17
From: New Hampshire, USA
Roger: Am I mistaken, or isn't the oil pressure gauge also run off the voltage stabilizer?
As for the speedo and tach, you will indeed have to calibrate them somehow. The easiest method would be to send them off to Nisonger with the necessary information and have them do it, but that's likely not within your stated budget. I am no help when it comes to the tachometer, but for the speedo, there are a few things to try.
For the bounciness, there are a number of items that could be causing that:
Beyond that, you can try to locate a speedometer that is a different TPM and see if that gets you close enough (though I am doubtful).
Tom
PS: We want some more pictures!

As for the speedo and tach, you will indeed have to calibrate them somehow. The easiest method would be to send them off to Nisonger with the necessary information and have them do it, but that's likely not within your stated budget. I am no help when it comes to the tachometer, but for the speedo, there are a few things to try.
For the bounciness, there are a number of items that could be causing that:
- Speedometer head.
- Speedometer angle gear.
- Speedometer cable.
- Transmission angle gear.
Beyond that, you can try to locate a speedometer that is a different TPM and see if that gets you close enough (though I am doubtful).
Tom
PS: We want some more pictures!

Junior Member
Joined: Mar 2013
Posts: 3
Likes: 0
From: Canada
Hello. Can you please let me know if you still have the 47. Have cash. Not spam. I am willing to come to N.M. for a road trip.
Please call 519 566 2233 or email kensperf@hotmail.com. If you sold it please let me know so I can stop bothering you.
Thanks, Ken Hebert.
Please call 519 566 2233 or email kensperf@hotmail.com. If you sold it please let me know so I can stop bothering you.
Thanks, Ken Hebert.
Veteran Member
Joined: Jul 2012
Posts: 6,796
Likes: 2,403
From: Walnut Creek, California
I just got my issue of Auto Restorer. Lots of good stuff in there even f it isn't Jaguar.
This month includes changing seals on a Chevrolet rear end. Somewhat different than the Dana's or salsbury's in the Jaguar. But, the part about how to do the pinion seal without messing us gear lash is excellent.
And, talk about rusty Jaguars, wow! this includes the refurb of what appeared to be a prisitine vintage MBZ coupe. Shiny on top, but the underside was a real mess!! Majot rust, some lousy patching and a lot hidden by under coating!!
Thread Starter
|
Member
Joined: Feb 2013
Posts: 84
Likes: 9
From: San Antonio, NM
Hey guys, thanks for the input on the gauges. I got sidetracked a bit and haven't been able to mess with them yet...in due time of course. And you're right Tom, I need more pics. When I don't have an active project I vicariously live through others that do. Expect more greasy shots from here out!
News for today focuses on the IRS (what a cool setup). I did some harvesting at the junkyard yesterday afternoon and came home with 6 shocks with springs for...$20. I think they rang me up wrong but I wasn't going to complain. I also grabbed some front fender plates that mount behind the wheels, mine look a bit crusty. They didn't charge for those either. This is starting to sound like one of those Car Craft Budget Builds where they find a supercharger at a swap meet for 50 bucks.
Anyways, the shocks are KYB Gas-A-Just in the front and a set of blue shocks that were made in Belgium. I can't find a name on them. I'm guessing Monroe but you guys will know better. After spending a little time cleaning:
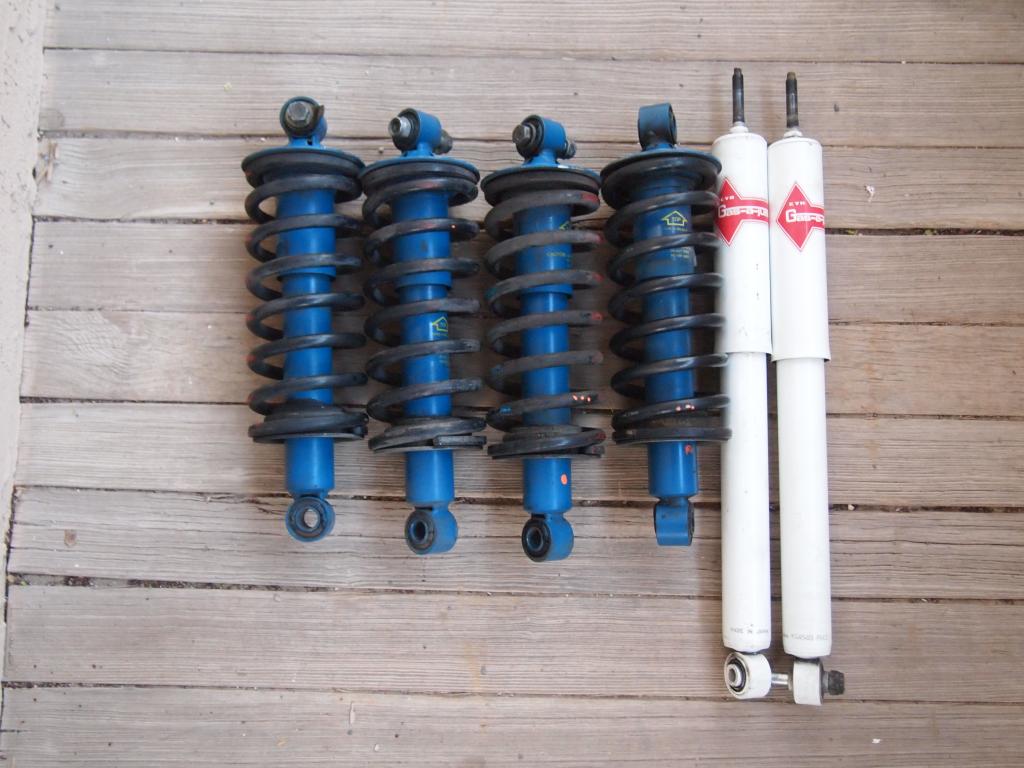
Yes, used shocks from the junkyard sounds...dirty, dangerous, and potentially disastrous but given they were orders of magnitude less expensive than new ones, I'm willing to gamble. Even if they're half as good as new I'm still way ahead.
So, with some time to kill I figured I'd swap out the shocks since its relatively painless. Off comes the left hand wheel and WOAH! Thats alot of play in the hub! Maybe I should spend some time looking into that rather than messing with shocks. Essentially, the entire cast aluminum piece is/was rocking in the lower wishbone with about 1/16" play at the control arm/hub junction. Tried snugging up the pivot, no dice. After popping out the pivot with a drift, I find this:
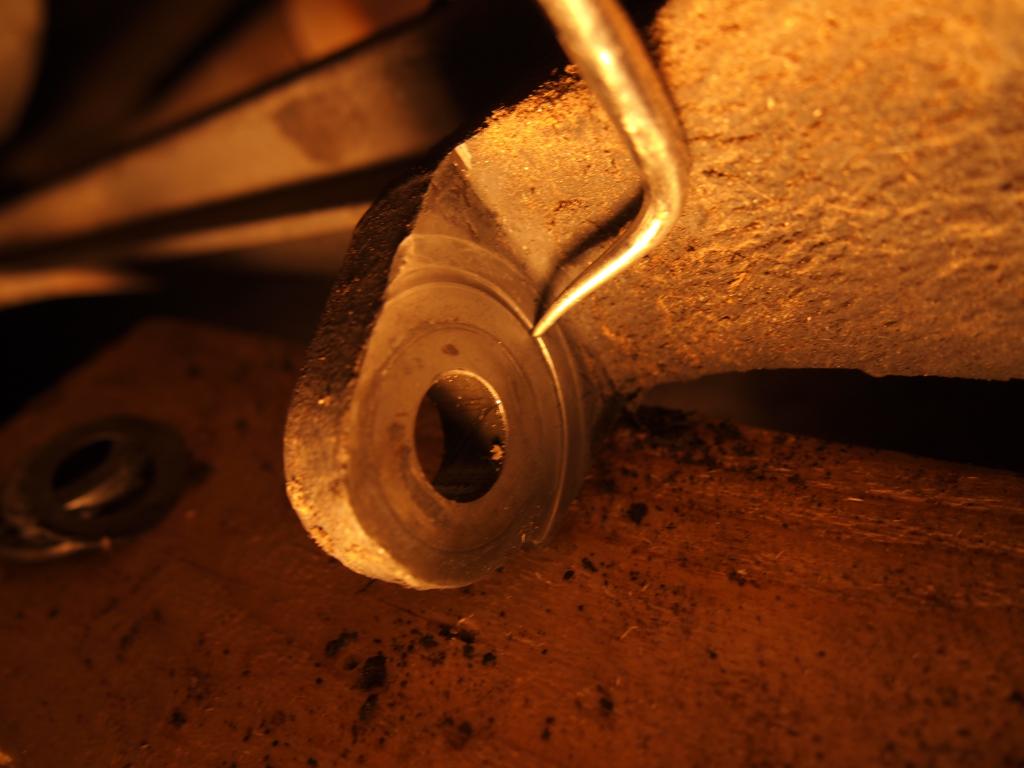
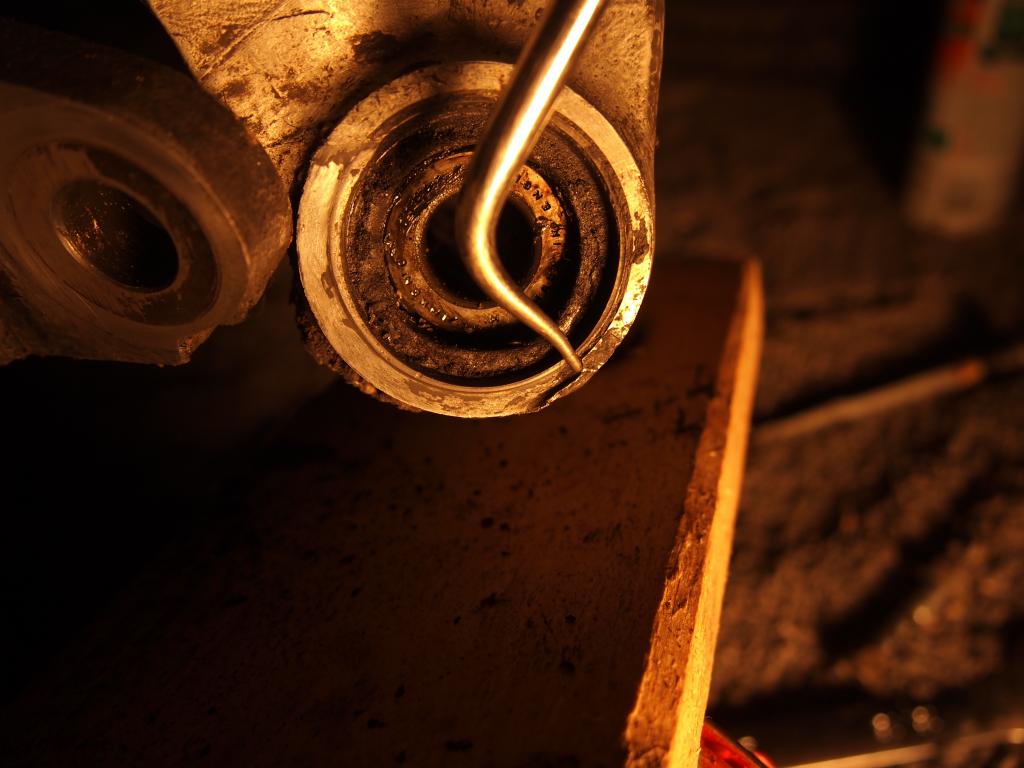
The aluminum hub has taken the brunt of the abuse but the control arm is still scored deep enough to catch a blunt scraping tool. Only the forward juntion was affected. At a cursory look, the bearings didn't seem damaged, though freshening wouldn't hurt. Has anyone run into this before? I'm not building a track car here, I reckon cleaning up the surfaces and using a spacer of sorts could accommodate the play. That said, am I better off getting a hub and arm from the junkyard?
I'm hoping to avoid dropping the IRS if possible but swapping one from an S3 is appealing. Gear ratio would drop but with the SBC, I should have enough torque for highway work. I could always swap the ring and pinion too. I wasn't able to look at the other side since I ran out of daylight and felt a beer and cigar would help me ponder my quandary.
News for today focuses on the IRS (what a cool setup). I did some harvesting at the junkyard yesterday afternoon and came home with 6 shocks with springs for...$20. I think they rang me up wrong but I wasn't going to complain. I also grabbed some front fender plates that mount behind the wheels, mine look a bit crusty. They didn't charge for those either. This is starting to sound like one of those Car Craft Budget Builds where they find a supercharger at a swap meet for 50 bucks.
Anyways, the shocks are KYB Gas-A-Just in the front and a set of blue shocks that were made in Belgium. I can't find a name on them. I'm guessing Monroe but you guys will know better. After spending a little time cleaning:
Yes, used shocks from the junkyard sounds...dirty, dangerous, and potentially disastrous but given they were orders of magnitude less expensive than new ones, I'm willing to gamble. Even if they're half as good as new I'm still way ahead.
So, with some time to kill I figured I'd swap out the shocks since its relatively painless. Off comes the left hand wheel and WOAH! Thats alot of play in the hub! Maybe I should spend some time looking into that rather than messing with shocks. Essentially, the entire cast aluminum piece is/was rocking in the lower wishbone with about 1/16" play at the control arm/hub junction. Tried snugging up the pivot, no dice. After popping out the pivot with a drift, I find this:
The aluminum hub has taken the brunt of the abuse but the control arm is still scored deep enough to catch a blunt scraping tool. Only the forward juntion was affected. At a cursory look, the bearings didn't seem damaged, though freshening wouldn't hurt. Has anyone run into this before? I'm not building a track car here, I reckon cleaning up the surfaces and using a spacer of sorts could accommodate the play. That said, am I better off getting a hub and arm from the junkyard?
I'm hoping to avoid dropping the IRS if possible but swapping one from an S3 is appealing. Gear ratio would drop but with the SBC, I should have enough torque for highway work. I could always swap the ring and pinion too. I wasn't able to look at the other side since I ran out of daylight and felt a beer and cigar would help me ponder my quandary.
Last edited by Johnny Bouncewell; Mar 30, 2013 at 03:33 AM. Reason: Clarity
Senior Member
Joined: Dec 2011
Posts: 534
Likes: 89
From: australia
Rear suspension is not too hard to remove. Lift rear end of car and support on chassis stands. Undo four bolts in prop shaft, one brake line connector, and the forward bushes on the trailing arms; you will probably have to hammer a screwdriver or chisel in there,as they sit on a metal dome and become rusted. Next remove the exhaust pipes that run through the IRS, oxy acetylene helps. If they are shot you may find that your local exhaust place has a template for their machine which will make them, for a reasonable price.Place a trolley jack under the diff. and have friend to help you. Remove rear wheels, and you should see two mounting rubbers on each side, held on with two bolts each, through the chassis rails. Remove those, and the IRS should come out.
Senior Member
Joined: Mar 2013
Posts: 101
Likes: 17
From: New Hampshire, USA
Two steps forward, one step back! Keep up with it, though. Once you get through all of this deferred maintenance, things will start to come together.
I'd be wary of trying a spacer on a suspension pivot, but I am certainly no expert.
I'd be wary of trying a spacer on a suspension pivot, but I am certainly no expert.

Senior Member
Joined: Aug 2012
Posts: 414
Likes: 33
From: NC
That is really strange, I am wondering how something got in there to cause the damage, or if it came from the factory with a problem with the cast. OR its possible somebody else was in there at some point and did not set up the bearings and spacers correctly. Just from what I have been reading on the final drives - mine is out at the moment - I would "ASSume" that you could remove the damage to a flat surface and then reshim the clearances to make it tight. But I am no expert by any means. I am very curious to hear what you end up doing with this. Keep us posted.
Thread Starter
|
Member
Joined: Feb 2013
Posts: 84
Likes: 9
From: San Antonio, NM
Update for April Fools. I convinced my father I bought him a 1972 Citroen DS to replace his Buick. As a truly masochistic mechanic, I've secretly coveted one of these for years. He was wary and told me he wasn't excited about driving a catfish. Eventually, he realized it was April 1st but he is still in the dark about the XJ.
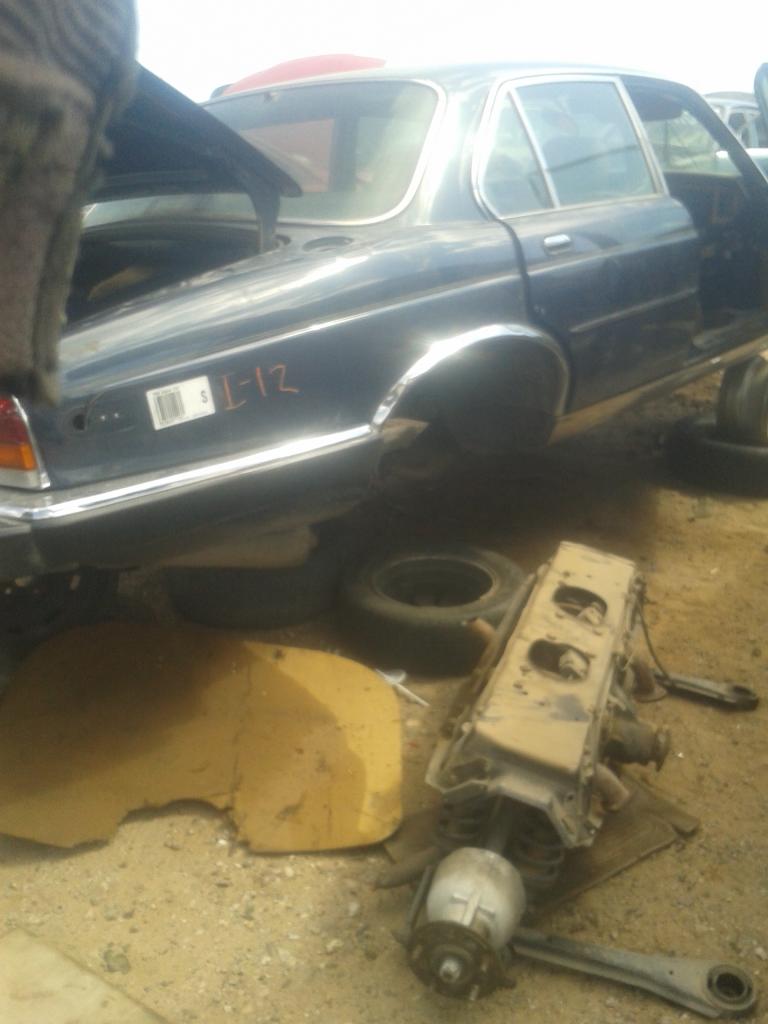
I went to the junkyard on Easter Sunday for their 25% off sale (I'm that dedicated to this project). I came home with a complete rear end from a Series 3 XJ6 for $120, which is $60 cheaper than the lower wishbone bearings/spacers I need to replace. That's before taking into account the nasty wear on the aluminum hub and control arm from the lower fulcrum bearings flopping around for years. I imagine it hadn't been greased for years and slowly developed enough slop in the bearings to wear on the hub.
It was exciting removing it without jacks (not allowed) and dragging the thing around by myself certainly earned me a beer when I got home. What a cool set up. Really impressive for when it was designed. I'll clean this one up on the bench before installing.

And after a bit of wrestling with it:
Question about gear ratios. My 700R4 has a 0.7 OD and I have a 3.54 gears in the axle that is currently in the car. While I'd be running into lugging problems installing the 2.88 gears that are in the newer axle? It also might help my inaccurate speedo readings.
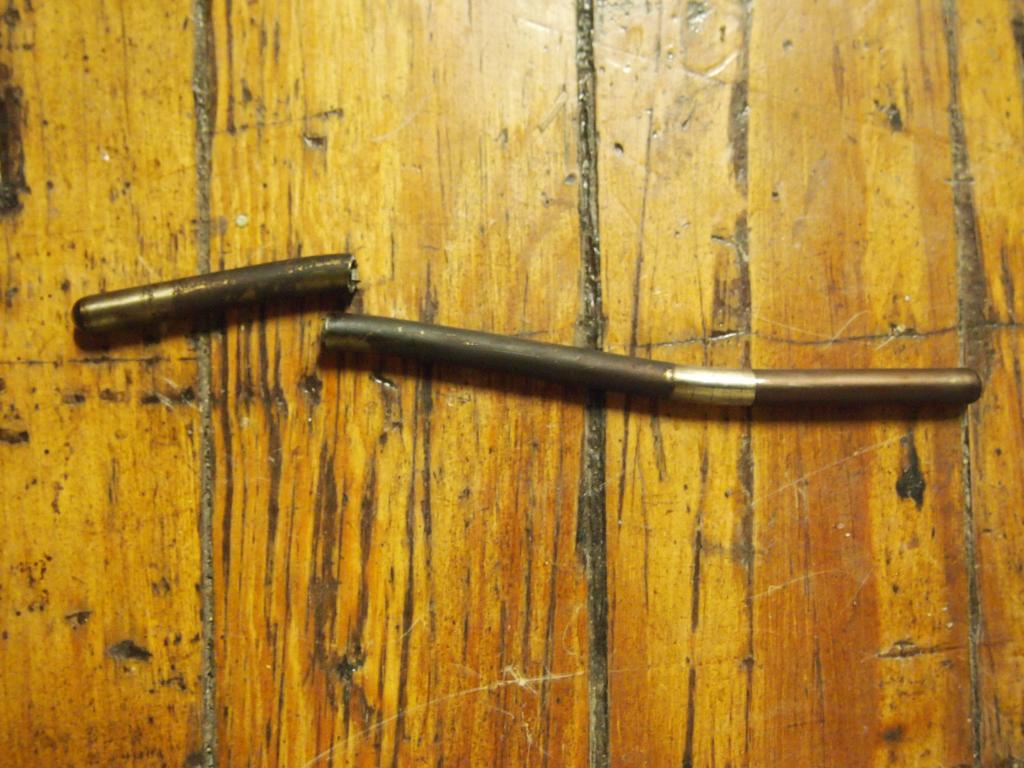
Not wanting to do any heavy lifting today, I figured I'd poke around and see if I could figure out why I'm burning oil on one bank of the SBC. I pulled the valve cover and found a rocker arm was no longer in contact with the pushrod. Looking around, I found the pushrod bent and broken in half.
Ugly. It seems I have a rounded cam lobe on one cylinder. A new cam is the minimum that needs to be done and I might get spunky with a few go fast parts. Hey, I'm digging in the lump, might as well coax a few more ponies out of the little 305. I know this is not the ideal audience (or engine) for this question but I'm open to suggestions. I was thinking an RV grind cam with a dual plane intake. I'm fine tweaking the quadrajet to match. Much more than that and I think I'll be limited by the rams horn exhaust manifold and stock heads. I'd like to avoid pulling the engine if possible.
I went to the junkyard on Easter Sunday for their 25% off sale (I'm that dedicated to this project). I came home with a complete rear end from a Series 3 XJ6 for $120, which is $60 cheaper than the lower wishbone bearings/spacers I need to replace. That's before taking into account the nasty wear on the aluminum hub and control arm from the lower fulcrum bearings flopping around for years. I imagine it hadn't been greased for years and slowly developed enough slop in the bearings to wear on the hub.
It was exciting removing it without jacks (not allowed) and dragging the thing around by myself certainly earned me a beer when I got home. What a cool set up. Really impressive for when it was designed. I'll clean this one up on the bench before installing.
And after a bit of wrestling with it:
Question about gear ratios. My 700R4 has a 0.7 OD and I have a 3.54 gears in the axle that is currently in the car. While I'd be running into lugging problems installing the 2.88 gears that are in the newer axle? It also might help my inaccurate speedo readings.
Not wanting to do any heavy lifting today, I figured I'd poke around and see if I could figure out why I'm burning oil on one bank of the SBC. I pulled the valve cover and found a rocker arm was no longer in contact with the pushrod. Looking around, I found the pushrod bent and broken in half.
Ugly. It seems I have a rounded cam lobe on one cylinder. A new cam is the minimum that needs to be done and I might get spunky with a few go fast parts. Hey, I'm digging in the lump, might as well coax a few more ponies out of the little 305. I know this is not the ideal audience (or engine) for this question but I'm open to suggestions. I was thinking an RV grind cam with a dual plane intake. I'm fine tweaking the quadrajet to match. Much more than that and I think I'll be limited by the rams horn exhaust manifold and stock heads. I'd like to avoid pulling the engine if possible.
Senior Member
Joined: Mar 2013
Posts: 101
Likes: 17
From: New Hampshire, USA
Johnny,
Good work! I would suggest that you keep the gearset that you currently have. If you look at John's Cars' site, you will see that they do not recommend the 700R4 in concert with the lower rear axle ratio.
While you've got your hand in the 305, definitely throw a little attention its way, but don't spend too much, as you never know what other surprises that old lump has in store for you...
Tom