When you click on links to various merchants on this site and make a purchase, this can result in this site earning a commission. Affiliate programs and affiliations include, but are not limited to, the eBay Partner Network.
I do have a pair or two of gloves for yard work. Canvass and leather. Just tossed a pair. too many hoes on the wear surfaces.
And, I have a pair of Hf sourced leather gauntlets. Intended for welding. but, I find them great for pruning thorny plants. Namely the wild black berry vine tangle.
Small world, my daughter has an AA degree in Graphic Arts. Doesn't do it anymore. too much time on the computer has done no good for her shoulders. And, I think there is a Hutchins gene on shoulder issues. Actually cervical vertebra issues that manifest in shoulder pain.
Way back when, I worked at a real full service station while going to college. We did a lt of tire work. Sudsy water was the lube for the tire beads.
I remember those, in the early 80's in regional NZ I had a job in a "Service Station" when they sold a service.
The customer drove in, we went to the window and asked "how much", once the pump was set we went back to window and asked if we could check the oil and water and clean the windscreen. Took their cash to the boss at the till and he gave us the change to take back to the car.
I did that Tuesday and Thursday nights when I was an apprentice ,and Sunday's I got to run the tire bay. We had some tubeless plugs to do, but mainly vulcanising tube patches or replacing tubes for the guys with new cars(because the boss said) if the car is newer then 2 years old they can afford a new tube. Just tell them they need a new one. then we would patch that tube and put it in a new box to sell the next weekend.
Oh, yeah. But, in my day, the pump nozzles were fully manual. No lock. We filled til we heard just the right noise to tell that the tank was full. Loose fit of nozzle to tank. No evap control at all.
Then, mandatory windshield and back glass wipe. Chamois in a bucket. Wrung out by hand.
Under the hood/bonnet for oil and water. Few pressure caps on radiators. so, safe to open and top off. Oil in cans on rack on the island. although one guy I almost worked for, faked cans with bulk oil!! No, I needed the work, but not that way....
And, check the tires and top off with a "guage" on the hose.
Did our own taking of cash and making change. Run in to office to the register location. Fill out by hand on credit card sales. Pre card swipe days by a lot.
We were pressed to push tire sales on the gas fills. Never did get one. It just irritated most customers. This at the insistence of Oil company rep. Boss, finely said,. forget it. It doesn't work, just loses customers.
We had a couple of locals that parked their cars there and we just did what was needed and they paid by the month. Service, gas plus park fee. The latter cheap as it was guaranteed good income otherwise. One was a beautiful 40 Packard convertible in cream. I loved to pull t on to the rack for grease and oil change.
Tricks: Some did it, I chose not to:
1. Stab the oil short, sell a quart or two.
2. Twist the fan belt and show cracks to customer and warn of impending failure. The twist caused some or all of the cracks!!
Small world, my daughter has an AA degree in Graphic Arts. Doesn't do it anymore. too much time on the computer has done no good for her shoulders. And, I think there is a Hutchins gene on shoulder issues. Actually cervical vertebra issues that manifest in shoulder pain.
Carl
No degree here, not even a true Artist. I only wrote up some instructions.
I also wrote tutorials for a browser for a while but that wasn't nearly as much fun.
After the upper ball joints were completed it was time to install the lower ball joints on the spindle carrier.
The lock washers for the lower ball joints are interesting. I've never seen any like this. They have tabs that keep the heads from turning.
To torque the upper ball joint he stuck a long bar into the carrier for leverage. The bar is NOT on the ball joint! The picture is misleading due to angle of perspective!
Specified torque is 35-50 pounds. Mine are 45 pounds.
The lower joint was done the same way; torque specs, 45-55 pounds. Mine are 50 pounds. However, be sure the taper is caught or the joint will simply spin and not get any tighter. If you can't find the washer for the lower joint, look at your shock absorber mount.
These are new Nylocs, of course!
~~~~~~~~~~~~~~~~
Spindle Installation
First husband put the tiniest amount of anti seize on the taper and then wiped almost all of it off. The idea is for it not to rust into place for the next time we have to change it. (There Will be a next time I'm sure) If there's too much anti-seize the spindle will only spin in the bore and Never get tight (ask how I know).
Only the thinnest layer of anti-seize,
Then he wiped almost all of it off,
He twisted it into the bore until it got tight.
We discovered that American Nylocs were again too deep for this application. The threads work OK, but as with the upper wishbone shafts, the Nyloc doesn't engage. So the old nuts went back on with a dab of Loctite for good measure.
Spindle/stub axle torque, 80-90 pounds. You may need someone to hold the cross member down while you torque these nuts. Mine are 85 pounds.
The lock washers for the lower ball joints are interesting. I've never seen any like this. They have tabs that keep the heads from turning.
(';')
Elinor, you have those tab washers on the pivot bolts for the hand brake calipers too. If you are ever changing hand brake pads with the IRS in the car you can't really see them.
They are common on motorcycle brake rotors and sprockets.
Looks to me as though you're doing brilliantly!
This, amongst other threads will be so handy for when I get round to commencing mine.
I got two floorpans last week for half the retail price, I think that's the last panels I will need (hopefully) and the weather's clearing up.
Also picked up a re-chromed front bumper inc. over-riders and under-riders for less than �300.
Just got to finish doing a few things to the white Saab vert so I can sell it and fund the Jag project.
Very nice work. You do have a talent for tutorials. Bests factory manuals by miles!
1. Mighta ground the domestic Nyloks down so they threads engaged. But, excess heat may have destroyed the locking feature. I've done that for a reason and for no reason!!! But, as you did aided by Loctite, they should be secure.
2. Tabbed washers were quite common at one time. Even in engine internals,. ala rod cap nuts.
To be noted, hubby is feeling better. That is certainly good.
You can get half-height AN locknuts (nylocs); they are common in applications where they are used, not to attach components together, but to prevent components from coming apart:
Just passing it on. Love the work you and your better half are doing even though I'm an X308 guy. Love the 6s and wish I had one in the stable (but there is no room for all the wheeled accessories I DO have...
anjum:
Thank you for your kind words. The Undo button makes me look a Lot smarter than I really am. I highly recommend its regular use.
Carl:
Thank you for the complement. Even my Blue Book (ROM) leaves out so many details; no doubt assuming the reader is a BL trained mechanic and knows what to do, only needing a small reminder now and then.
Not only that but so many of the tools called for are not accessible to the average Olde Jaguar owner making us think outside the box on so many things. As there seems to be no point in others having to bash this stuff unnecessarily, I like to share the work-arounds, which in my work I have to find Many.
Yes, husband is feeling Much better! For a while I thought I might have to return him for at least a partial refund; or trade him in on a younger model.
Bryan:
Thank you for your kind comment and for the link. All information is gladly accepted and appreciated.
(';')
The springs had to come out to work on all the rubber bits we were changing. There are such horror stories about doing this, and the total, or even fatal disasters that can happen with only one misstep that we were quite trepidicious about it, in fact we agonized over it for weeks! But it Had to be done!
Ya simply can't believe all the horror stories. One does need to exercise reasonable caution to do anything on a car but undue fear is paralyzing. So we took all the precautions we could think of and just did it! And here I am, still alive to write it up!
Husband got some 3/4 inch all-thread (Redi Rod), a hand full of flat washers, a couple regular nuts, a Long nut and a length of pipe that easily fit over the all-thread.
He liberally greased the threads and washers to minimize wear because we didn't know the actual force of these springs.
He cut an angle on one of the pipe to match the angle of the bottom of the spring pan.
There is a built-up place on the top side of the cross member to seat a large washer and bolts that looks specifically made for such a device.
He was thinking this would also make it easier for re-installation. Yeah well ignorance is bliss - for a while anyway.
Husband and our beefy neighbor took the springs out in about 15 minutes with this tool. It was merely a matter of tightening the tool against the bottom of the spring pan, releasing the 6 bolts holding the pan to the wishbone, and slowly releasing the spring. Well that was hard! NOT! There was no drama, no explosion, no muss and little fuss.
However, after all the rubber bits were renewed, and it came time to put the springs Back in the car (and we were even more trepidicious) the shortcomings of this tool became abundantly clear! The spring Would Not follow the same path it did during removal. Coils kept binding on the lower wishbone and he didn't trust the threads on this grade one rod, but that's all he could get in that size.
Then, in a Blinding flash of inspiration he went to the Fastener Store and picked up some 3/8 inch fine thread grade 8 redi rod and several grade 8 nuts. He cut it into lengths that would enable the spring pan to be bolted relatively easily to the wishbone without fear of breaking something. He rounded the ends to more easily accept the grade 8 nuts.
At this point the large thru-bolt tool became merely a safety device which was tightened up as the pan neared the wishbone. In case one of the grade 8 redi rods let go the spring wouldn't go through the wall into the living room.
Some time ago he saw a set of thru-bolt sockets and ratchet at his local HF and picked up a set. This made running up the spring pans a relative snap! I can't imagine doing this with an end wrench. The farther the process went the better these sockets worked.
The Redi Rod is 3/8 fine thread, grade 8 as mentioned. He threaded 2 of them into the wishbone and double nutted 2 others onto the shock absorber mount. The remaining 2 holes were kept for long bolts that acted as guides only, so there was no chance of misalignment and the pan would bolt right up to the wishbone.
He greased the threads on the redi rods and put washers under the nuts which made the screwing-up process much easier.
You can see his Prize ratchet in the picture above.
To keep the pan more or less even he measured the remaining distance each bolt had to go before finished. Also, grade 8 is brittle and won't take much bending. So it was important to keep them as straight and evenly loaded as possible. Near the end, within a couple inches, he measured more often.
It was still a slow process, but I can't Even imagine doing it with an end wrench! That ratchet set paid for itself in this one job!
Great work, and outside the box thinking. Even my mechanic who made his own compressor had one of mine let go and broke a shock.
After seeing your post I will do it myself next time,there were so many warnings about I decided not to do it at home with the price I was quoted by a friend.
Thank you, Clarke.
I'm not saying disasters haven't happened, or couldn't happen even with the way we did this, but having basically 7 bolts holding the spring in place, and the relative ease with which this went along, I would not hesitate if I had to do it again! Such jobs are not all that hard with the "right" tools.
He was Very Careful to keep the pan 'level' with the spring in the beginning when the pan was out at the end of those long bolts, because the stress is multiplied with length, and grade 8 is brittle. That's why he carefully measured to see no bolt was excessively longer or shorter than any others.
The socket set cost him $50 more or less a couple years ago. He thought it looked like a handy thing to have around. This is the first time he's Really had a use for it but it was $50 Well spent!
This was Easy compared to what we're encountering with the Rack!!
(';')
1. Safety is foremost. The energy in those springs is phenomenal. If one doesn't intend to reuse them, a technique is to cut them with an Oxyacetylene torch in situ.
2. Getting traded in has been an incentive for all manner of critters. Not limited to the inert.
3. Straight through sockets. Slick and a special rachet as well. Oh, me, gotta look. I thought my racheting box wrenches were the ultimate. Nope, trumped.
4. yeah, I must agree, the factory manuals for all were written for the professionals. Once in a while, a "worka round is mentioned". But, even some pro's protest the brevity of some procedures.
5. There is an old racer's adage, "keep the shiny side up". If you and hubby and assistant keep this up, you won't be able to tell, which is which!!
6.No matter, Clean stuff to work on is to be admired. or just looked at! Some critters at car shows in years past used mirrors to enable gawkers to see the underside of their pride and joys. My roadster project was that way. Nope, never saw a car show???
7. Stretching a beefy transverse rear spring on an early Ford was challenging as the energy was there, albeit in a different form.
8. Ever thought of a length of chain as a "safety catch' when removing or installing coil spring? I have, but never did.
Enjoy the satisfaction of a job not only well done, but well told!
Thank you so much, Carl, I do try to make my reports plain.
I think it's too late now to think of a safety chain, I don't know where it would go anyway. If one was heavy enough to do any good it would be Seriously in the way I would think.
Husband also has a set of ratchet box ends but they weren't strong enough for this. They're really made only for running nuts off after loosened and not any real work.
It doesn't matter to me if anyone ever sees the work done on this car, that's why I haven't painted Every Single Part. Paint won't make it go any faster and only makes sheet metal last longer. Mostly it was for ease of handling and telling one side from the other that some bits are painted and others not. It's enough for me to know it's done more or less correctly, all the bushings are new and correct and all the bolts are tight.
We had to go for parts today into one of the "local" towns and there was a small car show. More cars might have participated but it was 2pm and people were getting scarce and cars were leaving. Nix would have been Right at home in that crowd, the only cars not modified to the hilt were a coupe of Ancient Stars!
But there was not a single Jaguar!! Chevys and Fords completely dominated! In fact, the only things not Mercan was a BMW Isetta (I'd never seen one of those!) and a Fiat (?) Metropolitan (a neighbor had one once).
Most were Drivers and looked it, but one of the Trailer Queens had a strategically place mirror just under the front to show off all the chrome underneath. If Nix was running I could have shown her as she looks Just as good as many there, and Way Better than some.
Today is May 3. Nix must either be emissions tested and pass, or be put on Planned Non Operational status by May 15.
There is No Way she'll be ready for testing, even in the next month let alone the next 12 days.
I knew this would probably be the case back in March but I've kept quiet about it. There was simply too much to do in too little time.
So, with the deadline staring us in the face and the suspension still on the work table, and the brakes not even having been touched, it's time to face reality. I have the forms filled out ready for the mail tomorrow.
I think they call this a Tactical Withdrawal; take stock of the situation, regroup and engage the battle again later.
(';')
Why ditch the methodical refurbing by rushing through just to pay the Guv, and then back to the shop to do the rest?
If fees are due, I the thing can be done online. I do my renewals on line and have noted the Non Op option !
OTH, I did a lot of getting SMOG inspection extensions during the "lump" process.
But, it entails a DSMV visit. Not the most fun. And, DMV caught on and limited them to 30 days at a time. With sour looks after the first 30!! But, a lot of the time, DMV folks have that look built in. A game face so to speak. Exceptions, oh yeah, some quite pleasant and helpful.
I woke this morning with a weird thought. Did I mail the right starter in for the warranty, or did I mail in the old one, that should await mailing instructions for the core charge recovery?
Well, on Coco's early walk we looked. I got it right. The still shiny one is gone. the oily one is on the bench!
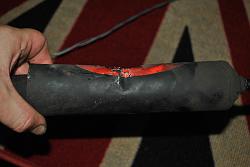
Exhaust Leak, Burned Boot, Interferance Fit With The Pan
When we took off the old rack, it was plain the boot was damaged but I didn't know how it happened until I had to repair the starter solenoid, and had to take down the exhaust down pipe.
Right there, plain as day, was a Hole that shot hot gas like a blow torch directly onto the inner tie rod boot!
I tried to remove that end from the pipe to reinsert it beyond the hole but there was no way it was coming off. So the next best thing in my mind, a farmer fix; a dab of muffler putty and a wide hose clamp.
Later I'll take the cut-off wheel and remove all that extra clamp.
The string is to show us where the rack will sit when it's installed.
Husband noticed a worn spot on the pan that Exactly corresponds with a worn spot on the old rack. I think the term is Negative Clearance.
True, it's been this way for 30 years but only 78,000 miles, and it isn't right.
We also discovered the "new" S3 is somewhat narrower where the pan sits.
In the picture below the 'new' rack sits above the old(er) one.
This clearance issue Must be corrected! We've found nothing in the Conversion Manual about this specific problem so he made more clearance between the pan and the new rack by putting a spacer under each motor mount.
The Perfect material for this was a short length of 4 inch thin wall square tubing which he cut up before I got a picture of it. He cut one wall for each mount and cleaned up the edges. Then with transfer punches he marked where the holes will be in the spacer plates.
These punches are of various sizes to center themselves in existing holes and mark the position of corresponding holes in new material.
For those unfamiliar with the reason for the center punch, the point of the drill bit sits in the punch crater and starts the hole in the correct place without wandering all over the map.
First he drilled holes smaller than the bolts require as pilot holes in the spacer plates.
Pilot holes made it much easier to drill the larger holes for the bolts.
And here is the completed spacer plate ready for placement.
The spacer is only .020Inch (~5mm) thick so new negative clearance problems aren't created somewhere else with this 'fix.'
If anyone sees a potential problem with this Please speak up!
(';')

 04-30-2015, 07:15 AM