
Yet Another Floor Pan Adventure FAQ


Senior Member
Joined: Dec 2013
Posts: 106
Likes: 20
From: Upper Hudson Valley, NY
Just to clarify some things/terms (if it is needed):
---When welding with MIG it is best to use the gas shielded process. Most "experts" recommend a mixture of 25% Argon (Ar) and 75% Carbon Dioxide (CO2) for the shielding gas. They call it "metal mix" and it's available at most reputable welding gas suppliers.
---The 'tip' is made of Copper (Cu) so that it conducts the electricity of the weld machine well and is a dissimilar metal to what you are welding (meaning it will not fuse to the base metal, in this case steel) So the concern that you will touch the tip to the weld surface is null.
---The 'shroud' is also copper for the same reason, though not so much the conductivity but the dissimilar metal (no fuse).
---As OB said the tip should be deeper than the shroud to allow a nice little cloud of shielding gas around the molten metal.
---While practicing as described earlier, please keep in mind that the distance that the torch is away from the work will greatly influence the amount of heat input to the molten metal and work. Imagine that the wire is an electrical conductor (which it is) and that by increasing the distance between the tip and the work the electricity has to travel further therefore increasing the resistance in the circuit and lowering the heat at the point of welding. You'll also notice that by increasing the distance between the torch and the work that the wire will heat to the point of white hot and will sometimes break before making contact and starting the puddle.
Decreasing the distance has the opposite effect. This is again something to practice and keep in mind.
OK, I gotta go, I'm gonna post this, and if I left anything out I'll catch it later...
Senior Member
Joined: Jun 2014
Posts: 210
Likes: 47
From: Alameda, California
The water intrusion always originates from the windshield and rear windows.
I got stuck in a monsoon storm in SoCal and my floors were like wading pools.
I had to pump out the water. The seals were leaking for years. This is why you see so many vintage XJ's with water damaged rear parcel trays, under the rear window. I could see water stains behind the dash. Another thing to check are the weep hole drains under the bottom of the doors. The coupes have drain tubes exiting the rear quarter panels. They plug up with dirt and debris. You can use a coat hager to rooter them clean. The air-con condensation drains can also plug up. Luckily I caught mine before there were rust-outs. The floors were wire brushed clean and epoxy primer coated.
Last edited by Giovanni LiCalsi; Jan 14, 2015 at 12:32 AM.
Senior Member
Joined: Jan 2014
Posts: 577
Likes: 246
From: Seattle
Got some bad news for you... if water gas been soaking the floors and carpeting for years... you will need to pull the windscreens and repair the windscreen channels ... they have rotted through and I will bet there is a lot of corrosion and mold on the seats. As well the rear leaks allow water to gain entry to the inside of the rear flanks between the fuel tanks and the outer skin. Replace the parcel shelf ...its toast
Look under the rear seat lower cushion for water and damaged door cards.
Look under the rear seat lower cushion for water and damaged door cards.
Senior Member
Joined: Jun 2014
Posts: 210
Likes: 47
From: Alameda, California
XJ's windshield and back window frames tend to flex a fair amount when cornering. This causes the old and dry window seals to lose grip and create leaks.
When replacing old seals with new ones, be sure to use Sikaflex on all sealing surfaces. Sikaflex will remain soft for over 20 years if the car is mostly garaged.
I have used Sikaflex in my industry profession for over 30 years and it has met the test of time, with excellent results.
When replacing old seals with new ones, be sure to use Sikaflex on all sealing surfaces. Sikaflex will remain soft for over 20 years if the car is mostly garaged.
I have used Sikaflex in my industry profession for over 30 years and it has met the test of time, with excellent results.
Last edited by Giovanni LiCalsi; Jan 14, 2015 at 09:23 PM.

Thread Starter
|
Veteran Member


Joined: Mar 2014
Posts: 26,760
Likes: 10,311
From: Tehama County, California, USA
I want to thank all of you for all encouragement and advice over the past couple days. I've tried to put all of your suggestons into practice at some point.
OB, your 3-second bursts are Great! If I don't get too focused and forget to let off.
weattg44, I'm glad to know I won't hurt anything if I get the shroud on what I'm welding. I'm still having a little trouble keeping a consistent distance from my work. You'll notice a couple wire whiskers on the pictures below. (I didn't clean it up for just that reason)
Giovanni, I know where one leak is, right over the driver's knee. But I'm also sure the AC drains don't work correctly. Last Summer when all the other cars in the parking lot had little puddles under the evaporators, Nix had no such puddle. I thought it a bit strange at the time, but it never occurred to me it's draining under the carpet and eating up my floor. I'll be addressing that situation before I even take it down off the jack stands.
Alyn, my front and rear window channels are sound; strange but true. There were no stains on the bulkhead when I pulled the heater blowers in December 2013 so I'm thinking that part of the car never did leak. I have pulled up all the carpet will come up (it was all glued down at the time of the first restoration in 1986) having learned that if the floor is lace the padding comes up Very easily. The back floors are sound and the front passenger floor is passable, not bad enough to rip out at this time. There has never been a moldy smell in the car.
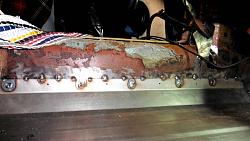
Today was a great day for more welding practice. Since part of what is to be welded will be on vertical surfaces it seemed like a good idea to try doing that. I found a couple lengths of angle iron and some non cad-plated washers because husband already drilled holes in the floor pan to replicate factory spot welds.
First I cut a slot and tried filling it vertically. Too much weld; too much grinding would be required for that to be acceptable. If I encounter that problem I'll probably weld on a patch.
I have attached several pictures numbered in the order I did them and also pictures of the back sides. I'm pleased about the penetration; all the backs are discolored but none blown through. I tried to cut a couple washers off with a cold chisel but only succeeded in marking up the edges of the washers. I got comfortable enough to try sticking some thin stock on thicker material but that was Far less than successful. I'll try that again tomorrow.
Husband's welding philosophy is to weld a little on and grind a little off, then weld a little more on and grind some more off. This can go on for quite some time until he feels it's right.
I'm lazy I guess, because I don't want to spend a lot of time grinding off what I've just welded on. Not only that, it's going to be quite difficult to do that kind of grinding inside the car when the floor pan is finally in place. I want to do it right the first time. He says I'm expecting too much and setting too high a goal for myself. Well, yeah, I am somewhat goal oriented. I don't want someone in the future taking up the carpet and finding 9 pounds of bulging welds and Iron Bird Droppings that catch carpet padding and who knows what else.
(';')
OB, your 3-second bursts are Great! If I don't get too focused and forget to let off.
weattg44, I'm glad to know I won't hurt anything if I get the shroud on what I'm welding. I'm still having a little trouble keeping a consistent distance from my work. You'll notice a couple wire whiskers on the pictures below. (I didn't clean it up for just that reason)
Giovanni, I know where one leak is, right over the driver's knee. But I'm also sure the AC drains don't work correctly. Last Summer when all the other cars in the parking lot had little puddles under the evaporators, Nix had no such puddle. I thought it a bit strange at the time, but it never occurred to me it's draining under the carpet and eating up my floor. I'll be addressing that situation before I even take it down off the jack stands.
Alyn, my front and rear window channels are sound; strange but true. There were no stains on the bulkhead when I pulled the heater blowers in December 2013 so I'm thinking that part of the car never did leak. I have pulled up all the carpet will come up (it was all glued down at the time of the first restoration in 1986) having learned that if the floor is lace the padding comes up Very easily. The back floors are sound and the front passenger floor is passable, not bad enough to rip out at this time. There has never been a moldy smell in the car.
Today was a great day for more welding practice. Since part of what is to be welded will be on vertical surfaces it seemed like a good idea to try doing that. I found a couple lengths of angle iron and some non cad-plated washers because husband already drilled holes in the floor pan to replicate factory spot welds.
First I cut a slot and tried filling it vertically. Too much weld; too much grinding would be required for that to be acceptable. If I encounter that problem I'll probably weld on a patch.
I have attached several pictures numbered in the order I did them and also pictures of the back sides. I'm pleased about the penetration; all the backs are discolored but none blown through. I tried to cut a couple washers off with a cold chisel but only succeeded in marking up the edges of the washers. I got comfortable enough to try sticking some thin stock on thicker material but that was Far less than successful. I'll try that again tomorrow.
Husband's welding philosophy is to weld a little on and grind a little off, then weld a little more on and grind some more off. This can go on for quite some time until he feels it's right.
I'm lazy I guess, because I don't want to spend a lot of time grinding off what I've just welded on. Not only that, it's going to be quite difficult to do that kind of grinding inside the car when the floor pan is finally in place. I want to do it right the first time. He says I'm expecting too much and setting too high a goal for myself. Well, yeah, I am somewhat goal oriented. I don't want someone in the future taking up the carpet and finding 9 pounds of bulging welds and Iron Bird Droppings that catch carpet padding and who knows what else.
(';')
Veteran Member
Joined: Feb 2013
Posts: 17,809
Likes: 3,945
Hi Elinor
When you are welding the thicker stuff, you need to increase the voltage and then match it with the wire speed.
Although you have got penetration, the voltage you are using looks too low and could do with going up another notch.
When you are doing 'plug welds' there should be 'no tilt' on the Torch.
Start the weld in the middle and move the Torch round in a circle, you will only be there a second or two, so you want to give it a little swirl round just like a decorative icing swirl on the top of a very small cake.
Vertical Welding: Again don't tilt the Torch to one side but keep it level and point the Torch up hill, with a little more Voltage matched with the Wire Speed.
Then as you go up, you weave it from side to side.
You only need to do so by a very small amount, as you microscopically build each weld, up and up like climbing the rungs of a ladder.
As for the 'Shroud' this I think is where most problems lay.
You need to get in really close less than a half inch away, or you won't get a good looking weld.
The 'Shroud' isn't live as it is slipped over the Insulated head part of the 'Torch' so if you accidently touch the 'Workpiece' with it, nothing much will happen and it won't start melting like the Wire.
These Shrouds are replaceable items and will eventually get a bit scorched to the point where they will need to be renewed.
As for the Welding grinding bit, you only really need do this, if you want the weld to be invisible ie after patching a hole in the bodywork.
A neat MIG Weld should look very good without any grinding at all.
Best to practise on the 'Flat' until you can put down a perfect bead without even thinking about it, before you get on to the more advanced techniques of Vertical welding.
Also a very good idea to do ALL your practice on metal of a similar thickness to that of your floor pans.
Don't give up as suddenly everything will fall into place and will leave you wondering, what all the fuss was about.
Thread Starter
|
Veteran Member
Joined: Mar 2014
Posts: 26,760
Likes: 10,311
From: Tehama County, California, USA
Practice makes perfect as they say, and it would seem to be so.
OB was right; it all came to me in a blinding flash of insight! It's so simple!
I was in Just the right mood, it was a cloudy dreary day with light rain so I couldn't do anything outside, the doors were open to let the undercoat smoke escape and the weather was Perfect for everything to just flow, and it all fell into place.
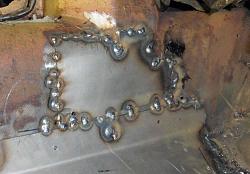
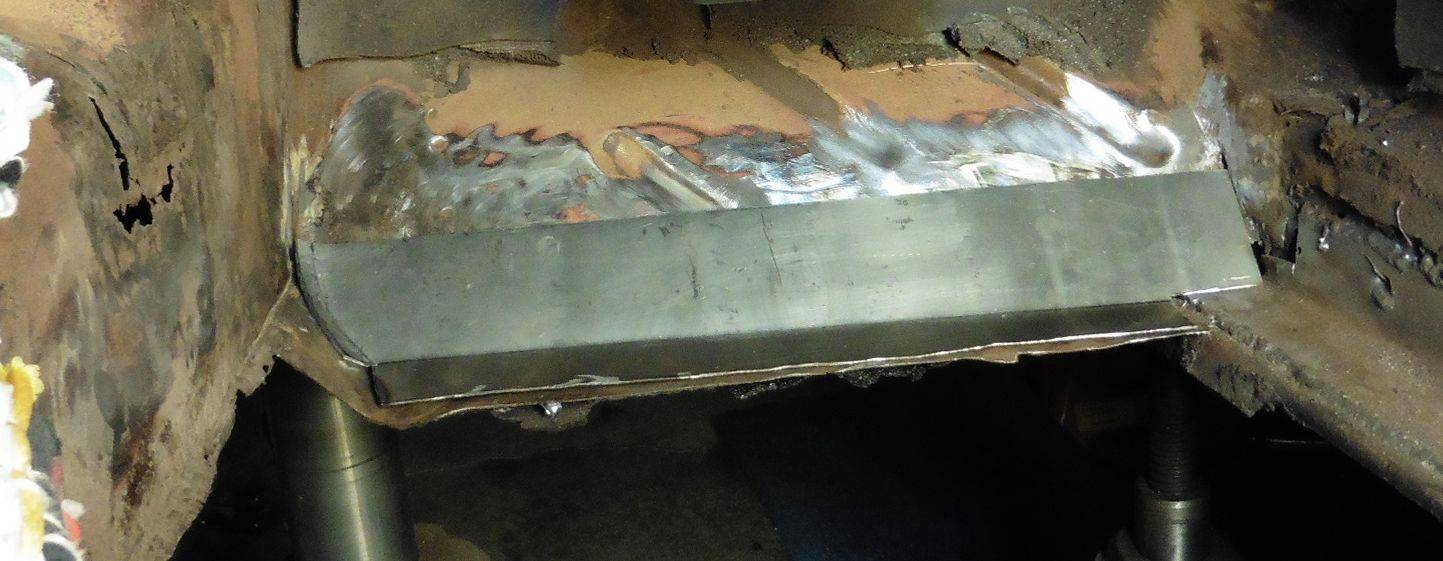
I only took 3 pictures because that would have interrupted the creative processes to take more. The first picture is the angle brace ready for welding. It stayed in that position for several days while I made Iron Bird droppings.
The second picture is the angle brace all welded up to the tunnel and whatever that structure is below it.
The third picture is the fill-in piece for the front of the floor pan. It's ready to weld up in the next couple days and the pan will sit on it. I wanted it to be finished today but it just got too late and I used up all my vital energy grinding welds off so the pan could sit flat and true on its supports.
So step 1 is finished. Steps 2 & 3 will be a cinch.
Tomorrow is the first Jaguar Club meeting of the year and we plan to attend although I have to drive the van (Bummer!) or the rest of this would be finished by supper time Saturday.
This has been quite stressful and arduous!
Thank you all for your ongoing interest, encouragement and support.
(';')
OB was right; it all came to me in a blinding flash of insight! It's so simple!
I was in Just the right mood, it was a cloudy dreary day with light rain so I couldn't do anything outside, the doors were open to let the undercoat smoke escape and the weather was Perfect for everything to just flow, and it all fell into place.
I only took 3 pictures because that would have interrupted the creative processes to take more. The first picture is the angle brace ready for welding. It stayed in that position for several days while I made Iron Bird droppings.
The second picture is the angle brace all welded up to the tunnel and whatever that structure is below it.
The third picture is the fill-in piece for the front of the floor pan. It's ready to weld up in the next couple days and the pan will sit on it. I wanted it to be finished today but it just got too late and I used up all my vital energy grinding welds off so the pan could sit flat and true on its supports.
So step 1 is finished. Steps 2 & 3 will be a cinch.
Tomorrow is the first Jaguar Club meeting of the year and we plan to attend although I have to drive the van (Bummer!) or the rest of this would be finished by supper time Saturday.
This has been quite stressful and arduous!
Thank you all for your ongoing interest, encouragement and support.
(';')

Member
Joined: Jan 2015
Posts: 30
Likes: 10
From: Nova Scotia, Canada
LnrB: I am living through most of the same pain...I bought complete floor pans for the XJ6, but I now realize that all of my problems are confined to the front floor pans and front rocker areas. I will likely be joining the floor pan under the seat support. I have cut everything out as you have, and admittedly, it can sometimes seem like a very daunting task. I am quickly learning that Jaguar's rust from the inside out!
Veteran Member
Joined: Feb 2013
Posts: 17,809
Likes: 3,945
Practice makes perfect as they say, and it would seem to be so.
OB was right; it all came to me in a blinding flash of insight! It's so simple!
I was in Just the right mood, it was a cloudy dreary day with light rain so I couldn't do anything outside, the doors were open to let the undercoat smoke escape and the weather was Perfect for everything to just flow, and it all fell into place.
I only took 3 pictures because that would have interrupted the creative processes to take more. The first picture is the angle brace ready for welding. It stayed in that position for several days while I made Iron Bird droppings.
The second picture is the angle brace all welded up to the tunnel and whatever that structure is below it.
The third picture is the fill-in piece for the front of the floor pan. It's ready to weld up in the next couple days and the pan will sit on it. I wanted it to be finished today but it just got too late and I used up all my vital energy grinding welds off so the pan could sit flat and true on its supports.
So step 1 is finished. Steps 2 & 3 will be a cinch.
Tomorrow is the first Jaguar Club meeting of the year and we plan to attend although I have to drive the van (Bummer!) or the rest of this would be finished by supper time Saturday.
This has been quite stressful and arduous!
Thank you all for your ongoing interest, encouragement and support.
(';')
For your very first Welding Job, I would be extremely pleased with that!
The 'penny' has well and truly dropped and what you have achieved so far is better than some 'so called' professional jobs that people pay good money for.
Plus the Satisfaction of doing it yourself, which is something that you cannot put a price on!
If you make a note of the Settings you used, then when you weld something similar, they will give you a good starting point but it is not an exact science, so you may have to adjust things up or down.
Always have a practice piece, clamped to the job you are doing because you need to have the 'Arc' 'Buzzing like a Bee' before you start Welding.
Being Super Critical, its hard to pick any faults with what you have done!
Most people would be very pleased with that!
The only thing you may need to 'Brush up on' would be on the movement of the Torch, as every time you start a new bead, I can see a bit of a 'wobble' which is hardly worth a mention in the scheme of things!
But its vital to get yourself comfortable and do a 'dummy run' with the Torch before you start to Weld but just before you pull the Trigger you could rest the Shroud on the Workpiece (at an angle) just to steady it.
If you want to go up a gear, and use an advanced Technique!
Providing the metal you're welding is thick enough not to burn through, then once you have put down one short bead, release the trigger to stop the weld but do not move the Torch!
Instead continue Straight away with another Bead, before the one you just put down has 'ANY' chance to cool, so as soon as you pull the Trigger you are joining onto HOT metal.
Pull Trigger Weld a Bead: Release Trigger
Pull Trigger again WITHOUT DELAY: Weld another Bead: Release Trigger
So its: Start Stop-Start Stop-Start Stop, without taking the Torch away.
There may be circumstances where you cannot do this:
Burning Underseal (That you may want to let cool down)
You may need to change position or move onto a different section.
Metal may be too thin and need to cool down to avoid burning through.
But after you've tacked the 'Workpiece' in place, so that it cannot move, the almost instant 'Start-Stop Technique' should really give you a super looking Weld.
When you do those 'Plug Welds' one of those Shrouds that has the 'forked head' would make that job a 'Breeze' and with 'Plug Welds' as small as those, there is no need to do any 'Circling' (Swirling)
Just line the Shroud up with the Wire in the middle of the hole, put on your Mask, hold the Torch in position (with NO Tilting) then just give it just a 2 or 3 Second burst=Job Done!
With just a little more Practice, I can see your Welding Skills will be in big demand!
So all I can say at this Stage is Well Done!
Last edited by orangeblossom; Jan 17, 2015 at 07:19 PM.
Thread Starter
|
Veteran Member
Joined: Mar 2014
Posts: 26,760
Likes: 10,311
From: Tehama County, California, USA
anjum: Thank you so much. I have SO many other things going on that I'm not looking for work right now, No. But I won't say Never. I'm very aware this is a salable skill.
Myke: Yes, they rust from the inside. I've found one leak but I'm sure the evaporator drains are somehow non-functional. Early in its life the car was also subjected to wet driver boots/shoes as evidence by the far worse condition of the floor at the gas pedal. I also have a hole in the A-piller but that will be patched and then treated from the inside, I just have to figure out how to do that. And yes, part of the reason this had taken so long is the Daunting aspect. I think I've conquered that now.
OB: I AM Extremely pleased with this! However, as a Perfectionist, I'm sure you understand I would like to have it better. You're right, it's a bit jerky whereas I would like to have the weld as smooth as silicone around the tub. But I'll be satisfied with this because it's DONE!
There was lots of burning undercoat, in fact it was hard to see where to weld because of the smoke. That's one reason the shop doors were open even though it was a bit cold. Husband was lying underneath on a creeper with a spray bottle of water putting out fires.
About the comfort thing; that's a BIG problem working right there, because, well, see, I'm lying across the sill, on that vertical seam, and it's in Just the wrong place, and even with lots of padding it's Extremely Uncomfortable and makes it Really Hard for a girl to concentrate!
But that part is Finished, and the rest will be easy.
(';')
Thread Starter
|
Veteran Member
Joined: Mar 2014
Posts: 26,760
Likes: 10,311
From: Tehama County, California, USA
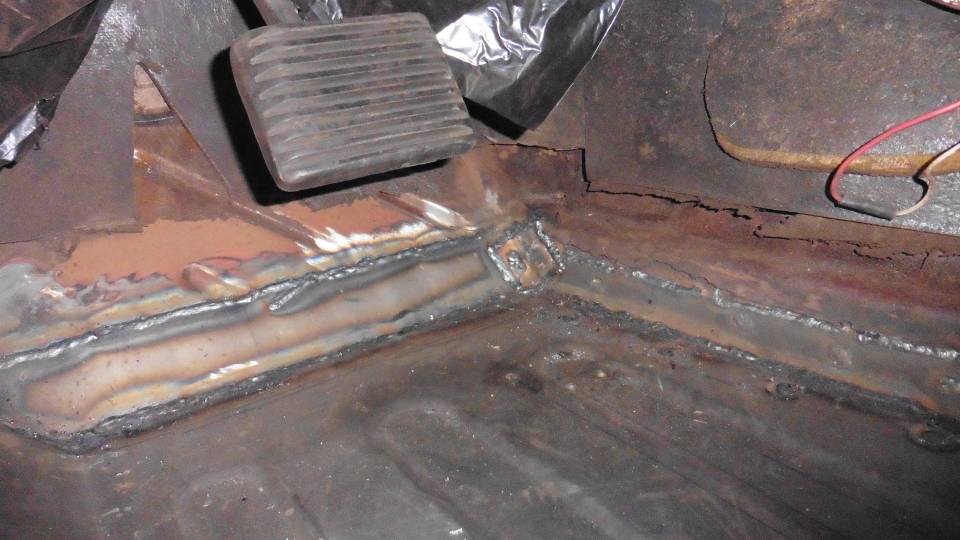
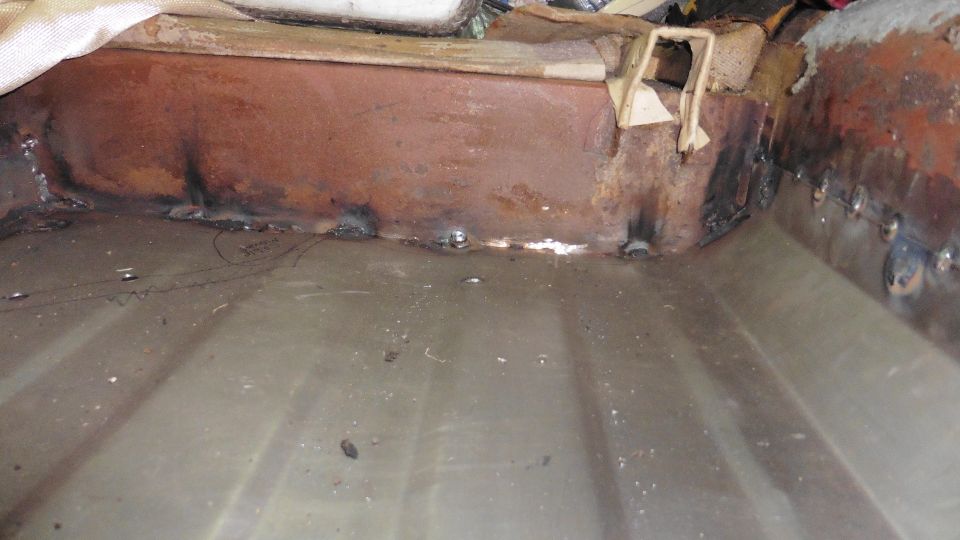
It's been a very intense couple days but by this evening I'm satisfied with what's done. *Very* satisfied!
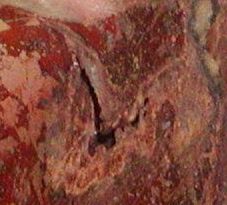
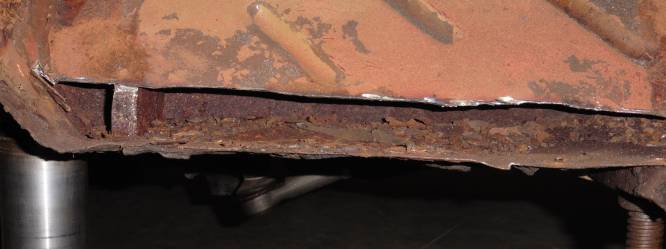
Nothing is Ever as straightforward as it should be I've learned, and this project was no different. There was more damage than first thought, more difficult repairs than first thought, more holes to plug, more cracks to fill, more to learn, more percussive adjustments (hand me that BIG hammer please, you know the one, no, not that one, the Bigger one) than I ever dreamed would be needed.
But it's Finished and we're celebrating with our good friend Carlo Rossi and some of his best Rhine.
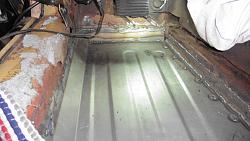
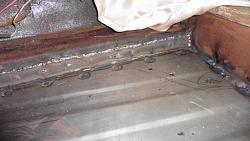
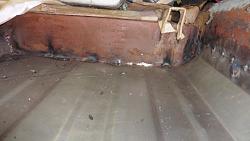
I hope the photos below are mostly self explanatory, except the A-pillar patch is ahead of the hole, and I can't put it in its correct position, although I've tried several times. I give up.
Did I mention, It's Finished! Now to clean up a bit (lot!!), prime, paint and reinstall padding, carpets, seats, etc., and get all that cr@p out of the living room floor.
One thing I have neglected to mention is how I got all the old adhesive off. It's a product called Goo Gone. Put some on a rag, wipe the surface and all the old adhesive comes Right off down to bare metal.
(';')


Nothing is Ever as straightforward as it should be I've learned, and this project was no different. There was more damage than first thought, more difficult repairs than first thought, more holes to plug, more cracks to fill, more to learn, more percussive adjustments (hand me that BIG hammer please, you know the one, no, not that one, the Bigger one) than I ever dreamed would be needed.
But it's Finished and we're celebrating with our good friend Carlo Rossi and some of his best Rhine.
I hope the photos below are mostly self explanatory, except the A-pillar patch is ahead of the hole, and I can't put it in its correct position, although I've tried several times. I give up.
Did I mention, It's Finished! Now to clean up a bit (lot!!), prime, paint and reinstall padding, carpets, seats, etc., and get all that cr@p out of the living room floor.
One thing I have neglected to mention is how I got all the old adhesive off. It's a product called Goo Gone. Put some on a rag, wipe the surface and all the old adhesive comes Right off down to bare metal.
(';')


Last edited by GGG; Jan 20, 2015 at 07:06 PM. Reason: insert 10 photos
Thread Starter
|
Veteran Member
Joined: Mar 2014
Posts: 26,760
Likes: 10,311
From: Tehama County, California, USA
Yes, the car was beginning to be the butt of such jokes.
Now it's on to primer, paint (undercoat on the bottom side), padding, carpet and seats. All that is Nothing compared to what this has been!
(';')

Joined: Jan 2014
Posts: 28,386
Likes: 6,340
From: Delaneys Creek,Qld. Australia
Nice work, my welding needs to improve 10 fold to do a job like that.
I get to practice on the front deck soon, before going anywhere near a car.
My tiny rust spot at the lower left corner on the rear screen has doubled in size over the summer and has finally broken the paint and is letting out a slight rusty residue. A job for later, but still concerning.

I get to practice on the front deck soon, before going anywhere near a car.
My tiny rust spot at the lower left corner on the rear screen has doubled in size over the summer and has finally broken the paint and is letting out a slight rusty residue. A job for later, but still concerning.

Thread Starter
|
Veteran Member
Joined: Mar 2014
Posts: 26,760
Likes: 10,311
From: Tehama County, California, USA
Thank you, Clarke,
But how does your car rust in Summer? Is it humid at your house?
I'm sorry to see that rust bubble, I have a similar one on the LR fender flare. I'll address that when we drop the IRS to fix the rear brakes.
(';')
But how does your car rust in Summer? Is it humid at your house?
I'm sorry to see that rust bubble, I have a similar one on the LR fender flare. I'll address that when we drop the IRS to fix the rear brakes.
(';')
Member
Joined: Jan 2015
Posts: 30
Likes: 10
From: Nova Scotia, Canada
Nice job! I bought the full floor pans from the very same manufacturer. They are 18 gauge steel, which is impressive. I think factory was 20 gauge. I will be doing both sides in the coming months and I will post pics once I remove the full pan, and set up for the full replacement. Prior to doing that, I have to address issues above the front of the rocker panels were the fenders join. I can see rubber hoses coming into those pockets. I suspect them to be some type of drain hose. If that is the case, then water drains into the area above the rocker support, which causes rust to develop. My Jag is in surprising good shape for a car that spent its life on the East Coast of Canada. Normally, when we are bored...we sit around and listen to the cars rust up here...given the amount of salt on the roads, and salt in the air!

Veteran Member
Joined: Jul 2012
Posts: 6,796
Likes: 2,403
From: Walnut Creek, California
LnrB:
Very nice work. My compliments.
For the interior, I'd suggest Rustoleum red. Just brush it on. Adheres well and can handle a tad of rust as well as the shiny metal.
Undersides. Undercoating is desired by some and criticized by others. some say it merely traps water. Not good. As the PO hid a lot of sins with it, I guess you might as well match it. Not the sins!!! Merely, the appearance. but, a heavy slather of Rustoleum on the bare and nearby light rust before the application of the undercoat.
Oh, how about bed liner. Something like under coat, but tougher. And, can be ahd in spray cans for ease in application.
Carl.
Thread Starter
|
Veteran Member
Joined: Mar 2014
Posts: 26,760
Likes: 10,311
From: Tehama County, California, USA
LnrB:
Very nice work. My compliments.
For the interior, I'd suggest Rustoleum red. Just brush it on. Adheres well and can handle a tad of rust as well as the shiny metal.
Undersides. Undercoating is desired by some and criticized by others. some say it merely traps water. Not good. As the PO hid a lot of sins with it, I guess you might as well match it. Not the sins!!! Merely, the appearance. but, a heavy slather of Rustoleum on the bare and nearby light rust before the application of the undercoat.
Oh, how about bed liner. Something like under coat, but tougher. And, can be and in spray cans for ease in application.
Carl.
Why red especially? I was going to do black on a gray primer.
The car is Never driven in the rain anyway but our driveway (600 feet long) is gravel and I'm concerned the small pebbles/rocks will eventually chip the paint off entirely and leave the underside with no protection; which is why I was going to get a can of spray undercoat. The bed liner is a Great idea! I think I like your idea better.
(';')