
2004 XKR Mod Project


I couldn't keep the Paragon Intake from throwing codes so redid the pipes and put in a Mina exhaust until I can reroute the intake into the wheel well (parts on order). Here is a picture and a link to the YouTube sound file.
(turn your volume up)
100%
100%
Veteran Member
Joined: Feb 2011
Posts: 2,916
Likes: 547
From: North Carolina
Sorry Rob, I think your F-type needs to be beside my XK8! Matching black cats!! Lol!
Seriously, both stunning!!
Hey, some advice. I'm getting the seats done with suede inserts and was planning to use red stitching and piping both on the seats and door panels but now that I tried the red in the car, I hate it with the wood trim. I found some killer bronze metallic leather that goes with the wood or they have silver as well.
Any suggestions?
I've never really cared for the look of that leather. I'd just go black or black Suede myself. I've never found it to wear well and leather isn't as good looking like silver or bronze as metal can be made to look like leather. So I think you'd tire of it quickly and I doubt it would look good for long. Just my 6 cents.
The one thing I found really annoying was the arm rest so I had that rebuilt after finding a billet cup holder from: Replacement Billet Beverage Holder for Pontiac Solstice, Saturn Sky and Opel. | Santanainteriors.com
The arm rest is now nice and soft, at a better height or me and the cup holders actually hold. Be aware they are for standard sized cups (Santana is working on one that is a swap replace with bigger holes). But with the right cup (think Starbucks) they are rock solid. Total cost was around $650 to $700. They even matched my contrasting stitching (Portfolio addition). I bought a used armrest (magnetic) from Europe rather than tear up my own. If I'd used my one total would have been closer to $500.
I also replaced the Kenwood Double Din head unit with an Alpine (better sound fewer features) and had the amps cleaned up in the trunk. I'm probably going to hit up Tap Plastics over the weekend and fabricate a new trunk floor out of something that looks cooler as the old and the new materials aren't matching back there at the moment.
Pictures below:
I've installed a permanent OBD II gauge. Not sure where the hell to mount it so have it sitting next to the driver seat. Nice gadget, I can clear codes, it tells me what the codes mean, and it gives full performance stats while driving. Here is a picture.
Got it on eBay. Thing is pretty cool.
Scan Gauge II Window Windshield Mount OBD2 Scan Gauge | eBay
Got it on eBay. Thing is pretty cool.
Scan Gauge II Window Windshield Mount OBD2 Scan Gauge | eBay

Veteran Member
Joined: Jan 2012
Posts: 1,462
Likes: 304
I've installed a permanent OBD II gauge. Not sure where the hell to mount it so have it sitting next to the driver seat. Nice gadget, I can clear codes, it tells me what the codes mean, and it gives full performance stats while driving. Here is a picture.
Got it on eBay. Thing is pretty cool.
Scan Gauge II Window Windshield Mount OBD2 Scan Gauge | eBay
Got it on eBay. Thing is pretty cool.
Scan Gauge II Window Windshield Mount OBD2 Scan Gauge | eBay
https://buy.garmin.com/en-US/US/prod38354.html
Over the last week went to a smaller upper pulley, larger intercooler radiator, and Evens waterless coolant. Routed the intake into the wheel well, and replaced the perished rear bumper stops. Boost has jumped from 12 to 15 pounds, car initially coded while it learned new airflow but codes are clear now. New bump stops are more harsh than stock but they shouldn't fail. Supercharger is generating significantly more heat on boost but recovery appears faster. I already had a high speed (Ford performance) intercooler pump. I also did the key mod, having a flip key is a real trip.
Here are pictures of the new bump stops and intake.
Here are pictures of the new bump stops and intake.
Looks like you've been busy since I last checked.
Your Jag is looking amazing! I'm in love wit those tail lights.
I'm not a fan of when people mess with their exhaust because it usually ends up sounding like a rednecks pick-up truck.
But your exhaust is effing amazing!!!!
Btw congrats on the F-type, absolutely beautiful.
Your Jag is looking amazing! I'm in love wit those tail lights.
I'm not a fan of when people mess with their exhaust because it usually ends up sounding like a rednecks pick-up truck.
But your exhaust is effing amazing!!!!
Btw congrats on the F-type, absolutely beautiful.
Had these made up based on an eBay deal.
Domed Wheel Center Cap Sticker Overlay Custom Rim Hub Emblem Logo Decal Text Dom | eBay
Domed Wheel Center Cap Sticker Overlay Custom Rim Hub Emblem Logo Decal Text Dom | eBay
Veteran Member
Joined: Feb 2011
Posts: 2,916
Likes: 547
From: North Carolina
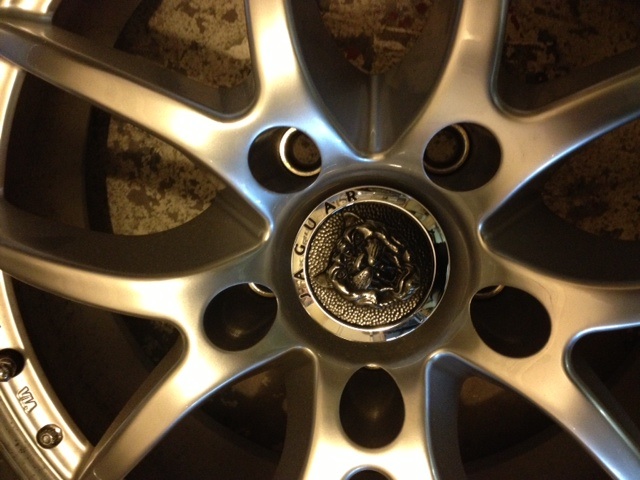
Like the custom centers.
Working on some for my car as well. Having a hell of a time finding four matching XJS bonnet badges. They range from dark black to a polished bronze! And never photograph the same! UGH! And I'll have several new growler badge centers after i'm done as well! I only need the outer ring!
I should have gone your direction!!
Veteran Member
Joined: Jan 2012
Posts: 2,953
Likes: 1,120
From: Phoenix, AZ USA
Had these made up based on an eBay deal.
Domed Wheel Center Cap Sticker Overlay Custom Rim Hub Emblem Logo Decal Text Dom | eBay
Domed Wheel Center Cap Sticker Overlay Custom Rim Hub Emblem Logo Decal Text Dom | eBay
How do they hold up to the usual use/abuse of taking them on and off?

Senior Member
Joined: Dec 2011
Posts: 312
Likes: 10
From: Chicago suburbs
Had these made up based on an eBay deal.
Domed Wheel Center Cap Sticker Overlay Custom Rim Hub Emblem Logo Decal Text Dom | eBay
Domed Wheel Center Cap Sticker Overlay Custom Rim Hub Emblem Logo Decal Text Dom | eBay
Attachment 61267
Like the custom centers.
Working on some for my car as well. Having a hell of a time finding four matching XJS bonnet badges. They range from dark black to a polished bronze! And never photograph the same! UGH! And I'll have several new growler badge centers after i'm done as well! I only need the outer ring!
I should have gone your direction!!
Those look nice so far.
Found them on eBay, I think Gorilla made them. They are getting dinged up by the wrench but you don't see it until you pull them out. All you really see is the top and that part is holding up fine.
I think they are 20x10 rear and 20x8.5 front but it's been awhile. They started out brushed aluminum and very pretty but after 2 curbs and $900 to replace the two I hit, had them powder coated black to make them repairable. Funny thing is I haven't hit a curb since. But I have two spare coated wheels in case I do. What was nice about having the extra wheels is I could do two at a time and still drive the car. Tires are 285x30 ZRs in back and 245x35 ZRs in front.
I had the caps done at 2" but having a set redone at 2.5" as they are just a tad small to my eye and a set of four is cheap. Good quality and they come sticky but think I'll use a little glue when I get to the final size just to make sure they don't come off.
Last edited by enderle; Nov 5, 2013 at 10:48 AM. Reason: back to black
Senior Member
Joined: Dec 2011
Posts: 312
Likes: 10
From: Chicago suburbs
I think they are 20x10 rear and 20x8.5 front but it's been awhile. They started out brushed aluminum and very pretty but after 2 curbs and $900 to replace the two I hit, had them powder coated black to make them repairable. Funny thing is I haven't hit a curb since. But I have two spare coated wheels in case I do. What was nice about having the extra wheels is I could do two at a time and still drive the car. Tires are 285x30 ZRs in back and 245x35 ZRs in front.
I had the caps done at 2" but having a set redone at 2.5" as they are just a tad small to my eye and a set of four is cheap. Good quality and they come sticky but think I'll use a little glue when I get to the final size just to make sure they don't come off.
I had the caps done at 2" but having a set redone at 2.5" as they are just a tad small to my eye and a set of four is cheap. Good quality and they come sticky but think I'll use a little glue when I get to the final size just to make sure they don't come off.
What bolt pattern did you use?
Do they ever rub?
What are your thoughts on 20x10 in front and 20x10 in the back?
These wheels used the stock bolt pattern, both front and back rubbed so we had to do a little adjustment to get them to clear. Doubt 10s will work in front as that was where I had the biggest rubbing problem, you'll likely have to flare the front to get them to fit. Backs were actually fine until we adjusted the camber for the lowering springs and then the hit but we just had to pull out the lip a small amount and pound on the wheel well liner a bit. They don't rub now.
Got a new set, went larger on the wheels and then decided to deal with the damn marker lights I hate. See what you think. Oh and I messed with the front logo as well.