
"How to ..........." please ?

Thread Starter
|
Veteran Member
Joined: Sep 2012
Posts: 1,473
Likes: 655
From: Devon. U.K.
Could anyone tell me how to remove the top part of the steering cowl please (item 10) I am replacing the rheostat for the lighting (#16) and I don't think I can get to the plug without the top bit out of the way. Bottom part (#13) came off with no problem but I can't see how the top is attached and I don't want to break anything pulling too hard.
As always - thanks in advance.
Cheers,
DD
(diagram courtesy of SNG Barratt)
As always - thanks in advance.
Cheers,
DD
(diagram courtesy of SNG Barratt)
Thread Starter
|
Veteran Member
Joined: Sep 2012
Posts: 1,473
Likes: 655
From: Devon. U.K.
Jim.
Thanks for that but JTIS - instruction 2:4 - makes it sound so easy. In fact, the plug for the rheostat is hidden away - you can't even see it with the lower cowl totally removed. There's another multiplug (black) in front of it :
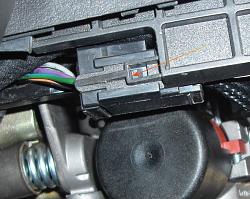
and I can't see how to get that out of the way. It looks simple - lift the tab and pull - but I have tried that and I reckon it is going to break before it comes out. The rheostat plug is right behind that black one !!
I'm going to go to "Plan B" - unsolder the wire from the old faulty rheostat, and solder them direct to the new replacement. Probably just as quick and a lot less likely to totally bu**er anything up.
Thanks as always for the help and advice.
Cheers,
David.
Thanks for that but JTIS - instruction 2:4 - makes it sound so easy. In fact, the plug for the rheostat is hidden away - you can't even see it with the lower cowl totally removed. There's another multiplug (black) in front of it :
and I can't see how to get that out of the way. It looks simple - lift the tab and pull - but I have tried that and I reckon it is going to break before it comes out. The rheostat plug is right behind that black one !!
I'm going to go to "Plan B" - unsolder the wire from the old faulty rheostat, and solder them direct to the new replacement. Probably just as quick and a lot less likely to totally bu**er anything up.
Thanks as always for the help and advice.
Cheers,
David.
Thread Starter
|
Veteran Member
Joined: Sep 2012
Posts: 1,473
Likes: 655
From: Devon. U.K.
Plan "B" was best option.
Disconnect battery (there's 12v permanently across the rheostat.)
Unsolder old rheostat - solder on replacement with new heatshrink around the terminals.
Reconnect battery - reset windows and radio.
Replace lower cowl.
30 minutes - job done.
I can now dim my interior lights, whereas before they were either off, or fully on.

Senior Member
Joined: Jan 2014
Posts: 120
Likes: 32
From: East Haddam,, CT
While we're talking dash lights are there any tricks to getting at the bulbs in the tach and speedo? I'm going to guess that my big hands will not be an asset for this job. I don't see like I did '200 years ago' and want to swap out the relatively weak tach and speedo bulbs for bulbs that put out more light during daytime driving in bad weather when my lights are switched on for safety. Night time driving with the factory bulbs is fine
RB
RB


Joined: Dec 2011
Posts: 120,439
Likes: 17,018
From: Durham, UK
Just a quarter turn anti-clockwise on each of the bulb holders. Large fingers is no disadvantage.
Graham