
HOW TO: Repaint door molding trim FAQ


Joined: Dec 2011
Posts: 120,439
Likes: 17,016
From: Durham, UK
Keith,
Excellent post. I would have thought long and hard about giving this a go without seeing the results you achieved - even after the dealer told me the cost of a replacement!
I must have been very lucky with my last 2001 XK8 Coupe. There wasn't a mark on any of the trims but the current 2005 is a different story. The black trim on the later cars needs a slightly different technique and is a lot easier to match than the Dorchester Gray.
What at first seemed to be some minor paint loss soon turned out to be closer to falling apart.
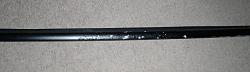
This is the centre and both ends were just as bad. I removed the loose paint with 200 grit, expecting to find holes in the metal. Fortunately it was sound and I finished surface prep with 400 grit before cleaning.
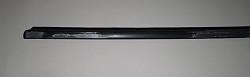
Masking up is straightforward. I overlapped the metal by 1/8 inch and then folded the tape round the top rubber seal by running a fingernail along. This shows it partly done. The bottom seal and ends were covered the same way.
The problems must have been due to poor priming so I used two coats of Acid Etch Primer - a single pass for each coat with 20 minutes between coats.
This was followed by two coats of Satin Black - again a single pass for each coat with 15 minutes in between coats. It looked pretty smooth at this stage but I gave it a light rub with 600 grit before the final coat.
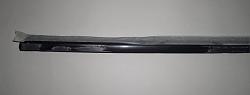
The Satin Black gave a very close match to the original without using clearcoat.
Now to see how it survives the Winter.
Excellent post. I would have thought long and hard about giving this a go without seeing the results you achieved - even after the dealer told me the cost of a replacement!
I must have been very lucky with my last 2001 XK8 Coupe. There wasn't a mark on any of the trims but the current 2005 is a different story. The black trim on the later cars needs a slightly different technique and is a lot easier to match than the Dorchester Gray.
What at first seemed to be some minor paint loss soon turned out to be closer to falling apart.

This is the centre and both ends were just as bad. I removed the loose paint with 200 grit, expecting to find holes in the metal. Fortunately it was sound and I finished surface prep with 400 grit before cleaning.

Masking up is straightforward. I overlapped the metal by 1/8 inch and then folded the tape round the top rubber seal by running a fingernail along. This shows it partly done. The bottom seal and ends were covered the same way.
The problems must have been due to poor priming so I used two coats of Acid Etch Primer - a single pass for each coat with 20 minutes between coats.

This was followed by two coats of Satin Black - again a single pass for each coat with 15 minutes in between coats. It looked pretty smooth at this stage but I gave it a light rub with 600 grit before the final coat.

The Satin Black gave a very close match to the original without using clearcoat.

Now to see how it survives the Winter.
Veteran Member
Joined: Jan 2012
Posts: 2,953
Likes: 1,120
From: Phoenix, AZ USA
Thanks Keith for the detailed post!
Tried this today with pretty good results. Rear window trim looks WAY better than it did before and the color is a decent match.
Only thing is that it has a bit of a texture to it and isn't smooth like the original trim is. I'm wondering if the clear went on a little too dry as it was pretty hot today.
Have others who have tried the Dupli-color found that it lays out smooth or is the texture normal?
Joined: Dec 2011
Posts: 120,439
Likes: 17,016
From: Durham, UK
You'll have Matt Black trims like mine, not Dorchester Gray like Keith's?
The black is a little less forgiving than the gray as far as seeing any imperfections is concerned but, like Keith's, mine are as good as the original.
Graham
Veteran Member
Joined: Jan 2012
Posts: 2,953
Likes: 1,120
From: Phoenix, AZ USA
Nope, mine are gray like the earlier cars, the VIN is very close to the transition. One of the first mistakes I made was to order a replacement screw cap for the cowl, naively assuming the color had to do with the year.
All in all it doesn't look too bad but a little less shiny in appearance and somewhat rough in texture.
I'll try a sand and polish and see how it comes out. Worst that happens is that I do it over again.
All in all it doesn't look too bad but a little less shiny in appearance and somewhat rough in texture.
I'll try a sand and polish and see how it comes out. Worst that happens is that I do it over again.
Last edited by ccfulton; Jul 8, 2012 at 08:23 AM.
Joined: Dec 2011
Posts: 120,439
Likes: 17,016
From: Durham, UK
That must make sourcing parts a nightmare!
I remember Keith had issues removing the trim. In contrast mine lifted off very easily. Definitely easier to refinish it off the vehicle. Did you remove yours or refinish it in situ?
Graham
I remember Keith had issues removing the trim. In contrast mine lifted off very easily. Definitely easier to refinish it off the vehicle. Did you remove yours or refinish it in situ?
Graham
Veteran Member
Joined: Jan 2012
Posts: 2,953
Likes: 1,120
From: Phoenix, AZ USA
I removed it.
It is the surround for the back glass I am working on and it took me a while to figure out how to get it off. The trim is two pieces but it turns out the intuitive approach of starting at the end of is not what you want to do.
The ends are joined together by a clip that is attached to the trim and not to the car, so pry as you might at the joint, it will not let go. The better way was to start in the middle at about 2 and 10 o clock then work you way around? The whole surround comes out in one piece this way.
It's pretty flexible and the clips are metal so watch the paint. And be sure to open the boot lid BEFORE you start. The seals are attached to the trim and I missed that step at first and ended up getting the seal all bount up before I figured it out.
My god there was a lot of dirt under there. I probably spent an hour cleaning all the crud out and steel wooling 10 years of crap off of the glass.
The glass side rubber on mine was dried up to the point it was near useless, so I pealed it off entirely before painting the trim. The body side I masked with tape before spraying.
I actually put it back on the car without the glass side rubber installed. As much junk as was under there it couldn't have been doing any good.
So, what I expected to take an hour ended up taking all day but next time, by golly, I will know how to get it all apart.
Anyone know of a place to source just the rubber for the trim? I would like to replace it but can't justify $600 for a whole new trim piece
Senior Member
Joined: Apr 2012
Posts: 217
Likes: 30
From: San Diego, CA
Gents, quick question. Could someone tell me what does this "trim removal tool" looks like? I can't find any drawing in JTIS...
Am I wrong if I am considering using a small plastic chisel used for cell phone servicing?
Any feedback about this legendary tool is much appreciated.
Best,
D.
Am I wrong if I am considering using a small plastic chisel used for cell phone servicing?
Any feedback about this legendary tool is much appreciated.
Best,
D.

Junior Member
Joined: Aug 2014
Posts: 5
Likes: 0
From: Bath, UK
My window/door trims are corroding badly - like everyone else's! I have figured out how to remove trims but I see there is a build-up of crud between the alloy and rubber.
I really need to completely strip and re-etch the alloy which would be best done by separating the rubber. My question is has anyone done this? How is the rubber fixed to the alloy - or is it just held on by the rubber lips?
Don't want to start something I can't satisfactorily finish!
I really need to completely strip and re-etch the alloy which would be best done by separating the rubber. My question is has anyone done this? How is the rubber fixed to the alloy - or is it just held on by the rubber lips?
Don't want to start something I can't satisfactorily finish!
Joined: Dec 2011
Posts: 120,439
Likes: 17,016
From: Durham, UK
A build up of oxidised aluminium is normal because of the poor priming by the manufacturer. Mine looked terminal when first removed but I was amazed how well they cleaned up prior to paint refinishing.
However, I think attempting to remove the rubber could end badly.
Graham
However, I think attempting to remove the rubber could end badly.
Graham
Junior Member
Joined: Aug 2014
Posts: 5
Likes: 0
From: Bath, UK
Thanks for the advice, Graham. You seem to be giving the same warnings as many other owners about the risks of separating the alloy and rubber.
I would like to hear from anyone who has separated the rubber and alloy as the build-up of crud between is severe!
Anyone out there with experience (good or bad!) who has separated the rubber and alloy?
Steve
I would like to hear from anyone who has separated the rubber and alloy as the build-up of crud between is severe!
Anyone out there with experience (good or bad!) who has separated the rubber and alloy?
Steve

Member
Joined: Mar 2018
Posts: 67
Likes: 8
From: Newark, Nottinghamshire UK
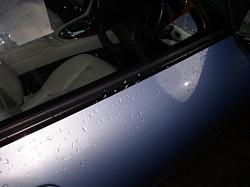
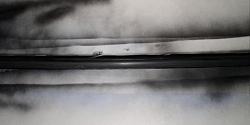
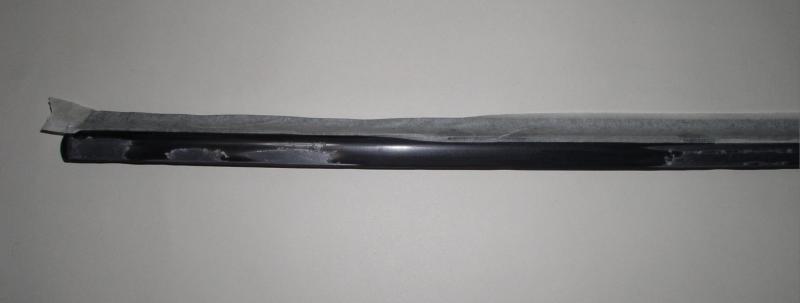
A while back the door molding trim on my car started to peel. It quickly got worse until it reached this state:

After doing some research I discovered the proper paint to repair this is Dorchester Grey 342/LDP, but WhiteXKR suggested another alternative, Graphite Duplicolor Wheel Paint:
Buy Duplicolor Wheel Coating, Graphite, 11 oz. Aerosol HWP102 at Advance Auto Parts

I thought I'd save a little bit and try it out.
Here are the steps I took to respray this area.
Step 1:
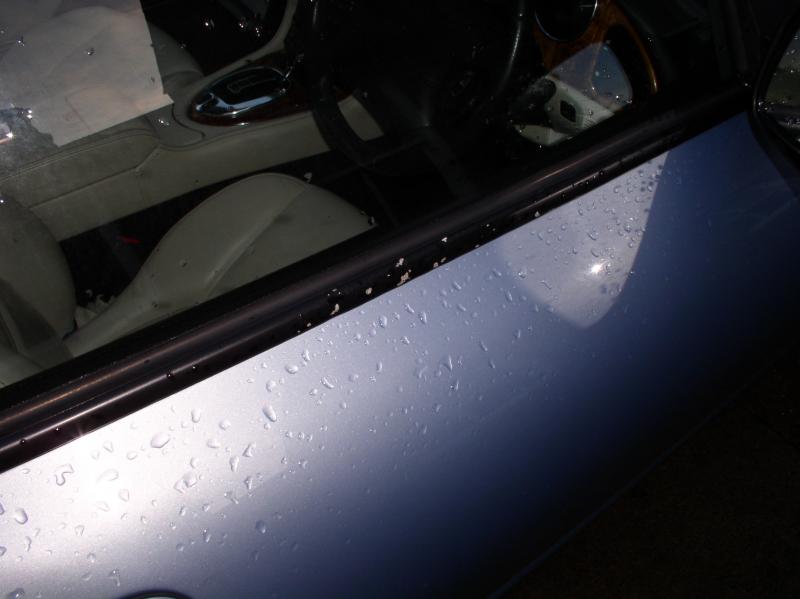
Although these pieces can be removed, I found it easier to leave them in place. This meant everything had to be masked off:

Step 2:
Carefully sand as much of the existing paint off as possible, using sand paper designed for use on metal. You shouldn't need anything too aggressive, I used 200 grit and probably could have used something less aggressive.
Once you finish sanding, clean the area with some isopropyl alcohol.

Step 3:
If you are using the actual Dorchester Gray, you will need to treat the aluminum with a self-etching primer. An advantage to the Duplicolor wheel paint is it is designed to work on unprimed aluminum, so I didn't need to prime. Give the area a few nice, light coats of paint allowing about 10 minutes between each coat.
Here is after one light coat:

Step 4:
Next up is the clear coat. After giving the last coat of paint 10 minutes to dry, give the area a few light coats of clear, with 10 minutes of dry time in between.
Step 5:
After the final coat has been given time to dry (but not too long) carefully remove the masking and enjoy.

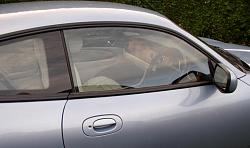
As WhiteXKR said, the shade of gray is very close, but the metallic flakes are larger (and reflect the sun a little bit more as a result) It is tough to see in the picture, but the door has been resprayed and the rear window trim has not. I may go back and spray the rear window trim, simply because it is a bit noticeable when they are placed side by side. For under $20, I believe the two cans of Duplicolor is the best route.
After doing some research I discovered the proper paint to repair this is Dorchester Grey 342/LDP, but WhiteXKR suggested another alternative, Graphite Duplicolor Wheel Paint:
Buy Duplicolor Wheel Coating, Graphite, 11 oz. Aerosol HWP102 at Advance Auto Parts
I thought I'd save a little bit and try it out.
Here are the steps I took to respray this area.
Step 1:
Although these pieces can be removed, I found it easier to leave them in place. This meant everything had to be masked off:
Step 2:
Carefully sand as much of the existing paint off as possible, using sand paper designed for use on metal. You shouldn't need anything too aggressive, I used 200 grit and probably could have used something less aggressive.
Once you finish sanding, clean the area with some isopropyl alcohol.
Step 3:
If you are using the actual Dorchester Gray, you will need to treat the aluminum with a self-etching primer. An advantage to the Duplicolor wheel paint is it is designed to work on unprimed aluminum, so I didn't need to prime. Give the area a few nice, light coats of paint allowing about 10 minutes between each coat.
Here is after one light coat:
Step 4:
Next up is the clear coat. After giving the last coat of paint 10 minutes to dry, give the area a few light coats of clear, with 10 minutes of dry time in between.
Step 5:
After the final coat has been given time to dry (but not too long) carefully remove the masking and enjoy.
As WhiteXKR said, the shade of gray is very close, but the metallic flakes are larger (and reflect the sun a little bit more as a result) It is tough to see in the picture, but the door has been resprayed and the rear window trim has not. I may go back and spray the rear window trim, simply because it is a bit noticeable when they are placed side by side. For under $20, I believe the two cans of Duplicolor is the best route.
Hi Keith
This is a job I need to do on my car but only on one half of the front and same on the rear so am wondering about removing from the car and doing the job on my workshop bench.
How easy is it to remove the actual trim? Can you describe the removal process and what tool you recommend using?
This is a job I need to do on my car but only on one half of the front and same on the rear so am wondering about removing from the car and doing the job on my workshop bench.
How easy is it to remove the actual trim? Can you describe the removal process and what tool you recommend using?
Joined: Dec 2011
Posts: 120,439
Likes: 17,016
From: Durham, UK
Keith,
I sold my 2005 XK8 five years ago and the repainted trim was unblemished. When the car again appeared for sale two years ago, the trim was still perfect. Have you needed to redo your trims or did the original repaint completely resolve the problem?
Graham
I sold my 2005 XK8 five years ago and the repainted trim was unblemished. When the car again appeared for sale two years ago, the trim was still perfect. Have you needed to redo your trims or did the original repaint completely resolve the problem?
Graham
