
Passenger side veneer removal. Help!

Thread Starter
|
Senior Member
Joined: Apr 2011
Posts: 604
Likes: 201
From: Paradise Valley, Ariz
Hello, I am going to replace the veneer on my dash.
All pieces are pretty straight forward and easy to remove, except the passenger side veneer.
I have looked for instruction but cannot find. Can anyone please either send link or cut and paste step by step for removing the airbag or passenger side veneer on dash.
I would very much appreciate it.
I am buying new set of veneer from
Jeff @ Madera concepts and it arrives Friday I am changing the color of veneer to a birdseye maple with a gray driftwood color, can't wait.
I will post pictures after completed.
I had 3 pieces that have cracked, Arizona and convertible not a good combo for veneer dash.
I thought if I was going to the trouble and expense to restore the veneer why not get something different than what I have had for 10 years, the interior is a 2-tone sable color so the gray driftwood will compliment very well.
SO, please send instructs to remove the passenger side veneer and thanks for taking the time.
Kind regards and,
Happy and Safe motoring...


Joined: Dec 2011
Posts: 120,439
Likes: 17,014
From: Durham, UK
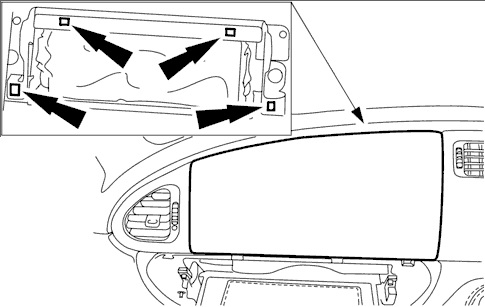
The panel is secured with four friction bushes and spring clips (RHD illustrated here).
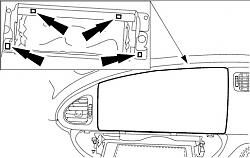
It can be gradually eased out with a plastic spatula by getting behind the edge next to each clip and prising towards you.
Remember there's an AirBag behind this panel. I know many have removed the veneer without adopting any of the safety precautions but it's takes little effort to disconnect the battery and allow the capacitors to discharge before starting.
Graham
Veteran Member
Joined: Feb 2012
Posts: 2,997
Likes: 714
From: Waco, Texas, US
Might be a good idea to spring for a few spare clips (sorry about the pun). They are not meant to be used multiple times and, depending on how many times the panels have been out before, they may not hold as well when you go to put them back in. Ask the man who knows.
The passenger airbag panel is probably OK as there is little reason to remove it during normal maintenance. However, the center section and main instrument panel may be a different story. Looks like you've had at least the center section off before for upgrades.
The good news is the spring clips are cheap. Better to have a few on hand in case. May save you a trip to the dealer in the middle of your project.

Thread Starter
|
Senior Member
Joined: Apr 2011
Posts: 604
Likes: 201
From: Paradise Valley, Ariz
ok, I got the passenger side veneer off.
Instructions:
First the veneer itself comes off easily after the center piece veneer is taken off. The passengers veneer pulls right off, pull from left to right from the left edge of veneer, the actual veneer piece will be attached to the metal frame of the airbag package with 2 nylon tethers( my tethers were purple nylon straps) from the rear or back side of airbag package.
I call it a package, because it is all self contained in it's own little rectangular pod.
The airbag package itself is secured in place with a separate bracket that is in front of airbag and needs to be removed by undoing 4 bolts. (7mm).
Now to get the tethers off the airbag package which are connected to the rear of airbag package (you cannot see the rearside without removal of airbag package) there are 2 bolts easily removed in front on either side of airbag package.
Now the trickier part need to remove four Phillips heads screws securing the glove box just in front( the box will hang down) directly above the glove box there are 2 compression nuts holding the airbag package in place need to remove them (10 mm).
The package will then lift up and pull out exposing the rear side where the tethers are attached, they are held in place by a 6 or 7 inch rod that goes through holes sewn into the nylon tether straps holding them in place. Use a long very small Phillips screw driver (or other long narrow piece) and place it against the rod and tap out the rod from the frame, the tethers will then be released.
There is also another way to remove tether straps, the strap assembly is bolted to the airbag package case in back with 2 bolts, but they are very difficult to get to , so I found that removing the long rod was easier.
Now to replace the veneer with new piece just reverse the process and reassembly the unit back together.
Ok the other major part of completing this job without problems is to REMOVE THE BATTERY CABLES FOR 30 MINUTES OR SO, TO DISCONNECT THE 12 VOLT SUPPLY AND LET THE CAPACITORS IN THE AIRBAG SYSTEM A CHANCE TO ALLOW THEIR CHARGE TO DISSIPATE.
This procedure is very important, you don't want the airbag going off!
Last edited by vettegood; Mar 17, 2013 at 02:31 PM.

Thread
Thread Starter
Forum
Replies
Last Post
Currently Active Users Viewing This Thread: 1 (0 members and 1 guests)