
Rear wheel bearing install

Senior Member
Joined: May 2014
Posts: 399
Likes: 38
From: Wildomar, CA
Hey Chilly Philly, I've been reading and looking at the pic in your instruction. It looks like you press one from each side, is that correct? looking at my hub carrier it seems like there is one from each side to press out, what blue adapter did you use to press out the races?

Veteran Member
Joined: Apr 2014
Posts: 5,457
Likes: 1,816
From: New Jersey USA
I used a drift and a 3 pound hammer ( big hammer big improvement here) to hammer out the races. Keep the drift in the slot so as to keep the wall of the hub carrier unscathed.
Don't forget the old bearing pieces are a perfect match to the new bearings diameter. I often use them to press back in New ones or to protect the new one already in place if I press the hub into it.
John
Don't forget the old bearing pieces are a perfect match to the new bearings diameter. I often use them to press back in New ones or to protect the new one already in place if I press the hub into it.
John
Veteran Member
Joined: Apr 2014
Posts: 5,457
Likes: 1,816
From: New Jersey USA
Btw, yes one from each side. Don't forget that you can position the carrier so that instead of pressing the hub into it, you are pressing the carrier onto the hub. This is an example of my point - if you can't get the hub secure on a flat surface, invert the items an work from a different perspective.
Outer bearing in place, need to press in hub and spacers. Put a 2x4 on press table, place hub on 2x4 wheel bolts extended down and protected. Use a left over bearing piece to place on new outer bearing deliver pressure from inside of hub.
Gosh that sounds obvious, excuse me if it is, I just remember feeling smart when I figured that one out.
One more: I went to lowes and purchased plumbi ng connectors ( steel $5 ) when I needed a spacer 4 inches long id larger than hub, od equal or smaller than bearing.
John
Senior Member
Joined: May 2014
Posts: 399
Likes: 38
From: Wildomar, CA
I used a drift and a 3 pound hammer ( big hammer big improvement here) to hammer out the races. Keep the drift in the slot so as to keep the wall of the hub carrier unscathed.
Don't forget the old bearing pieces are a perfect match to the new bearings diameter. I often use them to press back in New ones or to protect the new one already in place if I press the hub into it.
John
Don't forget the old bearing pieces are a perfect match to the new bearings diameter. I often use them to press back in New ones or to protect the new one already in place if I press the hub into it.
John
Thread Starter
|
Senior Member


Joined: Dec 2014
Posts: 592
Likes: 247
From: South Idaho
Sorry, I’ve been quite busy lately, but it looks like these gents have been taking care of you quite well with their advice.
The races were not difficult to remove, nothing like getting the hub remove from the carrier like you just did. Hammer and a cold chisel/drift to remove them from either side. Pressing the new ones in I primarily used a 72 mm Pittsburgh Automotive aluminum adapter from a bearing race and seal driver kit, along with the HF press.
The races were not difficult to remove, nothing like getting the hub remove from the carrier like you just did. Hammer and a cold chisel/drift to remove them from either side. Pressing the new ones in I primarily used a 72 mm Pittsburgh Automotive aluminum adapter from a bearing race and seal driver kit, along with the HF press.
Veteran Member
Joined: Sep 2012
Posts: 1,473
Likes: 655
From: Devon. U.K.
Agree with all of the above - would just add that if you cut a slot across the old outer 'shell' you can use it to push in the new one without any risk that it might get stuck. Plenty of different ways of getting the new outer 'shells' back into the hub carrier - I don't have a press so will use the threaded studding with some large steel washers and nuts to "pull" the new ones into the hub carrier. In the past, on other cars, I have gently tapped them in with a hammer using the old 'shell' to protect the edge of the new one.
Photo shows hub carrier after the 'shell' has been removed - you can see the slot that gives you access to the rear face to be able to tap it out with a hammer and drift (or old wood chisel in my case !!)
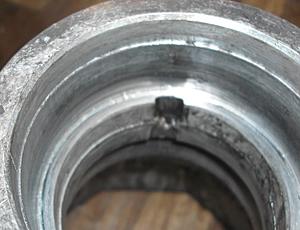
Photo shows hub carrier after the 'shell' has been removed - you can see the slot that gives you access to the rear face to be able to tap it out with a hammer and drift (or old wood chisel in my case !!)
Veteran Member
Joined: Apr 2014
Posts: 5,457
Likes: 1,816
From: New Jersey USA
How hard? With the right tool ( I tried using a big screwdriver = waste of time) it couldn't have been more than a couple of minutes.
A few blows on each side, repeat. Take a look you will see it moved.
John
A few blows on each side, repeat. Take a look you will see it moved.
John
Senior Member
Joined: May 2014
Posts: 399
Likes: 38
From: Wildomar, CA
Thank you guys, I wouldn't even dare tackling something like this without the support of my Jaguarian members. I'll stop by HF and pick up some drift punch and maybe a 4lbs hammer.
I will come back with questions on how to pack the bearings back later on though since the bearing just fell off the carrier when I pressed out the hub out...so I'll be back!!

I will come back with questions on how to pack the bearings back later on though since the bearing just fell off the carrier when I pressed out the hub out...so I'll be back!!
Veteran Member
Joined: Sep 2012
Posts: 1,473
Likes: 655
From: Devon. U.K.
I think the inner ones are fairly straightforward - as you say - they sort-of fall apart.
My "ongoing-project" is a complete wheel bearing replace on all four corners - I paid �200.00 (about $280.00 US) for a set of hubs / hub carriers from a breakers (parter-outer ??) here in the UK. They were in a pretty bad state but nothing a lot of heat and a big hammer couldn't solve !!
I'm still trying to sort out the front hubs / hub carriers - I enjoy a challenge.
The rears are fairly straightforward in comparison except I decided to replace the pivot bearings on the lower mounting bolt as well - will eventually post a thread, but will confirm now that four hands and a bit of ingenuity are required to get the outer bearing shells removed .
Veteran Member
Joined: Apr 2014
Posts: 5,457
Likes: 1,816
From: New Jersey USA
Zidjan, Hope this helps: Drift - The one I used came to a 4 corner point. So in this case the tip is square, but one corner is a bit raised.
Man as I type this I realize how hard that would be to visualize. Imagine a square plane with an axis running through any 2 opposite corners. Now in your minds eye rotate the square on that axis a few degrees. One corner goes up, the other down. Since this one corner extends at the edge of the drift, not in the center like a punch would, it gives you a good place to grip into the slot without scoring the hub carrier and a way to direct the power downward.
Hope it helps Z.
John
Veteran Member
Joined: Sep 2012
Posts: 1,473
Likes: 655
From: Devon. U.K.
Man as I type this I realize how hard that would be to visualize. Imagine a square plane with an axis running through any 2 opposite corners. Now in your minds eye rotate the square on that axis a few degrees. One corner goes up, the other down. Since this one corner extends at the edge of the drift, not in the center like a punch would, it gives you a good place to grip into the slot without scoring the hub carrier and a way to direct the power downward.
John - any chance you could translate that into English
John - any chance you could translate that into English
Veteran Member
Joined: Apr 2014
Posts: 5,457
Likes: 1,816
From: New Jersey USA
Ok to picture the head of the drift. Take a credit card hold between two fingers on opposite corners. Tilt so one untouched corner is raised.
That's the profile of the head of the drift I used.
John
That's the profile of the head of the drift I used.
John
Senior Member
Joined: May 2014
Posts: 399
Likes: 38
From: Wildomar, CA
The other side went pretty smooth as I smarted up a bit and decided to use the press and the drift to push the race out....
Veteran Member
Joined: Apr 2014
Posts: 5,457
Likes: 1,816
From: New Jersey USA
It's a small scar, I don't think it can affect anything. IMO you're ok.
Don't laugh but the whole reason I went into that crazy description was that I did the same thing you did on my first replacement.
John
Don't laugh but the whole reason I went into that crazy description was that I did the same thing you did on my first replacement.
John

Veteran Member
Joined: Jun 2013
Posts: 2,124
Likes: 1,386
From: Australia
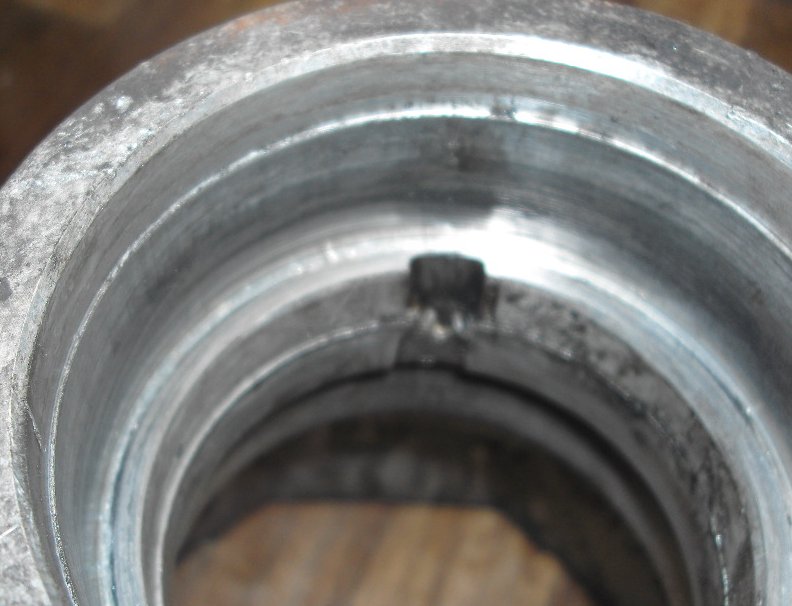
John, I read this too late, I bought a punch set from HF I managed to get those races out but at a cost ...I nicked one side of the hub carrier  I am guessing just a rookie mistake not really aiming what I was hammering at....I went with a punch that has round end... did I just F myself on this? or is this salvageable?
The other side went pretty smooth as I smarted up a bit and decided to use the press and the drift to push the race out....
The other side went pretty smooth as I smarted up a bit and decided to use the press and the drift to push the race out....
Senior Member
Joined: May 2014
Posts: 399
Likes: 38
From: Wildomar, CA
Thanks guys.... Next would be packing the bearings together...I'll read up this thread again for the other small details
Veteran Member
Joined: Sep 2012
Posts: 1,473
Likes: 655
From: Devon. U.K.
I have yet to reassemble mine but I think the strategy will be :
1. Press both outer shells into the hub carrier. I'll probably use the threaded studding, the old bearings with a slot cut in them, and a large metal washer to "pull" them in but a press would be a more efficient and quicker method.
2. Install the seal and inner bearing on one end of the sleeve and pack with grease.
3. Slide that into the hub carrier.
4. Slide on the large spacer and the thin spacer.
5 Put lots of grease on the second inner bearing and tap that on using a suitable socket.
6. Install the rubber seal over that second bearing.
Don't forget the two spacers that fit on each end of the "sleeve". They are different sizes and should be fitted in the same place that they were removed from.
Also - if it's not too late - the bolt that holds all this lot together is "eccentric" and should be fitted exactly as it was when removed.
Veteran Member
Joined: Sep 2012
Posts: 1,473
Likes: 655
From: Devon. U.K.
Good point John. I must admit I am surprised that it's just friction that holds the ABS reluctor ring in place. I will be tempted to accidentally put a dab of epoxy glue on it before I press it back down on the inner hub !!