
Replacing Thermostat Housing and Tower


Just wanted to thank Gus and GGG for their assistance. Your detailed pics of the tower change out was a great help the bent 8 mm wrench was the trick. I did make one small change. I bent one for the open end and one for the box end. I also add a piece of 3/8 in (10 mm) square key stock to the wrenches making them 7 to 8 inches long. This made the wrench long enough to clear the top of the tower. Then used a 3/8 or 10 mm to remove and reinstall the bolts.
Graham thanks for the your help with the drain plug and sensor issue. Cleaned and dryed them out and all the codes cleared.
Life is easy when you have a group of Jag nuts to assist.
Jim
Graham thanks for the your help with the drain plug and sensor issue. Cleaned and dryed them out and all the codes cleared.
Life is easy when you have a group of Jag nuts to assist.
Jim


Joined: Dec 2011
Posts: 120,439
Likes: 17,003
From: Durham, UK
Is that a black plastic screw cap on your replacement tower?
The one I used, and all the ones I've seen advertised, have aluminium caps.
Graham
The one I used, and all the ones I've seen advertised, have aluminium caps.
Graham
Member
Joined: Apr 2010
Posts: 91
Likes: 11
From: Tampa
Yes... it came with an aluminum cap BUT the seal seems different and i don't remember exactly when/who but a guy that works on these and has for many years says that the aluminum caps have often developed small leaks, but used in conjunction with a new plastic cap= Never a problem. I just took his word for it and threw the aluminum one in my parts box...just in case
Joined: Dec 2011
Posts: 120,439
Likes: 17,003
From: Durham, UK
Yes... it came with an aluminum cap BUT the seal seems different and i don't remember exactly when/who but a guy that works on these and has for many years says that the aluminum caps have often developed small leaks, but used in conjunction with a new plastic cap= Never a problem. I just took his word for it and threw the aluminum one in my parts box...just in case
Sent it back. They replaced it immediately without question and also refunded my postage cost. The replacement was a smooth casting:

The cap fitted perfectly and the car is now sold but I'll remember your comment on using a new plastic cap if I need to fit an aluminium replacement tower on this car.
Thanks,
Graham
Joined: Dec 2011
Posts: 120,439
Likes: 17,003
From: Durham, UK
Just wanted to thank Gus and GGG for their assistance. Your detailed pics of the tower change out was a great help the bent 8 mm wrench was the trick. I did make one small change. I bent one for the open end and one for the box end. I also add a piece of 3/8 in (10 mm) square key stock to the wrenches making them 7 to 8 inches long. This made the wrench long enough to clear the top of the tower. Then used a 3/8 or 10 mm to remove and reinstall the bolts.
Graham thanks for the your help with the drain plug and sensor issue. Cleaned and dryed them out and all the codes cleared.
Life is easy when you have a group of Jag nuts to assist.
Jim
Graham thanks for the your help with the drain plug and sensor issue. Cleaned and dryed them out and all the codes cleared.
Life is easy when you have a group of Jag nuts to assist.
Jim
That 'super wrench' is worth posting a photo with measurements for those who are looking to solve the same tower replacement problem in future.
Graham
Trending Topics


Senior Member
Joined: Nov 2010
Posts: 199
Likes: 5
From: LONG BEACH
I am gonna be getting my tstat house via UPS in the next 5 hours or so...
Question: Can I siphon the coolant out of the Thermostat or do I have to remove the plug from the bottom of the radiator?
Question: Can I siphon the coolant out of the Thermostat or do I have to remove the plug from the bottom of the radiator?
Senior Member
Joined: Nov 2010
Posts: 199
Likes: 5
From: LONG BEACH
Grrrr, I looked everywhere and can't find the drain plug. Is it hidden by the snow dam?
EDIT: looks like its on the back of the radiator facing the passenger seat. I was expecting it to be on the bottom facing down.
http://matt.zenfolio.com/xk-coolant-...tat---v1-1.pdf
EDIT: looks like its on the back of the radiator facing the passenger seat. I was expecting it to be on the bottom facing down.
http://matt.zenfolio.com/xk-coolant-...tat---v1-1.pdf
Last edited by 2000CAXK8; Feb 28, 2012 at 01:35 PM.
Joined: Dec 2011
Posts: 120,439
Likes: 17,003
From: Durham, UK

Move to one side as you undo it.
Graham
Last edited by GGG; Feb 28, 2012 at 05:50 PM.
Senior Member
Joined: Nov 2010
Posts: 199
Likes: 5
From: LONG BEACH
well I hit a minor hiccup. I drained the radiator via the plug on the bottom of the radiator but because the thermostat is cold and closed there is coolant filling the bottom half of this:

I think i'll have to siphon that out after all
I think i'll have to siphon that out after all
Joined: Dec 2011
Posts: 120,439
Likes: 17,003
From: Durham, UK
.........the bent 8 mm wrench was the trick. I did make one small change. I bent one for the open end and one for the box end. I also add a piece of 3/8 in (10 mm) square key stock to the wrenches making them 7 to 8 inches long. This made the wrench long enough to clear the top of the tower. Then used a 3/8 or 10 mm to remove and reinstall the bolts.
Jim
Jim

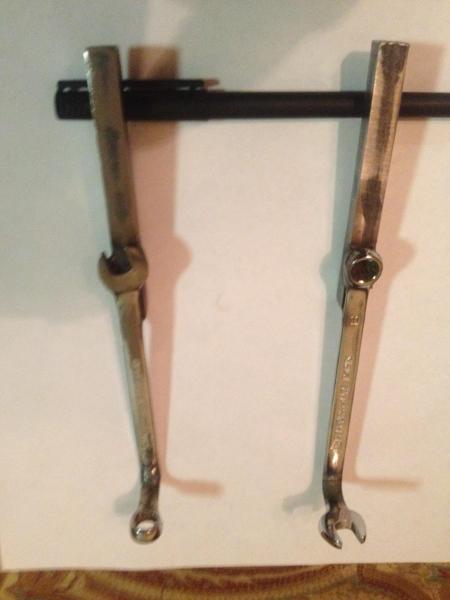
Clearly shows the bend needed and how the square key extension makes it easier to remove and reinstall the bolts.
Thanks to Jim for this.
Thanks Graham for posting the pics, I am sorry that I have not responded sooner but it has been on of those 70 hr work weeks. Gus had used/cut a slot in the bolts so a screw driver could be used. Which differently made the instalation easier. But I did not have a vise to cut the slots in the bolts. I had bent the 8 mm wrench and tried to use the vise grips but could only get about a 1/8 of a turn on the bolt. I purchased a second 8 mm wrench and bent them for open and box end. added the 3/8 in or 10 mm key stock to the back off the wrench which gave additional clearence from the tower. With the key stock it made the wrench between 7-8 inches in length, which cleared the top of the tower. (1 st. pic) Used a 3/8 in or 10mm wrench on the key stock to remove the back 2 bolts. Like the old saying "There is more then one way to skin a CAT!!" My cost was around $26 bucks. I hope this helps Jim


Veteran Member

Joined: Dec 2010
Posts: 8,833
Likes: 2,920
From: Douglasville Ga.
There have been a number of reports on leaking covers. Who supplied the tower? Often the threads are not cut properly, so take the o-ring out and make sure it screws on a little further. If that is not the problem, look for a larger o-ring.
