Jaguar Forums - Jaguar Enthusiasts Forum
  • LOG IN
  • REGISTER
  • Forums
    • General Jaguar Forums
      • New Member Area - Intro a MUST
      • Jaguar Forums Feedback & Suggestion Center
      • General Tech Help
    • Jaguar Models ( Current )
      • XF (X260)
      • F-Type ( X152 )
      • XE ( X760 )
      • E-Pace
      • F-Pace (X761) / C-X17
      • I-Pace EV
    • Jaguar Models ( Modern )
      • XF and XFR ( X250 )
      • XJ ( X351 )
      • X-Type ( X400 )
      • S-Type / S type R Supercharged V8 ( X200 )
      • XJ XJ6 / XJ8 / XJR ( X350 & X358 )
      • XJ XJ8 / XJR ( X308 )
      • XJ XJ12 ( X305 )
      • XJ XJ6 / XJR6 ( X300 )
      • XK8 / XKR ( X100 )
      • XK / XKR ( X150 )
    • Jaguar Models ( Classics )
      • Mark V - X 420G
      • MKI / MKII S type 240 340 & Daimler
      • XK120 XK140 XK150
      • E type ( XK-E )
      • XJ6 & XJ12 Series I, II & III
      • XJS ( X27 )
      • XJ40 ( XJ81 )
      • XKSS
      • XJ220
    • Other Jaguars
      • Other Jaguar Models / Concepts / Replicas
    • Diesel variants
      • Diesel variants - All models
    • Non Jaguar vehicles
      • Non-Jaguar Vehicles
    • Brand Review
      • Jaguar Press release
      • Jaguar Customer Relationship Centre
      • Jaguar Engines & transmissions
      • Wheels / Tires, Suspension & handling
      • Interior
      • Exterior
      • Audio/Visual Electronics
      • Detailing / Car care
      • Motorsports
    • Jaguar Classifieds
      • Marketplace
      • PRIVATE For Sale / Trade or Buy Classifieds
      • VENDOR 'For Sale' Classifieds
    • Regional
      • US Northeast
      • US Central
      • US Southwest
      • US Western
      • US Northwest
      • US Midwest
      • US Mid Atlantic
      • US Lower Atlantic
      • US Southern Midwest
      • Canada
      • Mexico, South America
      • UK & Eire
      • Europe
      • Australia - Queensland
      • Australia - New South Wales / ACT
      • Australia - Victoria / Tasmania
      • Australia - Western
      • Australia - South / NT
      • New Zealand
      • Other Areas
    • Official Site Sponsors
      • VENDOR Threads
    • General Interest / History
      • Sights N Sounds
      • Photography
      • Forum announcement archives / Forum History
      • Jaguarforums Merchandise
      • Memorial Section
  • News
  • Marketplace
    • Vendor Directory
    • Become a Vendor
    • Member Marketplace
    • Vendor Marketplace
    • Site Store
  • New Posts
  • Tools
    • Car Payment Calculator
    • Tire Rim Calculator
    • Vin Decoder
    • Recalls
    • Technical Service Bulletins (TSBs)
    • Members List
    • Live Feed
  • Gallery
  • View Dark Mode
    • Please register or login to enable Dark Mode.
  • Log In
  • Register
Jaguar Forums - Jaguar Enthusiasts Forum
    • Threads
      • Advanced
Dark Mode

Please register or login to enable Dark Mode.

Log In

Forgot your Password?

By logging into your account, you agree to our Terms of Use and Privacy Policy, and to the use of cookies as described therein.
or
 
  • Recent
  • Commented
  • Albums
  • My Pictures

My Post Pictures

Clive.R
January 21, 2022
 176
 0
Sort:
Default
  • Default
  • Most Recent
This may look like I am not getting a decent amount of room here, but it certainly surprised me how much there actually is.
0 2023/02/28 00:41:06 Clive.R
I have plenty of room here and it is not fouling any part of the car, and the added bonus of not having to touch the chassis rails on the car.
0 2023/02/28 00:46:02 Clive.R
This picture once again makes things look a lot worse than they really are. I am extremely pleased about the outcome of todays efforts. I do realize that the bolts are not all done up, this will only give me more room when they are done, also remember that there are gaskets to go into some of these pictures, and that both the engine and transmission are dummies for the want of a better word, better to damage these rather than the item I will be using in the end,
0 2023/02/28 00:46:32 Clive.R
Here at the centre bearing, the slip yoke here was completely pushed until it stopped, no force required. I had a feeling it was going to be close, but things were only going to get better.
0 2023/03/07 19:46:30 Clive.R
Here we can see the centre bearing, it too will be replaced, no point in making sure the tailshaft is in complete working order, then skimp out on the centre bearing, the whole shaft will be biven a good going over.
0 2023/03/07 19:52:44 Clive.R
As we move along the drive line, we ar near the output saft extension. Here the Ford slip yoke is completely in the transmission and looking very much at home in there, but then again it has been there since 1987. There is only a small amount of movement with the shaft, 20mm all up.
0 2023/03/07 19:53:23 Clive.R
It really is a huge surprise to see how little I had to do to get this all to fit so nicely. The new universal joints are on order so it will be a fairly simple job of fitting the, and the centre bearing and Jurid joint, and the shaft will be done.
0 2023/03/07 20:01:38 Clive.R
This is my first completed engine mount, it is on the drivers side (Australia RHD) Anyway you will probably recognise the cone shape of the Jaguar bases for engine mounts and the bush type of engine mount, I am pretty happy about the way they came out.
0 2023/03/24 22:13:10 Clive.R
This one is the passenger side, for some reason it did not want to look the same as the other one, but it is done now.
0 2023/03/24 22:16:26 Clive.R
A slightly different angle, as you can see it has been welded on both sides. The flux cored welding wire does not alway look as nice as a solid wire (Gas sheilded) but these should keep our engineer happy for a while.
0 2023/03/24 22:18:46 Clive.R
Not a good example in this shot, however take a look at the framework from the shock tower to where the evaporator hoses go through the firewall. Again on the other side, from the same place the shock tower this time to where the hearter hoses go through the firewall. also take a carefull look at the chassis rails themselves, they are upright as the narrow the engine bay all the way to the rear.
0 2023/03/27 00:12:06 Clive.R
0 2023/03/27 00:21:02 Clive.R
I just have to apply a couple more coats, but that will have to wait for another day. I put the gold pinstripes on and sealed it all under some 2K clear. Then it will all need to be sanded nice and flat before I consider anymore clear to be put onto the car.
0 2023/03/28 20:58:34 Clive.R
I have removed the chrome cover plate and the join has been filled, I like the way it turned out so it is full steam ahead.
0 2023/03/28 21:01:51 Clive.R
I have to shut it all down by this time, the sun has been covered and it is suddenly overcast, and I am not a weather man, so I am not taking any risks, give it a couple of days to get really hard, and then time to sand all over again. I am just thankfull I could get it all under way.
0 2023/03/28 21:05:33 Clive.R
I pondered for a while about how to start and finish the pinstripe, then this idea came to me so I tried it out, and it is now part of car. I kind of felt the need to be different again, hopefully without overdoing it.
0 2023/03/28 21:08:36 Clive.R
0 2023/03/29 20:12:55 Clive.R
The groove you see in this pic shows you where your retainer will hold the seal to the outer part of your sunroof. This is the top of the seal, we will be discarding the section with no flange. Now remove the ramp block from the sunroof and make note of how it came off using the front retainer to hold it all in place as you work your way around the sunroof.
0 2023/03/31 06:50:17 Clive.R
This what I am calling the front retainer, this is the bottom and you will notice a fairly wide groove all the way around both retainers. This is a little more explained.
0 2023/03/31 06:51:14 Clive.R
By the time you get to the end of your rubber, you should have a little bit to spare and then you will have the second elbow. We won’t be using that piece. Now take the second piece and place the elbow into the rear end of the sunroof.
0 2023/03/31 06:52:10 Clive.R
Placing this elbow in the rear corner the cut section should be facing forward. Gently set it in place and cut and glue the front section to this elbow. Now the tail will be plenty long enough to cut and join into the first elbow.
0 2023/03/31 06:54:10 Clive.R
Now with the flat sides of your retainers facing upwards, if everything looks like it is where you want it, screw or clamp the retainers down pretty tight. This should allow you to check the fit of the rubber you will see on the outside of the sunroof, push them into place and making sure the seal is almost perfectly flat. Allow it to set then apply a second amout of glue, this can be sanded later to give a much better finish. I am sorry this is a long drawn out thread today.
0 2023/03/31 06:55:12 Clive.R
Being a nice sunny day the clear went on pretty good. I really needed to get the roof done so I can put the sunroof back in place, and get the antenna on top, then I can put the hood lining in and then get ready for the glass. Maybe it will start to look like a car again soon.
0 2023/04/20 04:23:30 Clive.R
I am really liking the colour. Hopefully I can do a bit more sanding tomorrow and get rid of a bit more orange peel, and then lay down the last coat of clear, and if all goes well I can start assembling the parts to make it look like a car again.
0 2023/04/20 04:27:18 Clive.R
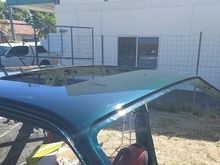
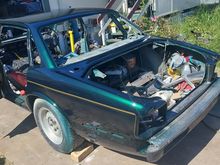
It will be great to see it all back together again, the sooner I can get the body and the roof painted the sooner I can get the rest of the interior put back, probably be thinking about the carpet in the very near future, and then the seats I suppose. I will post it when it gets done. That will be all for today at least, hopefully things will go as well as they did today, the pics will probably look very much like the ones we have here, so I won't be doubling up on things that don't need to be.
0 2023/04/20 04:34:09 Clive.R
It won't be removed now, all the things I put back on now are permanently there.
0 2023/05/01 22:49:31 Clive.R
0 2023/05/01 22:53:43 Clive.R
Smaller plugs will mean I can tuck the wiring away a little bit easier.
0 2023/05/13 19:52:38 Clive.R
I will put the other end of the connector on so I will remember what way around I have them wired. Too cold and wet to be doing very much. No fibreglassing going to get done for a little while.
0 2023/05/13 19:54:01 Clive.R
I changed all the plugs inside, made things a lot easier to push into place.
0 2023/05/16 01:08:03 Clive.R
Almost ready to get the glass re fitted into the car, the windscreen will be new though.
0 2023/05/16 01:09:06 Clive.R
0 2023/05/16 01:10:58 Clive.R
The front indicators and parking lights are not very visable here, but you can see a rough idea of the reflectors being removed. However the rear fog lamps were something I was not sure about, so I turned the vehicle around and did the same thing again.
0 2023/05/30 04:52:30 Clive.R
I did remove the reflectors as I did with the front, and I also got rid of the rear fog lights, the jury is still out with those for now, but you get the idea.
0 2023/05/30 04:55:08 Clive.R
This masonite was in really bad shape so I decided to make it again from marine ply, first part done now I have a couple of hurdles to get through because I will be putting the battry in the boot of this car, and a compressor for tyres, not putting air suspension on this one. I will be maybe lowering it 2 inches with the springs, other than that the suspension will not change to much.
0 2023/05/30 05:00:58 Clive.R
Finally put the gutter strip back in place, starting to resemble a car again.
0 2023/05/30 05:04:34 Clive.R
Inside is starting to look like it belongs to something.
0 2023/05/30 05:07:31 Clive.R
The interior will not change much from here on, I will be trying to keep the iterior as stock as I can for the most part.
0 2023/06/15 21:32:13 Clive.R
I did notice these on the sovereign, and I thought it wouldn't hurt putting them on this car so I removed them from the sovereign and bolted them here.
0 2023/06/15 21:33:51 Clive.R
They were on both sides of the car so likewise they are in this car now. The only thing really different were they had been spot welded into place on the other car, and they are bolted on this car.
0 2023/06/15 22:38:25 Clive.R
First
Page
3 of 5
Last
Go To
Page
  • 1
  • 2
  • 3
  • 4
  • 5
3 of 5
Go To GO
Go to page of 5 pages
  • 1
  • 2
  • 3
  • 4
  • 5

Top
Jaguar Forums - Jaguar Enthusiasts Forum
  • Contact Us
  • FAQ
  • Archive
  • Advertising
  • Cookie Policy
  • Privacy Statement
  • Terms of Service
  • Your Privacy Choices
  • Manage Preferences

© 2026 MH Sub I, LLC dba Internet Brands

Follow Us        


When you click on links to various merchants on this site and make a purchase, this can result in this site earning a commission. Affiliate programs and affiliations include, but are not limited to, the eBay Partner Network.