Jaguar Forums - Jaguar Enthusiasts Forum
  • LOG IN
  • REGISTER
  • Forums
    • General Jaguar Forums
      • New Member Area - Intro a MUST
      • Jaguar Forums Feedback & Suggestion Center
      • General Tech Help
    • Jaguar Models ( Current )
      • XF (X260)
      • F-Type ( X152 )
      • XE ( X760 )
      • E-Pace
      • F-Pace (X761) / C-X17
      • I-Pace EV
    • Jaguar Models ( Modern )
      • XF and XFR ( X250 )
      • XJ ( X351 )
      • X-Type ( X400 )
      • S-Type / S type R Supercharged V8 ( X200 )
      • XJ XJ6 / XJ8 / XJR ( X350 & X358 )
      • XJ XJ8 / XJR ( X308 )
      • XJ XJ12 ( X305 )
      • XJ XJ6 / XJR6 ( X300 )
      • XK8 / XKR ( X100 )
      • XK / XKR ( X150 )
    • Jaguar Models ( Classics )
      • Mark V - X 420G
      • MKI / MKII S type 240 340 & Daimler
      • XK120 XK140 XK150
      • E type ( XK-E )
      • XJ6 & XJ12 Series I, II & III
      • XJS ( X27 )
      • XJ40 ( XJ81 )
      • XKSS
      • XJ220
    • Other Jaguars
      • Other Jaguar Models / Concepts / Replicas
    • Diesel variants
      • Diesel variants - All models
    • Non Jaguar vehicles
      • Non-Jaguar Vehicles
    • Brand Review
      • Jaguar Press release
      • Jaguar Customer Relationship Centre
      • Jaguar Engines & transmissions
      • Wheels / Tires, Suspension & handling
      • Interior
      • Exterior
      • Audio/Visual Electronics
      • Detailing / Car care
      • Motorsports
    • Jaguar Classifieds
      • Marketplace
      • PRIVATE For Sale / Trade or Buy Classifieds
      • VENDOR 'For Sale' Classifieds
    • Regional
      • US Northeast
      • US Central
      • US Southwest
      • US Western
      • US Northwest
      • US Midwest
      • US Mid Atlantic
      • US Lower Atlantic
      • US Southern Midwest
      • Canada
      • Mexico, South America
      • UK & Eire
      • Europe
      • Australia - Queensland
      • Australia - New South Wales / ACT
      • Australia - Victoria / Tasmania
      • Australia - Western
      • Australia - South / NT
      • New Zealand
      • Other Areas
    • Official Site Sponsors
      • VENDOR Threads
    • General Interest / History
      • Sights N Sounds
      • Photography
      • Forum announcement archives / Forum History
      • Jaguarforums Merchandise
      • Memorial Section
  • News
  • Marketplace
    • Vendor Directory
    • Become a Vendor
    • Member Marketplace
    • Vendor Marketplace
    • Site Store
  • New Posts
  • Tools
    • Car Payment Calculator
    • Tire Rim Calculator
    • Vin Decoder
    • Recalls
    • Technical Service Bulletins (TSBs)
    • Members List
    • Live Feed
  • Gallery
  • View Dark Mode
    • Please register or login to enable Dark Mode.
  • Log In
  • Register
Jaguar Forums - Jaguar Enthusiasts Forum
    • Threads
      • Advanced
Dark Mode

Please register or login to enable Dark Mode.

Log In

Forgot your Password?

By logging into your account, you agree to our Terms of Use and Privacy Policy, and to the use of cookies as described therein.
or
 
  • Recent
  • Commented
  • Albums
  • My Pictures

Nav's HID upgrade

Thermo
April 24, 2010
 11
 1
Description:
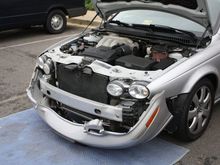
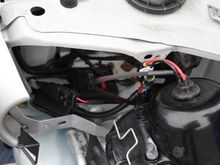
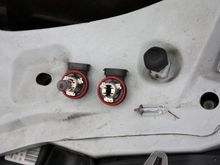
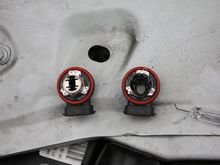
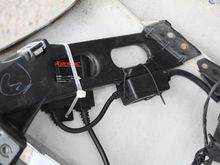
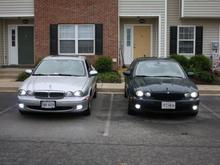
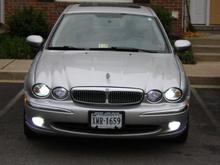
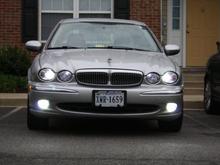
Spent the day with Nav installing HID's in both his headlights and foglights. A little bit of a how to for the HID install too.

Read more ยป
Sort:
Default
  • Default
  • Most Recent
Nav standing between our two cars.
0 2010/04/24 18:29:40 Thermo
The front end of Nav's car sitting on the ground in preps for pulling the headlight assemblies.  Only took about 20 minutes to get the car to this point.
The front end of Nav's car sitting on the ground in preps for pulling the headlight assemblies. Only took about 20 minutes to get the car to this point.
0 2010/04/24 18:29:40 Thermo
Drilled a hole in the back of the headlight cover, ran all the wires through the supplied stopper.  Connected up really easy.  Just had to cut the factory plugs off to be spliced in.  Please note, try to keep these splices inside the housing as they will last longer as they won't be exposed to the weather.
Drilled a hole in the back of the headlight cover, ran all the wires through the supplied stopper. Connected up really easy. Just had to cut the factory plugs off to be spliced in. Please note, try to keep these splices inside the housing as they will last longer as they won't be exposed to the weather.
0 2010/04/24 18:29:40 Thermo
The arrangement of the ballast boxes behind the headlight.  The ballasts sit below the headlight assembly.  Lots of room to mount something this size there.
The arrangement of the ballast boxes behind the headlight. The ballasts sit below the headlight assembly. Lots of room to mount something this size there.
0 2010/04/24 18:32:20 Thermo
Converting the factory H11 bulb housings to accept the HID bulbs.  The left one is a standard bulb, the right one has the bulb removed in preparation for internal removal.
Converting the factory H11 bulb housings to accept the HID bulbs. The left one is a standard bulb, the right one has the bulb removed in preparation for internal removal.
0 2010/04/24 18:32:20 Thermo
Stepping through the internal removal.  The left one has the bulb removed, the right one has a 1/2" hole drilled through it and the metal topper removed.  Note, there is still the 3 tabs to secure the holder to the fog light housing.  DO NOT!!!! remove these 3 tabs.
Stepping through the internal removal. The left one has the bulb removed, the right one has a 1/2" hole drilled through it and the metal topper removed. Note, there is still the 3 tabs to secure the holder to the fog light housing. DO NOT!!!! remove these 3 tabs.
0 2010/04/24 18:32:20 Thermo
The bulb mount modified with a hole big enough to allow the plug to slide through and then the bulb inserted into the hole and caulked to seal things back up.
0 2010/04/24 18:35:53 Thermo
The ballast and support box mounted to the internal supports for the bumper cover.  Convenient place to mount things and keeps all the wires on the bumper cover for easy removal later.
The ballast and support box mounted to the internal supports for the bumper cover. Convenient place to mount things and keeps all the wires on the bumper cover for easy removal later.
0 2010/04/24 18:35:53 Thermo
Our cars, side by side, HIDs top and bottom, along with LED running lights.  Of note, I am using a 285K MCD 10MM bulb where Nav is using a store bought LED bulb. Both LED bulb colors are rated at 7000K.  Nav's HID lights are 5000K, mine are 6000K.
Our cars, side by side, HIDs top and bottom, along with LED running lights. Of note, I am using a 285K MCD 10MM bulb where Nav is using a store bought LED bulb. Both LED bulb colors are rated at 7000K. Nav's HID lights are 5000K, mine are 6000K.
1 2010/04/24 18:35:53 Thermo
High shot of Nav's HID upgrade
0 2010/04/24 18:39:50 Thermo
Street level shot of Nav's HID upgrade.
0 2010/04/24 18:39:50 Thermo
 

Top
Jaguar Forums - Jaguar Enthusiasts Forum
  • Contact Us
  • FAQ
  • Archive
  • Advertising
  • Cookie Policy
  • Privacy Statement
  • Terms of Service
  • Your Privacy Choices
  • Manage Preferences

© 2026 MH Sub I, LLC dba Internet Brands

Follow Us        


When you click on links to various merchants on this site and make a purchase, this can result in this site earning a commission. Affiliate programs and affiliations include, but are not limited to, the eBay Partner Network.