Jaguar Forums - Jaguar Enthusiasts Forum
  • LOG IN
  • REGISTER
  • Forums
    • General Jaguar Forums
      • New Member Area - Intro a MUST
      • Jaguar Forums Feedback & Suggestion Center
      • General Tech Help
    • Jaguar Models ( Current )
      • XF (X260)
      • F-Type ( X152 )
      • XE ( X760 )
      • E-Pace
      • F-Pace (X761) / C-X17
      • I-Pace EV
    • Jaguar Models ( Modern )
      • XF and XFR ( X250 )
      • XJ ( X351 )
      • X-Type ( X400 )
      • S-Type / S type R Supercharged V8 ( X200 )
      • XJ XJ6 / XJ8 / XJR ( X350 & X358 )
      • XJ XJ8 / XJR ( X308 )
      • XJ XJ12 ( X305 )
      • XJ XJ6 / XJR6 ( X300 )
      • XK8 / XKR ( X100 )
      • XK / XKR ( X150 )
    • Jaguar Models ( Classics )
      • Mark V - X 420G
      • MKI / MKII S type 240 340 & Daimler
      • XK120 XK140 XK150
      • E type ( XK-E )
      • XJ6 & XJ12 Series I, II & III
      • XJS ( X27 )
      • XJ40 ( XJ81 )
      • XKSS
      • XJ220
    • Other Jaguars
      • Other Jaguar Models / Concepts / Replicas
    • Diesel variants
      • Diesel variants - All models
    • Non Jaguar vehicles
      • Non-Jaguar Vehicles
    • Brand Review
      • Jaguar Press release
      • Jaguar Customer Relationship Centre
      • Jaguar Engines & transmissions
      • Wheels / Tires, Suspension & handling
      • Interior
      • Exterior
      • Audio/Visual Electronics
      • Detailing / Car care
      • Motorsports
    • Jaguar Classifieds
      • Marketplace
      • PRIVATE For Sale / Trade or Buy Classifieds
      • VENDOR 'For Sale' Classifieds
    • Regional
      • US Northeast
      • US Central
      • US Southwest
      • US Western
      • US Northwest
      • US Midwest
      • US Mid Atlantic
      • US Lower Atlantic
      • US Southern Midwest
      • Canada
      • Mexico, South America
      • UK & Eire
      • Europe
      • Australia - Queensland
      • Australia - New South Wales / ACT
      • Australia - Victoria / Tasmania
      • Australia - Western
      • Australia - South / NT
      • New Zealand
      • Other Areas
    • Official Site Sponsors
      • VENDOR Threads
    • General Interest / History
      • Sights N Sounds
      • Photography
      • Forum announcement archives / Forum History
      • Jaguarforums Merchandise
      • Memorial Section
  • News
  • Marketplace
    • Vendor Directory
    • Become a Vendor
    • Member Marketplace
    • Vendor Marketplace
    • Site Store
  • New Posts
  • Tools
    • Car Payment Calculator
    • Tire Rim Calculator
    • Vin Decoder
    • Recalls
    • Technical Service Bulletins (TSBs)
    • Members List
    • Live Feed
  • Gallery
  • View Dark Mode
    • Please register or login to enable Dark Mode.
  • Log In
  • Register
Jaguar Forums - Jaguar Enthusiasts Forum
    • Threads
      • Advanced
Dark Mode

Please register or login to enable Dark Mode.

Log In

Forgot your Password?

By logging into your account, you agree to our Terms of Use and Privacy Policy, and to the use of cookies as described therein.
or
 
  • Recent
  • Commented
  • Albums
  • My Pictures

5 - Miscellaneous Bits

listerjag
June 18, 2011
 12
 0
Description:
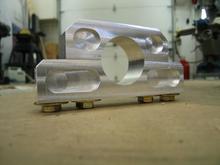
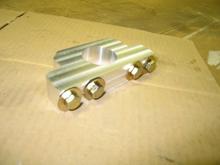
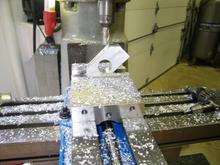
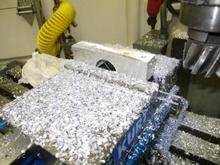
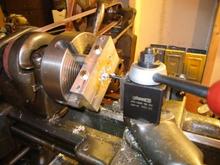
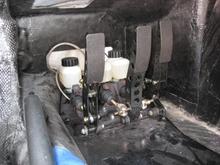
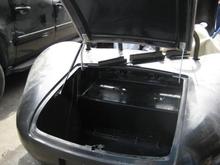
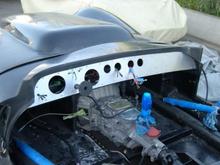
The best part about building a car from scratch is ... well, I'm not sure! Maybe its the fact that you have to put it all together and take it all apart multiple times before it is even ready for paint. Here are a few details of some of the "everyday" type chores of the process. Oh, and then the discovery that my NASCAR steering column didn't come with mounting hardware... As before, each photo has a description of the associated work.

Read more ยป
Sort:
Default
  • Default
  • Most Recent
5 12
So, here is the final mounting bracket to hold the steering column with as much metal cut away as I felt comfortable doing w/o loosing too much integrity.  It is installed directly behind the dash and the bolts are accessible from under the dash.  It works just as designed and allows you to adjust the steering wheel position from the dash.  The sad part is that, after all of this work, you can't even see it!
5 12 So, here is the final mounting bracket to hold the steering column with as much metal cut away as I felt comfortable doing w/o loosing too much integrity. It is installed directly behind the dash and the bolts are accessible from under the dash. It works just as designed and allows you to adjust the steering wheel position from the dash. The sad part is that, after all of this work, you can't even see it!
0 2011/06/18 07:23:14 listerjag
5 11
The mount was almost done.  It was plenty strong but a bit heavy.  Back to the mill to shave off some weight!
5 11 The mount was almost done. It was plenty strong but a bit heavy. Back to the mill to shave off some weight!
0 2011/06/18 07:23:14 listerjag
5 10
Shaping the part on the mill.
5 10 Shaping the part on the mill.
0 2011/06/18 07:23:14 listerjag
5 9
Here i am milling off as much material as possible to lighten up the bracket and to achieve the overall height required to insure the bracket fit where intended.  Also, note the additional holes - the two inside holes are the clamping bolts and the outer holes are the mounting bolts to mount the bracket to the underside of the dash.
5 9 Here i am milling off as much material as possible to lighten up the bracket and to achieve the overall height required to insure the bracket fit where intended. Also, note the additional holes - the two inside holes are the clamping bolts and the outer holes are the mounting bolts to mount the bracket to the underside of the dash.
0 2011/06/18 07:28:00 listerjag
5 8
Fresh off the lathe, the hole was perfectly split and fit the OD of the steering column exactly.
5 8 Fresh off the lathe, the hole was perfectly split and fit the OD of the steering column exactly.
0 2011/06/18 07:28:00 listerjag
5 7
Boring the hole to size on the lathe. Making sure the piece is held nice and tight so you don't shoot it across the room is paramount (don't ask me how i know!!!)
5 7 Boring the hole to size on the lathe. Making sure the piece is held nice and tight so you don't shoot it across the room is paramount (don't ask me how i know!!!)
0 2011/06/18 07:28:00 listerjag
5 6
Setting up and centering a heavy unbalanced rectangular piece in a 4-jaw chuck is always a joy.  Being a rank amateur/hobby machinist, this took me way longer than you might imagine!  Even on this 1940 ancient well-used lathe, i can still get to 0.001" of what i am trying to achieve.
5 6 Setting up and centering a heavy unbalanced rectangular piece in a 4-jaw chuck is always a joy. Being a rank amateur/hobby machinist, this took me way longer than you might imagine! Even on this 1940 ancient well-used lathe, i can still get to 0.001" of what i am trying to achieve.
0 2011/06/18 07:32:06 listerjag
5 5
To make a clamp for the steering column, I started to two blocks of 6061 aluminum.  The blocks were clamped in my milling vice and trued up.  I then drilled and tapped two holes into the block  so i could bolt them together to allow me to bore a precise hole that was perfectly split.  When the bolts are tight, the clap secures the column, when loosened, you can move the column in the clamp.
5 5 To make a clamp for the steering column, I started to two blocks of 6061 aluminum. The blocks were clamped in my milling vice and trued up. I then drilled and tapped two holes into the block so i could bolt them together to allow me to bore a precise hole that was perfectly split. When the bolts are tight, the clap secures the column, when loosened, you can move the column in the clamp.
0 2011/06/18 07:32:06 listerjag
5 4
Here are the master cylinders from the top.  The cylinder at the bottom of the photo is the clutch, the center one actuates the rear brakes and the top is for the front brakes.  I must have put these pedals in and out of the chassis at least a dozen times over the past 4 years!
5 4 Here are the master cylinders from the top. The cylinder at the bottom of the photo is the clutch, the center one actuates the rear brakes and the top is for the front brakes. I must have put these pedals in and out of the chassis at least a dozen times over the past 4 years!
0 2011/06/18 07:32:06 listerjag
5 3
The pedals are installed for the first time.  a bit tight and difficult to work in but, they fit.  adjusting them is a pleasure (not).  to provide better access, i cut the top of the foot well off and made an access panel so you could get to the pedals from above (see the next photo)
5 3 The pedals are installed for the first time. a bit tight and difficult to work in but, they fit. adjusting them is a pleasure (not). to provide better access, i cut the top of the foot well off and made an access panel so you could get to the pedals from above (see the next photo)
0 2011/06/18 07:38:11 listerjag
5 2
Here i have fitted the trunk, trunk hinges, and the latch.  Boy was it difficult to get the carbon fiber panels to line up with any precision at all.
5 2 Here i have fitted the trunk, trunk hinges, and the latch. Boy was it difficult to get the carbon fiber panels to line up with any precision at all.
0 2011/06/18 07:38:11 listerjag
5 1
Making progress - I actually put the wiring harness in the chassis fairly early on to make it easier to pull all of the wires.  In this picture you see a steel non-collapsible steering column.  I was not too thrilled at the prospect of being skewered by my own steering column so i replaced it with a NASCA collapsible column.  Of course, it didn't fit and that resulted in a whole new project...see later in this album.
5 1 Making progress - I actually put the wiring harness in the chassis fairly early on to make it easier to pull all of the wires. In this picture you see a steel non-collapsible steering column. I was not too thrilled at the prospect of being skewered by my own steering column so i replaced it with a NASCA collapsible column. Of course, it didn't fit and that resulted in a whole new project...see later in this album.
0 2011/06/18 07:38:11 listerjag

Top
Jaguar Forums - Jaguar Enthusiasts Forum
  • Contact Us
  • FAQ
  • Archive
  • Advertising
  • Cookie Policy
  • Privacy Statement
  • Terms of Service
  • Your Privacy Choices
  • Manage Preferences

© 2026 MH Sub I, LLC dba Internet Brands

Follow Us        


When you click on links to various merchants on this site and make a purchase, this can result in this site earning a commission. Affiliate programs and affiliations include, but are not limited to, the eBay Partner Network.