Jaguar Forums - Jaguar Enthusiasts Forum
  • LOG IN
  • REGISTER
  • Forums
    • General Jaguar Forums
      • New Member Area - Intro a MUST
      • Jaguar Forums Feedback & Suggestion Center
      • General Tech Help
    • Jaguar Models ( Current )
      • XF (X260)
      • F-Type ( X152 )
      • XE ( X760 )
      • E-Pace
      • F-Pace (X761) / C-X17
      • I-Pace EV
    • Jaguar Models ( Modern )
      • XF and XFR ( X250 )
      • XJ ( X351 )
      • X-Type ( X400 )
      • S-Type / S type R Supercharged V8 ( X200 )
      • XJ XJ6 / XJ8 / XJR ( X350 & X358 )
      • XJ XJ8 / XJR ( X308 )
      • XJ XJ12 ( X305 )
      • XJ XJ6 / XJR6 ( X300 )
      • XK8 / XKR ( X100 )
      • XK / XKR ( X150 )
    • Jaguar Models ( Classics )
      • Mark V - X 420G
      • MKI / MKII S type 240 340 & Daimler
      • XK120 XK140 XK150
      • E type ( XK-E )
      • XJ6 & XJ12 Series I, II & III
      • XJS ( X27 )
      • XJ40 ( XJ81 )
      • XKSS
      • XJ220
    • Other Jaguars
      • Other Jaguar Models / Concepts / Replicas
    • Diesel variants
      • Diesel variants - All models
    • Non Jaguar vehicles
      • Non-Jaguar Vehicles
    • Brand Review
      • Jaguar Press release
      • Jaguar Customer Relationship Centre
      • Jaguar Engines & transmissions
      • Wheels / Tires, Suspension & handling
      • Interior
      • Exterior
      • Audio/Visual Electronics
      • Detailing / Car care
      • Motorsports
    • Jaguar Classifieds
      • Marketplace
      • PRIVATE For Sale / Trade or Buy Classifieds
      • VENDOR 'For Sale' Classifieds
    • Regional
      • US Northeast
      • US Central
      • US Southwest
      • US Western
      • US Northwest
      • US Midwest
      • US Mid Atlantic
      • US Lower Atlantic
      • US Southern Midwest
      • Canada
      • Mexico, South America
      • UK & Eire
      • Europe
      • Australia - Queensland
      • Australia - New South Wales / ACT
      • Australia - Victoria / Tasmania
      • Australia - Western
      • Australia - South / NT
      • New Zealand
      • Other Areas
    • Official Site Sponsors
      • VENDOR Threads
    • General Interest / History
      • Sights N Sounds
      • Photography
      • Forum announcement archives / Forum History
      • Jaguarforums Merchandise
      • Memorial Section
  • News
  • Marketplace
    • Vendor Directory
    • Become a Vendor
    • Member Marketplace
    • Vendor Marketplace
    • Site Store
  • New Posts
  • Tools
    • Car Payment Calculator
    • Tire Rim Calculator
    • Vin Decoder
    • Recalls
    • Technical Service Bulletins (TSBs)
    • Members List
    • Live Feed
  • Gallery
  • View Dark Mode
    • Please register or login to enable Dark Mode.
  • Log In
  • Register
Jaguar Forums - Jaguar Enthusiasts Forum
    • Threads
      • Advanced
Dark Mode

Please register or login to enable Dark Mode.

Log In

Forgot your Password?

By logging into your account, you agree to our Terms of Use and Privacy Policy, and to the use of cookies as described therein.
or
 
  • Recent
  • Commented
  • Albums
  • My Pictures

6 - Building the Body

listerjag
July 8, 2011
 15
 0
Description:
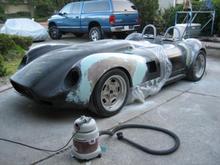
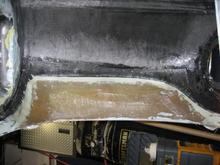
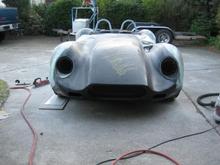
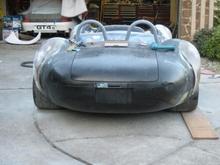
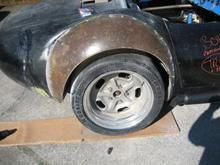
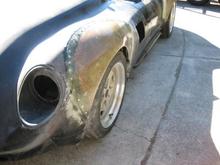
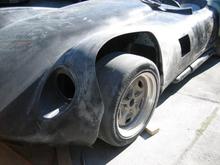
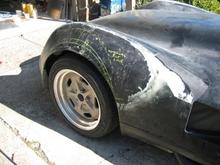
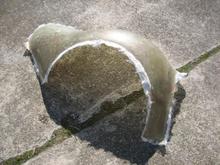
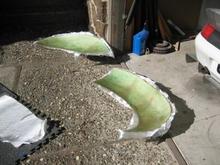
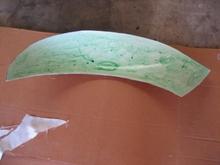
For those of you who like to see things move along and change dramatically, this is the saga of how we started the widening process on my car. Our goal was to add at least 6 inches of width to the front and a minimum of 10 inches to the rear. All of this was accomplished over a 4 day weekend (very long days). As before, each photo has a description of the process. I hope you find them interesting!

Read more »
Sort:
Default
  • Default
  • Most Recent
15
So, this is what we accomplished in just 4 days.  we even started the process of shaping the front fenders and blending them into the body.  Unfortunately, i had to pack my bags, put the car away in his garage and fly back east to get back to the office.  the next trip would prove to be both quite interesting and very challenging.
15 So, this is what we accomplished in just 4 days. we even started the process of shaping the front fenders and blending them into the body. Unfortunately, i had to pack my bags, put the car away in his garage and fly back east to get back to the office. the next trip would prove to be both quite interesting and very challenging.
0 2011/07/08 17:53:42 listerjag
14
We also had to reinforce the fenders from the underside with fiberglass tape.  What a pleasure it is to lay up fiberglass and resin upside down.  We only got the drivers side front fender done during this very long 4 day weekend (12 to 14 hours per day)
14 We also had to reinforce the fenders from the underside with fiberglass tape. What a pleasure it is to lay up fiberglass and resin upside down. We only got the drivers side front fender done during this very long 4 day weekend (12 to 14 hours per day)
0 2011/07/08 17:53:42 listerjag
13
The front, while quite a bit narrower than the rear is still substantially widened over the "stock" body.  we added just under 7 inches to the width up front!
13 The front, while quite a bit narrower than the rear is still substantially widened over the "stock" body. we added just under 7 inches to the width up front!
0 2011/07/08 17:53:42 listerjag
12
Now we could admire the very wide backside of the Lister.  It is 77 inches wide from fender lip to fender lip!
12 Now we could admire the very wide backside of the Lister. It is 77 inches wide from fender lip to fender lip!
0 2011/07/08 17:54:20 listerjag
11
Same process on the rear but the rear just would not cooperate and the fitment was pretty poor.  We addressed this later with lots of pour foam and shaping - but that is for another story!
11 Same process on the rear but the rear just would not cooperate and the fitment was pretty poor. We addressed this later with lots of pour foam and shaping - but that is for another story!
0 2011/07/08 17:54:20 listerjag
10
Now the front fenders are epoxied and screwed onto the body.  the extra wide shape is starting to become evident and the car is already looking much more agressive.
10 Now the front fenders are epoxied and screwed onto the body. the extra wide shape is starting to become evident and the car is already looking much more agressive.
0 2011/07/08 17:54:20 listerjag
9
Here, little Bro helps with the trimming and shaping of the wheel arch on the driver side rear quarter panel.  we both itched for weeks after this project!
9 Here, little Bro helps with the trimming and shaping of the wheel arch on the driver side rear quarter panel. we both itched for weeks after this project!
0 2011/07/08 17:54:44 listerjag
8
The fitment of the rear quarters was simply "outstanding" - not.  these required a lot of work to make them fit.
8 The fitment of the rear quarters was simply "outstanding" - not. these required a lot of work to make them fit.
0 2011/07/08 17:54:44 listerjag
7
Now the really fun part…fitting the new panels.  The fronts fit fine because we made the molds off of my front fenders. There they are after trimming and while we are fitting them to the car.  Also, you can see the poorly fitting rear quarter panels – they were made from molds from my bros car which, we now know, is VERY different than my car (yes we are building one for him as well):
7 Now the really fun part…fitting the new panels. The fronts fit fine because we made the molds off of my front fenders. There they are after trimming and while we are fitting them to the car. Also, you can see the poorly fitting rear quarter panels – they were made from molds from my bros car which, we now know, is VERY different than my car (yes we are building one for him as well):
0 2011/07/08 17:54:44 listerjag
6
Next, i took the sawsall to the rear and, in just a few minutes, had massive tire clearance back there as well.
6 Next, i took the sawsall to the rear and, in just a few minutes, had massive tire clearance back there as well.
0 2011/07/08 17:55:05 listerjag
5
The sawsall made making tire clearance a piece of cake - just didn't really look all that great...
5 The sawsall made making tire clearance a piece of cake - just didn't really look all that great...
0 2011/07/08 17:55:05 listerjag
4
Next, we removed all of the bondo and started laying out the cut lines required to maximize tire clearance for the much wider wheels and tires.
4 Next, we removed all of the bondo and started laying out the cut lines required to maximize tire clearance for the much wider wheels and tires.
0 2011/07/08 17:55:05 listerjag
3
Using the same process, we made molds for the very wide rear quarter panels and then laid up the panels.  Here is the "raw" passenger side rear quarter panel in the rough.
3 Using the same process, we made molds for the very wide rear quarter panels and then laid up the panels. Here is the "raw" passenger side rear quarter panel in the rough.
0 2011/07/08 17:55:27 listerjag
2
This is the process of laying up the widened front fenders.  Both and done and curing in the No. CA sunshine (a good thing it was sunny because the hills of Oakland do not get very warm in January!).
2 This is the process of laying up the widened front fenders. Both and done and curing in the No. CA sunshine (a good thing it was sunny because the hills of Oakland do not get very warm in January!).
0 2011/07/08 17:55:27 listerjag
1
After getting the body bonded on the chassis and getting the chassis mobile, my bro towed my car up to his place in Oakland CA to work on the body since it is much warmer than here in VA.  We made the flares with about 20 lbs of bondo applied to the body and then make molds for new front and rear fenders.   Here is the passenger side mold for the front fender flare area:
1 After getting the body bonded on the chassis and getting the chassis mobile, my bro towed my car up to his place in Oakland CA to work on the body since it is much warmer than here in VA. We made the flares with about 20 lbs of bondo applied to the body and then make molds for new front and rear fenders. Here is the passenger side mold for the front fender flare area:
0 2011/07/08 17:55:27 listerjag
 

Top
Jaguar Forums - Jaguar Enthusiasts Forum
  • Contact Us
  • FAQ
  • Archive
  • Advertising
  • Cookie Policy
  • Privacy Statement
  • Terms of Service
  • Your Privacy Choices
  • Manage Preferences

© 2026 MH Sub I, LLC dba Internet Brands

Follow Us        


When you click on links to various merchants on this site and make a purchase, this can result in this site earning a commission. Affiliate programs and affiliations include, but are not limited to, the eBay Partner Network.