Jaguar Forums - Jaguar Enthusiasts Forum
  • LOG IN
  • Forums
    • General Jaguar Forums
      • New Member Area - Intro a MUST
      • Jaguar Forums Feedback & Suggestion Center
      • General Tech Help
    • Jaguar Models ( Current )
      • XF (X260)
      • F-Type ( X152 )
      • XE ( X760 )
      • E-Pace
      • F-Pace (X761) / C-X17
      • I-Pace EV
    • Jaguar Models ( Modern )
      • XF and XFR ( X250 )
      • XJ ( X351 )
      • X-Type ( X400 )
      • S-Type / S type R Supercharged V8 ( X200 )
      • XJ XJ6 / XJ8 / XJR ( X350 & X358 )
      • XJ XJ8 / XJR ( X308 )
      • XJ XJ12 ( X305 )
      • XJ XJ6 / XJR6 ( X300 )
      • XK8 / XKR ( X100 )
      • XK / XKR ( X150 )
    • Jaguar Models ( Classics )
      • Mark V - X 420G
      • MKI / MKII S type 240 340 & Daimler
      • XK120 XK140 XK150
      • E type ( XK-E )
      • XJ6 & XJ12 Series I, II & III
      • XJS ( X27 )
      • XJ40 ( XJ81 )
      • XKSS
      • XJ220
    • Other Jaguars
      • Other Jaguar Models / Concepts / Replicas
    • Diesel variants
      • Diesel variants - All models
    • Non Jaguar vehicles
      • Non-Jaguar Vehicles
    • Brand Review
      • Jaguar Press release
      • Jaguar Customer Relationship Centre
      • Jaguar Engines & transmissions
      • Wheels / Tires, Suspension & handling
      • Interior
      • Exterior
      • Audio/Visual Electronics
      • Detailing / Car care
      • Motorsports
    • Jaguar Classifieds
      • Marketplace
      • PRIVATE For Sale / Trade or Buy Classifieds
      • VENDOR 'For Sale' Classifieds
    • Regional
      • US Northeast
      • US Central
      • US Southwest
      • US Western
      • US Northwest
      • US Midwest
      • US Mid Atlantic
      • US Lower Atlantic
      • US Southern Midwest
      • Canada
      • Mexico, South America
      • UK & Eire
      • Europe
      • Australia - Queensland
      • Australia - New South Wales / ACT
      • Australia - Victoria / Tasmania
      • Australia - Western
      • Australia - South / NT
      • New Zealand
      • Other Areas
    • Official Site Sponsors
      • VENDOR Threads
    • General Interest / History
      • Sights N Sounds
      • Photography
      • Forum announcement archives / Forum History
      • Jaguarforums Merchandise
      • Memorial Section
  • News
  • Marketplace
    • Vendor Directory
    • Become a Vendor
    • Member Marketplace
    • Vendor Marketplace
    • Site Store
  • New Posts
  • Tools
    • Car Payment Calculator
    • Tire Rim Calculator
    • Vin Decoder
    • Recalls
    • Technical Service Bulletins (TSBs)
    • Members List
    • Live Feed
  • Gallery
  • View Dark Mode
    • Please register or login to enable Dark Mode.
  • Log In
Jaguar Forums - Jaguar Enthusiasts Forum
    • Threads
      • Advanced
Dark Mode

Please register or login to enable Dark Mode.

Log In

Forgot your Password?

By logging into your account, you agree to our Terms of Use and Privacy Policy, and to the use of cookies as described therein.
or
 
  • Recent
  • Commented
  • Albums
  • My Pictures

7 - Building the Body Part 2

listerjag
August 15, 2011
 9
 0
Description:
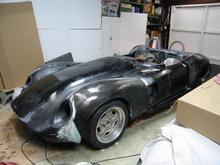
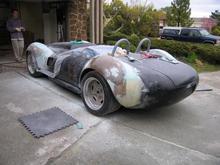
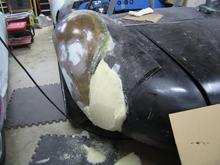
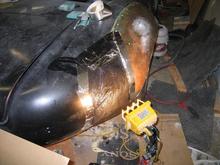
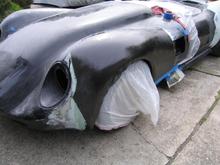
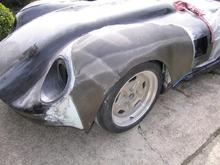
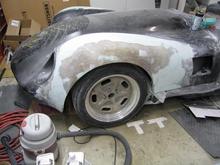
Sorry I have been absent but...my track car has demanded some attention and i have not had much time for the internet! But i digress! The body work did not end with the last chapter - it was just beginning. Still at my Bro's house in No. CA, we were working long weekends trying to get the car ready to ship to my garage in VA. So, here are a few more photos and descriptions about this next phase.

Read more »
Sort:
Default
  • Default
  • Most Recent
A bit of trimming to clean up the fender arches and we now have completed the four corners!  Here is a shot when we wrapped up the project for that weekend – its kinda, sorta starting to look like something you might want to drive…almost anyway.  Of course, with all of the back slapping and congratulations we gave each other at this stage, we kind of overlooked the massive effort required to turn this into what the car looks like today.  It was a fun time but, i am really glad to be done with that part of the project.
A bit of trimming to clean up the fender arches and we now have completed the four corners! Here is a shot when we wrapped up the project for that weekend – its kinda, sorta starting to look like something you might want to drive…almost anyway. Of course, with all of the back slapping and congratulations we gave each other at this stage, we kind of overlooked the massive effort required to turn this into what the car looks like today. It was a fun time but, i am really glad to be done with that part of the project.
0 2011/08/15 19:23:19 listerjag
Just like the front, we finally were able to laminate the carbon skin over each of the rear quarterpanels.  It felt good to be making progress but, honestly, the car still looked pretty rough.
Just like the front, we finally were able to laminate the carbon skin over each of the rear quarterpanels. It felt good to be making progress but, honestly, the car still looked pretty rough.
0 2011/08/15 19:23:19 listerjag
Still too rough for the carbon fiber skin…the dreaded bondo was applied generously to aid in the final contouring of the quarter panel…followed by a LOT of sanding and mess making.  Clearly, all this sanding makes your hair begin to fall out...at least that is my theory and I'm stickin' to it!
Still too rough for the carbon fiber skin…the dreaded bondo was applied generously to aid in the final contouring of the quarter panel…followed by a LOT of sanding and mess making. Clearly, all this sanding makes your hair begin to fall out...at least that is my theory and I'm stickin' to it!
0 2011/08/15 19:23:19 listerjag
With a bit more shaping and sanding, the rear quarter was starting to look good...yes?  well, maybe not, but after several very long chilly days, we decided it looked better!
With a bit more shaping and sanding, the rear quarter was starting to look good...yes? well, maybe not, but after several very long chilly days, we decided it looked better!
0 2011/08/15 19:24:44 listerjag
Then we removed the bag and started shaping with a crosscut saw (now we’re on the passenger side)  the pour foam shaped nicely and gave us a smooth contour despite the lousy fitment of the rear quarter panels.  Here is the quarter panel part way through the shaping process.  I know, it looks horrible and rough but...it's the finished product that counts, right?
Then we removed the bag and started shaping with a crosscut saw (now we’re on the passenger side) the pour foam shaped nicely and gave us a smooth contour despite the lousy fitment of the rear quarter panels. Here is the quarter panel part way through the shaping process. I know, it looks horrible and rough but...it's the finished product that counts, right?
0 2011/08/15 19:24:44 listerjag
We followed the same procedure on the other side as well and had a nice, aggressive look from up front.  Now, if you remember, the new rear quarter panels did not fit well and there was a 1 inch gap at the rear of the new flare.  So…we “bagged” the fender in preparation for the “pour foam” treatment.  We then filled the bag with the liquid foam and allowed it to cure and expand with a little help from our heat source (it was pretty chilly in No Ca when we were doing this).
We followed the same procedure on the other side as well and had a nice, aggressive look from up front. Now, if you remember, the new rear quarter panels did not fit well and there was a 1 inch gap at the rear of the new flare. So…we “bagged” the fender in preparation for the “pour foam” treatment. We then filled the bag with the liquid foam and allowed it to cure and expand with a little help from our heat source (it was pretty chilly in No Ca when we were doing this).
0 2011/08/15 19:24:44 listerjag
with a good fit using the cloth, we applied the vinylester resin to permanently laminate the carbon skin to the body.  Now it was finally staring to look like all of our work would pay off!
with a good fit using the cloth, we applied the vinylester resin to permanently laminate the carbon skin to the body. Now it was finally staring to look like all of our work would pay off!
0 2011/08/15 19:25:47 listerjag
Once happy with the shape (after LOTS of sanding and bodywork), we then trimmed a nice single piece of carbon fiber cloth to fit the new fender.
0 2011/08/15 19:25:47 listerjag
Our goal over the past several weekends was to finish the rough shape of the fenders and then cover the body with one final layer of carbon fiber to give it strength.

First step was to work on and develop the front fender shape and integrate the large flare into the overall shape of the car.  We wanted a wide look without disruption the classic profile of the Lister/Jag style.
Our goal over the past several weekends was to finish the rough shape of the fenders and then cover the body with one final layer of carbon fiber to give it strength. First step was to work on and develop the front fender shape and integrate the large flare into the overall shape of the car. We wanted a wide look without disruption the classic profile of the Lister/Jag style.
0 2011/08/15 19:25:47 listerjag


Top
Jaguar Forums - Jaguar Enthusiasts Forum
  • Contact Us
  • FAQ
  • Archive
  • Advertising
  • Cookie Policy
  • Privacy Statement
  • Terms of Service
  • Your Privacy Choices
  • Manage Preferences

© 2026 MH Sub I, LLC dba Internet Brands

Follow Us        


When you click on links to various merchants on this site and make a purchase, this can result in this site earning a commission. Affiliate programs and affiliations include, but are not limited to, the eBay Partner Network.