Jaguar Forums - Jaguar Enthusiasts Forum
  • LOG IN
  • REGISTER
  • Forums
    • General Jaguar Forums
      • New Member Area - Intro a MUST
      • Jaguar Forums Feedback & Suggestion Center
      • General Tech Help
    • Jaguar Models ( Current )
      • XF (X260)
      • F-Type ( X152 )
      • XE ( X760 )
      • E-Pace
      • F-Pace (X761) / C-X17
      • I-Pace EV
    • Jaguar Models ( Modern )
      • XF and XFR ( X250 )
      • XJ ( X351 )
      • X-Type ( X400 )
      • S-Type / S type R Supercharged V8 ( X200 )
      • XJ XJ6 / XJ8 / XJR ( X350 & X358 )
      • XJ XJ8 / XJR ( X308 )
      • XJ XJ12 ( X305 )
      • XJ XJ6 / XJR6 ( X300 )
      • XK8 / XKR ( X100 )
      • XK / XKR ( X150 )
    • Jaguar Models ( Classics )
      • Mark V - X 420G
      • MKI / MKII S type 240 340 & Daimler
      • XK120 XK140 XK150
      • E type ( XK-E )
      • XJ6 & XJ12 Series I, II & III
      • XJS ( X27 )
      • XJ40 ( XJ81 )
      • XKSS
      • XJ220
    • Other Jaguars
      • Other Jaguar Models / Concepts / Replicas
    • Diesel variants
      • Diesel variants - All models
    • Non Jaguar vehicles
      • Non-Jaguar Vehicles
    • Brand Review
      • Jaguar Press release
      • Jaguar Customer Relationship Centre
      • Jaguar Engines & transmissions
      • Wheels / Tires, Suspension & handling
      • Interior
      • Exterior
      • Audio/Visual Electronics
      • Detailing / Car care
      • Motorsports
    • Jaguar Classifieds
      • Marketplace
      • PRIVATE For Sale / Trade or Buy Classifieds
      • VENDOR 'For Sale' Classifieds
    • Regional
      • US Northeast
      • US Central
      • US Southwest
      • US Western
      • US Northwest
      • US Midwest
      • US Mid Atlantic
      • US Lower Atlantic
      • US Southern Midwest
      • Canada
      • Mexico, South America
      • UK & Eire
      • Europe
      • Australia - Queensland
      • Australia - New South Wales / ACT
      • Australia - Victoria / Tasmania
      • Australia - Western
      • Australia - South / NT
      • New Zealand
      • Other Areas
    • Official Site Sponsors
      • VENDOR Threads
    • General Interest / History
      • Sights N Sounds
      • Photography
      • Forum announcement archives / Forum History
      • Jaguarforums Merchandise
      • Memorial Section
  • News
  • Marketplace
    • Vendor Directory
    • Become a Vendor
    • Member Marketplace
    • Vendor Marketplace
    • Site Store
  • New Posts
  • Tools
    • Car Payment Calculator
    • Tire Rim Calculator
    • Vin Decoder
    • Recalls
    • Technical Service Bulletins (TSBs)
    • Members List
    • Live Feed
  • Gallery
  • View Dark Mode
    • Please register or login to enable Dark Mode.
  • Log In
  • Register
Jaguar Forums - Jaguar Enthusiasts Forum
    • Threads
      • Advanced
Dark Mode

Please register or login to enable Dark Mode.

Log In

Forgot your Password?

By logging into your account, you agree to our Terms of Use and Privacy Policy, and to the use of cookies as described therein.
or
 
  • Recent
  • Commented
  • Albums
  • My Pictures

Fuel Tank Leak Repair and Rust Aversion Paint applied

Rob Evenson
March 13, 2014
 18
 0
Description:
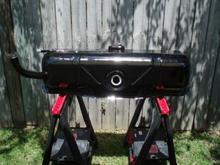
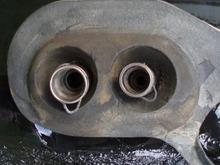
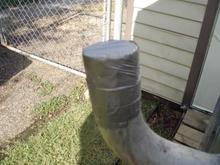
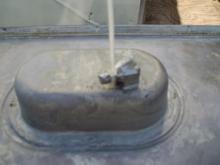
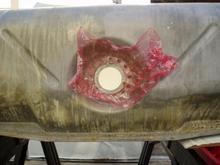
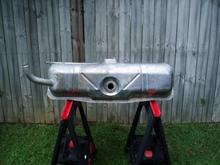
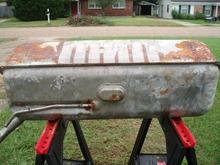
This album is about repairing a leak on the fuel tank and then painting the tank with a rust aversion product. I did this work about two years ago when I noticed a fuel odor and was loosing fuel at a fairly rapid rate according to the guage. I live in South Eastern United States and the humidity and rainfall is extreme. Additionally, there is no garage for the vehicle and these vehicle, especially the earlier MY's are prone to leaky boots from a variety of intrusion points. I intentionally posted many pictures of the rusted tank just to scare the bejeebers out of those procrastinating fixing that pesky boot leak. :) Every picture has a description with it.

Read more ยป
Sort:
Default
  • Default
  • Most Recent
Ready to go back in.
0 2014/03/13 21:14:22 Rob Evenso
Getting ready to put the tank back in the vehicle, ensure the fuel line clips are in place before you put the tank in.  Note the orientation of the clips, they are in the locked position.  It is darn near impossible to get the clips on the tank after the tank has been installed.
Getting ready to put the tank back in the vehicle, ensure the fuel line clips are in place before you put the tank in. Note the orientation of the clips, they are in the locked position. It is darn near impossible to get the clips on the tank after the tank has been installed.
0 2014/03/13 21:14:22 Rob Evenso
After several coats of rust aversion paint.
0 2014/03/13 21:14:22 Rob Evenso
After several coats of rust aversion paint.
0 2014/03/13 21:16:06 Rob Evenso
After several coats of rust aversion paint.
0 2014/03/13 21:16:06 Rob Evenso
After the first application of rust aversion paint, I applied a layer of fiberglass on the bottom of the tank in order to provide an extra barrier from moisture in the event the boot sprung another leak. The fiberglass is painted onto the surface.  You simply keep applying the rust aversion paint until there is full coverage over the fiberglass.  

It is important to mention to use only one layer of fiberglass.  The reason is after the paint is applied the thickness increases and if any additional layers of fiberglass is applied, it will be a real challenge to get the tank back into it's allotted space.  The space is very tight, even with the single layer, it was difficult to get the tank back in.
After the first application of rust aversion paint, I applied a layer of fiberglass on the bottom of the tank in order to provide an extra barrier from moisture in the event the boot sprung another leak. The fiberglass is painted onto the surface. You simply keep applying the rust aversion paint until there is full coverage over the fiberglass. It is important to mention to use only one layer of fiberglass. The reason is after the paint is applied the thickness increases and if any additional layers of fiberglass is applied, it will be a real challenge to get the tank back into it's allotted space. The space is very tight, even with the single layer, it was difficult to get the tank back in.
0 2014/03/13 21:16:06 Rob Evenso
Opening seal - duct tape with tie strap
0 2014/03/13 21:19:08 Rob Evenso
Opening seal - duct tape with tie strap
0 2014/03/13 21:19:08 Rob Evenso
Opening seal - duct tape with tie strap
0 2014/03/13 21:19:08 Rob Evenso
Opening seal - duct tape with tie strap
0 2014/03/13 21:20:31 Rob Evenso
The interior of the tank needs to cleaned as well.  This pic and the following few demonstrate how to seal the various openings on the tank in order to use the rust removal solution on the interior of the tank.  In this pic, for the sending unit opening, cut a piece of cardboard that has the same thickness of the sending unit, I had to use two or three pieces to get the desired thickness.  Place a piece of plastic wrap first to protect the cardboard, then insert the cardboard, followed by the retaining ring used for the sending unit.  This opening is the one used for adding the solution and rinsing the interior of the tank.
The interior of the tank needs to cleaned as well. This pic and the following few demonstrate how to seal the various openings on the tank in order to use the rust removal solution on the interior of the tank. In this pic, for the sending unit opening, cut a piece of cardboard that has the same thickness of the sending unit, I had to use two or three pieces to get the desired thickness. Place a piece of plastic wrap first to protect the cardboard, then insert the cardboard, followed by the retaining ring used for the sending unit. This opening is the one used for adding the solution and rinsing the interior of the tank.
0 2014/03/13 21:20:31 Rob Evenso
Another close-up to tank bottom after initial cleaning.  Can you see the leak culprit?  It's directly above the drain hole. I sealed the hole with Quick Steel putty, letting it set, then sanding it smooth.  I applied the Quick Steel to several other areas for suspect weak spots.
Another close-up to tank bottom after initial cleaning. Can you see the leak culprit? It's directly above the drain hole. I sealed the hole with Quick Steel putty, letting it set, then sanding it smooth. I applied the Quick Steel to several other areas for suspect weak spots.
0 2014/03/13 21:20:31 Rob Evenso
Tank after clean up and lots of sanding, then more rust removal solution, then more sanding and another round of solution followed by a clean rinse.
0 2014/03/13 21:22:37 Rob Evenso
Close-up of bottom, drain plug to the left.  When the tank is in the vehicle the plug is to the right of the feed/return lines when looking up from under the vehicle.  There is only one way to get to the lines, get under the vehicle from the drivers side, back far enough to view over the top of the differential.  You'll see the fuel lines, each with their respective retaining clips.  Reach up and turn the clips counter clock-wise a quarter turn.  DON'T YANK THEM OUT!!! Leave them attached to the tank.
Close-up of bottom, drain plug to the left. When the tank is in the vehicle the plug is to the right of the feed/return lines when looking up from under the vehicle. There is only one way to get to the lines, get under the vehicle from the drivers side, back far enough to view over the top of the differential. You'll see the fuel lines, each with their respective retaining clips. Reach up and turn the clips counter clock-wise a quarter turn. DON'T YANK THEM OUT!!! Leave them attached to the tank.
0 2014/03/13 21:22:37 Rob Evenso
Tank out of vehicle, front and top-facing sides.
0 2014/03/13 21:22:37 Rob Evenso
Tank out of vehicle, front and bottom-facing sides.
0 2014/03/13 21:23:28 Rob Evenso
Tank out of vehicle, bottom-facing side.
0 2014/03/13 21:23:28 Rob Evenso
Tank out of vehicle, rear-facing side.
0 2014/03/13 21:23:28 Rob Evenso
 

Top
Jaguar Forums - Jaguar Enthusiasts Forum
  • Contact Us
  • FAQ
  • Archive
  • Advertising
  • Cookie Policy
  • Privacy Statement
  • Terms of Service
  • Your Privacy Choices
  • Manage Preferences

© 2026 MH Sub I, LLC dba Internet Brands

Follow Us        


When you click on links to various merchants on this site and make a purchase, this can result in this site earning a commission. Affiliate programs and affiliations include, but are not limited to, the eBay Partner Network.