Jaguar Forums - Jaguar Enthusiasts Forum
  • LOG IN
  • REGISTER
  • Forums
    • General Jaguar Forums
      • New Member Area - Intro a MUST
      • Jaguar Forums Feedback & Suggestion Center
      • General Tech Help
    • Jaguar Models ( Current )
      • XF (X260)
      • F-Type ( X152 )
      • XE ( X760 )
      • E-Pace
      • F-Pace (X761) / C-X17
      • I-Pace EV
    • Jaguar Models ( Modern )
      • XF and XFR ( X250 )
      • XJ ( X351 )
      • X-Type ( X400 )
      • S-Type / S type R Supercharged V8 ( X200 )
      • XJ XJ6 / XJ8 / XJR ( X350 & X358 )
      • XJ XJ8 / XJR ( X308 )
      • XJ XJ12 ( X305 )
      • XJ XJ6 / XJR6 ( X300 )
      • XK8 / XKR ( X100 )
      • XK / XKR ( X150 )
    • Jaguar Models ( Classics )
      • Mark V - X 420G
      • MKI / MKII S type 240 340 & Daimler
      • XK120 XK140 XK150
      • E type ( XK-E )
      • XJ6 & XJ12 Series I, II & III
      • XJS ( X27 )
      • XJ40 ( XJ81 )
      • XKSS
      • XJ220
    • Other Jaguars
      • Other Jaguar Models / Concepts / Replicas
    • Diesel variants
      • Diesel variants - All models
    • Non Jaguar vehicles
      • Non-Jaguar Vehicles
    • Brand Review
      • Jaguar Press release
      • Jaguar Customer Relationship Centre
      • Jaguar Engines & transmissions
      • Wheels / Tires, Suspension & handling
      • Interior
      • Exterior
      • Audio/Visual Electronics
      • Detailing / Car care
      • Motorsports
    • Jaguar Classifieds
      • Marketplace
      • PRIVATE For Sale / Trade or Buy Classifieds
      • VENDOR 'For Sale' Classifieds
    • Regional
      • US Northeast
      • US Central
      • US Southwest
      • US Western
      • US Northwest
      • US Midwest
      • US Mid Atlantic
      • US Lower Atlantic
      • US Southern Midwest
      • Canada
      • Mexico, South America
      • UK & Eire
      • Europe
      • Australia - Queensland
      • Australia - New South Wales / ACT
      • Australia - Victoria / Tasmania
      • Australia - Western
      • Australia - South / NT
      • New Zealand
      • Other Areas
    • Official Site Sponsors
      • VENDOR Threads
    • General Interest / History
      • Sights N Sounds
      • Photography
      • Forum announcement archives / Forum History
      • Jaguarforums Merchandise
      • Memorial Section
  • News
  • Marketplace
    • Vendor Directory
    • Become a Vendor
    • Member Marketplace
    • Vendor Marketplace
    • Site Store
  • New Posts
  • Tools
    • Car Payment Calculator
    • Tire Rim Calculator
    • Vin Decoder
    • Recalls
    • Technical Service Bulletins (TSBs)
    • Members List
    • Live Feed
  • Gallery
  • View Dark Mode
    • Please register or login to enable Dark Mode.
  • Log In
  • Register
Jaguar Forums - Jaguar Enthusiasts Forum
    • Threads
      • Advanced
Dark Mode

Please register or login to enable Dark Mode.

Log In

Forgot your Password?

By logging into your account, you agree to our Terms of Use and Privacy Policy, and to the use of cookies as described therein.
or
 
  • Recent
  • Commented
  • Albums
  • My Pictures

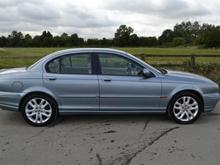
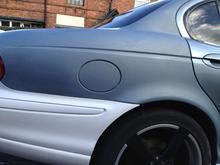
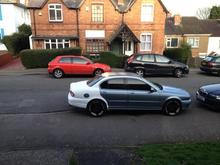
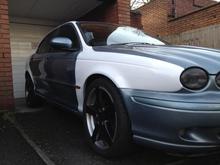
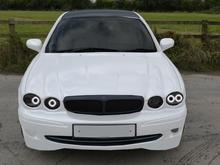
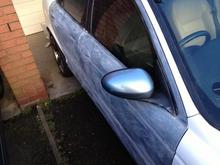
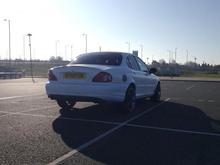
Blue X-Type becomes White

v6j.co.uk
February 27, 2014
 30
 5
Description:
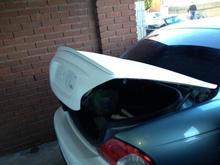
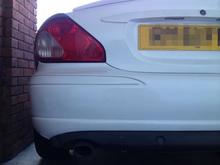
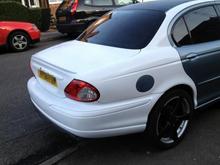
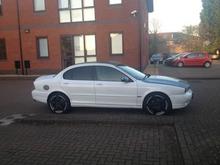
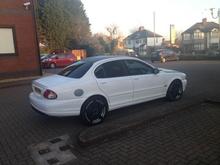
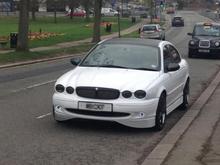
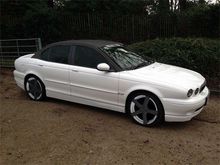
A log of me painting my blue X-Type white, plus a few other tweaks that I am sure you will notice along the way (mostly the black bits such as windows, front and rear lights, roof and new 18" wheel spokes).

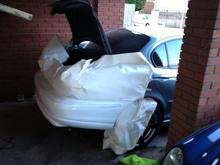
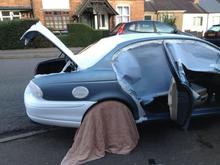
The challenge was to do it for a budget, so the paint of choice was Poundland Paint. Yes I did just say that! New colour code PL-White ;)

I had previously achieved a perfect respray of my MGF from blue to white funnily enough, using those PL paints. The cost was certainly less than £50. The Jaguar would be more though...

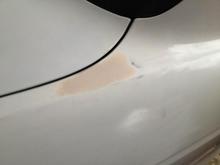
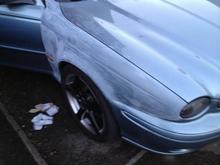
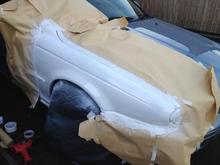
Note that for each panel, whether it be a bumper, or a quarter, or a door, or a wing, it takes 7 cans of 300ML to get a coverage that can later withstand 120Grade W D rubbing :) The stuff blows around all over the place.

Read more »
Sort:
Default
  • Default
  • Most Recent
Exterior on the day of purchase.
0 2014/02/27 08:17:33 v6j.co.uk
Interior on the day of purchase.
0 2014/02/27 08:17:33 v6j.co.uk
Rubbed down the bumper, then wiped it down with Poundland Eco Spirit, then masked the area off with PL masking tape and PL wall backing paper.  I soon switched to parcel paper as this was lighter, easier to shape and came with an extra 25% per roll per £ :)
Rubbed down the bumper, then wiped it down with Poundland Eco Spirit, then masked the area off with PL masking tape and PL wall backing paper. I soon switched to parcel paper as this was lighter, easier to shape and came with an extra 25% per roll per £ :)
0 2014/02/27 08:23:13 v6j.co.uk
A bit of paint went on, then a blast with the heat gun, then more spraying and so this went on.  No sanding during the process and a sheen effect started to soon appear (quite surprising actually).
A bit of paint went on, then a blast with the heat gun, then more spraying and so this went on. No sanding during the process and a sheen effect started to soon appear (quite surprising actually).
0 2014/02/27 08:23:13 v6j.co.uk
Took the masking off. The picture doesn't show it but it was getting dark so I was happy with today's work.
0 2014/02/27 08:23:13 v6j.co.uk
Day 2 - Time to degrease, rub down with 600 grade w d, wipe down and mask.  Another panel done. Another 7 cans of spray paint used.
Day 2 - Time to degrease, rub down with 600 grade w d, wipe down and mask. Another panel done. Another 7 cans of spray paint used.
0 2014/02/27 08:34:30 v6j.co.uk
Starting to present the look I am aiming for
0 2014/02/27 08:34:30 v6j.co.uk
Day 2 and already I can take arty pictures of the new paintwork :)
0 2014/02/27 08:34:30 v6j.co.uk
Day 3 - Rear offside quarter and roof line painting time.  This shows the rubbed and wiped down surface.
Day 3 - Rear offside quarter and roof line painting time. This shows the rubbed and wiped down surface.
0 2014/02/27 08:40:52 v6j.co.uk
Day 3 - Masked off (easier to do the petrol cover later due to the edging of the masking tape covering the rubber insert nicely.
0 2014/02/27 08:40:52 v6j.co.uk
Day 3 - Another successful day spraying. Note the 18" wheels that I carbon fiber wrapped. Very nice stuff that carbon fiber wrapping.  Note the side windows were tinted by me, the rear was too fiddly so cost me £50 which was reasonable.  Also you may see the carbon fiber roof. This looks great, but it was temporary, during the white painting, and I will do this gloss black later :)
Day 3 - Another successful day spraying. Note the 18" wheels that I carbon fiber wrapped. Very nice stuff that carbon fiber wrapping. Note the side windows were tinted by me, the rear was too fiddly so cost me £50 which was reasonable. Also you may see the carbon fiber roof. This looks great, but it was temporary, during the white painting, and I will do this gloss black later :)
0 2014/02/27 08:40:52 v6j.co.uk
Day 4 - Weather not too great, but time to see to a couple of dents which got me money off the purchase price :)
0 2014/02/27 08:50:41 v6j.co.uk
Day 4 - Body filling a couple of dents went superbly well.  Using 120 Grade once dried to smooth, then to 600, then prime and then white again.
Day 4 - Body filling a couple of dents went superbly well. Using 120 Grade once dried to smooth, then to 600, then prime and then white again.
0 2014/02/27 08:50:41 v6j.co.uk
Day 4 - No spraying achieved apart from covering over the body fillers.
0 2014/02/27 08:50:41 v6j.co.uk
Day 4 - Getting rid of nasty dinks the easy way.
0 2014/02/27 08:53:02 v6j.co.uk
Day 4 - After the dinks were done a nice coat to finish this stage.
0 2014/02/27 08:58:12 v6j.co.uk
My photoshop mockup of what it will look like.
0 2014/02/27 14:34:20 v6j.co.uk
Day 5 - Front wing being rubbed down. After wiping this state off with Eco Spirit, the surface looks a nice consistent matte finish.
0 2014/02/28 08:31:51 v6j.co.uk
Day 5 - Masked up and a few coats later.
0 2014/02/28 08:31:51 v6j.co.uk
Day 5 - Wow to the shiny finish already.
0 2014/02/28 08:31:51 v6j.co.uk
Day 5 - Paint crept past the masking onto the bumper. Not a problem, this will be white too after I have taken it off, to adjust the styling of the headlights and install Angel Eyes! Oh yes...
0 2014/02/28 08:34:10 v6j.co.uk
Quick photoshop mockup knockup to help position the angel eyes.  

Ideal positioning on the left, but more realistic configuration on the right, due to where to attach the one in full beam pod.

These Angel eyes are £9.99 for 2 from China (no customs) and consist of about 90 LEDs each or is it 60 I cannot remember.  They make for VERY nice DRL or sidelights.  Testing 2 off a 9V fills the kitchen with light!
Quick photoshop mockup knockup to help position the angel eyes. Ideal positioning on the left, but more realistic configuration on the right, due to where to attach the one in full beam pod. These Angel eyes are £9.99 for 2 from China (no customs) and consist of about 90 LEDs each or is it 60 I cannot remember. They make for VERY nice DRL or sidelights. Testing 2 off a 9V fills the kitchen with light!
2 2014/02/28 08:44:05 v6j.co.uk
Day 6 - More rubbing down to do
0 2014/03/14 17:20:45 v6j.co.uk
Day 6 - Phew all done for rubbing down the doors
0 2014/03/14 17:20:45 v6j.co.uk
Doors painted, so just the sideskirt for this side to do.  Looking good as I came back to the car from the carboot sale.
Doors painted, so just the sideskirt for this side to do. Looking good as I came back to the car from the carboot sale.
0 2014/03/14 17:20:45 v6j.co.uk
Doors now done on the driver's side.  Looking encouraging
Doors now done on the driver's side. Looking encouraging
0 2014/03/14 17:25:48 v6j.co.uk
After the front bumper (now that was hard work) parked at the office
0 2014/03/14 17:25:48 v6j.co.uk
Hard work starting to appear as a good idea :)
0 2014/03/14 17:25:48 v6j.co.uk
Latest pic taken today now all paint is on.

I only things I have photoshopped here are the lower front bumper extensions and side skirts, so I can see how the next stage will look, Plus the wing mirrors since these are still blue :)

I will be using acrylic for the body kit, and epoxy & filler to attach smoothly, but I will need to construct some bracket-like supports to keep these little additions in place.
Latest pic taken today now all paint is on. I only things I have photoshopped here are the lower front bumper extensions and side skirts, so I can see how the next stage will look, Plus the wing mirrors since these are still blue :) I will be using acrylic for the body kit, and epoxy & filler to attach smoothly, but I will need to construct some bracket-like supports to keep these little additions in place.
3 2014/04/02 20:01:20 v6j.co.uk
Photoshopped; Toying around with the idea of doing the whole roof black for a bit, see how it looks.
0 2014/07/16 17:43:37 v6j.co.uk
 

Top
Jaguar Forums - Jaguar Enthusiasts Forum
  • Contact Us
  • FAQ
  • Archive
  • Advertising
  • Cookie Policy
  • Privacy Statement
  • Terms of Service
  • Your Privacy Choices
  • Manage Preferences

© 2026 MH Sub I, LLC dba Internet Brands

Follow Us        


When you click on links to various merchants on this site and make a purchase, this can result in this site earning a commission. Affiliate programs and affiliations include, but are not limited to, the eBay Partner Network.