Jaguar Forums - Jaguar Enthusiasts Forum
  • LOG IN
  • REGISTER
  • Forums
    • General Jaguar Forums
      • New Member Area - Intro a MUST
      • Jaguar Forums Feedback & Suggestion Center
      • General Tech Help
    • Jaguar Models ( Current )
      • XF (X260)
      • F-Type ( X152 )
      • XE ( X760 )
      • E-Pace
      • F-Pace (X761) / C-X17
      • I-Pace EV
    • Jaguar Models ( Modern )
      • XF and XFR ( X250 )
      • XJ ( X351 )
      • X-Type ( X400 )
      • S-Type / S type R Supercharged V8 ( X200 )
      • XJ XJ6 / XJ8 / XJR ( X350 & X358 )
      • XJ XJ8 / XJR ( X308 )
      • XJ XJ12 ( X305 )
      • XJ XJ6 / XJR6 ( X300 )
      • XK8 / XKR ( X100 )
      • XK / XKR ( X150 )
    • Jaguar Models ( Classics )
      • Mark V - X 420G
      • MKI / MKII S type 240 340 & Daimler
      • XK120 XK140 XK150
      • E type ( XK-E )
      • XJ6 & XJ12 Series I, II & III
      • XJS ( X27 )
      • XJ40 ( XJ81 )
      • XKSS
      • XJ220
    • Other Jaguars
      • Other Jaguar Models / Concepts / Replicas
    • Diesel variants
      • Diesel variants - All models
    • Non Jaguar vehicles
      • Non-Jaguar Vehicles
    • Brand Review
      • Jaguar Press release
      • Jaguar Customer Relationship Centre
      • Jaguar Engines & transmissions
      • Wheels / Tires, Suspension & handling
      • Interior
      • Exterior
      • Audio/Visual Electronics
      • Detailing / Car care
      • Motorsports
    • Jaguar Classifieds
      • Marketplace
      • PRIVATE For Sale / Trade or Buy Classifieds
      • VENDOR 'For Sale' Classifieds
    • Regional
      • US Northeast
      • US Central
      • US Southwest
      • US Western
      • US Northwest
      • US Midwest
      • US Mid Atlantic
      • US Lower Atlantic
      • US Southern Midwest
      • Canada
      • Mexico, South America
      • UK & Eire
      • Europe
      • Australia - Queensland
      • Australia - New South Wales / ACT
      • Australia - Victoria / Tasmania
      • Australia - Western
      • Australia - South / NT
      • New Zealand
      • Other Areas
    • Official Site Sponsors
      • VENDOR Threads
    • General Interest / History
      • Sights N Sounds
      • Photography
      • Forum announcement archives / Forum History
      • Jaguarforums Merchandise
      • Memorial Section
  • News
  • Marketplace
    • Vendor Directory
    • Become a Vendor
    • Member Marketplace
    • Vendor Marketplace
    • Site Store
  • New Posts
  • Tools
    • Car Payment Calculator
    • Tire Rim Calculator
    • Vin Decoder
    • Recalls
    • Technical Service Bulletins (TSBs)
    • Members List
    • Live Feed
  • Gallery
  • View Dark Mode
    • Please register or login to enable Dark Mode.
  • Log In
  • Register
Jaguar Forums - Jaguar Enthusiasts Forum
    • Threads
      • Advanced
Dark Mode

Please register or login to enable Dark Mode.

Log In

Forgot your Password?

By logging into your account, you agree to our Terms of Use and Privacy Policy, and to the use of cookies as described therein.
or
 
  • Recent
  • Commented
  • Albums
  • My Pictures

1 - The Beginning

listerjag
May 11, 2011
 11
 1
Description:
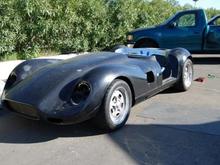
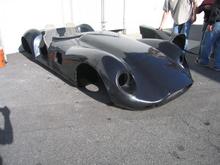
This all started as a quick trip to check out the Lucra version of the Lister. Little did I know that it would result in embarking on a 4 year project that is still not quite finished!

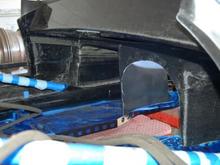
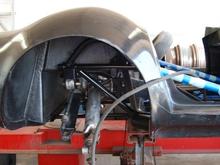
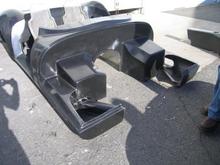
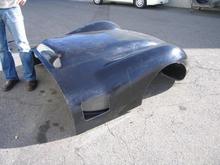
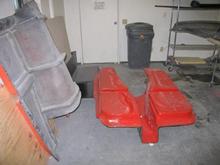
The initial portion of the build was done at the Lucra shop mainly because it would be much easier to ship the frame and chassis as one piece rather than separate pieces. Then, because it would have been winter on my coast when we were going to be doing all of the composite work, we moved the car to my brothers house in No. California where we would continue on the project through the winter.

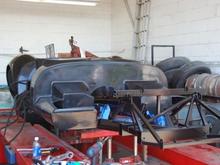
We met for 4 and 5 day weekends, working 12 to 14 hours per day to get the car ready to ultimately ship to my place on the East Coast.

So, here is the very beginning - each photo has a brief description of what we were doing or what the photo represents.

Read more »
Sort:
Default
  • Default
  • Most Recent
After 4 very long days on the left coast, this is the rolling chassis with a body.  The wheels are borrowed as PS Engineering had not yet finished making the custom offsets and widths I had sent to them earlier.   This is the original shape of the "narrow body".  the final version is MUCH wider!
After 4 very long days on the left coast, this is the rolling chassis with a body. The wheels are borrowed as PS Engineering had not yet finished making the custom offsets and widths I had sent to them earlier. This is the original shape of the "narrow body". the final version is MUCH wider!
0 2011/05/11 18:49:51 listerjag
here it is from the back.  it is now basically a unibody as the carbon fiber body and steel frame have been epoxied and fastened together.  Only the hood, doors and trunk lid can be removed at this point.
here it is from the back. it is now basically a unibody as the carbon fiber body and steel frame have been epoxied and fastened together. Only the hood, doors and trunk lid can be removed at this point.
0 2011/05/11 18:52:38 listerjag
Once the rear portion of the body/chassis bonding was completed, everyone participated in the hood mounting ceremony!  This was a critical step as it would determine the alignment of the largest panel of the car.  The more hands the merrier!  So, I did the honors and drilled the ever-so-critical hood hinge mounting holes.  Felt good to get the hood on because it actually started looking like a car…sort of anyway
Once the rear portion of the body/chassis bonding was completed, everyone participated in the hood mounting ceremony! This was a critical step as it would determine the alignment of the largest panel of the car. The more hands the merrier! So, I did the honors and drilled the ever-so-critical hood hinge mounting holes. Felt good to get the hood on because it actually started looking like a car…sort of anyway
0 2011/05/11 18:54:36 listerjag
All sections where the carbon fiber body touched the frame were screwed, glued, and wrapped with carbon fiber lay-up to create a “uni-body” type of construction:
0 2011/05/11 18:55:49 listerjag
While waiting for the glue and resin to cure, we started putting the suspension and rear end into position.  Here, the differential and half shafts have just been installed.  the next step is the lateral links, trailing links and toe rods.
While waiting for the glue and resin to cure, we started putting the suspension and rear end into position. Here, the differential and half shafts have just been installed. the next step is the lateral links, trailing links and toe rods.
0 2011/05/11 18:56:39 listerjag
The entire body weighed in at about 120 lbs.  Pretty cool.  Of course, it only looked like this until it met my sawsall!!  Next we moved the body to the Lucra shop in Oceanside CA where, with their help, my brother and I started bonding the body to the frame.  After cutting off all of the mold flashings and cutting the body to slide down over the frame, we were able to begin the bonding process.  Because of our limited time (both of us had to be at work on Monday) we worked very long hours and typically locked up well after the Lucra folks had left at night.
The entire body weighed in at about 120 lbs. Pretty cool. Of course, it only looked like this until it met my sawsall!! Next we moved the body to the Lucra shop in Oceanside CA where, with their help, my brother and I started bonding the body to the frame. After cutting off all of the mold flashings and cutting the body to slide down over the frame, we were able to begin the bonding process. Because of our limited time (both of us had to be at work on Monday) we worked very long hours and typically locked up well after the Lucra folks had left at night.
0 2011/05/11 18:58:38 listerjag
We couldn't resist and had to "mock up" what the car would look like some day.  it was amazing how light these large body panels were.
We couldn't resist and had to "mock up" what the car would look like some day. it was amazing how light these large body panels were.
0 2011/05/11 19:01:08 listerjag
This is the rear body section out of the mold and with most of the mold flashing removed.
0 2011/05/11 19:02:26 listerjag
And a few shots of my “virgin body” before I got my mitts (and my sawsall) on it.  The hood shell:
And a few shots of my “virgin body” before I got my mitts (and my sawsall) on it. The hood shell:
0 2011/05/11 19:03:12 listerjag
Here is the mold used to lay up the carbon fiber center tunnel.  this will be bonded into the chassis much later in the saga.
Here is the mold used to lay up the carbon fiber center tunnel. this will be bonded into the chassis much later in the saga.
0 2011/05/11 19:04:18 listerjag
My brother and I toured the facility that built the bodies.  Very cool place.  Here are a few shots of the facility and one of the body molds.  The insulated thing in back is their autoclave for the high dollar piece.  this is the actual mold for the rear portion of the body.
My brother and I toured the facility that built the bodies. Very cool place. Here are a few shots of the facility and one of the body molds. The insulated thing in back is their autoclave for the high dollar piece. this is the actual mold for the rear portion of the body.
1 2011/05/11 19:05:13 listerjag
 

Top
Jaguar Forums - Jaguar Enthusiasts Forum
  • Contact Us
  • FAQ
  • Archive
  • Advertising
  • Cookie Policy
  • Privacy Statement
  • Terms of Service
  • Your Privacy Choices
  • Manage Preferences

© 2026 MH Sub I, LLC dba Internet Brands

Follow Us        


When you click on links to various merchants on this site and make a purchase, this can result in this site earning a commission. Affiliate programs and affiliations include, but are not limited to, the eBay Partner Network.