Jaguar Forums - Jaguar Enthusiasts Forum
  • LOG IN
  • REGISTER
  • Forums
    • General Jaguar Forums
      • New Member Area - Intro a MUST
      • Jaguar Forums Feedback & Suggestion Center
      • General Tech Help
    • Jaguar Models ( Current )
      • XF (X260)
      • F-Type ( X152 )
      • XE ( X760 )
      • E-Pace
      • F-Pace (X761) / C-X17
      • I-Pace EV
    • Jaguar Models ( Modern )
      • XF and XFR ( X250 )
      • XJ ( X351 )
      • X-Type ( X400 )
      • S-Type / S type R Supercharged V8 ( X200 )
      • XJ XJ6 / XJ8 / XJR ( X350 & X358 )
      • XJ XJ8 / XJR ( X308 )
      • XJ XJ12 ( X305 )
      • XJ XJ6 / XJR6 ( X300 )
      • XK8 / XKR ( X100 )
      • XK / XKR ( X150 )
    • Jaguar Models ( Classics )
      • Mark V - X 420G
      • MKI / MKII S type 240 340 & Daimler
      • XK120 XK140 XK150
      • E type ( XK-E )
      • XJ6 & XJ12 Series I, II & III
      • XJS ( X27 )
      • XJ40 ( XJ81 )
      • XKSS
      • XJ220
    • Other Jaguars
      • Other Jaguar Models / Concepts / Replicas
    • Diesel variants
      • Diesel variants - All models
    • Non Jaguar vehicles
      • Non-Jaguar Vehicles
    • Brand Review
      • Jaguar Press release
      • Jaguar Customer Relationship Centre
      • Jaguar Engines & transmissions
      • Wheels / Tires, Suspension & handling
      • Interior
      • Exterior
      • Audio/Visual Electronics
      • Detailing / Car care
      • Motorsports
    • Jaguar Classifieds
      • Marketplace
      • PRIVATE For Sale / Trade or Buy Classifieds
      • VENDOR 'For Sale' Classifieds
    • Regional
      • US Northeast
      • US Central
      • US Southwest
      • US Western
      • US Northwest
      • US Midwest
      • US Mid Atlantic
      • US Lower Atlantic
      • US Southern Midwest
      • Canada
      • Mexico, South America
      • UK & Eire
      • Europe
      • Australia - Queensland
      • Australia - New South Wales / ACT
      • Australia - Victoria / Tasmania
      • Australia - Western
      • Australia - South / NT
      • New Zealand
      • Other Areas
    • Official Site Sponsors
      • VENDOR Threads
    • General Interest / History
      • Sights N Sounds
      • Photography
      • Forum announcement archives / Forum History
      • Jaguarforums Merchandise
      • Memorial Section
  • News
  • Marketplace
    • Vendor Directory
    • Become a Vendor
    • Member Marketplace
    • Vendor Marketplace
    • Site Store
  • New Posts
  • Tools
    • Car Payment Calculator
    • Tire Rim Calculator
    • Vin Decoder
    • Recalls
    • Technical Service Bulletins (TSBs)
    • Members List
    • Live Feed
  • Gallery
  • View Dark Mode
    • Please register or login to enable Dark Mode.
  • Log In
  • Register
Jaguar Forums - Jaguar Enthusiasts Forum
    • Threads
      • Advanced
Dark Mode

Please register or login to enable Dark Mode.

Log In

Forgot your Password?

By logging into your account, you agree to our Terms of Use and Privacy Policy, and to the use of cookies as described therein.
or
 
  • Recent
  • Commented
  • Albums
  • My Pictures

2 - Little nagging bits

listerjag
May 14, 2011
 9
 2
Description:
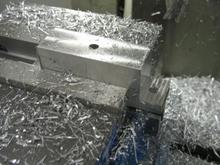
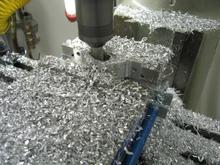
When undertaking a project like this, you continuously run into little "challenges" that make you realize how much easier it would be to buy a kit car (or better yet, just buy something already built!). So, here are two little nagging bits discovered early in the building that had to be addressed and resolved.

As with the first chapter below, each photo has a description of the task at hand and what i was trying to achieve at the time.

Read more »
Sort:
Most Recent
  • Default
  • Most Recent
The first step is to true up a block of aluminum, measure and drill mounting holes and cut the initial flanges.
0 2011/05/14 08:53:23 listerjag
During the first fit of the trunk lid, i discovered that the gas strut, while easily attached to the aluminum hinge, had no place to attach to the body.  Rather than bend up a kludgey metal tab, and since any "billet aluminum" parts are always revered by all, i decided to design and build a "simple" strut mount.  While a nice diversion from the true task at hand, like everything else i do, it took way more time than i thought!  After i made the sketches, i started with my little billet piece.
During the first fit of the trunk lid, i discovered that the gas strut, while easily attached to the aluminum hinge, had no place to attach to the body. Rather than bend up a kludgey metal tab, and since any "billet aluminum" parts are always revered by all, i decided to design and build a "simple" strut mount. While a nice diversion from the true task at hand, like everything else i do, it took way more time than i thought! After i made the sketches, i started with my little billet piece.
0 2011/05/14 08:53:23 listerjag
Of course the biggest test was to see if it actually worked the way it was intended.  I have learned that this is often NOT the case (as evident by my overflowing "scrap part" box).  However, it worked exactly as intended and i was able to scratch on very little task off of the list!
Of course the biggest test was to see if it actually worked the way it was intended. I have learned that this is often NOT the case (as evident by my overflowing "scrap part" box). However, it worked exactly as intended and i was able to scratch on very little task off of the list!
0 2011/05/14 08:52:43 listerjag
Fast-forwarding ahead several hours and here is the finished part compared with the design drawing (yes, it's a hand drafted drawing, my CAD system does not reside in the garage!).  Overall, pretty much exactly what i drew.
Fast-forwarding ahead several hours and here is the finished part compared with the design drawing (yes, it's a hand drafted drawing, my CAD system does not reside in the garage!). Overall, pretty much exactly what i drew.
0 2011/05/14 08:52:43 listerjag
Next, it is time to start shaping the bracket – some creative clamping is sometimes needed to keep from flinging the piece across the garage (ask me how I know that!!).  Then some lightening slots to keep it from weighing the back of the car down:
Next, it is time to start shaping the bracket – some creative clamping is sometimes needed to keep from flinging the piece across the garage (ask me how I know that!!). Then some lightening slots to keep it from weighing the back of the car down:
0 2011/05/14 08:52:43 listerjag
well, this is clearly out of order but, this is how it fit together before the bit of welding and grinding...somehow i have to figure out how to re-arrange photos in an album on this site!  LOL
well, this is clearly out of order but, this is how it fit together before the bit of welding and grinding...somehow i have to figure out how to re-arrange photos in an album on this site! LOL
0 2011/05/14 08:52:00 listerjag
after fitting the pieces together, a bit of welding, and a bit of grinding, the part looked like this:
0 2011/05/14 08:52:00 listerjag
Now that the trunk had hinges and a strut to hold it up, it needed a latch.  Not wanting to invent everything on this car, i cheated and raided the corvette parts bin for a late model electric latch assembly.  unfortunately, the "latch" part could in no way be mounted to the underside of the trunk lid.  that started another little "diversion"...  here is the factory trunk latch with the "adapter plate" i cut out of 16 gage steel.
Now that the trunk had hinges and a strut to hold it up, it needed a latch. Not wanting to invent everything on this car, i cheated and raided the corvette parts bin for a late model electric latch assembly. unfortunately, the "latch" part could in no way be mounted to the underside of the trunk lid. that started another little "diversion"... here is the factory trunk latch with the "adapter plate" i cut out of 16 gage steel.
0 2011/05/14 08:52:00 listerjag
and the finished part, primed and finally ready to be installed.

Quite a bit of work for something as simple as a trunk strut mounting and latch system!

I know, boring but it needed to be done!
and the finished part, primed and finally ready to be installed. Quite a bit of work for something as simple as a trunk strut mounting and latch system! I know, boring but it needed to be done!
2 2011/05/14 08:51:13 listerjag


Top
Jaguar Forums - Jaguar Enthusiasts Forum
  • Contact Us
  • FAQ
  • Archive
  • Advertising
  • Cookie Policy
  • Privacy Statement
  • Terms of Service
  • Your Privacy Choices
  • Manage Preferences

© 2026 MH Sub I, LLC dba Internet Brands

Follow Us        


When you click on links to various merchants on this site and make a purchase, this can result in this site earning a commission. Affiliate programs and affiliations include, but are not limited to, the eBay Partner Network.