Jaguar Forums - Jaguar Enthusiasts Forum
  • LOG IN
  • REGISTER
  • Forums
    • General Jaguar Forums
      • New Member Area - Intro a MUST
      • Jaguar Forums Feedback & Suggestion Center
      • General Tech Help
    • Jaguar Models ( Current )
      • XF (X260)
      • F-Type ( X152 )
      • XE ( X760 )
      • E-Pace
      • F-Pace (X761) / C-X17
      • I-Pace EV
    • Jaguar Models ( Modern )
      • XF and XFR ( X250 )
      • XJ ( X351 )
      • X-Type ( X400 )
      • S-Type / S type R Supercharged V8 ( X200 )
      • XJ XJ6 / XJ8 / XJR ( X350 & X358 )
      • XJ XJ8 / XJR ( X308 )
      • XJ XJ12 ( X305 )
      • XJ XJ6 / XJR6 ( X300 )
      • XK8 / XKR ( X100 )
      • XK / XKR ( X150 )
    • Jaguar Models ( Classics )
      • Mark V - X 420G
      • MKI / MKII S type 240 340 & Daimler
      • XK120 XK140 XK150
      • E type ( XK-E )
      • XJ6 & XJ12 Series I, II & III
      • XJS ( X27 )
      • XJ40 ( XJ81 )
      • XKSS
      • XJ220
    • Other Jaguars
      • Other Jaguar Models / Concepts / Replicas
    • Diesel variants
      • Diesel variants - All models
    • Non Jaguar vehicles
      • Non-Jaguar Vehicles
    • Brand Review
      • Jaguar Press release
      • Jaguar Customer Relationship Centre
      • Jaguar Engines & transmissions
      • Wheels / Tires, Suspension & handling
      • Interior
      • Exterior
      • Audio/Visual Electronics
      • Detailing / Car care
      • Motorsports
    • Jaguar Classifieds
      • Marketplace
      • PRIVATE For Sale / Trade or Buy Classifieds
      • VENDOR 'For Sale' Classifieds
    • Regional
      • US Northeast
      • US Central
      • US Southwest
      • US Western
      • US Northwest
      • US Midwest
      • US Mid Atlantic
      • US Lower Atlantic
      • US Southern Midwest
      • Canada
      • Mexico, South America
      • UK & Eire
      • Europe
      • Australia - Queensland
      • Australia - New South Wales / ACT
      • Australia - Victoria / Tasmania
      • Australia - Western
      • Australia - South / NT
      • New Zealand
      • Other Areas
    • Official Site Sponsors
      • VENDOR Threads
    • General Interest / History
      • Sights N Sounds
      • Photography
      • Forum announcement archives / Forum History
      • Jaguarforums Merchandise
      • Memorial Section
  • News
  • Marketplace
    • Vendor Directory
    • Become a Vendor
    • Member Marketplace
    • Vendor Marketplace
    • Site Store
  • New Posts
  • Tools
    • Car Payment Calculator
    • Tire Rim Calculator
    • Vin Decoder
    • Recalls
    • Technical Service Bulletins (TSBs)
    • Members List
    • Live Feed
  • Gallery
  • View Dark Mode
    • Please register or login to enable Dark Mode.
  • Log In
  • Register
Jaguar Forums - Jaguar Enthusiasts Forum
    • Threads
      • Advanced
Dark Mode

Please register or login to enable Dark Mode.

Log In

Forgot your Password?

By logging into your account, you agree to our Terms of Use and Privacy Policy, and to the use of cookies as described therein.
or
 
  • Recent
  • Commented
  • Albums
  • My Pictures

My Post Pictures

Grio
January 8, 2015
 24
 0
Sort:
Most Recent
  • Default
  • Most Recent
This is on the driver side in the vent area below the front bumper. Those 2 screw holes( 6MM) were where a bracket was that held this up in place. Looking for this bracket if someone has a dead xjr. I imagine it could be for several years.
0 2021/05/13 18:18:01 Grio
0 2021/05/13 18:17:36 Grio
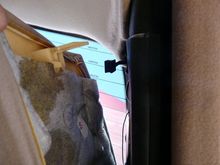
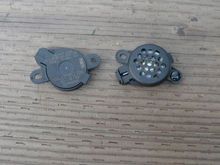
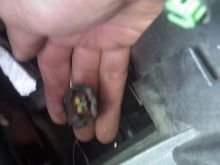
This is the pillar cover with that black squarish piece which is mounted to the body.It slides in a captive groove just below where that yellow plastic piece is protruding. Use a long needle nose to slide it in. Then the pieces snaps back onto the black mount.
0 2016/06/20 20:13:07 Grio
This is a front and back view of the beeper- speaker for the parking assist.
0 2016/06/20 20:11:16 Grio
0 2016/06/20 19:54:35 Grio
Vertical of back seat left on pivot points of 2004 xjr
0 2016/06/20 19:54:34 Grio
This is where you start your finger in the door moulding to get the rear pillar trim off. That tab there slides onto a plastic post mounted on the body
0 2016/06/20 19:54:31 Grio
This is where you can use a small hook to pull in the tabs on this bezel trim that is on the parcel shelf
0 2016/06/20 19:54:30 Grio
This is the strap that sits below the rear seat. Pull both- one on each side and the vertical seat back comes forward
0 2016/06/20 19:54:28 Grio
This is the rear pillar trim.The black part is on the body with a squarish part that is sort of like a zip tie and slides into a slot on the trim cover
0 2016/06/20 19:54:25 Grio
This is the parcel shelf that may have the sun shade built in. Unscrew the 3 plastic captive screws and pop the bezels out and it slides down
0 2016/06/20 19:54:24 Grio
These are where your speakers are if you have to remove them.
0 2016/06/20 19:54:23 Grio
These are called bezels I believe and  you'll need 3 that look like these if yours are sun baked an brittle
These are called bezels I believe and you'll need 3 that look like these if yours are sun baked an brittle
0 2016/06/20 19:54:21 Grio
There are actually 4 of these seat bottom keepers.You push the black lever and pull up on the seat.
0 2016/06/20 19:54:20 Grio
Seat back on pivots note seat belts still attached and the pull release straps in the foreground
0 2016/06/20 19:54:19 Grio
Rear pillar cover with seatbelt coming through. Seatbelt must be held to the front of the seat back vertical on installation.
0 2016/06/20 19:54:17 Grio
Correct pump and connector sitting atop the radiator prior to installation.This was a Hella
0 2016/04/17 10:12:59 Grio
This is the "correct pump and connector". It is a Hella. It is just sitting on top of the radiator prior to me installing it.
0 2016/04/17 10:10:39 Grio
This was the connector dealer parts guy didn't know existed that plugged into a Bosch auxiliary pump.
0 2016/04/17 10:09:01 Grio
This is the "correct" pump and what all the dealer information systems says is the correct connector. The other connector would have inserted into the bottom of the Bosch pump that I had bought.
0 2016/04/17 10:01:06 Grio
This is what my pump had been plugged into. Jag dealer had no knowledge( parts guy) of that connector existing. It was right next to the "correct" one on the wiring harness.
0 2016/04/17 09:59:20 Grio
0 2015/02/23 22:04:44 Grio
Place to plug in your OBD reader. Don't even have to pull off any covers to get to this. It is hidden back up in there so use a flashlight to see where to plug in.
0 2015/01/08 09:10:52 Grio
Place to plug in your OBD code reader in a 2004 XJR
0 2015/01/08 08:55:53 Grio

Top
Jaguar Forums - Jaguar Enthusiasts Forum
  • Contact Us
  • FAQ
  • Archive
  • Advertising
  • Cookie Policy
  • Privacy Statement
  • Terms of Service
  • Your Privacy Choices
  • Manage Preferences

© 2026 MH Sub I, LLC dba Internet Brands

Follow Us        


When you click on links to various merchants on this site and make a purchase, this can result in this site earning a commission. Affiliate programs and affiliations include, but are not limited to, the eBay Partner Network.