LOG IN
REGISTER
Forums
General Jaguar Forums
New Member Area - Intro a MUST
Jaguar Forums Feedback & Suggestion Center
General Tech Help
Jaguar Models ( Current )
XF (X260)
F-Type ( X152 )
XE ( X760 )
E-Pace
F-Pace (X761) / C-X17
I-Pace EV
Jaguar Models ( Modern )
XF and XFR ( X250 )
XJ ( X351 )
X-Type ( X400 )
S-Type / S type R Supercharged V8 ( X200 )
XJ XJ6 / XJ8 / XJR ( X350 & X358 )
XJ XJ8 / XJR ( X308 )
XJ XJ12 ( X305 )
XJ XJ6 / XJR6 ( X300 )
XK8 / XKR ( X100 )
XK / XKR ( X150 )
Jaguar Models ( Classics )
Mark V - X 420G
MKI / MKII S type 240 340 & Daimler
XK120 XK140 XK150
E type ( XK-E )
XJ6 & XJ12 Series I, II & III
XJS ( X27 )
XJ40 ( XJ81 )
XKSS
XJ220
Other Jaguars
Other Jaguar Models / Concepts / Replicas
Diesel variants
Diesel variants - All models
Non Jaguar vehicles
Non-Jaguar Vehicles
Brand Review
Jaguar Press release
Jaguar Customer Relationship Centre
Jaguar Engines & transmissions
Wheels / Tires, Suspension & handling
Interior
Exterior
Audio/Visual Electronics
Detailing / Car care
Motorsports
Jaguar Classifieds
Marketplace
PRIVATE For Sale / Trade or Buy Classifieds
VENDOR 'For Sale' Classifieds
Regional
US Northeast
US Central
US Southwest
US Western
US Northwest
US Midwest
US Mid Atlantic
US Lower Atlantic
US Southern Midwest
Canada
Mexico, South America
UK & Eire
Europe
Australia - Queensland
Australia - New South Wales / ACT
Australia - Victoria / Tasmania
Australia - Western
Australia - South / NT
New Zealand
Other Areas
Official Site Sponsors
VENDOR Threads
General Interest / History
Sights N Sounds
Photography
Forum announcement archives / Forum History
Jaguarforums Merchandise
Memorial Section
News
Marketplace
Vendor Directory
Become a Vendor
Member Marketplace
Vendor Marketplace
Site Store
New Posts
Tools
Car Payment Calculator
Tire Rim Calculator
Vin Decoder
Recalls
Technical Service Bulletins (TSBs)
Members List
Live Feed
Gallery
View Dark Mode
Please register or login to enable Dark Mode.
Log In
Register
Threads
Google
Threads
Posts
Advanced
Dark Mode
Please register or login to enable Dark Mode.
Log In
Forgot your Password?
By logging into your account, you agree to our
Terms of Use
and
Privacy Policy
, and to the use of cookies as described therein.
or
Login with Google
Login with Facebook
Recent
Commented
Albums
My Pictures
My Post Pictures
giandanielxk8
January 18, 2015
814
0
Sort:
Most Recent
Default
Most Recent
0
2021/05/04 14:16:17
giandaniel
0
2021/05/04 13:26:59
giandaniel
0
2021/05/03 16:07:32
giandaniel
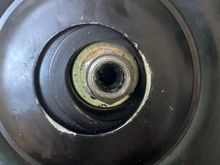
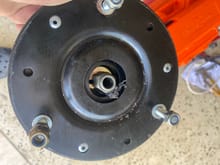
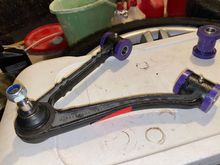
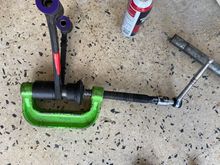
Shock nut is not centered and you can see signs of the bushes being shaved by the mount itself.
0
2021/05/03 16:07:25
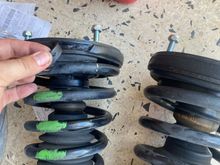
giandaniel
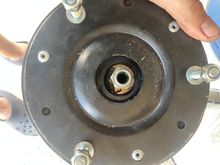
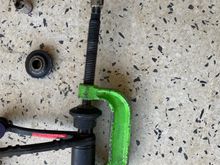
Passenger side Welsh mount was already starting to break apart. They have been on the car since May 4, 2020. They were installed when the car had 74,800 miles. Currently mileage is 79,989 miles.
0
2021/05/03 16:07:19
giandaniel
0
2021/05/03 16:07:13
giandaniel
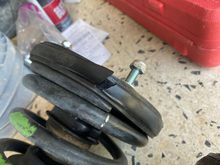
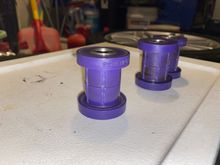
Final design of modified bushes.
0
2021/05/03 16:07:05
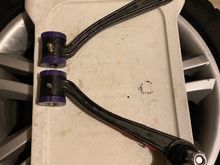
giandaniel
Final product: New ball-joints, and new zerk fittings. The bushes were greased using Hotchkis Super Silicon grease. That stuff is extremely tacky, it took me 30 minutes to get it off of my hands.
0
2021/05/02 19:19:31
giandaniel
I drilled some holes and tried again. I was happy with the results.
0
2021/05/02 19:19:24
giandaniel
Then I tested them out and found, that while the bush was being greased, the inner bore was only lightly greased.
0
2021/05/02 19:19:17
giandaniel
First design: grease channels
0
2021/05/02 19:19:09
giandaniel
0
2021/05/02 15:44:50
giandaniel
0
2021/05/02 15:44:42
giandaniel
0
2021/05/02 15:44:35
giandaniel
0
2021/05/02 15:44:26
giandaniel
0
2021/05/02 15:44:19
giandaniel
0
2021/04/30 19:21:01
giandaniel
0
2021/04/30 19:20:27
giandaniel
0
2021/04/26 17:33:10
giandaniel
0
2021/04/14 21:07:41
giandaniel
0
2021/04/14 21:07:27
giandaniel
0
2021/04/14 21:07:12
giandaniel
0
2021/03/13 21:27:11
giandaniel
0
2021/02/28 17:47:27
giandaniel
0
2021/02/28 17:47:15
giandaniel
0
2021/02/28 17:47:07
giandaniel
0
2021/02/28 17:46:59
giandaniel
0
2021/02/28 17:46:52
giandaniel
0
2021/02/28 17:46:47
giandaniel
0
2021/02/28 17:46:40
giandaniel
0
2021/02/28 17:46:31
giandaniel
0
2021/02/26 18:33:25
giandaniel
0
2021/02/26 18:33:16
giandaniel
0
2021/02/26 18:33:09
giandaniel
0
2021/02/26 18:33:01
giandaniel
0
2021/02/26 18:32:54
giandaniel
0
2021/02/26 18:32:46
giandaniel
0
2021/02/26 18:32:39
giandaniel
0
2021/02/26 18:32:31
giandaniel
0
2021/02/20 17:45:19
giandaniel
First
Page
14 of 21
Last
Go To
Page
1
...
12
13
14
15
16
...
21
14 of 21
Go To
GO
Go to page
of 21
pages
1
...
12
13
14
15
16
...
21