LOG IN
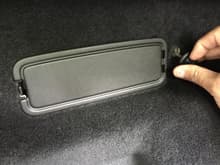
REGISTER
Forums
General Jaguar Forums
New Member Area - Intro a MUST
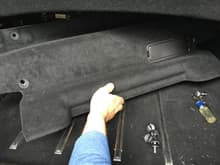
Jaguar Forums Feedback & Suggestion Center
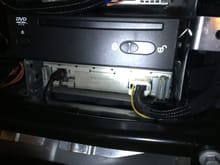
General Tech Help
Jaguar Models ( Current )
XF (X260)
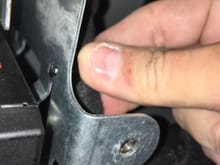
F-Type ( X152 )
XE ( X760 )
E-Pace
F-Pace (X761) / C-X17
I-Pace EV
Jaguar Models ( Modern )
XF and XFR ( X250 )
XJ ( X351 )
X-Type ( X400 )
S-Type / S type R Supercharged V8 ( X200 )
XJ XJ6 / XJ8 / XJR ( X350 & X358 )
XJ XJ8 / XJR ( X308 )
XJ XJ12 ( X305 )
XJ XJ6 / XJR6 ( X300 )
XK8 / XKR ( X100 )
XK / XKR ( X150 )
Jaguar Models ( Classics )
Mark V - X 420G
MKI / MKII S type 240 340 & Daimler
XK120 XK140 XK150
E type ( XK-E )
XJ6 & XJ12 Series I, II & III
XJS ( X27 )
XJ40 ( XJ81 )
XKSS
XJ220
Other Jaguars
Other Jaguar Models / Concepts / Replicas
Diesel variants
Diesel variants - All models
Non Jaguar vehicles
Non-Jaguar Vehicles
Brand Review
Jaguar Press release
Jaguar Customer Relationship Centre
Jaguar Engines & transmissions
Wheels / Tires, Suspension & handling
Interior
Exterior
Audio/Visual Electronics
Detailing / Car care
Motorsports
Jaguar Classifieds
Marketplace
PRIVATE For Sale / Trade or Buy Classifieds
VENDOR 'For Sale' Classifieds
Regional
US Northeast
US Central
US Southwest
US Western
US Northwest
US Midwest
US Mid Atlantic
US Lower Atlantic
US Southern Midwest
Canada
Mexico, South America
UK & Eire
Europe
Australia - Queensland
Australia - New South Wales / ACT
Australia - Victoria / Tasmania
Australia - Western
Australia - South / NT
New Zealand
Other Areas
Official Site Sponsors
VENDOR Threads
General Interest / History
Sights N Sounds
Photography
Forum announcement archives / Forum History
Jaguarforums Merchandise
Memorial Section
News
Marketplace
Vendor Directory
Become a Vendor
Member Marketplace
Vendor Marketplace
Site Store
New Posts
Tools
Car Payment Calculator
Tire Rim Calculator
Vin Decoder
Recalls
Technical Service Bulletins (TSBs)
Members List
Live Feed
Gallery
View Dark Mode
Please register or login to enable Dark Mode.
Log In
Register
Threads
Google
Threads
Posts
Advanced
Dark Mode
Please register or login to enable Dark Mode.
Log In
Forgot your Password?
By logging into your account, you agree to our
Terms of Use
and
Privacy Policy
, and to the use of cookies as described therein.
or
Login with Google
Login with Facebook
Recent
Commented
Albums
My Pictures
X150 IBOC Tuner Replacement (Convertible)
twhumphrey
May 4, 2017
24
0
Sort:
Most Recent
Default
Most Recent
24. Put the mounting plate on your new tuner and reverse the process to install it!
0
2017/05/04 17:32:47
twhumphrey
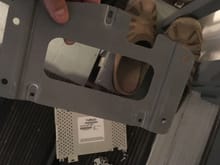
23. The stack comes off straight up when the four nuts are removed, and the IBOC tuner then can be removed with its mounting plate which sits on the four mounting studs you removed the nuts from. You will need a T25 driver to unscrew the IBOC tuner housing from the mounting plate.
0
2017/05/04 17:32:36
twhumphrey
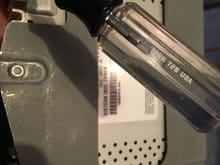
21. Carefully slide the driver onto the front nut and unwind it.
0
2017/05/04 17:32:21
twhumphrey
22. Then remove the nut closest to the battery terminal. BE CAREFUL.
0
2017/05/04 17:32:13
twhumphrey
20. On the battery side of the stack, BE VERY CAREFUL. You will be working right next to the positive battery terminal. DON'T TOUCH IT WITH YOUR DRIVER!
0
2017/05/04 17:32:05
twhumphrey
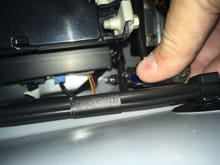
17. Now you can put your socket and driver onto the rear nut of the mounting bracket.
0
2017/05/04 17:31:57
twhumphrey
18. And onto the front nut of the mounting bracket.
0
2017/05/04 17:31:48
twhumphrey
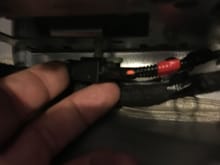
16. Pull this connector from the right hand side of the component stack, to give room to work on the mounting screws.
0
2017/05/04 17:31:35
twhumphrey
19. You will want to remove this harness section from the holder to get access to the frontward RHS mounting nut.
0
2017/05/04 17:31:26
twhumphrey
14. You need to close the top only until the point that both the tonneau cover and rear window are wide open, then stop there. The top will hold this position but only for a little while, so the next steps need to be done quickly.
0
2017/05/04 17:31:17
twhumphrey
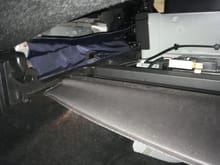
12. Now you need to put the windowshade cover back in place so you can partially close the top and access the mounting screws from the top.
0
2017/05/04 17:31:06
twhumphrey
13. Both sides need to be snapped down, and then the windowshade closed or the top will not fold.
0
2017/05/04 17:30:58
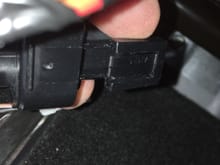
twhumphrey
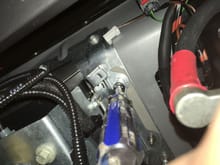
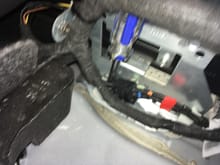
11. This connector has a snap on the side and can be removed more easily.
0
2017/05/04 17:30:48
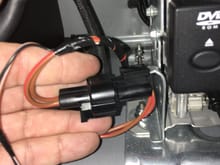
twhumphrey
10. There are two connections to the IBOC tuner module to be removed. The RF connector is by far the harder connector to remove. It has a tab on the bottom side that has to be pushed into the connector to release it from the far side. I released it after removing the stack because I could not get my finger under the connector to access the tabl.
0
2017/05/04 17:30:39
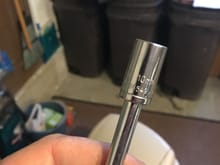
twhumphrey
15. You will need a 10 mm socket and screwdriver handle or socket extension and socket wrench to remove the four mounting screws.
0
2017/05/04 17:30:27
twhumphrey
9. There is a tab on the top of this connector (tilted toward the camera in this shot); the tab must be pulled away from the connector body to release the connector from the metal tab it hooks onto.
0
2017/05/04 17:30:19
twhumphrey
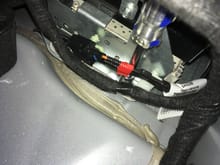
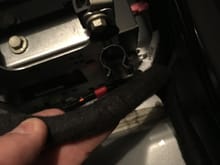
8. You will also want to remove this cable for access to the screws.
0
2017/05/04 17:30:12
twhumphrey
7. You will need to remove this cable hanger from the outside of the rack to be able to access the mounting screws. This is more easily done through the trunk, IMHO.
0
2017/05/04 17:30:03
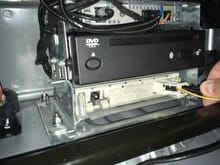
twhumphrey
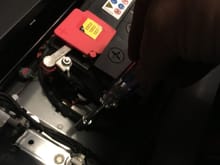
6. Here is the stack with the DVD for the Navigation system and, on the bottom, the IBOC tuner.
0
2017/05/04 17:29:55
twhumphrey
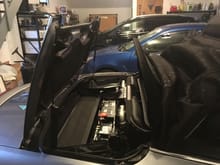
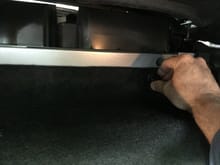
5. Remove the wall to expose the battery and entertainment stack.
0
2017/05/04 17:29:45
twhumphrey
4. And lower right.
0
2017/05/04 17:29:42
twhumphrey
3. Lower left.
0
2017/05/04 17:29:39
twhumphrey
2. There are four of them, upper left and right.
0
2017/05/04 17:29:30
twhumphrey
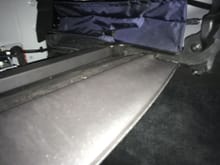
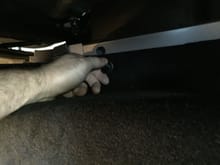
1. Close the top, open the trunk and remove the windowshade cover. Then remove the four plastic wing nuts that hold the trunk wall in place.
0
2017/05/04 17:29:22
twhumphrey