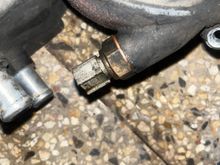
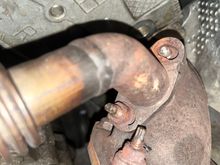
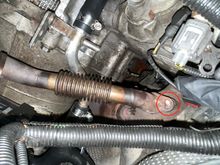
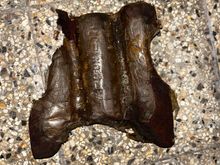
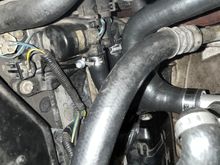
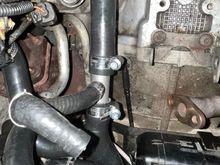
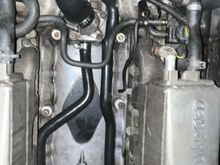
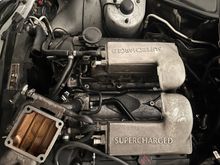
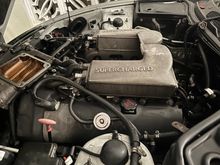
Jaguar Forums - Jaguar Enthusiasts Forum
  • LOG IN
  • REGISTER
  • Forums
    • General Jaguar Forums
      • New Member Area - Intro a MUST
      • Jaguar Forums Feedback & Suggestion Center
      • General Tech Help
    • Jaguar Models ( Current )
      • XF (X260)
      • F-Type ( X152 )
      • XE ( X760 )
      • E-Pace
      • F-Pace (X761) / C-X17
      • I-Pace EV
    • Jaguar Models ( Modern )
      • XF and XFR ( X250 )
      • XJ ( X351 )
      • X-Type ( X400 )
      • S-Type / S type R Supercharged V8 ( X200 )
      • XJ XJ6 / XJ8 / XJR ( X350 & X358 )
      • XJ XJ8 / XJR ( X308 )
      • XJ XJ12 ( X305 )
      • XJ XJ6 / XJR6 ( X300 )
      • XK8 / XKR ( X100 )
      • XK / XKR ( X150 )
    • Jaguar Models ( Classics )
      • Mark V - X 420G
      • MKI / MKII S type 240 340 & Daimler
      • XK120 XK140 XK150
      • E type ( XK-E )
      • XJ6 & XJ12 Series I, II & III
      • XJS ( X27 )
      • XJ40 ( XJ81 )
      • XKSS
      • XJ220
    • Other Jaguars
      • Other Jaguar Models / Concepts / Replicas
    • Diesel variants
      • Diesel variants - All models
    • Non Jaguar vehicles
      • Non-Jaguar Vehicles
    • Brand Review
      • Jaguar Press release
      • Jaguar Customer Relationship Centre
      • Jaguar Engines & transmissions
      • Wheels / Tires, Suspension & handling
      • Interior
      • Exterior
      • Audio/Visual Electronics
      • Detailing / Car care
      • Motorsports
    • Jaguar Classifieds
      • Marketplace
      • PRIVATE For Sale / Trade or Buy Classifieds
      • VENDOR 'For Sale' Classifieds
    • Regional
      • US Northeast
      • US Central
      • US Southwest
      • US Western
      • US Northwest
      • US Midwest
      • US Mid Atlantic
      • US Lower Atlantic
      • US Southern Midwest
      • Canada
      • Mexico, South America
      • UK & Eire
      • Europe
      • Australia - Queensland
      • Australia - New South Wales / ACT
      • Australia - Victoria / Tasmania
      • Australia - Western
      • Australia - South / NT
      • New Zealand
      • Other Areas
    • Official Site Sponsors
      • VENDOR Threads
    • General Interest / History
      • Sights N Sounds
      • Photography
      • Forum announcement archives / Forum History
      • Jaguarforums Merchandise
      • Memorial Section
  • News
  • Marketplace
    • Vendor Directory
    • Become a Vendor
    • Member Marketplace
    • Vendor Marketplace
    • Site Store
  • New Posts
  • Tools
    • Car Payment Calculator
    • Tire Rim Calculator
    • Vin Decoder
    • Recalls
    • Technical Service Bulletins (TSBs)
    • Members List
    • Live Feed
  • Gallery
  • View Dark Mode
    • Please register or login to enable Dark Mode.
  • Log In
  • Register
Jaguar Forums - Jaguar Enthusiasts Forum
    • Threads
      • Advanced
Dark Mode

Please register or login to enable Dark Mode.

Log In

Forgot your Password?

By logging into your account, you agree to our Terms of Use and Privacy Policy, and to the use of cookies as described therein.
or
 
  • Recent
  • Commented
  • Albums
  • My Pictures

giandanielxk8's Photos

View Profile
Sort:
Commented
  • Most Recent
  • Most Comments
  • Albums
  • Photos
0 2025/05/01 15:31:12 giandaniel
0 2025/05/01 15:31:08 giandaniel
Yes, I’m concerned about that fuel line. I told him about it.
0 2025/05/01 15:31:05 giandaniel
High beams
High beams
0 2025/04/27 14:58:15 giandaniel
Low beams
Low beams
0 2025/04/27 14:58:10 giandaniel
0 2025/04/27 14:58:05 giandaniel
0 2025/04/27 14:40:42 giandaniel
0 2025/04/27 14:40:10 giandaniel
0 2025/04/27 14:38:55 giandaniel
0 2025/04/27 14:38:31 giandaniel
0 2025/04/27 14:36:46 giandaniel
0 2025/04/27 14:35:54 giandaniel
It really doesn't matter what OEM input harness you're buying if your car had the OE D1S HID system from Valeo. 

However, if your car came stock with halogen, then you want the harness for an H1 OEM input. The OE input in halogen cars will plug to the OE input for the halogen low beam bulb. 

In the case of cars with HID, we have to find a way to wire the harness to the OEM input that comes from the fuse box.
It really doesn't matter what OEM input harness you're buying if your car had the OE D1S HID system from Valeo. However, if your car came stock with halogen, then you want the harness for an H1 OEM input. The OE input in halogen cars will plug to the OE input for the halogen low beam bulb. In the case of cars with HID, we have to find a way to wire the harness to the OEM input that comes from the fuse box.
0 2025/04/27 13:39:16 giandaniel
If you look closely, you can see that I routed the harness wire to the passenger ballast beneath plastic trim that sits above the radiator. 

I lost one of the torx bolts smh.
If you look closely, you can see that I routed the harness wire to the passenger ballast beneath plastic trim that sits above the radiator. I lost one of the torx bolts smh.
0 2025/04/27 13:20:50 giandaniel
Each ballast is accessible inside each headlight's bulb cover, as seen here.
0 2025/04/27 13:20:46 giandaniel
This is where I placed the ballasts.
0 2025/04/27 13:20:43 giandaniel
That fuse tap is grounded to the shock tower bolts and connects to the 9006 socket below that is connected to my harness's 9006 OE input.
0 2025/04/27 13:20:39 giandaniel
Which is why I opted for this arrangement. It doesn't splice into the factory wiring. Instead, a fuse tap on fuse #6 receives the positive electrical signal sends a positive charge to the OE Valeo ballast that goes on to then power the HID in normal circumstances.
0 2025/04/27 13:20:35 giandaniel
The harness itself also has a positive to battery and negative to ground terminals. I attached the positive box's positive strap bolt, and the ground to a shock tower bolt.
0 2025/04/27 13:20:31 giandaniel
On to the wiring, This is where I secured the harness relays. With a ballast extension wire, you could relocate it next to the brake booster, which I considered.
0 2025/04/27 13:20:27 giandaniel
0 2025/04/27 13:20:23 giandaniel
0 2025/04/27 13:20:19 giandaniel
0 2025/04/27 13:20:15 giandaniel
After mounting the headlight this is the look. On the left, the D2S Micro 5.0 bi-xenon projector serving low beam and high beam duty and on the right the Morimoto Mini HB High beam projector.
0 2025/04/27 13:20:11 giandaniel
This is the wire from the bulb ignitor, which you connect to the ballast.
0 2025/04/27 13:20:07 giandaniel
This is the 9006 splitter. The single end connects to the OE high beam power source, and the split ends connect to the Bi-xenon solenoid pigtail of the Micro D2S projector and to the my Mini HB high beam LEd projector, or, to the halogen bulb socket if you're retaining it. It could also connect to a second bi-xenon or Bi-LED projector if you to do so. (Remember, if you're going with a second set of bi-xenon projectors, you will have to add a second harness and a second set of ballasts).
0 2025/04/27 13:20:04 giandaniel
Once you have secured the projector to the headlights, you can install the ignitor. I find it's easier to install the entire projector with the bulb already secured to it and then connect the ignitor.
0 2025/04/27 13:19:59 giandaniel
0 2025/04/27 13:19:54 giandaniel
After you've removed the OE projector, which is held by two screws on the bottom and a clip on the top. 

Refer to page six, post 104 of this thread: 

I recommend that you harvest the Valeo projector  to help you design a bracket. I used a 1/8th inch thick aluminum sheet for the bottom bracket and a dremmel with a cut-off wheel to help me fabricate that bracket. I also used a drill to make the bolt holes.

The two wires that you see extend from the projector power the high-beam solenoid that lo
After you've removed the OE projector, which is held by two screws on the bottom and a clip on the top. Refer to page six, post 104 of this thread: I recommend that you harvest the Valeo projector to help you design a bracket. I used a 1/8th inch thick aluminum sheet for the bottom bracket and a dremmel with a cut-off wheel to help me fabricate that bracket. I also used a drill to make the bolt holes. The two wires that you see extend from the projector power the high-beam solenoid that lo
0 2025/04/27 13:19:50 giandaniel
0 2025/04/27 13:19:43 giandaniel
0 2025/04/27 13:19:37 giandaniel
0 2025/04/27 13:19:33 giandaniel
0 2025/04/19 20:41:56 giandaniel
0 2025/04/14 15:59:27 giandaniel
0 2025/04/14 15:13:22 giandaniel
OE Jaguar Radiator Bumper Side
0 2025/04/14 15:08:51 giandaniel
Radtec All Aluminum XK8 and XKR Radiator Bumper side
0 2025/04/14 14:56:29 giandaniel
Radtec All Aluminum XK8 and XKR Radiator Bumper side
0 2025/04/14 14:56:27 giandaniel
Radtec All Aluminum XK8 and XKR Radiator Engine side
0 2025/04/14 14:56:26 giandaniel
Radtec All Aluminum XK8 and XKR Radiator Engine side
0 2025/04/14 14:56:25 giandaniel
First
Page
2 of 19
Last
Go To
Page
  • 1
  • 2
  • 3
  • 4
  • 5
  • 6
  • 7
  • ...
  • 19
2 of 19
Go To GO
Go to page of 19 pages
  • 1
  • 2
  • 3
  • 4
  • 5
  • 6
  • 7
  • ...
  • 19

Top
Jaguar Forums - Jaguar Enthusiasts Forum
  • Contact Us
  • FAQ
  • Archive
  • Advertising
  • Cookie Policy
  • Privacy Statement
  • Terms of Service
  • Your Privacy Choices
  • Manage Preferences

© 2026 MH Sub I, LLC dba Internet Brands

Follow Us        


When you click on links to various merchants on this site and make a purchase, this can result in this site earning a commission. Affiliate programs and affiliations include, but are not limited to, the eBay Partner Network.