Jaguar Forums - Jaguar Enthusiasts Forum
  • LOG IN
  • REGISTER
  • Forums
    • General Jaguar Forums
      • New Member Area - Intro a MUST
      • Jaguar Forums Feedback & Suggestion Center
      • General Tech Help
    • Jaguar Models ( Current )
      • XF (X260)
      • F-Type ( X152 )
      • XE ( X760 )
      • E-Pace
      • F-Pace (X761) / C-X17
      • I-Pace EV
    • Jaguar Models ( Modern )
      • XF and XFR ( X250 )
      • XJ ( X351 )
      • X-Type ( X400 )
      • S-Type / S type R Supercharged V8 ( X200 )
      • XJ XJ6 / XJ8 / XJR ( X350 & X358 )
      • XJ XJ8 / XJR ( X308 )
      • XJ XJ12 ( X305 )
      • XJ XJ6 / XJR6 ( X300 )
      • XK8 / XKR ( X100 )
      • XK / XKR ( X150 )
    • Jaguar Models ( Classics )
      • Mark V - X 420G
      • MKI / MKII S type 240 340 & Daimler
      • XK120 XK140 XK150
      • E type ( XK-E )
      • XJ6 & XJ12 Series I, II & III
      • XJS ( X27 )
      • XJ40 ( XJ81 )
      • XKSS
      • XJ220
    • Other Jaguars
      • Other Jaguar Models / Concepts / Replicas
    • Diesel variants
      • Diesel variants - All models
    • Non Jaguar vehicles
      • Non-Jaguar Vehicles
    • Brand Review
      • Jaguar Press release
      • Jaguar Customer Relationship Centre
      • Jaguar Engines & transmissions
      • Wheels / Tires, Suspension & handling
      • Interior
      • Exterior
      • Audio/Visual Electronics
      • Detailing / Car care
      • Motorsports
    • Jaguar Classifieds
      • Marketplace
      • PRIVATE For Sale / Trade or Buy Classifieds
      • VENDOR 'For Sale' Classifieds
    • Regional
      • US Northeast
      • US Central
      • US Southwest
      • US Western
      • US Northwest
      • US Midwest
      • US Mid Atlantic
      • US Lower Atlantic
      • US Southern Midwest
      • Canada
      • Mexico, South America
      • UK & Eire
      • Europe
      • Australia - Queensland
      • Australia - New South Wales / ACT
      • Australia - Victoria / Tasmania
      • Australia - Western
      • Australia - South / NT
      • New Zealand
      • Other Areas
    • Official Site Sponsors
      • VENDOR Threads
    • General Interest / History
      • Sights N Sounds
      • Photography
      • Forum announcement archives / Forum History
      • Jaguarforums Merchandise
      • Memorial Section
  • News
  • Marketplace
    • Vendor Directory
    • Become a Vendor
    • Member Marketplace
    • Vendor Marketplace
    • Site Store
  • New Posts
  • Tools
    • Car Payment Calculator
    • Tire Rim Calculator
    • Vin Decoder
    • Recalls
    • Technical Service Bulletins (TSBs)
    • Members List
    • Live Feed
  • Gallery
  • View Dark Mode
    • Please register or login to enable Dark Mode.
  • Log In
  • Register
Jaguar Forums - Jaguar Enthusiasts Forum
    • Threads
      • Advanced
Dark Mode

Please register or login to enable Dark Mode.

Log In

Forgot your Password?

By logging into your account, you agree to our Terms of Use and Privacy Policy, and to the use of cookies as described therein.
or
 
  • Recent
  • Commented
  • Albums
  • My Pictures

Peter_of_Australia's Photos

View Profile
Sort:
Most Recent
  • Most Recent
  • Most Comments
  • Albums
  • Photos
I removed the drive shaft (not sure now, if that is the RHS or LHS, but it will come to me, before I reinstall... ;) Note that I made it "shiny" already ;)
0 2024/02/09 05:12:48 Peter_of_A
0 2024/02/07 15:24:09 Peter_of_A
And just in case you ever see a need to adjust the hand-brake: This can be done under the car, above the prop-shaft, behind the centre-prop-shaft-bearing.
0 2024/02/07 04:41:04 Peter_of_A
AND THIS IS THE OTHER VERY WORRYING FAULT I FOUND: CRACKS in the brake-line rubber-pipe (see also on the second picture). I ordered two new rubber-brake-lines: C2S46537 - and if it helps: It looks like 2202699, H621492 and C2S4684. are different P/Ns for the same thing.
0 2024/02/07 04:41:01 Peter_of_A
After re-assembly of the brake caliper to the car with those two 13mm bolts, this is how I pulled the cable into the lever. At least I did not forget to feed the cable/grommet thru the bracket, but it might have been even easier, if I had positioned the cable before fitting the two 13mm bolts...
0 2024/02/07 04:40:58 Peter_of_A
SP that is what it looks like correctly assembled. Very hard to see the difference compared to the 1mm incorrect position before. One should actually expect, that the parts are made to make an incorrect assembly impossible...
0 2024/02/07 04:40:56 Peter_of_A
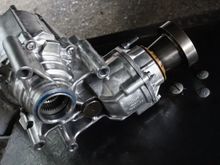
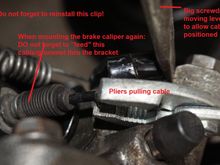
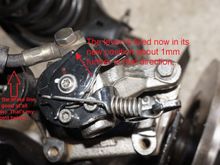
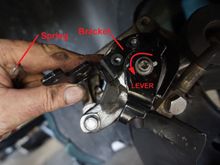
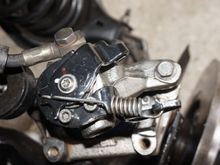
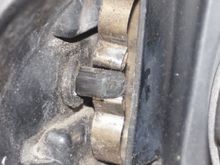
The problem was: When I replaced all the seals of the caliper I tried to dismantle the caliper as much as possible, hence, I also had the "lever" removed. When I put it back on, I placed it one tooth-width (there are tiny teeth on the bracket under the screw) too much clockwise. Due to that the brake cable could not engage the emergency brake on the left side. Also note: During reassembly put the spring into position FIRST, and only then rotate the bracket into position to fit the 2 bolts (would
0 2024/02/07 04:40:53 Peter_of_A
0 2024/02/07 04:14:39 Peter_of_A
0 2024/02/07 04:14:37 Peter_of_A
0 2024/02/07 04:14:34 Peter_of_A
0 2024/02/07 04:14:32 Peter_of_A
0 2024/02/07 04:14:29 Peter_of_A
0 2024/02/07 04:14:27 Peter_of_A
0 2024/02/07 03:50:30 Peter_of_A
0 2024/01/05 03:33:22 Peter_of_A
0 2023/12/13 17:51:33 Peter_of_A
0 2023/11/28 15:58:30 Peter_of_A
0 2023/11/22 04:04:37 Peter_of_A
0 2023/11/20 22:54:20 Peter_of_A
I have not polished the rims before taking this picture, hence I would look even better than this...
0 2023/11/13 04:29:43 Peter_of_A
The black latch between the metal spring is missing at your car.
0 2023/11/09 14:49:06 Peter_of_A
...and there are 2 correct bolts for the lock. Job done and time to "frohlock"! (Only Germans will get that joke: "frohlocken" is German and means "to rejoice" (and the word obviously contains the word lock...)   ;)
...and there are 2 correct bolts for the lock. Job done and time to "frohlock"! (Only Germans will get that joke: "frohlocken" is German and means "to rejoice" (and the word obviously contains the word lock...) ;)
0 2023/11/04 04:25:42 Peter_of_A
And there are 2 the bolts for the big black plastic bezel (and using them as above for the lock would be wrong)....
0 2023/11/04 04:25:40 Peter_of_A
SO this here would be the correct positioning of the cable from the boot-lid-lock, hence, better do it that way and save yourself a lot of time. And another hint: If you can't find that cable anymore: It is hiding at the very bottom inside of the boot-lid - you have to fish it out blindly.
0 2023/11/04 04:25:37 Peter_of_A
And then I had my fun: I knew, I did everything right, but when I put the latch back into the car I  had 2 problems, one after another: The boot-lid did not want to latch in (i.e. boot lid could not be closed) and the remote would not open the lid (once I finally managed to close the boot lid). After removing and dis- and reassembling the latch many more times, I finally figured it out I positioned the cable from the lock in the boot lid incorrectly...
And then I had my fun: I knew, I did everything right, but when I put the latch back into the car I had 2 problems, one after another: The boot-lid did not want to latch in (i.e. boot lid could not be closed) and the remote would not open the lid (once I finally managed to close the boot lid). After removing and dis- and reassembling the latch many more times, I finally figured it out I positioned the cable from the lock in the boot lid incorrectly...
0 2023/11/04 04:25:35 Peter_of_A
Lid back on.
Lid back on.
0 2023/11/04 04:25:33 Peter_of_A
Here you see very clearly that I have teeth again where there were none before! 11 new teeth! Imagine, how much a dentist would charge you for that!  ;)
Here you see very clearly that I have teeth again where there were none before! 11 new teeth! Imagine, how much a dentist would charge you for that! ;)
0 2023/11/04 04:25:31 Peter_of_A
And pushing the motor back in onto it's contacts carefully.
0 2023/11/04 04:25:29 Peter_of_A
Pulling the gears back in (one of which has obviously been resurrected) with their pins positioning them in their correct positions and applying bearing grease.
0 2023/11/04 04:25:27 Peter_of_A
You can just spot 3 dark spots in the grooves before the epoxy starts below: These are each 1/3 of a pin (as used in sewing). I placed one into every second groove (except as you see on the right 2 next to each other, as this is a 11T gear). I positioned those 6 pin-bits with the fist thin layer of epoxy. This works exactly like reo (that is Aussie slang for steel-reinforcement in concrete). I let each layer dry for about 10 minutes and added a total of about 4 layers. Now this should be solid!
0 2023/11/04 04:25:23 Peter_of_A
Done. And then as in picture above I turned the protrusion around to re-attach it to the rest again. I used "Duramax 5 Minute Epoxy Fix", which is 2 component epoxy glue, which is totally hard after 16 hours and can be applied for 5 minutes after mixing. I used the OE pin to ensure that the parts will be connected in the correct angle. Avoid epoxy glue on the pin. But here is my cunning idea, which I incorporated:
0 2023/11/04 04:25:20 Peter_of_A
...while I went ahead to cut off the protruding bit of the late gear. Note that using a saw would have made it very easy, BUT this would have cut off too much material! So I could not use a saw and I used a cutter knife (in a metal guide - import due to the heat), and heated it up again and again with a heat gun before I painfully pressed the bigger part of the late gear with my thumb onto a soft kitchen-rag while cutting the protruding bit off...
0 2023/11/04 04:25:16 Peter_of_A
So this is what I ordered as future backup solution (Plan C)...
0 2023/11/04 04:25:11 Peter_of_A
So this is my problem: The (outer) teeth of the upper gear, which were supposed to drive the lower gear are utterly worn off. So that is an "Ex-gear", just like Monty Python's Ex-Parrot...: It's passed on - this gear is no more - it has ceased to be - it's expired and gone see it's maker - this is a late gear! Bereft of life it rests in peace!
0 2023/11/04 03:59:23 Peter_of_A
After pulling off the cover, you can pull off the motor (it is just stuck on contacts there) and remove the 2 pins of the plastic gears (left of the motor) by either letting gravity help you, or use a magnet to pull them out, although, you need to pull only the bigger pin of the gear, which is bereft of life... then you just pull out the late gear.
0 2023/11/04 03:59:19 Peter_of_A
0 2023/10/30 15:35:50 Peter_of_A
0 2023/10/30 15:31:14 Peter_of_A
0 2023/10/29 05:18:57 Peter_of_A
...especially, when it's cold...   ;)
...especially, when it's cold... ;)
0 2023/10/23 01:34:00 Peter_of_A
...a fancy cardigan for your leaper...
0 2023/10/23 01:32:48 Peter_of_A
First
Page
5 of 5
Last
Go To
Page
  • 1
  • 2
  • 3
  • 4
  • 5
5 of 5
Go To GO
Go to page of 5 pages
  • 1
  • 2
  • 3
  • 4
  • 5

Top
Jaguar Forums - Jaguar Enthusiasts Forum
  • Contact Us
  • FAQ
  • Archive
  • Advertising
  • Cookie Policy
  • Privacy Statement
  • Terms of Service
  • Your Privacy Choices
  • Manage Preferences

© 2026 MH Sub I, LLC dba Internet Brands

Follow Us        


When you click on links to various merchants on this site and make a purchase, this can result in this site earning a commission. Affiliate programs and affiliations include, but are not limited to, the eBay Partner Network.