removing rear calipers
#21
 01-29-2011, 02:37 AM


crap sorry guys i meant to update this thread today.
I cleaned the parts up a good bit but still need to spend some more time with a polisher or something to get some heavier stuff off (was just using purple power so i could stay inside).
I guess ill get this updated within the next week or so then since im typically online once a week.
The brake pads (both sets) are fairly easy to find. The fork and lock tab are harder though...
My advice to anyone else doing this is contact your local dealers, its such a small item, they have it but don't make any kind of money off it.
The part itself is nearly the same price from Nalley or Hennessey as in the UK but u dont have to pay for the shipping or wait for it either.
Pads I wouldn't recomend however. I ordered my mintex today for 35 dollars and the handbrake pads for 25. Both the mentioned dealerships wanted like 90 bucks for either.
Thanks for the advice fraser. Ill take it apart and look into it, but it all seemed to operating fairly smooth and the lever was the cleanest part of the whole brake assembly so it should be fine.
Does anyone know how to figure out how far in the bolt for the handbrake is supposed to go in(the one horizontal one holding the two sides together)? I didn't check if it was tight, but i didn't clean it so I knew how far it was in.
Last edited by sidescrollin; 01-29-2011 at 02:40 AM.
#22
01-29-2011, 11:29 AM

Junior Member
Join Date: Jan 2011
Location: essex
Posts: 4
Likes: 0
Received 0 Likes
on
0 Posts
#23
02-05-2011, 04:32 PM
I guess it depends on where you live but the ones that were on my car were perfectly reusable just dirty

#24
02-05-2011, 05:11 PM
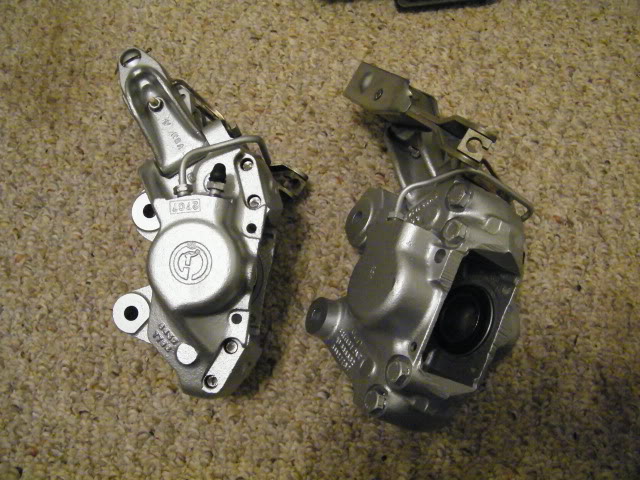
Well, cleaned and painted now. I have the handbrake pads and seal kit, but havent gone to get the fork yet and the brake pads i ordered are taking forever to get here.
To anyone who reads this in the future and notices the dates. This can easily be done in a weekend if you have all of the parts. Im doing it over a couple of weeks, the weather is terrible and I am waiting to get the parts.
I mostly used a wire wheel on a drill, I thought itd be too harsh but it wasn't at all. Some of the smaller places I used a brillo or the dremel.

I shot a single coat over some other stuff just for added protection(springs, bolts,etc).
I used earplugs to fill the channels for paint.obviously don't paint inside or use any abrasives in there either...I just used some polishing compound on a rag to clean it.
PS: pepboys sells offbrand scuff pads for $1.50. Anywhere else like autozone carries 3M and its $3.50 for the same pad!
To anyone who reads this in the future and notices the dates. This can easily be done in a weekend if you have all of the parts. Im doing it over a couple of weeks, the weather is terrible and I am waiting to get the parts.
I mostly used a wire wheel on a drill, I thought itd be too harsh but it wasn't at all. Some of the smaller places I used a brillo or the dremel.
I shot a single coat over some other stuff just for added protection(springs, bolts,etc).
I used earplugs to fill the channels for paint
.obviously don't paint inside or use any abrasives in there either...I just used some polishing compound on a rag to clean it.PS: pepboys sells offbrand scuff pads for $1.50. Anywhere else like autozone carries 3M and its $3.50 for the same pad!
Last edited by sidescrollin; 02-05-2011 at 05:20 PM.
#25
02-05-2011, 05:22 PM
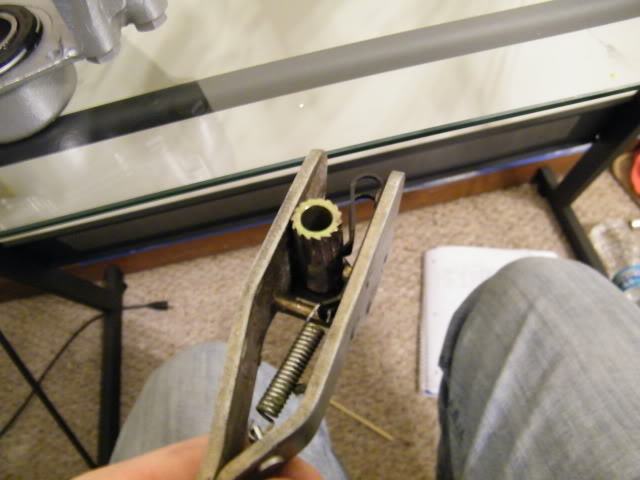
I meant to get a picture of the adjuster fraser mentioned but forgot.
Mine is fine though, they coat them in cadmium pretty heavily. The spring that goes with is just painted, but mine is fine.
some bizarre green lube in there as well.
Ill try to post pics so ppl can see what they may need to check on when doing this.
Mine is fine though, they coat them in cadmium pretty heavily. The spring that goes with is just painted, but mine is fine.
some bizarre green lube in there as well.
Ill try to post pics so ppl can see what they may need to check on when doing this.
#26
02-05-2011, 05:34 PM

Member
sidescrollin,
Keep up the posts with pictures, I'm in the process of removing the whole cage and replacing all the brakes, rotors, shocks, mounts etc on the rear of my 93 xjs and the pictures your posting are helpiing me greatly with my confidence I need to do this job myself.
I'm going to do it a little different then you, but the end result will be the same. I'm going to buy rebuilt calipers and low mileage used shocks and springs. I'm also going to disconnect the ebrake. I have an automatic and never use the ebrake anyways.
I also have to replace several brake lines in the rear, cause one broke and caused a fire under my car in the rear diff. area. Anyways, great posts and keep it up.
#27
02-06-2011, 02:22 AM

Veteran Member
Join Date: Mar 2008
Location: Pacific Northwest USA
Posts: 24,743
Received 10,757 Likes
on
7,101 Posts
The following users liked this post:
Jsquared (01-28-2024)
#28
02-06-2011, 02:25 AM
Veteran Member
Join Date: Mar 2008
Location: Pacific Northwest USA
Posts: 24,743
Received 10,757 Likes
on
7,101 Posts
The following users liked this post:
Jsquared (01-28-2024)
#29
02-06-2011, 05:11 AM
sidescrollin,
Keep up the posts with pictures, I'm in the process of removing the whole cage and replacing all the brakes, rotors, shocks, mounts etc on the rear of my 93 xjs and the pictures your posting are helpiing me greatly with my confidence I need to do this job myself.
I'm going to do it a little different then you, but the end result will be the same. I'm going to buy rebuilt calipers and low mileage used shocks and springs. I'm also going to disconnect the ebrake. I have an automatic and never use the ebrake anyways.
I also have to replace several brake lines in the rear, cause one broke and caused a fire under my car in the rear diff. area. Anyways, great posts and keep it up.
Keep up the posts with pictures, I'm in the process of removing the whole cage and replacing all the brakes, rotors, shocks, mounts etc on the rear of my 93 xjs and the pictures your posting are helpiing me greatly with my confidence I need to do this job myself.
I'm going to do it a little different then you, but the end result will be the same. I'm going to buy rebuilt calipers and low mileage used shocks and springs. I'm also going to disconnect the ebrake. I have an automatic and never use the ebrake anyways.
I also have to replace several brake lines in the rear, cause one broke and caused a fire under my car in the rear diff. area. Anyways, great posts and keep it up.
I know I could make it alot more comprehensive , but i don't think its really necessary. The main question this thread was started with was what I needed help on and what I think others would. How to get the caliper off and then where to separate it from the handbrake.
obviously anyone here can help if someone does have a question, but obviously the first thing to do is
Getting the pistons out and back in for example, google for me.
I know what you mean about the confidence though, anyone who reads this thread should know Im not using anything more than basic handtools and jackstands.
lol i have an auto too and never use the handbrake. Right before I took it off the road i tried using it at a light so i wouldn't run out of brake fluid and the handbrake wouldn't even hold the cars still.
#30
02-06-2011, 05:17 AM
****s fun
#31
02-06-2011, 05:23 AM
thanks for the suggestion, I was going to do something like this but it was more just scrubbing at low speed. I like this idea better though.
I don't like posting this much and making walls of text so....
heres why this is taking me forever haha
The following users liked this post:
Jsquared (01-28-2024)
#32
02-06-2011, 09:23 AM


Join Date: Oct 2007
Location: PHX some of the time
Posts: 116,752
Received 6,253 Likes
on
5,453 Posts

#34
02-21-2011, 03:09 PM
I finished my brakes yesterday Im trying to do decide if I should just post some more pics or make a sort of writeup.
I didn't intend to while I was doing any of this so I didn't take that many pictures under the car to point out orders and directions but I could post most of the pics I have and try to make some write up.
Obviously if there is anything someone doesn't get or needs help on send me a message because I can answer it since I just did this.
probably do this later tonight
#35
02-21-2011, 05:13 PM
Let me start by saying there are different methods to doing this and if you know or can think of a better way of doing any of it, share it! If you spot anything I did wrong please let me and anyone else to read this in the future know. Also it could sound to some people I am mentioning particular brands in this, but Im only doing so in case people wonder what I used and because some people not know what something is if I just use the generic name ex: Degreaser/cleaner or Penetrating oil.
------My car has a Dana diff, if you have a salisbury this will be different, if you have brembo brakes it should be very similar. the salisbury has the caliper bolts on the caliper itself and has wire or pins locking them I believe------------------------------------------------
For this I just used a set of jackstands a couple of notches up, the tires need to be off the ground enough you can easily spin them freely.
I would like to mention I HIGHLY recommend wearing glasses for this, I usually don't for things I should and didn't till halfway through this job but 1. there is tons of falling dirt and rust that will slow down this job and 2. you don't want brake fluid in your eye. (trust me lol) it will dramatically speed up your work.
Start by pulling the springs off of the caliper arms. next disconnect the handbrake cable by sliding the furthest arm and slipping the end out, next take the little rubber boot off near the other caliper arm, now it will slide outof both and you can simply pull it back out of the way.
After that disconnect the brake line going to the caliper (7/16th,11mm), while you are at it and already have the right wrench in hand go ahead and take the bridge pipe between the 2 sides of the caliper off as well.
Now loosen the clamp on the dust cover on the half shaft and wiggle the cover until it clears the joints. You should be able to see a hole through the rotor, if not turn the wheel until you can. Look through it until you see the head of a bolt. There are 2 for each caliper and it can be a pita to line this up right. But the bottom bolt can be seen from directly underneath in case you are having trouble.
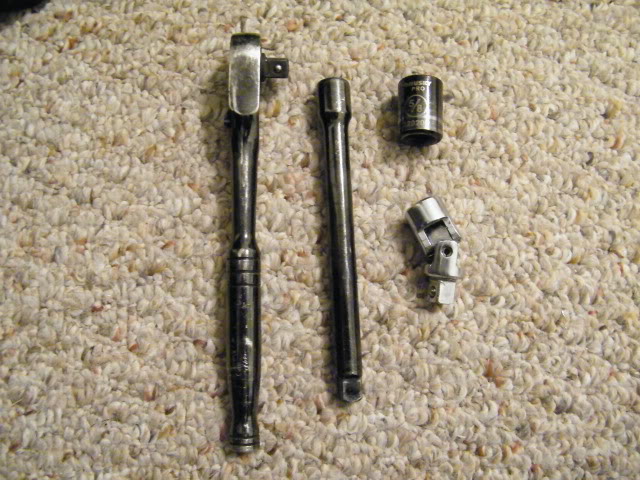
For this I used a 5/8th (16mm) on a universal socket and an 8-inch exstension. Its easiest to line the whole thing up and get it on the bolt and then put the ratchet on after.
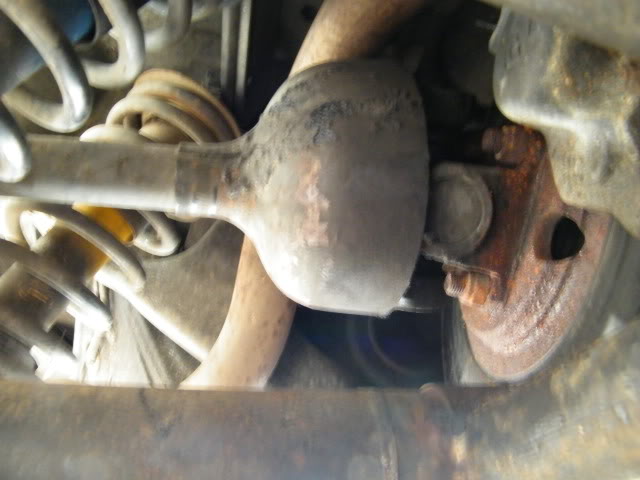
The Dust cover pulled out of the way and the access hole for the caliper bolts
Now this next part can be tricky, the bolts are completely covered in blue loctite and it takes a good bit of strength to get them off. Not to mention having to hold the ratchet in the right position. I jammed a big wrench (12inch 7/8) between the rear spring and held the other side up against part of the cage, this will keep the ratchet in place so you can focus you strength on the ratchet.
If you have a cheater pipe lucky you! I had to put a 7/8th wrench on the ratchet to get enough leverage.
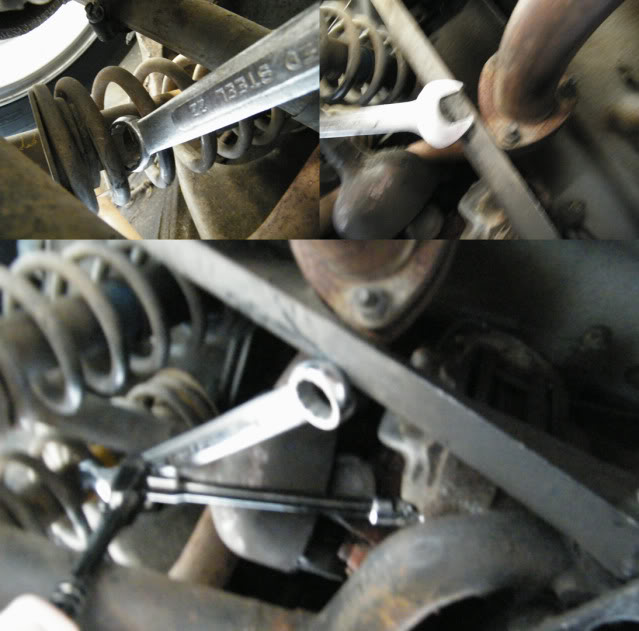
How I kept the ratchet in place so I could remove the main bolts
Once these are off you can freely move the caliper+handbrake assembly around this give a little more room for the next part (which you can technically do before or after removing the main bolts). Now I know this reads like any manual "remove the bolts" but I have been there and sympathize with you on the tedious flat to flat slow work this can be.
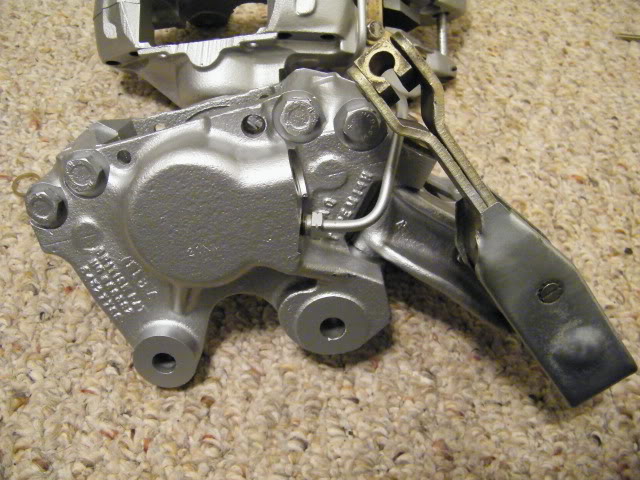
Using a 7/16 (11mm) remove the two bolts/pins holding the handbrake caliper to the main brake caliper. You may have to use a combination of flipping the wrench using different lengths and attacking it on different sides. I had a 6inch and 3inch stubby to work with but when I did the right side caliper I removed the bridge pipe first and got away with just the 6inch.There should be a lock tab on these, for me only 2 were up and the wrench overcame them (couldn't get a screwdriver between them), but there are 2 more tabs which could be bent so I guess you'll have to bend them down somehow if they are there for you. Now remove the retraction fork.
The Two bolts holding the handbrake caliper to the Main brake caliper
With these out you should be able to wiggle the two calipers apart. But you don't forcefully pull it at one side be gentle with them and try to pull evenly. On my right caliper I couldn't get them apart, but after leaving some PB blaster on them one side freed up, on the outter side I tapped a wrench on the bolt holding the handbrake pad on and this popped it free.
Now push the handbrake caliper back, making room for the main caliper. pull the main caliper out and now you can slide the handbrake caliper out after it.
MMMMMM
Next is cleaning and rebuilding.Take the 4 bolts out holding the calipers together (14mm). I don't have a vice so I had to use some clamps to hold it in place on a benchtop. Again you are going to need either a cheater or extend the leverage with another wrench (pb blaster makes this way easier).
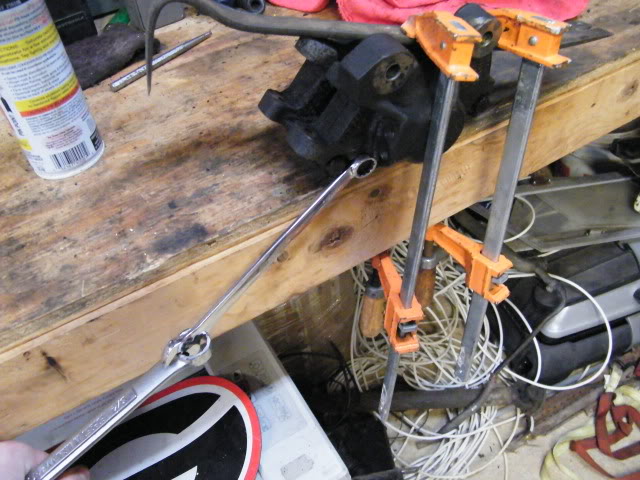
My rig lol
Alot of people like to remove pistons by blowing air into the channels, if you don't have a compressor just go to a gas station and use the one there for car tires. Be careful and make sure to not let the pistons just fly out and get damaged.
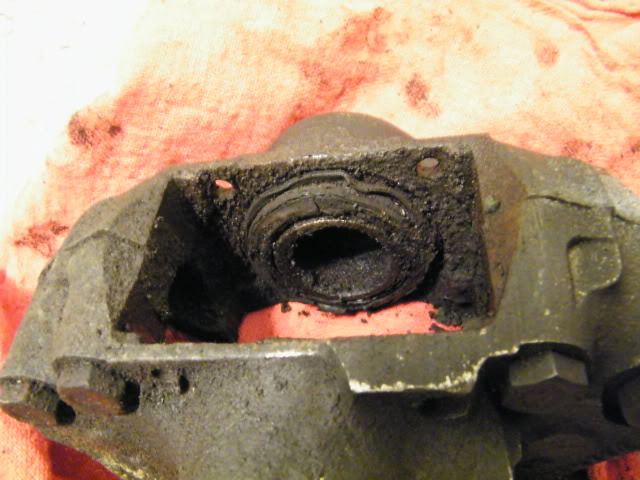
However, because there is a dust cover on XJS pistons and thus a little channel/collar on top of the pistons you can use the collar to your advantage. I sprayed PB blaster into the caliper channel and around the top of the piston then went around the edges of the top of the caliper with a flathead screwdriver, be sure to spend little effort in one place, try to go around the piston and pull it up evenly.
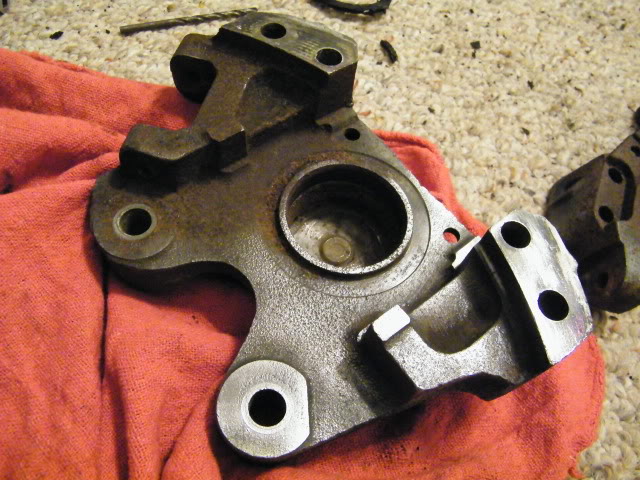
The handbrake just has two bolts that loosen to let the pads slide off. The bolt on one end has a cotter pin to be removed, I don't know how to find out how far in it needs to be, I just taped it off where there was a dirt ring and cleaned and painted that So I would know how far in it went in. You can see how far it goes in, so on reassebly you can see where that line is.
To take the arm off simply remove the cotter pin on it and slide the pin out. Take the screw out of the side and the metal cover comes off. using some pliers pull the spring (now the only thing connecting the two) up and off the pin inside. If you can't remember how the pads went on, just match the shapes of your car and the pads. The taper of the pads follows the taper of the buttresses on the rear of the car.
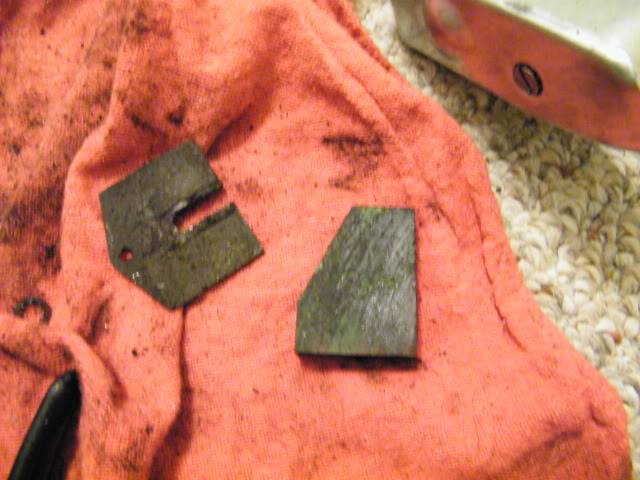
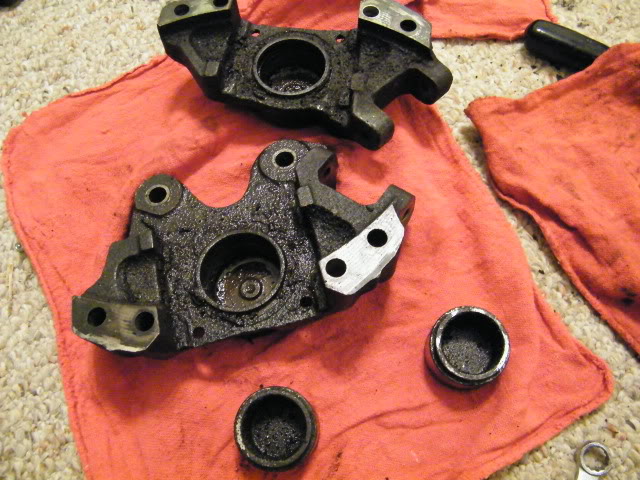
When taking one of my handbrake pads off, it just separated from its mounting plate.
Now to clean everything! I washed mine off with purple power cleaner first just to clean excess dirt and dust off. Gasoline, diesel, kerosine etc would work well but I didn't want to go outside.
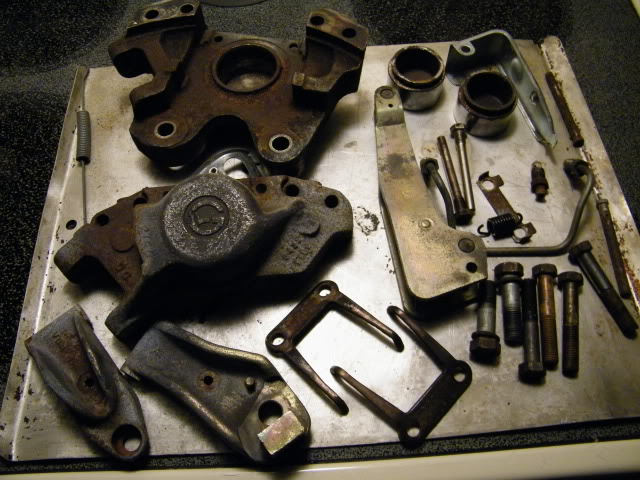
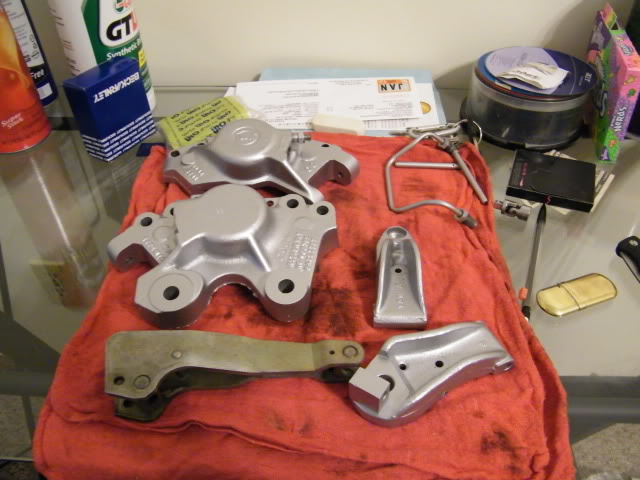
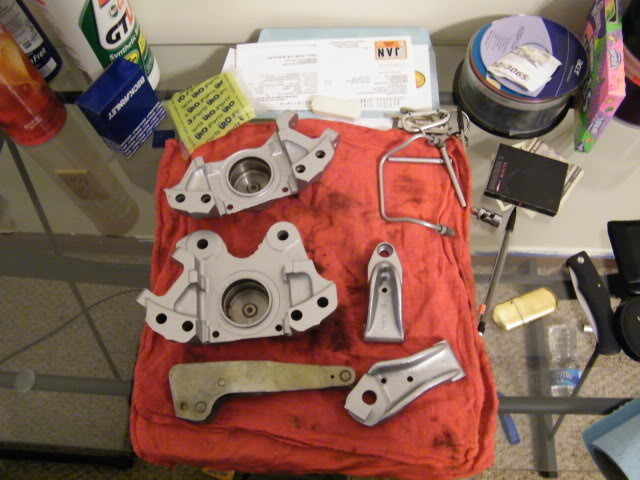
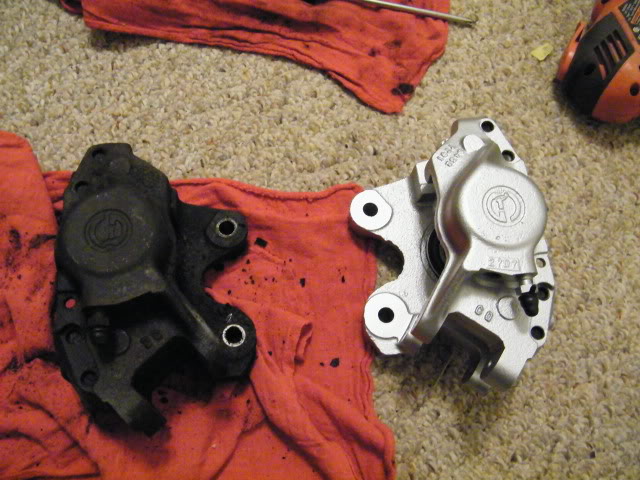
Everything from one caliper after being washed and dried
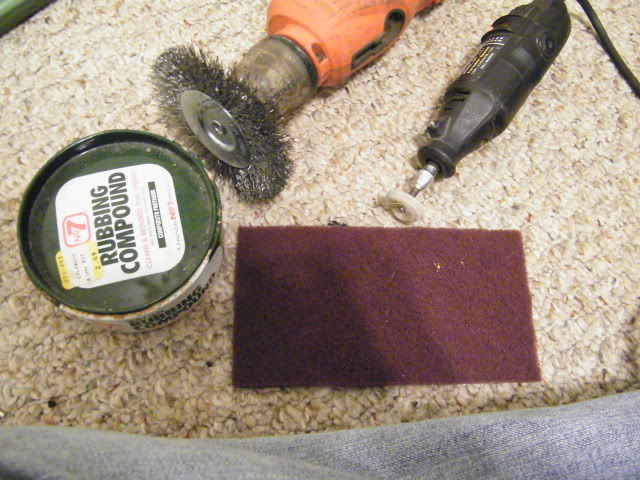
Now go over them with whatever you'd like. I using a combination of a scuff pad, dremel tool with cotton disk ( and No7 rubbing compound), and a wire wheel on my drill. MOST of it was the drill and the rest was areas it couldn't reach.
Obviously don't do any of this cleaning, painting, scuffing etc on the inside of the caliper (well,cylinder watever its called),It needs to be as smooth as possible. All I did was use some polishing compound on a rag inside to clean it, same with the pistons themselves. The uppper part of the piston I did clean with the wire wheel though because it had some dirt and crap on it (just the very top where the dust cover goes). This [the wire wheel] got the caliper down to bare metal and it looked great.Wipe the caliper clean and paint it and its good to go! I covered the inside with blue tape and put earplugs in the channels and any holes with threads. I used silver dupicolor caliper paint, looks great! I also cleaned and painted some other bits just to protect and prolong their life (beware, you are working on brake stuff, don't lay your freshly painted calipers on a rag thats got brake fluid on it, youll have to repaint them!!lol)
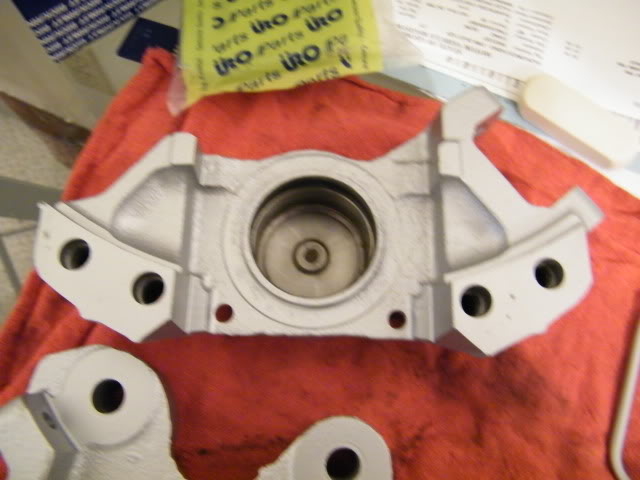
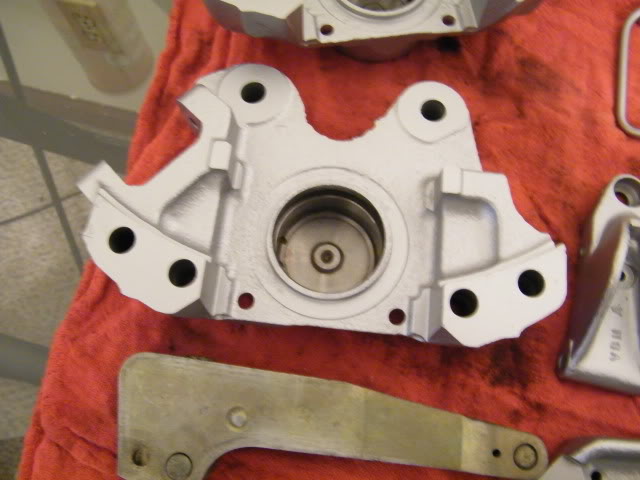
After the wire wheel...this actually isnt a very good pic because the wheel I was using was worn out when I did this pic
Next is reassembly. Put the piston in the caliper and take it out a couple of times just so you have a feel for just how straight it must go in. Now put the new O-ring inside and with some brake fluid on your finger tip wet it(like an oil filter seal).After putting some around the piston as well, put the piston in the caliper as flatly as you can and push. try to do this as evenly as possible, while its posssible to mar it the piston really shouldn't go anywhere if its not straight. You should be able to get it started with your hand.Try pushing on it then seeing it it looks angle at all and push on the appropriate areas to evenly get it down. I got it most of the way in pressing it with my hand and forearm then sat a wrench across the top and pressed it in the rest of the way with both my hands.
put the dust cover around the top and work it around so it isn't sticking out much at the top of the piston. Work the outer part of it around the rim of the caliper, put the wire clamp on. Try putting the ends on first then spreading it to get the rest of the way on. This reduces the chances the ends will gouge the rubber. You can put the dust cover on the piston before putting it in the caliper and it allows you to work it around and get it sealed a bit better, but its not a big deal if you don't.
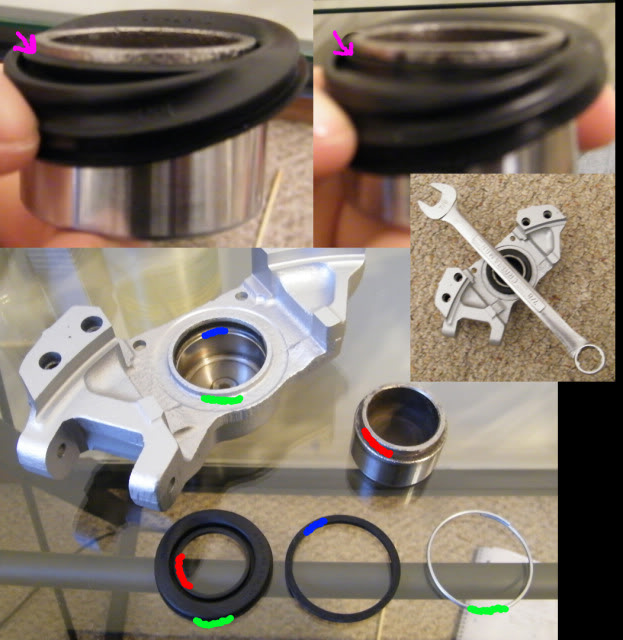
Match the colors!
Next step is basically reversing everything you have done, put the caliper back together and get everything on the car. BTW I used blue loctite on the caliper bolts that used them.[REMEMBER TO PUT THE DUST COVERS BACK WHERE THEY WERE ON THE HALFSHAFTS]. If you don't know how to bleed the brakes then google it, i have already made this too long haha. Be sure to spray some brake cleaner on the calipers after bleeding them, you wouldn't want to ruin the new paint!
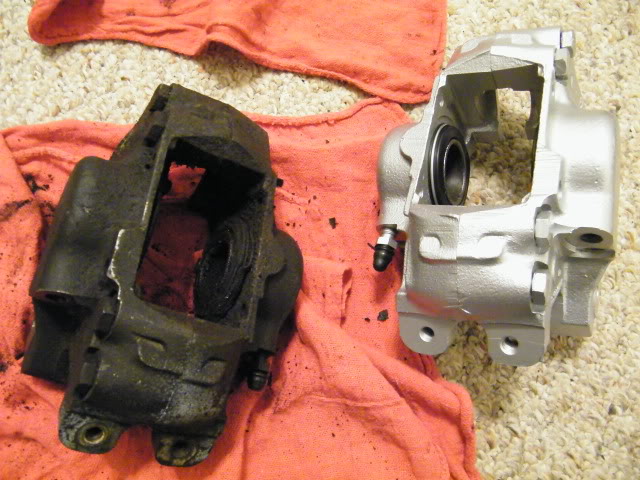
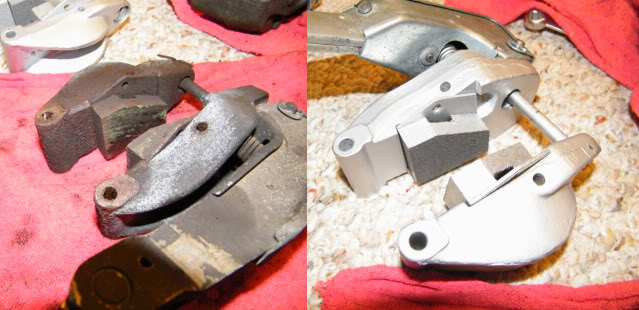
Some before and After
For me getting everything back on the car had some hiccups for sure. The bolts holding the caliper to the car to a while to get lined up and put in. I found it easier to first put in the bottom bolts because you can actually see them and then you only have one axis to line up on the top. If you don't put the pads in until later you can see the bolt and try to get it lined up. The other real pita for me was getting the two brake lines back on, what you have to remember is you had to stretch them a little to get them off so you may have to do the same to get them back again, but if you really have to bend them at all do as little as possible. Only other thing worth mentioning is the handbrake to the main caliper. I assembled the whole things before putting them on the car, so I had a good feel for how they went together. I put the handbrakes back in, then after putting the handbrake back in the main brake approximatley where it should be I put the pins/bolts to line it up correctly. Then I took one pin out, put the fork and lock tab through it and put it back, after that I took the other pin out and put it through the fork and lock tab. Get the fork in the holes and tighten it up. My pins wouldn't thread up and I had to lift on the bottom rear of the handbrake sides while tapping on the head to get them popped down far enough to begin threading. Before putting the bridge on bend the lock tabs back into place.
Again everyone will have different ways of doing this and please take in any comments on this post, Im just some kid figuring this out as I go and spending as little as possible .I am in no way saying this is the correct way to do this. You car may need more or less replaced than mine and there could be better ways to do some of this. I am just trying to put some info out there to make it easier for XJSs to be cared for.
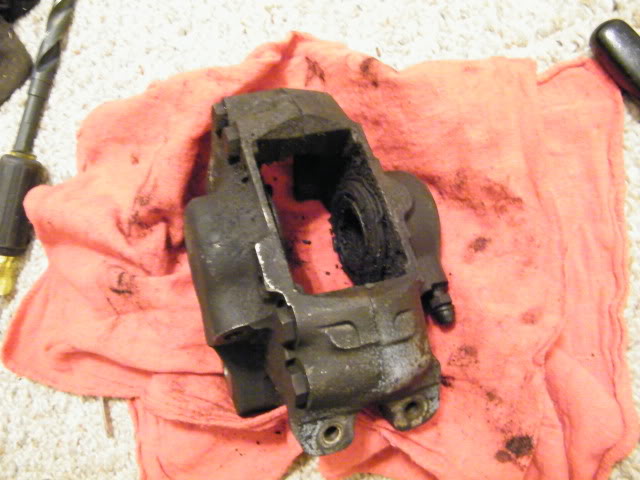
This whole thing totaled me about 80-90 dollars. For rebuilding the rear calipers and getting new pads I guess thats not bad. But depending on your own needs it could be more or less!! Alot of my money was in getting both sets of pads.
My car was parked since 1997 so not only was all of the rubber gone but it had time to damage my pads.
and FFS put the right brake fluid in it! Thats probably was caused all of this to begin with!
------My car has a Dana diff, if you have a salisbury this will be different, if you have brembo brakes it should be very similar. the salisbury has the caliper bolts on the caliper itself and has wire or pins locking them I believe------------------------------------------------
For this I just used a set of jackstands a couple of notches up, the tires need to be off the ground enough you can easily spin them freely.
I would like to mention I HIGHLY recommend wearing glasses for this, I usually don't for things I should and didn't till halfway through this job but 1. there is tons of falling dirt and rust that will slow down this job and 2. you don't want brake fluid in your eye. (trust me lol) it will dramatically speed up your work.
Start by pulling the springs off of the caliper arms. next disconnect the handbrake cable by sliding the furthest arm and slipping the end out, next take the little rubber boot off near the other caliper arm, now it will slide outof both and you can simply pull it back out of the way.
After that disconnect the brake line going to the caliper (7/16th,11mm), while you are at it and already have the right wrench in hand go ahead and take the bridge pipe between the 2 sides of the caliper off as well.
Now loosen the clamp on the dust cover on the half shaft and wiggle the cover until it clears the joints. You should be able to see a hole through the rotor, if not turn the wheel until you can. Look through it until you see the head of a bolt. There are 2 for each caliper and it can be a pita to line this up right. But the bottom bolt can be seen from directly underneath in case you are having trouble.
For this I used a 5/8th (16mm) on a universal socket and an 8-inch exstension. Its easiest to line the whole thing up and get it on the bolt and then put the ratchet on after.
The Dust cover pulled out of the way and the access hole for the caliper bolts
Now this next part can be tricky, the bolts are completely covered in blue loctite and it takes a good bit of strength to get them off. Not to mention having to hold the ratchet in the right position. I jammed a big wrench (12inch 7/8) between the rear spring and held the other side up against part of the cage, this will keep the ratchet in place so you can focus you strength on the ratchet.
If you have a cheater pipe lucky you! I had to put a 7/8th wrench on the ratchet to get enough leverage.
How I kept the ratchet in place so I could remove the main bolts
Once these are off you can freely move the caliper+handbrake assembly around this give a little more room for the next part (which you can technically do before or after removing the main bolts). Now I know this reads like any manual "remove the bolts" but I have been there and sympathize with you on the tedious flat to flat slow work this can be.
Using a 7/16 (11mm) remove the two bolts/pins holding the handbrake caliper to the main brake caliper. You may have to use a combination of flipping the wrench using different lengths and attacking it on different sides. I had a 6inch and 3inch stubby to work with but when I did the right side caliper I removed the bridge pipe first and got away with just the 6inch.There should be a lock tab on these, for me only 2 were up and the wrench overcame them (couldn't get a screwdriver between them), but there are 2 more tabs which could be bent so I guess you'll have to bend them down somehow if they are there for you. Now remove the retraction fork.
The Two bolts holding the handbrake caliper to the Main brake caliper
With these out you should be able to wiggle the two calipers apart. But you don't forcefully pull it at one side be gentle with them and try to pull evenly. On my right caliper I couldn't get them apart, but after leaving some PB blaster on them one side freed up, on the outter side I tapped a wrench on the bolt holding the handbrake pad on and this popped it free.
Now push the handbrake caliper back, making room for the main caliper. pull the main caliper out and now you can slide the handbrake caliper out after it.
MMMMMM
Next is cleaning and rebuilding.Take the 4 bolts out holding the calipers together (14mm). I don't have a vice so I had to use some clamps to hold it in place on a benchtop. Again you are going to need either a cheater or extend the leverage with another wrench (pb blaster makes this way easier).
My rig lol
Alot of people like to remove pistons by blowing air into the channels, if you don't have a compressor just go to a gas station and use the one there for car tires. Be careful and make sure to not let the pistons just fly out and get damaged.
However, because there is a dust cover on XJS pistons and thus a little channel/collar on top of the pistons you can use the collar to your advantage. I sprayed PB blaster into the caliper channel and around the top of the piston then went around the edges of the top of the caliper with a flathead screwdriver, be sure to spend little effort in one place, try to go around the piston and pull it up evenly.
The handbrake just has two bolts that loosen to let the pads slide off. The bolt on one end has a cotter pin to be removed, I don't know how to find out how far in it needs to be, I just taped it off where there was a dirt ring and cleaned and painted that So I would know how far in it went in. You can see how far it goes in, so on reassebly you can see where that line is.
To take the arm off simply remove the cotter pin on it and slide the pin out. Take the screw out of the side and the metal cover comes off. using some pliers pull the spring (now the only thing connecting the two) up and off the pin inside. If you can't remember how the pads went on, just match the shapes of your car and the pads. The taper of the pads follows the taper of the buttresses on the rear of the car.
When taking one of my handbrake pads off, it just separated from its mounting plate.
Now to clean everything! I washed mine off with purple power cleaner first just to clean excess dirt and dust off. Gasoline, diesel, kerosine etc would work well but I didn't want to go outside.
Everything from one caliper after being washed and dried
Now go over them with whatever you'd like. I using a combination of a scuff pad, dremel tool with cotton disk ( and No7 rubbing compound), and a wire wheel on my drill. MOST of it was the drill and the rest was areas it couldn't reach.
Obviously don't do any of this cleaning, painting, scuffing etc on the inside of the caliper (well,cylinder watever its called),It needs to be as smooth as possible. All I did was use some polishing compound on a rag inside to clean it, same with the pistons themselves. The uppper part of the piston I did clean with the wire wheel though because it had some dirt and crap on it (just the very top where the dust cover goes). This [the wire wheel] got the caliper down to bare metal and it looked great.Wipe the caliper clean and paint it and its good to go! I covered the inside with blue tape and put earplugs in the channels and any holes with threads. I used silver dupicolor caliper paint, looks great! I also cleaned and painted some other bits just to protect and prolong their life (beware, you are working on brake stuff, don't lay your freshly painted calipers on a rag thats got brake fluid on it, youll have to repaint them!!lol)
After the wire wheel...this actually isnt a very good pic because the wheel I was using was worn out when I did this pic
Next is reassembly. Put the piston in the caliper and take it out a couple of times just so you have a feel for just how straight it must go in. Now put the new O-ring inside and with some brake fluid on your finger tip wet it(like an oil filter seal).After putting some around the piston as well, put the piston in the caliper as flatly as you can and push. try to do this as evenly as possible, while its posssible to mar it the piston really shouldn't go anywhere if its not straight. You should be able to get it started with your hand.Try pushing on it then seeing it it looks angle at all and push on the appropriate areas to evenly get it down. I got it most of the way in pressing it with my hand and forearm then sat a wrench across the top and pressed it in the rest of the way with both my hands.
put the dust cover around the top and work it around so it isn't sticking out much at the top of the piston. Work the outer part of it around the rim of the caliper, put the wire clamp on. Try putting the ends on first then spreading it to get the rest of the way on. This reduces the chances the ends will gouge the rubber. You can put the dust cover on the piston before putting it in the caliper and it allows you to work it around and get it sealed a bit better, but its not a big deal if you don't.
Match the colors!
Next step is basically reversing everything you have done, put the caliper back together and get everything on the car. BTW I used blue loctite on the caliper bolts that used them.[REMEMBER TO PUT THE DUST COVERS BACK WHERE THEY WERE ON THE HALFSHAFTS]. If you don't know how to bleed the brakes then google it, i have already made this too long haha. Be sure to spray some brake cleaner on the calipers after bleeding them, you wouldn't want to ruin the new paint!
Some before and After
For me getting everything back on the car had some hiccups for sure. The bolts holding the caliper to the car to a while to get lined up and put in. I found it easier to first put in the bottom bolts because you can actually see them and then you only have one axis to line up on the top. If you don't put the pads in until later you can see the bolt and try to get it lined up. The other real pita for me was getting the two brake lines back on, what you have to remember is you had to stretch them a little to get them off so you may have to do the same to get them back again, but if you really have to bend them at all do as little as possible. Only other thing worth mentioning is the handbrake to the main caliper. I assembled the whole things before putting them on the car, so I had a good feel for how they went together. I put the handbrakes back in, then after putting the handbrake back in the main brake approximatley where it should be I put the pins/bolts to line it up correctly. Then I took one pin out, put the fork and lock tab through it and put it back, after that I took the other pin out and put it through the fork and lock tab. Get the fork in the holes and tighten it up. My pins wouldn't thread up and I had to lift on the bottom rear of the handbrake sides while tapping on the head to get them popped down far enough to begin threading. Before putting the bridge on bend the lock tabs back into place.
Again everyone will have different ways of doing this and please take in any comments on this post, Im just some kid figuring this out as I go and spending as little as possible .I am in no way saying this is the correct way to do this. You car may need more or less replaced than mine and there could be better ways to do some of this. I am just trying to put some info out there to make it easier for XJSs to be cared for.
This whole thing totaled me about 80-90 dollars. For rebuilding the rear calipers and getting new pads I guess thats not bad. But depending on your own needs it could be more or less!! Alot of my money was in getting both sets of pads.
My car was parked since 1997 so not only was all of the rubber gone but it had time to damage my pads.
and FFS put the right brake fluid in it! Thats probably was caused all of this to begin with!
Last edited by sidescrollin; 02-21-2011 at 05:25 PM.
The following users liked this post:
Jsquared (01-28-2024)
#36
02-21-2011, 05:20 PM
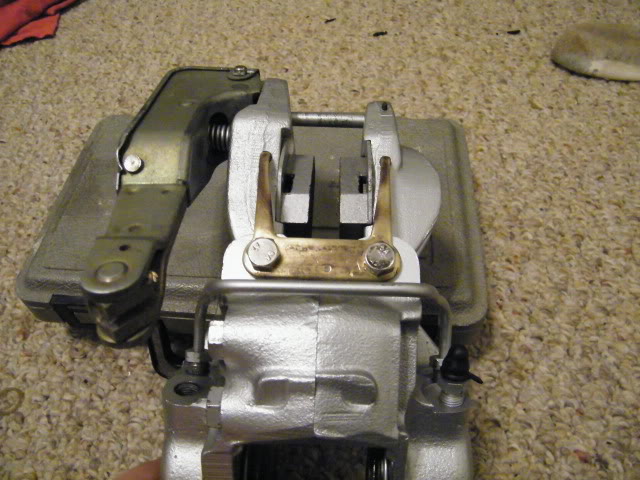
wanted to post a pic of the gear fraser mentioned and a couple of more pics for people to reference so they can understand how everything goes together. Makes it easier to understand everything when you are under the car and haven't taken stuff apart yet.

Happy cats like to run
(old pic)
Happy cats like to run
(old pic)
Last edited by sidescrollin; 02-21-2011 at 05:45 PM.
The following 4 users liked this post by sidescrollin:
#37
01-25-2015, 06:41 PM

Junior Member
I know this is 4 years old but havent seen anything better so far than this post to help,How exactly are the parking brake handles suppose to work? mine move back & forth but no kind of ratchet sound,no clicking & it goes right back,is this normal? I hate to take them apart if I dont need to,I have cleaned them up good,put them on calipers but they seem to be tight on the rotor,makes it real hard to turn rotor,I assume this shouldnt happen? Any ideas?
#38
01-25-2015, 07:05 PM
Veteran Member
#39
01-26-2015, 12:06 AM
Junior Member
#40
01-26-2015, 06:36 AM

Veteran Member
Set up the parking brake pads by undoing the split pin on the large slot-headed bolt that goes between the two parking brake caliper halves (on the right in the photo) then hold the caliper halves inwards and adjust them by turning the slotted head with a screwdriver. The pads should be just, just, touching the discs, but not hard enough to slow them..
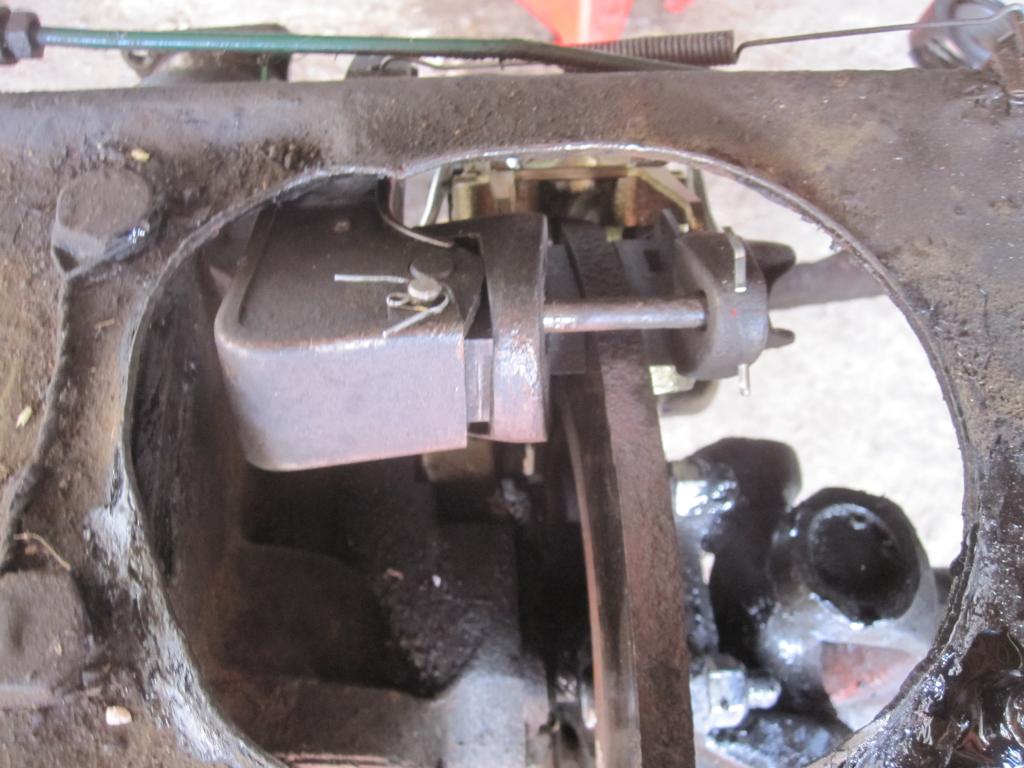
Replace the split pin. Then, as the pads wear, the self adjusters in the caliper halves will/should take up any slack created by pad wear. The self adjusters will not actually do anything until the pads wear. The crucial thing is to set up the mechanism so there is no slack between the pads and the discs to begin with.
Then, when back in the car, applying the handbrake should engage the pads after the lever is pulled up a 2 to 3 inches or so. If it is more than that, the cable needs to be adjusted. This is done by pulling up the carpet behind the driver's seat on the sill inside the car, and you will find the threaded cable adjuster nut and locking nut.
Greg
The following 2 users liked this post by Greg in France:
Jsquared (01-28-2024),
orangeblossom (01-26-2015)