

MM's How to change a headliner post


Hope you don't mind MM.....just trying to show you what I mean by the post being more readable for the members and easier for you to post - less time consuming too.
I only included a few of the pics here n there and I can delete very easily.
Please let me know once you've seen it and I will delete this and leave your original post
Thanks - Jim
Original post by Motormouth
Howdy all! Just wanted to share a bit about me and Draguar (formerly known as Christine...which seems to be all-too-common a name for problematic cars...lol).
When I got her, the headliner was not looking near up-to-par. There was a huge burn hole above the passenger side sun-visor, and the back was frayed and coming apart. So, I decided to share my adventure of changing out my headliner in case anyone wanted to try it him- or herself.
Now, before I get started, remember that Draguar is a 1976 XJ12L (Series II). Not all Jags (or other cars) are going to be the same. This is simply how I did it.
Below you will see the before pictures.

One more "before" picture (5987), then on to the fun stuff.
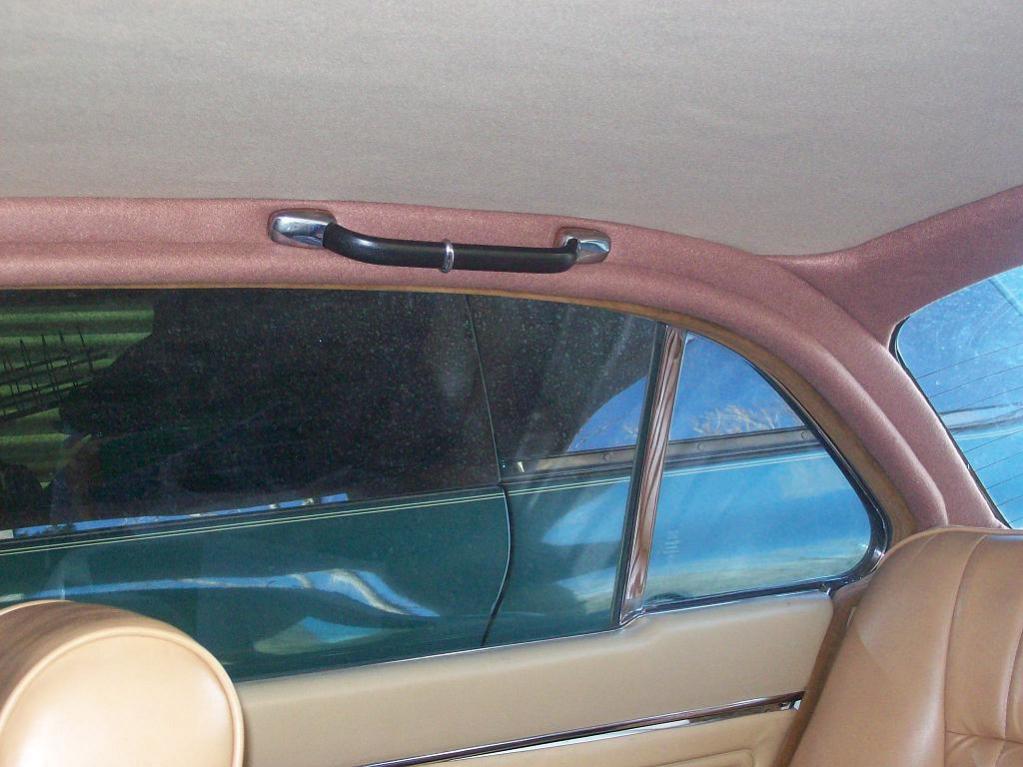
The first thing I had to do was take the clothing hangers ("OS" bars) off from above the rear doors. The chrome covers for the screws simply clip on. I took a rather large flat-head screwdriver and pried them carefully off from the front lower part of the cover. I then moved my screwdriver toward the back, rotating it as I went. It then popped off, exposing the screw beneath.
Unscrew it, and put all the pieces back together to keep them in order and in the right place, since there were plastic risers in between the handle and the liner trim (see the next post). The final picture shows the area where it used to be.


The first picture shows how I put the pieces on the floorboard.
I took the trim off VERY carefully (in case the clips were plastic, which they didn't turn out to be). I started at the front near the sun visor, and, feeling as I went, pulled each clip out one by one, until the whole thing was loose. I did the same for the rear.
The front was a bit different, because I had to unscrew both sunvisors and the rear view mirror. Sorry that I don't have pictures of those two things.
The following pictures show the trim pieces out of the car.
A couple more pictures before I took the headliner out.
These pictures show the clip holes that would need to be cut from the new headliner once I got ready to put it in.

Now for the fun part!!
I started taking out the headliner from the front passenger corner. I peeled a bit of it back to see how easy it was going to be. I figured out it would be fairly easy. Although some of the foam stuck to the insulation, I knew it would be OK taking it out.
I removed the headliner simply by peeling it back, and then removed the foam (pieces at a time).


After it was all out, I used a steel brush to remove the remaining foam from the metal above the doors (where the clips would go).
After that, I figured the insulation would give me a headache by being somewhat loose (since I wasn't going to remove the entire headliner backing piece), so I sprayed a coat of the headliner adhesive onto it, and pressed down spots that seemed like they would be loose or hanging down.


I spread my new headliner material out and got a general idea of how big a piece I would need. I placed the old headliner (as best I could) on top of the new headliner and drew around what I figured would be the best shape for it. I left myself about 2 inches on all sides for scrap.

The first picture shows the adhesive I used. It's a headliner specific adhesive rated for high-temperature usage. I got it from my local fabric store (where I also got my headliner material, which has foam padding on it).
I started at the rear of the car nearest the rear windshield. I sprayed a strip about a foot tall (front to back) and all the way across the roof. Now, here's the important part:
IT IS IMPERATIVE TO LET IT TACK UP BEFORE YOU TRY TO STICK THE HEADLINER ON!! lol I know because it took me half an hour to figure this out.
So, I sprayed one foot sections, let each tack up for about 5 minutes, then attached my headliner, starting from the center of the roof and smoothing it outward, working from the area that I had already done. It took about 30 to 40 minutes total (after the initial frustration of it not sticking because I didn't let it tack up long enough) to finish putting the headliner in.


Once I got the headliner in, I let it dry for a couple of hours. I then went back with scissors and trimmed to NEAR where the finished size and edges would be. Then I used new razor blades (I went through 3 of them) to do the final trim. I made sure to feel for, then trim around, the holes where the clips went into the body for the trim parts.
Once I finished the final trim, I sprayed around the edges (on the metal), let it tack up, and pressed the edge
 of the headliner material into place. I ended up with a "pretty good looking" new headliner. There are a few places that you can tell aren't perfectly smooth, but it looks a HECK of a lot better than the original headliner.

Once I finished with the headliner, and let it dry, I re-covered the trim pieces with a different material (using the same adhesive and in the same manner), and put it all back together.
What I ended up with is one heck of a good start on a great-looking new interior.
I hope you'll stay tuned for my next HOW TO, when I describe the LONG process of redoing the wood veneer.


Thats strange Translator...just received a pm from MM who agrees that it looks a lot better this way
Interested to see anyone else's point of view and whether they can see the pics
Senior Member
Joined: Oct 2009
Posts: 654
Likes: 4
From: Albuquerque, NM
I can see the pictures just fine.
I don't know if you embedded them or what, Jim, but what I'll do is upload them to my album, then link to them from there.
Is there a limit on the number of photos a person can have in their albums?
I don't know if you embedded them or what, Jim, but what I'll do is upload them to my album, then link to them from there.
Is there a limit on the number of photos a person can have in their albums?

Junior Member
Joined: Nov 2009
Posts: 13
Likes: 0
That looks like a very well done job, Jim. I'm proud of you, and you should be of yourself.
I was out of the country for a few months and came back seeing the headliner in my Jag coming off. Needless to say I felt guilty of not taking good care of my car, so I had it replaced quickly at $250. How many hours did you spend on replacing the headliner and what was the cost on materials used? You're blessed with skills and zest, you know. Please post pics on the wood veneer job when you have a chance, it should be inspiring to many.
Thanks for the posting.
Trending Topics

Hey there elandfish, thanks for the praise, but if you look at the top of my post you'll see that the work was carried out by Motormouth and it is his post. I only reposted it to try and better show off his handiwork, as it looks like such a job well done.
I know he was going to be posting up on the woodwork but haven't seen any to date....Perhaps you could send him a pm on this?


Thread
Thread Starter
Forum
Replies
Last Post
Currently Active Users Viewing This Thread: 1 (0 members and 1 guests)