When you click on links to various merchants on this site and make a purchase, this can result in this site earning a commission. Affiliate programs and affiliations include, but are not limited to, the eBay Partner Network.
Well, it's home! I had to rent a box truck with a liftgate and pallet mover to get it from the shop where it was delivered to my garage. So, $385 to get it across the country. $275 to get it across town! Now I can get to work on it. First thing is to check the tappet gaps.
[QUOTE=..... Then they hit me with $100 surcharge saying the pickup address was residential! I think I'm gonna stop doing reviews.[/QUOTE]
they always do that. I shipped a 3.8 engine to New York. I paid the quoted price. Then they sent me a bill for $300. because the facilty had a Gate and the trucker had to stop the truck at the gate.
I told them to shove the bill up their behind and to sue me if they liked.
I had a chance to measure the tappet gaps. Next task will be a leak down test.
Cyl int (.004) exh (.006) Comp (psi)
1. .00015 .004. 180
2. .004 .007 130
3. .006 .008 180
4. .007 .006 170
5. .005 .007 130
6. .004 .008. 120
Hi Jim,
The valve clearance doesn't look bad except #1 intake is very tight. Was the compression test done dry? Or did you squirt some oil in the cylinders?
The compression readings are from the auction pictures. Currently there is no flywheel attached so I can't crank it. The #1 reading is odd. It may mean a worn valve seat/stem. I may have to pop the head.
Removed the intake, carbs are on the bench! Things are coming apart easily. The jet diaphragms are stiff and need replacing. The shafts and butterfly look good. These use a big O ring between the carb and the intake runner. I'm looking at rebuilding kits for the HD8's and they appear to have a lot of gaskets ect that don't apply to these. I just need to seal the shaft ends. Maybe I'll get some new jets, O rings and teflon!?
Those are nice carbs to balance when the time comes, all butterfly valves are shut and there are screws for fine adjustment to set the idle and balance.
Interesting on the mounts, I've never seen large strong springs holding the carbs on.
Certainly can't over tighten them _ I guess it's to compensate for any expansion of the manifold when it heats up.
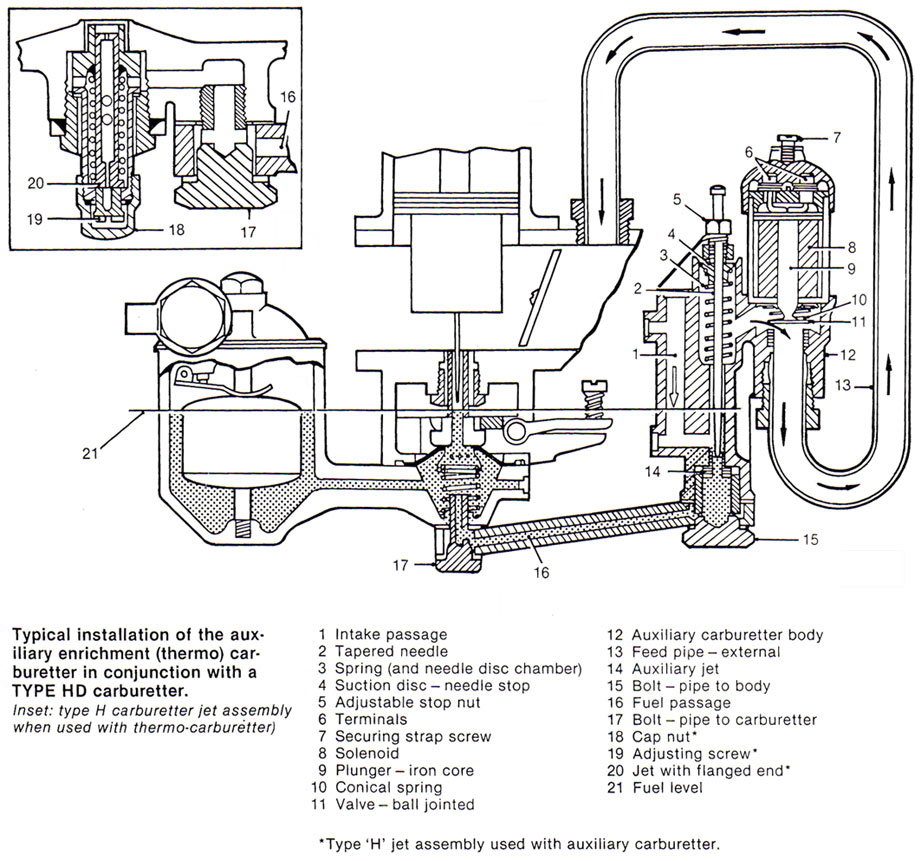
The starting carb gets its gas from the center carbs float bowls bottom bolt. Well, I snapped that bolt! It had holes drilled into it for gas to flow thru it and was seized up in gas crud. It would be #17 in this chart - 5/16 22 BSF thread!
I don't know of an easy way to get snapped of rusted bolts out of aluminum.
Heating things up does very little as it does not break down the aluminum oxide that binds with the rust.
I will make some suggestions pending what others will say.
Immerse the part in boiling water for at least a 1/2 hour or more and try an easy out, the bolt already has a hole it, so that's one thing.
Make sure it's a good quality easy out, you don't want that breaking off in there too.
You could try some heat and WD40, heat it up until the WD40 begins to bubble, keep adding heat just before it burns off after is bubbles.
The WD40 may penetrate into the threads for the easy-out to work.
You could also drill it out, start with the smallest drill removing as little material as possible using lots of oil so the drill doesn't grab.
Keep going until you see the major diameter of the threads _ this may relieve the tension of the bond so you can get pick and thread it out.
Using reverse drills may help to loosen things up.
Patients is key, it may take an hour or more to win, I spent half a day once carefully drilling out a 2BA screw in one of these things, I got enough of it out so I could eventually use a tap to remove the rest and clean up the threads.
If you Google BSF taps and dies, suppliers will come up that have them, usually out of the UK, waiting for the tap to come in the mail will give you lots of time to work on this.
Here is one source.
I drilled out the center of the bolt starting small and increasing drill size until the next size up may cut into the threads. I then tried to "crush the can" with a punch. Unfortunately the aluminum boss cracked. Time for a new float bowl.
While the carbs are apart I started looking at the head. I Scraped off the intake gasket and saw this. Is this how heads were painted? What's this blue stuff?
There are new gaskets on the head cover gaskets and the breather. This looks too good to be original paint from 1963. The paint on the bolts and nuts make me think this has been repainted. Not necessarily a bad thing.
From my knowledge the only part that is painted gold or blue or duck egg to denote the type of engine you have is the area around the spark plug holes. They are painted from the rear section to the front but not over the top of the aluminium bridge between the can covers and certainly not down the front of the engine over the chain covers.
Picture of my 3.4s engine in Duck egg blue.
Well, I took the head off today. It separated easily but hung up on the upper threads until I got it level and it was free.
Piston tops have a lot of carbon build up. Not surprising with 3 carbs plus the starting carb AED. Some light scratches on the cylinder walls. They appear to be the same in all directions. Cylinder 2 has some rust colored spots in places. I'll use my dial bore gauge to measure any wear and see how far out of round they are.