When you click on links to various merchants on this site and make a purchase, this can result in this site earning a commission. Affiliate programs and affiliations include, but are not limited to, the eBay Partner Network.
Hopefully answering Jagstuart's question about changing the polarity of the Smith's pin clock as fitted to the Mk2 S Type and many others.
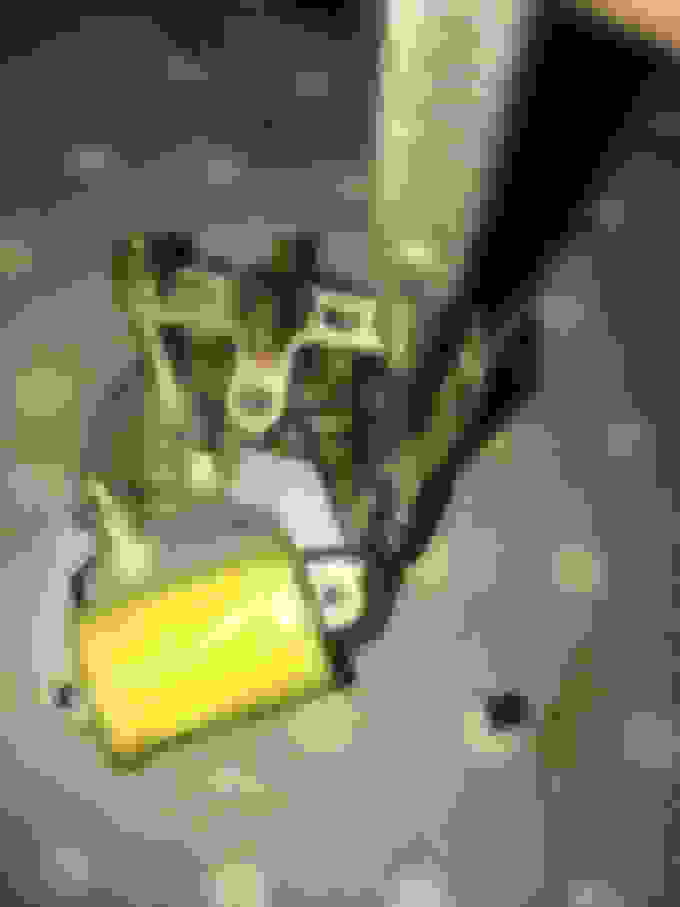
Remove the 4 screws and link and lift off the back cover Next remove the backplate by lifting it from the dowels Backplate removed Remove the insulating sleeve, screwdriver is pointing at the disc which is a diode, this has to be flipped round to face the opposite way Undo the 2 locating pegs and carefully pull the solenoid out of the way, do not pull the wires too much especially where they join the coil Remove the screw that holds the terminal in place and carefully lift out the rectifier housing, this can be quite brittle, so be careful This is the diode, this needs to be taken out and flipped side for side, you can put a small dot with a marker pen on one side so you know which side is which if you drop it ! This is held in place with a spring, be careful when removing this not to break the plastic holder. Put the diode and its housing back together in the reverse order here is the screw that holds the terminal in place When refitting the solenoid, make sure both gaps either side of the balance wheel are even.
The clock will now be negative earth, mark the back of the clock with a sticker or some other method so that anyone following knows the polarity has been changed.
The above link really nice chap, Chris, I had a long chat with him, he is an aircraft engineer turned watchmaker and a car enthusiast, founder member of the Area 8 JDC region. I met up with him for coffee just before Christmas, he knows his stuff and is a really helpful guy, many say that these clocks are not reliable in their original form, which to a point is true, but when cleaned adjusted and oiled properly do provide reliable service. The issue other than dirt is arcing on the pin which wears them away, this can be hugely reduced by adding a diode to stop the back emf which is what causes the arc.
I have successfully refurbished one clock with the clocks4classics circuit board, but even that had it's issues, although the pulse to the solenoid is generated by an electronic circuit, unless the jewels and other parts are cleaned and lubricated properly then the clock will still not run properly. The circuit board is not the answer to a dirty movement, but does solve an issue when the pin has burnt through. Replacing the pin is fiddly to say the least, outside my capabilities for sure, talking to Chris from cjnwatch he can replace the pins, but the cost is generally too high for most clients so they get another clock, convert to electronic or just leave it not working.
On another clock I have also got it working happily in it's original form but converted to negative earth.
Jose, Chris Eck uses a similar board to the clocks4classics circuit board, but his uses the original pin, not sure what would happen if he had one where the pin was gone, the clock I converted had no pin left (well only a stump !) , the clocks4classics circuit uses an opto sensor to pick up on the balance wheel so no mechanical contact, but this does mean that the original contacts are removed so unless you kept the parts you could not go back to original. A full clean, service and conversion would take a good watchsmith about 2 hours maybe a little more, $85 including shipping seems really cheap.
For those that don't want to send their clock off or just like to do it themselves, you have my description, for the lubrication etc. follow Chris's service PDF https://cjnwatch.co.uk/wp/wp-content...-Car-clock.pdf
Well that was quite a bit of fun. On try #3 I sent the diode hold spring into low earth orbit and lost contact completely. MIA. The diode housing though not crispy is very thin on the back and is a POS in my opinion, (although ya gotta love British engineering). It gave up the ghost and using a piece of epoxy impregnated cardboard I made another back super-glued it to the surviving part and used 1/16 foam sheet instead of the spring to trap and tension the diode. Spring and counter balance are all working now with old positive earth terminal hooked up to the juice.
new tan cardboard square backing between the busted housing and stop tab. little square chunk of foam between contact and cardboard.
That's the clocks4classics one, If you do get one make sure you download the latest installation manual, some of the old info doesn't tell you to remove the insulator from the topside of the plate, and the clock won't work - ask me how I know that ! I didn't read the bit that says "download the latest manual from our website" , emailed them and they pointed out my dumb mistake very promptly .
If the jewels are dirty and the balance spring amplitude is not at least 180 deg it will keep stopping, or won't start and just keeps going through the start routine. So clean the jewels and the train and oil with some decent clock oil and it will work a dream.
Hopefully answering Jagstuart's question about changing the polarity of the Smith's pin clock as fitted to the Mk2 S Type and many others.
Remove the 4 screws and link and lift off the back cover Next remove the backplate by lifting it from the dowels Backplate removed Remove the insulating sleeve, screwdriver is pointing at the disc which is a diode, this has to be flipped round to face the opposite way Undo the 2 locating pegs and carefully pull the solenoid out of the way, do not pull the wires too much especially where they join the coil Remove the screw that holds the terminal in place and carefully lift out the rectifier housing, this can be quite brittle, so be careful This is the diode, this needs to be taken out and flipped side for side, you can put a small dot with a marker pen on one side so you know which side is which if you drop it ! This is held in place with a spring, be careful when removing this not to break the plastic holder. Put the diode and its housing back together in the reverse order here is the screw that holds the terminal in place When refitting the solenoid, make sure both gaps either side of the balance wheel are even.
The clock will now be negative earth, mark the back of the clock with a sticker or some other method so that anyone following knows the polarity has been changed.
Any questions please ask.
Your information gave me the confidence to remove my clock, which hasn't been going since the year Y2K, when the generator in the '64 Daimler failed, and I installed a 'modern alternator' and went negative earth.
Mine didn't have the diode, so ended up reversing the leads on the solenoid(?) and it is sorted.
Again, thank you for the confidence.
I have two clocks, one on the car that was not working when I bought the car but I have now changed to Neg earth and just disconnected it completely. The second is a clock I bought with a complete dash as spare which I have never tried so I might start with this one and try the conversion out.
Thanks for the information so lets hope it works as I am sick and tired of having my clock constantly at 10 to 2.
See my post No 8. I'm equally tired of seeing my clock stuck at a few minutes after 12. I'm particularly interested in the route you choose & the result. Keep us informed Rob & why. Interesting subject as it effects so many. I have retained positive earth in my case. I don't want to ship my clock half way round the world. I want a home job that works. In the modern electronics world it should be simple. My brother in law, who is so trained, should be able to do it in a heartbeat.
Last edited by Glyn M Ruck; Apr 1, 2023 at 04:02 AM.
Glyn. Just have a crack at it yourself. It's not modern. Clockwork, with some electrics thrown in.
And, if you bugger it up, it will still say 10 to 2.
Tilly's thread is a great confidence builder.
I spent a couple of months back in 1963 in the Department of Civil Aviation's instrument workshop. I was already a radio/radar technician (5-year apprenticeship) but we had hundreds of illuminated bezel lamps that needed engraving for air traffic control radio consoles and the instrument workshop was understaffed. So, I got "volunteered" to assist with the pantographic engraver.
These workshops repaired instruments, mutimeters and clocks. A couple of watchmakers were employed, and they showed me a lot of tricks with clocks and similar instruments like speedos and tachometers.
The majority of the problems with clocks and similar mechanisms relates to dirt and a lack of lubrication.
They showed me how they would suspend a clock movement vertically in a jar with a couple of thin sticks under the face and then fill the jar with a cleaning fluid like shellite to just below the clock face.
They would then leave it immersed for 24 hours and then remove it and gently clean or dry it with a very weak airstream.
Moving parts would then be lubricated with watchmaker's oil.
They reckoned about 90% of the time this fixed the problem.
I have used this technique a few times on Smiths clocks and it has been successful.
I have not been so successful with my method which involves rapping it with my knuckle several times and swearing quietly building up to the butt end of a screw driver handle and swearing very loudly. I might try your method and see it it works any better Bill.
By the way I was not aware of the diode in the Smiths system and I gleefully changed a number of cars from positive to negative earth and the clock ran OK
Bill - The diode came later in the series to protect the points. It may well have not been present on those you worked on.
The clock is a nice design for pre-quartz. And as Bil mentioned, apart from burning the points, suffers the enemy of all old clocks, dirt in the movement. Back in the day, it was considered important to re-start the clock by prodding the setting knob every time the battery was re-connected.
Peter
Can you or anyone else supply an approximate date for the introduction of the diode into the clock. The majority of the clocks I resurrected were in Mk1s (pre-1959) and early Mk2s.
However I do get calls from owners wanting to change from positive to negative earth, which is a pretty simple procedure, but I would need to tell them about the clock polarity.
e.g. I currently have an acquaintance who has a1966 S type under restoration and wants to change polarity.
Cheers