


For Sale


 RE: For Sale
Marinawazz............putting it politely, members on here don't take too kindly to people joining and with their first post trying to sell something.
Unlikely you'll get a response.
This is an enthusiasts forum, NOT a car auction site. Perhaps if you took the time and trouble to post up some info about yourself, your car c/w pics and info you may get a response.
Jim
Guest
Posts: n/a
RE: For Sale
Jim, if I am not mistaken, it does say classifieds on this site and I did see others post items for sale here. Anyway, I just figured someone else might enjoy this car and why not a better place to advertise then a Jaguar site?!?!? Or, maybe you can suggest a good site to post this car on. Didn't mean to get your feathers up in a ruffle, just trying to sell a car sheesh![&o]
Guest
Posts: n/a
RE: For Sale
I'm with Jim on this one. As my screen name says, I'm shopping for a Jag. The first thing I look for is the model, followed by the location, color scheme, and conditon/particulars. If this info is there, buyers do not need to waste your time and theirs to call you only to find out the car is on the other side of the country, is the wrong color, etc. Many of the forums I belong to require much of this information, and the admins do not make a friendly posting like Jim did, they just delete or lock the post. Others do not allow for sale posts until you have been a member several months or have a minimum number of posts.
Here is a good tutorial on how to post pics from another forum, most of this applies to this forum:
Found this on a Google search & edited it for here. I use Photobucket, but this will apply to other free picture hosts for the most part:
1. First, transfer your pictures from your digital camera to your hard drive. If you are unsure how to do this, check the instructions that come with your camera.
2. Save the pictures to a JPG format. Your photo-editing software will have a 'save-as' option that will let you choose one of these formats. TIP: Make sure your photos are in color and are sized for web-viewing - 640x480 are good for inserting into a page, 800x600, 1024x768, and larger are best for stand alone viewing (new link). A 2000 x 1600 picture will take a long time to load and mess up the viewing of the page for everyone else.
3. Now that your pictures are formatted for the web and saved to your hard-drive you are ready to begin!
4. In order to let others see your photos you need to store them where web browsers (Internet Explorer, Firefox, etc) can retrieve them at any time. People cannot see pictures stored on your hard drive, i.e. C:\mypictures\myv8z.jpg. You must store your photos on an FTP site or on a website (Photobucket or Picasa for example) that lets you upload pictures. These are mostly free sites with annoying ads. Most Internet Service Providers give their customers free server storage for personal websites. Contact your ISP to find out what you need to do to access the FTP site where your content can be stored.
5. Once you have a place to keep your pictures, upload them to that site using the instructions specific to that site.
6. Next you will need to find the address where your images are stored - this is called a URL. Every webpage on the Internet has a URL. You can see the URL of a page in the address window at the top of your screen. It begins with http:, short for hypertext transfer protocol. For example, http://forums.hybridz.org is the URL address for the HybridZ Forums home page.
7. Your pictures will have their own unique URL. This will include the sites address and your file name - don't forget to include the file extension. For example, a picture with a file name of myv8Z.jpg on the HybridZ homepage would have a URL of http://www.hybridz.org/myv8Z.jpg. Photobucket and other hosting sites add a lot of stuff in here, so don't be surprised to see a url like http://i123.nameofhoster.com/ab/albu...z%20/myv8z.jpg
8. Once your photos are uploaded to your webspace, they are ready for use on your message board post. In a second browser window, you open the forum thread where you want to post and start your reply or new message. You can also edit a prior message to add pictures using this process. Type your message in this browser window until you are ready to add images, then change windows to your picture website (i.e. Photobucket). Find the picture you want to post and copy the url (this will save you a lot of typing, they are always very long). To copy, highlight the url by left-clicking prior to the http part and make sure the entire part is highlighted by moving your mouse to the right. Once it is highlighted, either press Control-C or go to Edit-Copy to copy the url. Some websites like Photobucket will automatically copy the url if you left click on any part of it- a small box pops up and says Copied. You usally want to use the one that starts with http. In Photobucket, this is called the Direct Link.
9. To display your picture in the message board post you are typing, click the insert image icon which appears in the options above the box where you are typing your message. [align=center]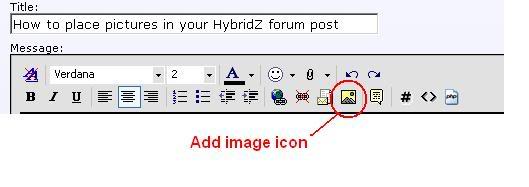 [/align]
10. When you click this icon, a box with "Http://" will open in your message asking for the url of your image. Note that it is highlighted, so if you type anything in it the Http part goes away. You are now ready to paste the url that was copied in step 8 here. With the Http part highlighted, press Control-V or Edit-Paste and you should see the same text as was copied in the box. Photobucket Shortcut- Once you are comfortable doing this, you can use the text in the IMG code in Photobucket located below the Direct Link you were using. This automatically adds the IMG codes before and after the url and saves you some time. Just determine where you want the image, copy it from Photobucket, and paste it into your post.
11. To let viewers see a larger image, all you need to do is paste the picture url into the post. Do not add the IMG before and after the url. This will allow viewers to click on it and let it load on another page.
12. Repeat 8 through 11 as needed for additional photos.
13. Click the "Preview Post" button at the bottom of where you are typing to see what your post will look like. If you see a red X where your picture should be, there is a problem. This is usually an improper url- either it was not properly copied or there is another problem. When you are ready to submit the post, you click submit. Your message will then be posted on the board with your image.
Here is a good tutorial on how to post pics from another forum, most of this applies to this forum:
Found this on a Google search & edited it for here. I use Photobucket, but this will apply to other free picture hosts for the most part:
1. First, transfer your pictures from your digital camera to your hard drive. If you are unsure how to do this, check the instructions that come with your camera.
2. Save the pictures to a JPG format. Your photo-editing software will have a 'save-as' option that will let you choose one of these formats. TIP: Make sure your photos are in color and are sized for web-viewing - 640x480 are good for inserting into a page, 800x600, 1024x768, and larger are best for stand alone viewing (new link). A 2000 x 1600 picture will take a long time to load and mess up the viewing of the page for everyone else.
3. Now that your pictures are formatted for the web and saved to your hard-drive you are ready to begin!
4. In order to let others see your photos you need to store them where web browsers (Internet Explorer, Firefox, etc) can retrieve them at any time. People cannot see pictures stored on your hard drive, i.e. C:\mypictures\myv8z.jpg. You must store your photos on an FTP site or on a website (Photobucket or Picasa for example) that lets you upload pictures. These are mostly free sites with annoying ads. Most Internet Service Providers give their customers free server storage for personal websites. Contact your ISP to find out what you need to do to access the FTP site where your content can be stored.
5. Once you have a place to keep your pictures, upload them to that site using the instructions specific to that site.
6. Next you will need to find the address where your images are stored - this is called a URL. Every webpage on the Internet has a URL. You can see the URL of a page in the address window at the top of your screen. It begins with http:, short for hypertext transfer protocol. For example, http://forums.hybridz.org is the URL address for the HybridZ Forums home page.
7. Your pictures will have their own unique URL. This will include the sites address and your file name - don't forget to include the file extension. For example, a picture with a file name of myv8Z.jpg on the HybridZ homepage would have a URL of http://www.hybridz.org/myv8Z.jpg. Photobucket and other hosting sites add a lot of stuff in here, so don't be surprised to see a url like http://i123.nameofhoster.com/ab/albu...z%20/myv8z.jpg
8. Once your photos are uploaded to your webspace, they are ready for use on your message board post. In a second browser window, you open the forum thread where you want to post and start your reply or new message. You can also edit a prior message to add pictures using this process. Type your message in this browser window until you are ready to add images, then change windows to your picture website (i.e. Photobucket). Find the picture you want to post and copy the url (this will save you a lot of typing, they are always very long). To copy, highlight the url by left-clicking prior to the http part and make sure the entire part is highlighted by moving your mouse to the right. Once it is highlighted, either press Control-C or go to Edit-Copy to copy the url. Some websites like Photobucket will automatically copy the url if you left click on any part of it- a small box pops up and says Copied. You usally want to use the one that starts with http. In Photobucket, this is called the Direct Link.
9. To display your picture in the message board post you are typing, click the insert image icon which appears in the options above the box where you are typing your message. [align=center]
[/align] 10. When you click this icon, a box with "Http://" will open in your message asking for the url of your image. Note that it is highlighted, so if you type anything in it the Http part goes away. You are now ready to paste the url that was copied in step 8 here. With the Http part highlighted, press Control-V or Edit-Paste and you should see the same text as was copied in the box. Photobucket Shortcut- Once you are comfortable doing this, you can use the text in the IMG code in Photobucket located below the Direct Link you were using. This automatically adds the IMG codes before and after the url and saves you some time. Just determine where you want the image, copy it from Photobucket, and paste it into your post.
11. To let viewers see a larger image, all you need to do is paste the picture url into the post. Do not add the IMG before and after the url. This will allow viewers to click on it and let it load on another page.
12. Repeat 8 through 11 as needed for additional photos.
13. Click the "Preview Post" button at the bottom of where you are typing to see what your post will look like. If you see a red X where your picture should be, there is a problem. This is usually an improper url- either it was not properly copied or there is another problem. When you are ready to submit the post, you click submit. Your message will then be posted on the board with your image.

Thread
Thread Starter
Forum
Replies
Last Post
FS[Western US]: XJS V12 Convertible
marklcap
PRIVATE For Sale / Trade or Buy Classifieds
0
Sep 29, 2015 12:41 PM
vacolorito
PRIVATE For Sale / Trade or Buy Classifieds
0
Sep 25, 2015 09:29 AM
Currently Active Users Viewing This Thread: 1 (0 members and 1 guests)