

2005 3.0 Litre AC Compressor Replaced W/Pics FAQ

Thread Starter
|
Veteran Member


Joined: Feb 2009
Posts: 8,020
Likes: 1,731
From: Sunny South Carolina
Before changing out your 3.0 V6 compressor. Read this tsb first!!!!
 JTB00183NAS1.pdf
Difficulty Level: moderate to easy
Tools Needed: AC Block Gauge (with quick connects and hoses) and Vacuum Pump (available inexpensively @ Harbor Freight Tools), R134a brass shut off, Green Dye (checking leaks, optional), 3/8" Ratchet with 13mm and 10mm socket, extension (optional), 13mm and 10mm wrench (racheting type optional), Meat Probe, Kitchen Scale not in picture below.
Time: 1 hour
First alldatadiy states the motor will have to be raised for the 3.0 litre. This is incorrect! The compressor will slide out easily without raising motor.
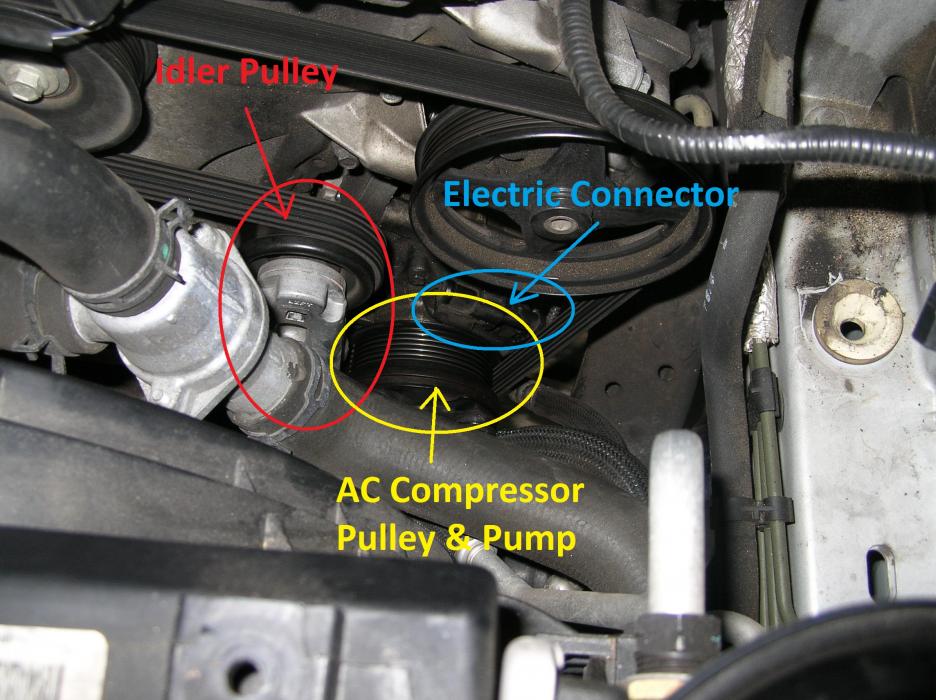
After having the HVAC system evacuated. Open hood, remove radiator splash shield, air box and intake tube for accessing the idler pulley, 1 electric connector and 2 upper compressor bolts. Using ratchet rotate idler counter clockwise to loosen serpentine belt (no need to remove belt) just slide off AC Compressor.
Disconnect 1 electrical connector on compressor.
Using (ratcheting) 13mm wrench loosen and remove the top front compressor bolt, loosen back bolt as well, NOTE: the top back bolt will not come out until the rest of the compressor bolts are removed! NOTE: Make sure this bolt is in place in compressor housing before replacing any other bolts!!! Simply if you have the compressor bolted in, there is no room to get this bolt into the compressor housing.
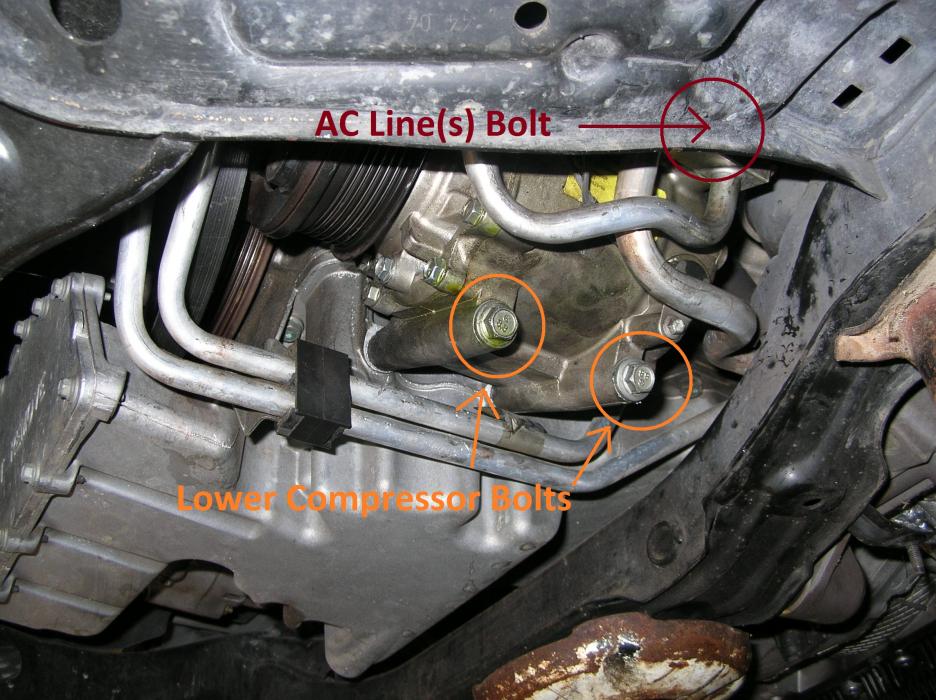
Raise front of vehicle, USE jack stands or ramps. Remove belly pan. Using 10mm (ratcheting) wrench, loosen and remove AC Line bolt. Remove the 2 lower compressor bolts, slide compressor out.
Reverse procedure for install. Making sure top backside bolt is in compressor housing. I used "elbow" torque for improper torque specs, my torque wrench is to big.
**AFTER** thinking about this thread, I have decided to break it up into 2 parts, AC compressor removal and Charging the System. Hand Tools in first picture will only be needed, part 1.
For proper Charging of system refer here: https://www.jaguarforums.com/forum/s...-system-55219/
JTB00183NAS1.pdfDifficulty Level: moderate to easy
Tools Needed: AC Block Gauge (with quick connects and hoses) and Vacuum Pump (available inexpensively @ Harbor Freight Tools), R134a brass shut off, Green Dye (checking leaks, optional), 3/8" Ratchet with 13mm and 10mm socket, extension (optional), 13mm and 10mm wrench (racheting type optional), Meat Probe, Kitchen Scale not in picture below.
Time: 1 hour
First alldatadiy states the motor will have to be raised for the 3.0 litre. This is incorrect! The compressor will slide out easily without raising motor.
After having the HVAC system evacuated. Open hood, remove radiator splash shield, air box and intake tube for accessing the idler pulley, 1 electric connector and 2 upper compressor bolts. Using ratchet rotate idler counter clockwise to loosen serpentine belt (no need to remove belt) just slide off AC Compressor.
Disconnect 1 electrical connector on compressor.
Using (ratcheting) 13mm wrench loosen and remove the top front compressor bolt, loosen back bolt as well, NOTE: the top back bolt will not come out until the rest of the compressor bolts are removed! NOTE: Make sure this bolt is in place in compressor housing before replacing any other bolts!!! Simply if you have the compressor bolted in, there is no room to get this bolt into the compressor housing.
Raise front of vehicle, USE jack stands or ramps. Remove belly pan. Using 10mm (ratcheting) wrench, loosen and remove AC Line bolt. Remove the 2 lower compressor bolts, slide compressor out.
Reverse procedure for install. Making sure top backside bolt is in compressor housing. I used "elbow" torque for improper torque specs, my torque wrench is to big.
**AFTER** thinking about this thread, I have decided to break it up into 2 parts, AC compressor removal and Charging the System. Hand Tools in first picture will only be needed, part 1.
For proper Charging of system refer here: https://www.jaguarforums.com/forum/s...-system-55219/
Last edited by joycesjag; Jul 3, 2012 at 07:02 PM. Reason: added tsb


Joined: Oct 2007
Posts: 121,178
Likes: 6,658
From: PHX some of the time
Just some additional info.
I finally got around to changing my compressor this week, the procedure was pretty much as Rick explained except for the two top bolts.
The one to the front of the car is fairly easily accessible through the wheel well and loosened off about 1/8" then went tight, I worked away at it and finally ended up shearing it off. The rear bolt is much more difficult to access and had the same problem, after much spraying of PB Blaster and working back and forth I got this one out.
I was kind of upset about the sheared bolt as it seemed like it was going to be difficult to rectify, but it turned out not so bad, the two bottom bolts screw directly into the crankcase, but the upper ones go into a separate plate that is bolted to the engine casing.
This was the cause of the problem as the bolts protrude through the plate and are susceptible to dirt and corrosion.
It was a simple job to remove this plate drill out the broken bolt and tap through both holes.
So it may be wise to try and soak these bolts with PB or something similar before trying to get them out especially with Northern cars.
If all else fails just shear them off, it's not the end of the world.
Thread Starter
|
Veteran Member
Joined: Feb 2009
Posts: 8,020
Likes: 1,731
From: Sunny South Carolina
Hmm Norri, IIRC on our 2005 the top bolts also screwed into the block, but it was awhile.
Sorry that you had problems.
Sorry that you had problems.
Trending Topics
Joined: Oct 2007
Posts: 121,178
Likes: 6,658
From: PHX some of the time
Rick,
I was looking at the Gaudin site for a new bolt, (It's doing fine with three for now)
and pulled up the details for 2005 MY and it's the same drawing. (Item 9)
It's not something you would pay attention to unless it had a broken bolt stuck in it.
I was looking at the Gaudin site for a new bolt, (It's doing fine with three for now)
and pulled up the details for 2005 MY and it's the same drawing. (Item 9)
It's not something you would pay attention to unless it had a broken bolt stuck in it.
Joined: Oct 2007
Posts: 121,178
Likes: 6,658
From: PHX some of the time
I did put oil in, I wasn't 100% sure that it was necessary but felt it was better to have too much than not enough. (others may disagree) I don't recall exactly how much I think there are some numbers in JTIS somewhere.
I'm sure the 2007 will be the same.
I'm sure the 2007 will be the same.

Veteran Member
Joined: Jun 2009
Posts: 3,899
Likes: 803
From: Home
Yes. The instructions with the compressor will usually give you how much to add to the compressor and how much to add to the dryer. You are changing the dryer with the compressor right?? Dryer should always be changed when a compressor is replaced.
It's very common to put 4oz in both the compressor and the dryer. I do something additional but it's probably not needed. I put the 4oz in the compressor then rotate the compressor by hand to move the oil around the compressor because you don't want a big slug in there when the A/C clutch kicks in!!
I also place the compressor on the bench with the pulley facing down. I want to make sure the front seal is lubricated as much as possible before that first start! I let it sit a minimum of 30 minutes.
.
.
.
Senior Member
Joined: Dec 2012
Posts: 127
Likes: 10
From: Los Angeles
Yes. The instructions with the compressor will usually give you how much to add to the compressor and how much to add to the dryer. You are changing the dryer with the compressor right?? Dryer should always be changed when a compressor is replaced.
It's very common to put 4oz in both the compressor and the dryer. I do something additional but it's probably not needed. I put the 4oz in the compressor then rotate the compressor by hand to move the oil around the compressor because you don't want a big slug in there when the A/C clutch kicks in!!
I also place the compressor on the bench with the pulley facing down. I want to make sure the front seal is lubricated as much as possible before that first start! I let it sit a minimum of 30 minutes.
.
.
.
It's very common to put 4oz in both the compressor and the dryer. I do something additional but it's probably not needed. I put the 4oz in the compressor then rotate the compressor by hand to move the oil around the compressor because you don't want a big slug in there when the A/C clutch kicks in!!
I also place the compressor on the bench with the pulley facing down. I want to make sure the front seal is lubricated as much as possible before that first start! I let it sit a minimum of 30 minutes.
.
.
.

Junior Member
Joined: Oct 2011
Posts: 11
Likes: 1
From: Fairfax VA
Hi,
I am replacing the compressor, expansion valve and the drier on my 2004 S-Type 3.0.
I have the compressor out and your pictures are a fantastic help. But, I can't locate the drier or the expansion valve. I need help everything is apart.
Thanks in advance
pistonspeed.
I am replacing the compressor, expansion valve and the drier on my 2004 S-Type 3.0.
I have the compressor out and your pictures are a fantastic help. But, I can't locate the drier or the expansion valve. I need help everything is apart.
Thanks in advance
pistonspeed.

Junior Member
Joined: Oct 2012
Posts: 15
Likes: 0
From: Tampa, Fl
Hi,
I am replacing the compressor, expansion valve and the drier on my 2004 S-Type 3.0.
I have the compressor out and your pictures are a fantastic help. But, I can't locate the drier or the expansion valve. I need help everything is apart.
Thanks in advance
pistonspeed.
I am replacing the compressor, expansion valve and the drier on my 2004 S-Type 3.0.
I have the compressor out and your pictures are a fantastic help. But, I can't locate the drier or the expansion valve. I need help everything is apart.
Thanks in advance
pistonspeed.
Speaking of the expansion valve:
I went to get a quote to have my A/C compressor, drier, and expansion valve changed. Everything seemed okay price wise, but I was told that it will take 6 hours (?!!!) to change out the expansion valve.
Is that correct? If so, what will happen if I change the compressor and drier without changing the expansion valve?
Thanks
Veteran Member
Joined: Jun 2009
Posts: 3,899
Likes: 803
From: Home
I have posted this before.
Don't change the expansion valve unless you had the compressor come apart (Black Death). One it's nearly impossible as the dash must be removed. Follow the A/C lines up to the firewall and you can just barely see one side of the expansion valve. So leave it alone unless you must replace it. Two it�s rarely needed. Not much can go wrong with it outside of debris clogging it up.
The dryer is a bit of a head scratcher and it's just a fabric desiccant bag. Look on the passenger side of the A/C condenser and you will see a small black metal cylinder. At the bottom of this cylinder there is a large hex plug. Remove the hex plug and the bag can be pulled out with needle nose pliers. Then just slide the new bag in and recap. The difficulty is getting to underside of that cylinder!
Remove the under belly pans and the one connected to the front bumper. After they are removed you still will have a small plastic duct to remove that is clipped to the bottom of the radiator. It's has some small metal clips and can be carefully pried loose. You want to keep this item because it helps channel the incoming fresh air into all the coolers mounted in front of the radiator.
Once this panel is loose or removed you can see the bottom of the dryer canister and the big hex plug.
.
.
.

Junior Member
Joined: Oct 2012
Posts: 15
Likes: 0
From: Tampa, Fl
I have posted this before.
Don't change the expansion valve unless you had the compressor come apart (Black Death). One it's nearly impossible as the dash must be removed. Follow the A/C lines up to the firewall and you can just barely see one side of the expansion valve. So leave it alone unless you must replace it. Two it�s rarely needed. Not much can go wrong with it outside of debris clogging it up.
The dryer is a bit of a head scratcher and it's just a fabric desiccant bag. Look on the passenger side of the A/C condenser and you will see a small black metal cylinder. At the bottom of this cylinder there is a large hex plug. Remove the hex plug and the bag can be pulled out with needle nose pliers. Then just slide the new bag in and recap. The difficulty is getting to underside of that cylinder!
Remove the under belly pans and the one connected to the front bumper. After they are removed you still will have a small plastic duct to remove that is clipped to the bottom of the radiator. It's has some small metal clips and can be carefully pried loose. You want to keep this item because it helps channel the incoming fresh air into all the coolers mounted in front of the radiator.
Once this panel is loose or removed you can see the bottom of the dryer canister and the big hex plug.
.
.
.
Don't change the expansion valve unless you had the compressor come apart (Black Death). One it's nearly impossible as the dash must be removed. Follow the A/C lines up to the firewall and you can just barely see one side of the expansion valve. So leave it alone unless you must replace it. Two it�s rarely needed. Not much can go wrong with it outside of debris clogging it up.
The dryer is a bit of a head scratcher and it's just a fabric desiccant bag. Look on the passenger side of the A/C condenser and you will see a small black metal cylinder. At the bottom of this cylinder there is a large hex plug. Remove the hex plug and the bag can be pulled out with needle nose pliers. Then just slide the new bag in and recap. The difficulty is getting to underside of that cylinder!
Remove the under belly pans and the one connected to the front bumper. After they are removed you still will have a small plastic duct to remove that is clipped to the bottom of the radiator. It's has some small metal clips and can be carefully pried loose. You want to keep this item because it helps channel the incoming fresh air into all the coolers mounted in front of the radiator.
Once this panel is loose or removed you can see the bottom of the dryer canister and the big hex plug.
.
.
.
Veteran Member
Joined: Jun 2009
Posts: 3,899
Likes: 803
From: Home
The A/C dryer is a change that is not in the JTIS and I had a heck of a time trying to figure it all out because my 2005 did not match what the JTIS had.
As you know the JTIS only goes up to 2004 for the S Type. There are not very many changes in the 2005-2008 years but there are a few!!
.
.
.
As you know the JTIS only goes up to 2004 for the S Type. There are not very many changes in the 2005-2008 years but there are a few!!
.
.
.
Thread Starter
|
Veteran Member
Joined: Feb 2009
Posts: 8,020
Likes: 1,731
From: Sunny South Carolina
The A/C dryer is a change that is not in the JTIS and I had a heck of a time trying to figure it all out because my 2005 did not match what the JTIS had.
As you know the JTIS only goes up to 2004 for the S Type. There are not very many changes in the 2005-2008 years but there are a few!!
As you know the JTIS only goes up to 2004 for the S Type. There are not very many changes in the 2005-2008 years but there are a few!!
IIRC that is why I did not change the dryer out. After all these years from when I first posted this thread, Joyces Jag does not have any AC issues!