

How to headlight repair stype FAQ


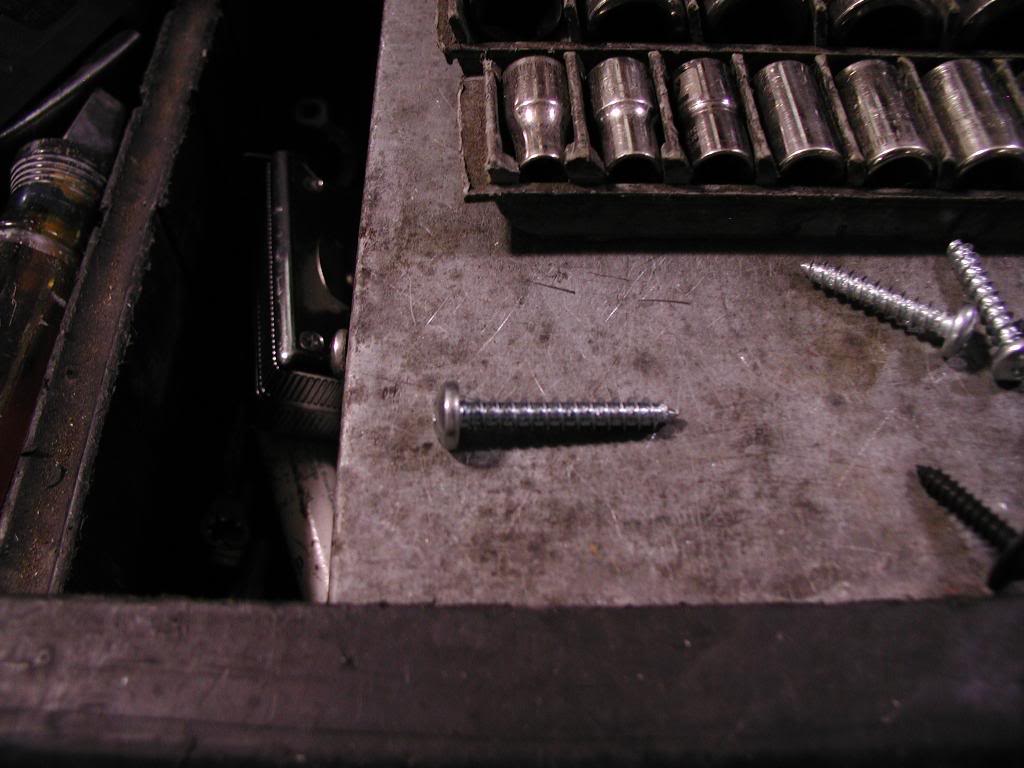
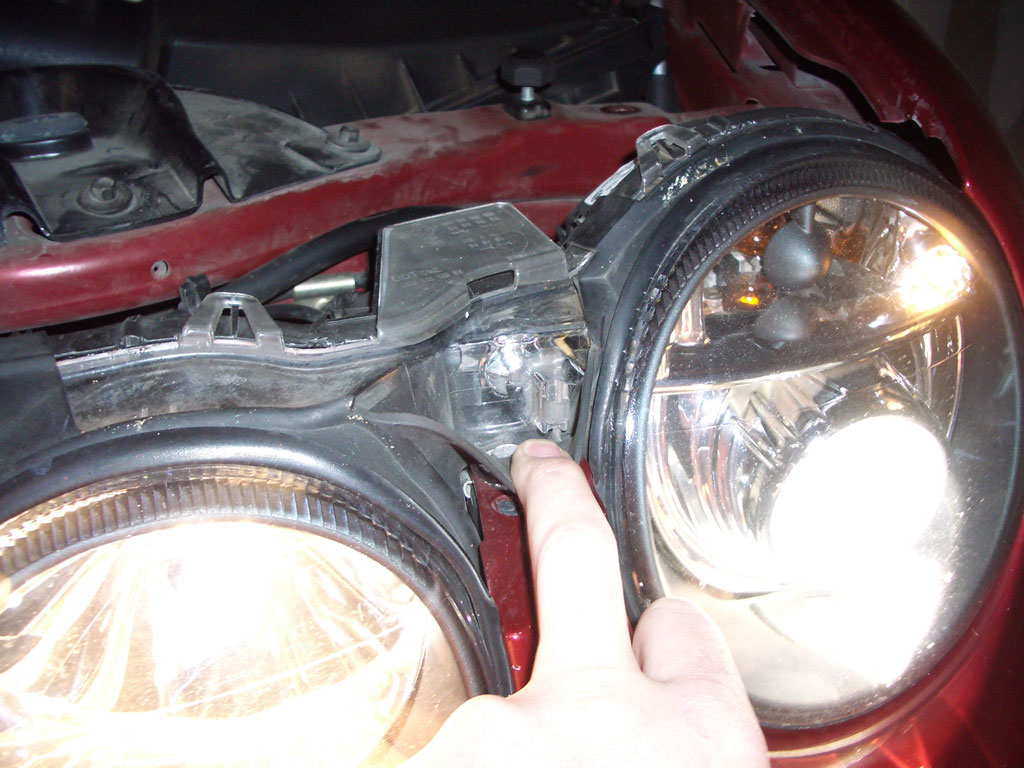
for those of you with broken headlights, heres the fast and good fix that works. If your headlights are broken and point down like grandma's t...well you know. Take 2 screws and install through clear lense behind rubber. See pic, the idea is to pin the assembly back to take place of the pin that broke inside. A screw about and 1" long works best if only the top post is broke, if totally broke top and bottom as the 1's I fixed in the pics, youll need longer..about an 1 1/2". Some have a chrome piece you screw into till it touches, these had a white piece with recessed hole that the screw went into and held. If you dont get the idea from this and the pics...well maybe you shouldnt try, but its better than buying new...
ORIGINAL: JagtechOhio
You ain't no photographer. but the main thing is you pointed out the fact that they can be easily repaired. Great tip for alot of people, thanks.
You ain't no photographer. but the main thing is you pointed out the fact that they can be easily repaired. Great tip for alot of people, thanks.
 , but I tried to delete the blurry pics,,,nope. but gives you the idea....i do try to help not only people here but customers at work too... that was a free fix for that guy so I could take pics....he was VERY gratefull
Senior Member


Joined: Jan 2009
Posts: 590
Likes: 99
From: Waxhaw NC
Just went to the car and pushed on the high beam connector and now everything makes sense and all my questions are answered except one. Will they still come up when you turn the car on?
Thanks
Michael
Thanks
Michael
Senior Member
Joined: Jan 2009
Posts: 590
Likes: 99
From: Waxhaw NC
Headlights are fixed thanks to Brutal and his detailed explanation, now to wait until tonight for the real test. I'm still looking for a LOW PRICE OEM parts person because you never know what's going to break next.


Nice one Brutal......good write up although the pics are terrible....lol
I'm gonna have to send you on that 2 week photography course to the Carribean as we discussed......all expenses paid of course
I'm gonna FAQ this for the benefit of future members who will no doubt ask this question
Cheers
Jim
Trending Topics
ORIGINAL: hottienamedscottie
You make it look so simple. It makes me question the intelligence of the two techs who both told me I need to spend $3K to get them fixed.
Bless you.
You make it look so simple. It makes me question the intelligence of the two techs who both told me I need to spend $3K to get them fixed.
Bless you.
Guest
Posts: n/a
OK, I have a 2003 S-Type R, and it has this problem. The headlights do not stay as completely low as they go when they go through the self-leveling routine, but they stay far too low, maybe a car-length out or so (total...the bright part of the low beams I can barely see past the bumper). The passenger's-side beam seems to extend a little further, but we're talking about just a few feet, nothing special. It makes a slightly nervous proposition of driving in the dark where there's not ample street lighting and oncoming traffic means you can't leave the high beams on (which are also low but are so incredibly bright that it basically makes up the difference for the lacking low-beams). For reference, I took a video of me wiggling the electric connector of the brights, but it doesn't seem overly loose to me. I wouldn't know, though, as I have nothing against which to compare it.
Anyway, I'm sharing these pictures for two reasons: 1) because the previously provided pictures weren't very clear and 2) mine differ from the OP's somewhat, and I'd like advice accordingly.
Here's what it looks like normally. I'd removed the plastic radiator cover because I didn't realize I didn't need to, so it's pretty dusty under there.

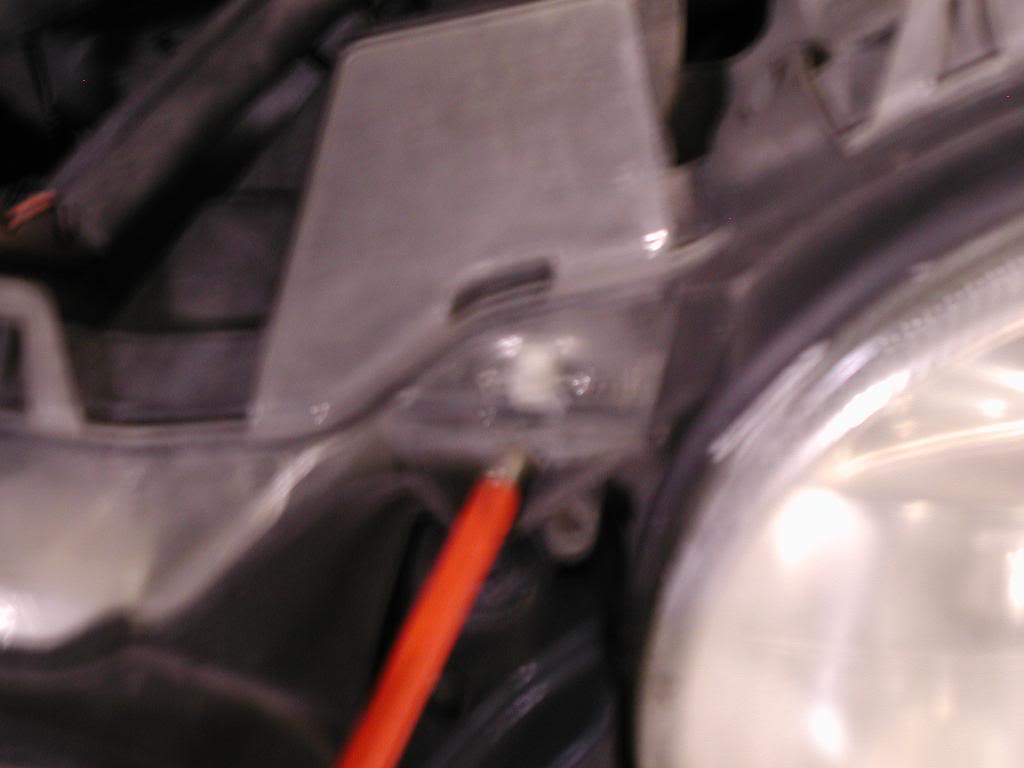
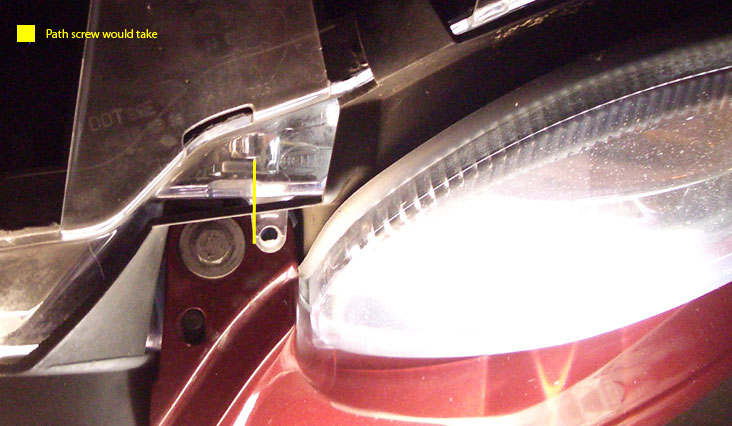
And here's what it looks like when I pull down the rubber surround. Notice the chrome piece? It looks like the back of a speaker (the actual speaker piece, the cone with the voice coil in the back, etc), and it's positioned such that there's a seemingly useless piece of clear lens plastic sticking out just-barely-not-quite directly in front of it.
Here it is without the flash, which might help it show through better:

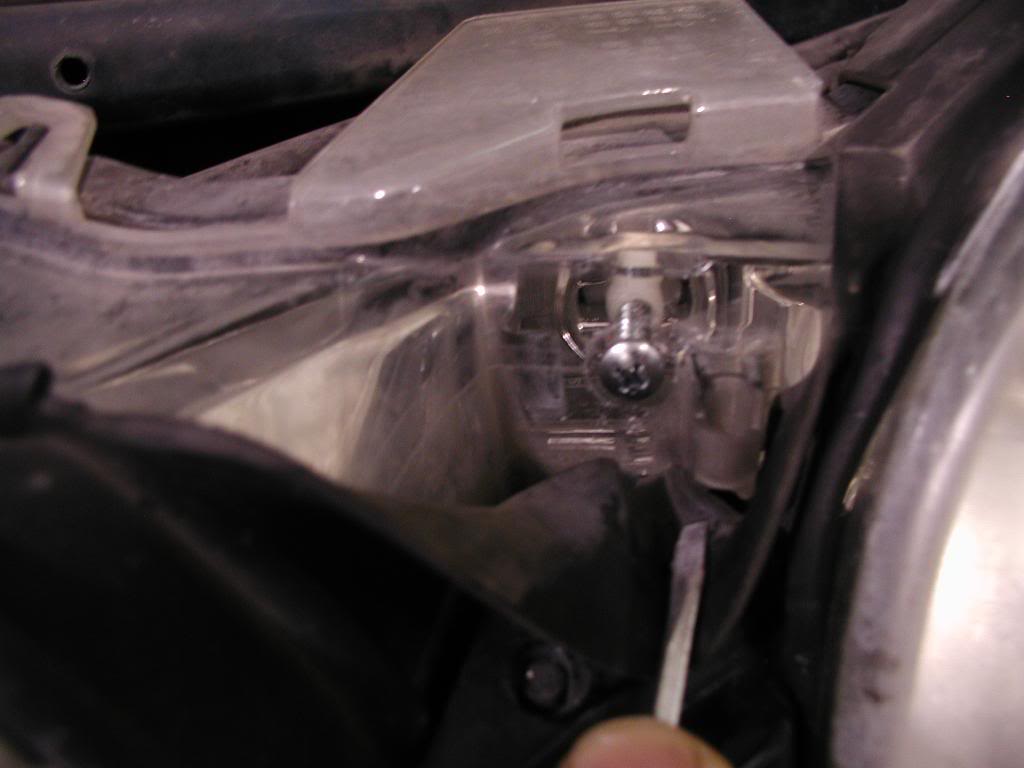
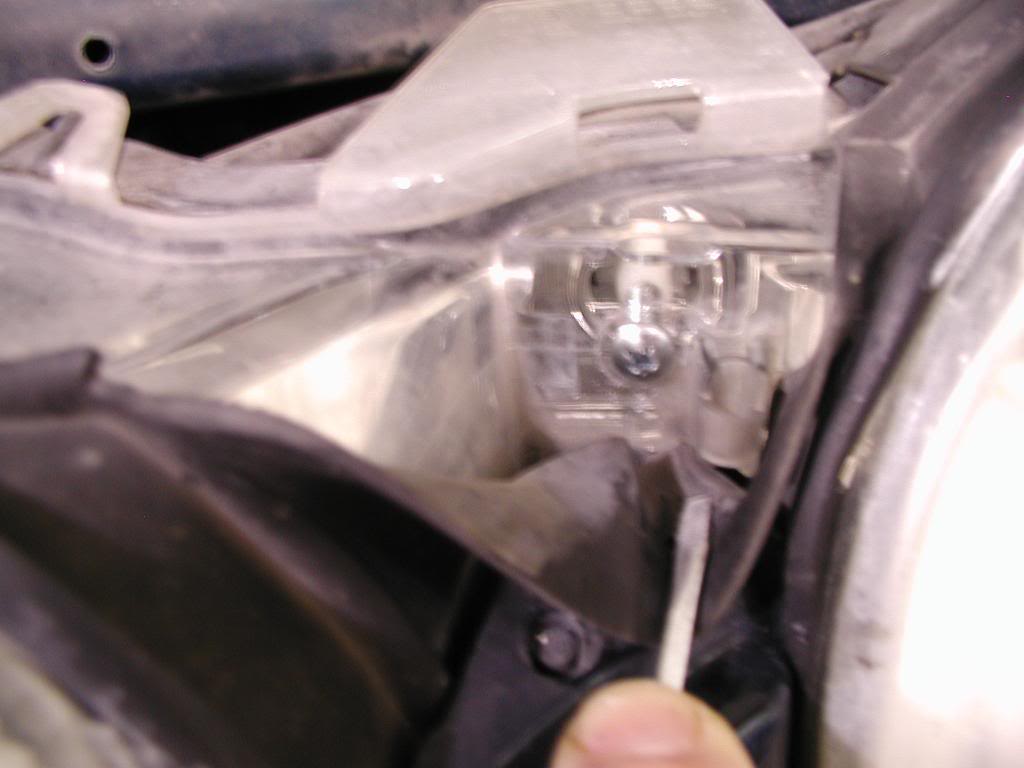
OK, so brass tacks time. What the heck do I do with this? Use a fairly small diameter drill bit at an angle? Find some way to remove that protruding piece of plastic with the vertical hole in it? I can't figure out what else to do besides that. The following illustration shows the potential path of the screw, generously moved over to the left slightly (and very skinny):
Any help would be appreciated!
Anyway, I'm sharing these pictures for two reasons: 1) because the previously provided pictures weren't very clear and 2) mine differ from the OP's somewhat, and I'd like advice accordingly.
Here's what it looks like normally. I'd removed the plastic radiator cover because I didn't realize I didn't need to, so it's pretty dusty under there.
And here's what it looks like when I pull down the rubber surround. Notice the chrome piece? It looks like the back of a speaker (the actual speaker piece, the cone with the voice coil in the back, etc), and it's positioned such that there's a seemingly useless piece of clear lens plastic sticking out just-barely-not-quite directly in front of it.
Here it is without the flash, which might help it show through better:
OK, so brass tacks time. What the heck do I do with this? Use a fairly small diameter drill bit at an angle? Find some way to remove that protruding piece of plastic with the vertical hole in it? I can't figure out what else to do besides that. The following illustration shows the potential path of the screw, generously moved over to the left slightly (and very skinny):
Any help would be appreciated!
Last edited by Deacon; Mar 12, 2009 at 12:59 AM.
Well i cant see your pics at work, but yes you go to the side of the piece, i never drill i just use my makita cordless driver and screw right in. Have you verified that it is broken inside?
Senior Member
Joined: Jan 2009
Posts: 590
Likes: 99
From: Waxhaw NC
OK, so brass tacks time. What the heck do I do with this? Use a fairly small diameter drill bit at an angle?
1. You can use a small drill bit or just drill a sheet metal screw into the clear plastic. I used a small drill bit and then went in w/the screw.
Find some way to remove that protruding piece of plastic with the vertical hole in it?
2. You don't need to touch the plastic piece w/the vertical hole in it.
The best way to explain it is that you have to put a screw into the plastic and that screw will push against the chrome piece inside which will bring the head lights up.

Member
Joined: Feb 2009
Posts: 50
Likes: 1
From: Washington, D.C.
I would also add, don't use a self tapping screw as it will go through the chrome backing. Using a powerdriver you can get a screw to go through the headlight, but it might be easier to start the hole with a drill.
One final note, I got this to work in that it made the headlight useful again (pointing at the road, instead of a spot 5 feet in front of the car), but it did not fix it to the point that it could be aimed within state inspection standards. So I still had to replace the headlight assembly
One final note, I got this to work in that it made the headlight useful again (pointing at the road, instead of a spot 5 feet in front of the car), but it did not fix it to the point that it could be aimed within state inspection standards. So I still had to replace the headlight assembly

Junior Member
Joined: Feb 2009
Posts: 15
Likes: 0
Ran down to home depot got a nice 12v Li-Ion drill and 4 sheet metal screws. Came home and went to work.
WOW! What a difference. I'll get some pics tomorrow in the sunlight, I had the chrome piece so it should compliment Brutal's pics nicely

glad to help you out, this is why I like to do this kinda stuff.Yes there are times and people that only want it back to exact function and original. And those that FIX everything, and then the mixture of both. I always belive in save where you can, spend where you want


