

HID/LED Question.


Greetings.
I am confused as to which lights/bulbs I should be getting.
If someone could make this as idiot proof as possible that would save me a headache.
I have been wanting to do a HID/LED Conversion to my 2003 X-type
I see that there are differences between each year for these conversions.
So what I want to do is:
Low Beams
Fog Lights
Running lights (the little 5 watt that's in the high beam housing)
Side markers ( not the four main ones but the smaller ones, i believe there are 2 in the front, 2 on the driver side front/rear and 2 on the passenger side front/rear )
And all the interior lights. How many are there?
This is for a 2003 x-type
Thanks for your help I've been trying to figure it out for months.
~Boss
Veteran member


Joined: May 2008
Posts: 14,803
Likes: 4,102
From: Great Mills, MD
Boss, doing the low beams is easy. You will need to get H1 bulbs. THen you remove the headlight housing, mount the HID ballast under the headlight housing and then you drill a hole in the back of the headlight housing cap to allow you to run the wires in and out. If you need me to go into more detail about this, let me know. I have done a few X-Types this way and it is much easier than you think.
Now, for the fogs. This is something that you will need to look at very closely when buying your HID kit. You need an H11 fog light. The HID kits are going to come in 2 flavors, those that have the H11 base included and are only an H11 kit and then you have the "universal kits" that apply to like 10 bulb styles and the bulb doesn't have the necessary base to make mounting easy. In this case, you have to modify the H11 base that you have now, fit the universal bulb into the holder, and then silicon seal the bulb in place. I have done the bulbs both ways. IF you can, get the H11 specific bulb kit even if it costs you $10 more. It will be well worth your time. Again, if you have any questions about this, let me know. Been there, done that.
Now, for the driving lights in the high beam housings. The big thing with this is getting the base out of the headlight housing. I HIGHLY!!!!!!! recommend doing this when you have the headlight assemblies out for the HID conversion. The issue is that the bases are in there pretty good (just held in by friction). But, what ends up happening is people fight to get it out and they end up breaking the supports for the headlights, leading to the headlights not pointing where they need to and either buying new headlight assemblies or spending time fixing the supports. I have also seen more than my fair share of people having issues buying the cheap W5W LED bulbs. One set I played with, the solder joints literally corroded away and the bulb disintegrated inside the housing. Others seem to have a short life span. So, again, what you pay for is what you are going to get. I have an option, but you have to be willing to do some more leg work to make it happen. I have been using them for 4 years now and no issues. The side marker lights use the same bulb as the running lights in the high beam housing.
Do you think you could provide me links to the products you have been satisfied with?
That would be a huge help, I trust your knowledge you know a lot about our cats, plus we have the same year which is also a plus.
Thanks!
~Boss
That would be a huge help, I trust your knowledge you know a lot about our cats, plus we have the same year which is also a plus.
Thanks!
~Boss
Veteran member
Joined: May 2008
Posts: 14,803
Likes: 4,102
From: Great Mills, MD
Boss, I have had overall good luck with Xentec products. The wife's car had a few issues with the HIDs initially, but I think I have finally figured that out. So, for the low beams, check out:
Xeno HID Kit H1 H3 H6M H4 H7 H8 H11 H9 H10 H13 9004 9005 9006 9007 D2S D2R 6000K | eBay
As for the fogs, look at this kit.
H11 6000K Xenon Low Beam Headlights HID Conversion Kit | eBay
Notice how this kit only lists the one style of bulb. This will be a direct fit to the bulb that you are removing and will make upgrading to HIDs in the fogs much easier. You will not have to modify the bulb base to make it all work. I am sure there are other kits out there like this. So, look around and see what you can find.

Member
Joined: Oct 2012
Posts: 38
Likes: 4
From: Finland
Problem is that park lamps are in the same housing with the high beams. Temperature is just too high for led lamps. Maximum temp for leds is about 180F. After that they go bad really fast.
Simple solution is a blue tinted W5W regular bulb, they look quite close to xenon temperature.
This is one solution that I�m thinking about to replace fog lights. I really don�t have any real use for them anyway and one can get a ticket quite easily if used without a reason.
Modificars - Verkkokauppa - 1 hipower LEDinen pivajovalo / huomiovalo
Sorry, page is in finnish. These are DRL lights that modern cars have as standard. In europe these lights replace low beams in day time use (low beams mandatory in Finland 24/7). This way I wouldn�t have to use my xenon lights during daytime.
Anyway, these light have a control module that switches them to semibright to replace parking lights after low beams are turned on. Led DRL light up as soon car is turned on.
Veteran member
Joined: May 2008
Posts: 14,803
Likes: 4,102
From: Great Mills, MD
Repkim, I have been using LED bulbs for my parking/running lights for 4 years now with no issues. Granted, I also didn't do the normal W5W replacement bulb. I did it the hard way by getting my hands on a 285 Kmcd 10mm LED bulb, making the leads fit into the bulb housing and then adding a specific resistor to make the LED work for the car. They are just as bright as the W5W bulbs, have the brilliant white light (rated at 7000K) and for the little bit of work, I can install some in my car for $0.50 a light bulb. So, in the long run, lots cheaper than getting the pre-made LED bulbs. Granted, I do not use my high beams all that much, but with the amount of air flowing over the front of the car, I don't see the bulbs failing any time soon even if I used my high beams all the time.
Thanks for the links Thermo what LED's did you use for the internal lights and the external side markers? Also could you explain how you do the conversion?
Links to these bulbs and the amount I need would be extremely helpful! =]]
Thanks again,
~Boss
Links to these bulbs and the amount I need would be extremely helpful! =]]
Thanks again,
~Boss
Trending Topics
Veteran member
Joined: May 2008
Posts: 14,803
Likes: 4,102
From: Great Mills, MD
Boss, this is one that is not for the weary. You will be cutting wires and modifying things. So, just keep that in mind. It is easy to do, but also takes a little bit of skill.
So, before you get going, you will need:
-soldering iron and solder
-wire cutter
-wire stripper
-285K MCD 10mm LEDs (one for each bulb you are replacing)
-270 ohm, 1/2 watt resistor (same number as the LEDs)
-3" pieces of shrink tubing big enough to slide the resistor through (same number of pieces as the LEDs)
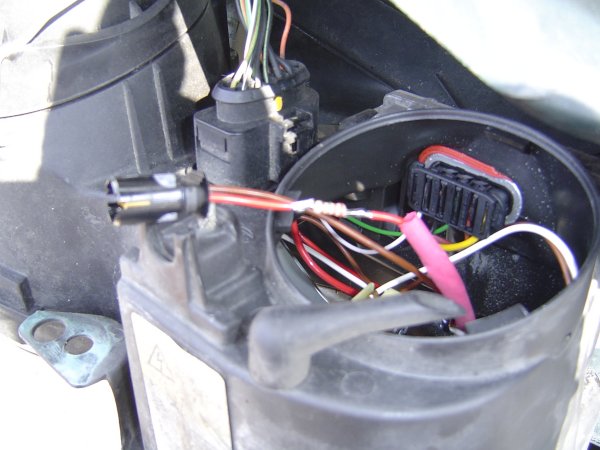
This picture gives you an idea of what needs to be done with the resistor. In short, you will need to cut one of the wires going to the bulb base (which one doesn't matter). Now, strip back the insulation a little bit, slide a 3" piece of shrink tubing over one of the wires, and install the resistor where you cut the wire. You will be soldering the resistor in. Then slide the shrink tubing up and over the resistor, centering the resistor inside of the shrink tubing and shrink it down.
Now, with the LED, on the short lead, fold the last 1/8" of the lead over on itself. Then take the 2 layers of lead and fold it over on itself again (so you have essentially 3 leads stacked one on top of the other). With the long lead, fold the last 3/16" of lead over on itself and then fold it once again. You will want to attempt to fold the leads so that once you are done, both leads are about the same length, but not so they are folded closer than about 1/4" away from the bottom of the LED (ie, single lead thickness for the 1/4" before the clear part of the LED).
Now, take the LED and plug it into the bulb base. Ensure what was the longer lead is plugged into the positive side of the socket. Installing the bulb backwards (ie, longer lead on the negative side) will cause the LED to not work. Once the bulb is installed, turn on the lights to ensure the LED lights. Once operation is verified, reinstall the bulb base and move on to the next bulb. As you can imagine, you will need to remove the headlights from the car to do this mod. You can attempt to do it with the headlights in the car still, but you will be spending more time fighting to get everything where you need it than it will take to pull the headlights out. This can be done on the side marker lights, the license plate lights, or any other bulb that uses the W5W/194 bulb.
As for interior bulbs, I have not played with those yet. What I have in mind is by no means "an easy modification". I am an electronics tech and I plan on going fancy with this. So, I will leave the interior lights to someone else. If you get the pre-made LED fixtures, then putting them in is no more difficult than replacing a standard bulb.
So, before you get going, you will need:
-soldering iron and solder
-wire cutter
-wire stripper
-285K MCD 10mm LEDs (one for each bulb you are replacing)
-270 ohm, 1/2 watt resistor (same number as the LEDs)
-3" pieces of shrink tubing big enough to slide the resistor through (same number of pieces as the LEDs)
This picture gives you an idea of what needs to be done with the resistor. In short, you will need to cut one of the wires going to the bulb base (which one doesn't matter). Now, strip back the insulation a little bit, slide a 3" piece of shrink tubing over one of the wires, and install the resistor where you cut the wire. You will be soldering the resistor in. Then slide the shrink tubing up and over the resistor, centering the resistor inside of the shrink tubing and shrink it down.
Now, with the LED, on the short lead, fold the last 1/8" of the lead over on itself. Then take the 2 layers of lead and fold it over on itself again (so you have essentially 3 leads stacked one on top of the other). With the long lead, fold the last 3/16" of lead over on itself and then fold it once again. You will want to attempt to fold the leads so that once you are done, both leads are about the same length, but not so they are folded closer than about 1/4" away from the bottom of the LED (ie, single lead thickness for the 1/4" before the clear part of the LED).
Now, take the LED and plug it into the bulb base. Ensure what was the longer lead is plugged into the positive side of the socket. Installing the bulb backwards (ie, longer lead on the negative side) will cause the LED to not work. Once the bulb is installed, turn on the lights to ensure the LED lights. Once operation is verified, reinstall the bulb base and move on to the next bulb. As you can imagine, you will need to remove the headlights from the car to do this mod. You can attempt to do it with the headlights in the car still, but you will be spending more time fighting to get everything where you need it than it will take to pull the headlights out. This can be done on the side marker lights, the license plate lights, or any other bulb that uses the W5W/194 bulb.
As for interior bulbs, I have not played with those yet. What I have in mind is by no means "an easy modification". I am an electronics tech and I plan on going fancy with this. So, I will leave the interior lights to someone else. If you get the pre-made LED fixtures, then putting them in is no more difficult than replacing a standard bulb.
Veteran member
Joined: May 2008
Posts: 14,803
Likes: 4,102
From: Great Mills, MD
Patriot, go to your local auto parts store and get yourself some H1 bulb connectors. You can splice them into the current wiring harness inside the headlights and you will be golden.

Junior Member
Joined: Dec 2012
Posts: 19
Likes: 0
From: Tennessee
I put the H1 conector on, tried the lights: not working. I found that the FUZE (17) was blown, I put a fresh fuze in, turned it on... BLOWN FUZE!
por que, jaguar!!! haha
THERMO, what is the answer? bad circuit, wiring. my friend was thinking somehow, that the factory connector should be replaced with an Identical connector.
Quick back-story
I hit a guard rail 2 weeks ago. scratched up the driver side fender and light.( I would post pics but I am new)
LONG STORY SHORT, I tried to replace the headlights, and the driver side light was fine but the PASSENGER SIDE DECIDED NOT TO WORK(go figure) because the connector had melted.
Veteran member
Joined: May 2008
Posts: 14,803
Likes: 4,102
From: Great Mills, MD
Patriot, first things first. Try unplugging the headlight housing on the side that is blowing the fuses and then put in a new fuse. Now, with the headight disconnected, turn on the headlights. Does that one fuse blow? If yes, then you have a problem with the wiring harness of the car and you have more than likely somehow pinched a wire bundle and you need to hand over hand the wiring bundle to see where the wire bundle is damaged.
If the fuse does not blow, then your problem is internal to the headlight assembly. At this point, you need to do a good look at the plug for the headlight to make sure that the plug looks to be in good condition and is not melted (if melted, let me know). After that, depending on your level of experience, it may be worth your while just to pick up a new headlight assembly and put it in. If you have some wiring background, then you should be able to hand over hand the wiring inside of the headlight housing and find your issue. I am betting that you will find that the plug is damaged, leading to an overheating condition that is allowin the wires to touch inside of the plug.
If the fuse does not blow, then your problem is internal to the headlight assembly. At this point, you need to do a good look at the plug for the headlight to make sure that the plug looks to be in good condition and is not melted (if melted, let me know). After that, depending on your level of experience, it may be worth your while just to pick up a new headlight assembly and put it in. If you have some wiring background, then you should be able to hand over hand the wiring inside of the headlight housing and find your issue. I am betting that you will find that the plug is damaged, leading to an overheating condition that is allowin the wires to touch inside of the plug.
Junior Member
Joined: Dec 2012
Posts: 19
Likes: 0
From: Tennessee
Working and Legal to drive, my Driver side FOG and DAYTIME RUNNING LIGHT are now Disabled(no longer working). it seems to never end.  haha
haha
I will upload pictures as soon as I can.
I will upload pictures as soon as I can.
Veteran member
Joined: May 2008
Posts: 14,803
Likes: 4,102
From: Great Mills, MD
Patriot, looking at the diagrams, there is nothing really common with the problem that you are seeing. Unless someone has moved the ground wire for the fog light, these are completely separate systems once you get down to the left and right side setups. Because the passenger side is working, we can eliminate the relays and head light switch. So, really, this only leaves a wire bundle issue. Thankfully you only have to go a few feet for this look as you have to go between the fuse box in the engine bay to the headlight/fog light area. Pay special attention to where the bundle runs over a bolt or a sharp edge of metal. After that, look for spots where the bundle got pinched between a body panel and the metal structure of the car.
Wish you luck. There is no real check that you can do to tell you where the problem is without having a $15000 piece of test equipment.
Wish you luck. There is no real check that you can do to tell you where the problem is without having a $15000 piece of test equipment.
H11 Slim HID Xenon Kit 2X35W Digital AC Ballast 4300K 6000K 8000K 10000K 12000K | eBay
Would this work? I tried using the link you listed but the bidding has ended.
Thanks
Would this work? I tried using the link you listed but the bidding has ended.
Thanks

Member
Joined: Feb 2013
Posts: 32
Likes: 0
From: Australia
So this would be easy enough for a noob to do? Only time I have ever fiddled with the electronics in my car was installing the sub in my '98 W202 C180. It seems that HID's are one of the most common upgrades/mods around here and thats got me interested. Keep in mind I'm only 21 and have alot of fiddling with cars to go! haha
Veteran member
Joined: May 2008
Posts: 14,803
Likes: 4,102
From: Great Mills, MD
Boss, that HID kit should make your life very easy. The bulb should twist right into the factory housing and no cutting/drilling will be required to mount the bulb. As for the wiring, you should be able to make up the plug that comes with the kit, plug it into the factory plug and you are done there. The big thing will be making sure that you get the wiring with the correct polarity. The black wire on the car goes to the black wire to the ballast. The green/white wire on the car goes to the red wire to the ballast. They should have the spades on the wires already, you just need to put them into the black plastic plug and make sure that they snap into place.
bevoh, the complexity of installing HIDs is a function of which kit you get. If you look at the kit that Boss Fury is looking at buying, that makes installing the fog lights about as easy as it comes as you don't even have to cut any wiring. The hardest part of that is finding a good spot to mount the ballasts. I found that you can put the ballasts between the bumper cover and the supports for the bumper cover and that holds things pretty well. Then you just need a single zip tie to make sure that things don't move. May be wise to tie some of the wiring into place so it is not flopping around.
As for the headlights, this is not quite as straight forward. You will end up cutting wires to do this mod. You will also end up drilling about a 3/4" hole in the back of the headlight cover to install a grommet to allow wires to run in and out of the headlight housing. The slim ballasts fit nicely right under the headlight housing. LIke I mentioned before to Boss, HIDs are polarity sensitive. So, make sure you get the red lead to the positive wire and the black lead to the negative wire.